1. परिचय
This manual provides essential information for the proper installation, understanding of function, maintenance, and troubleshooting of the HD Switch RH Steering Linkage Ball Joint End. This component is designed as a direct replacement for Cub Cadet and MTD part numbers 923-0448A and 723-0448A, featuring enhanced durability and corrosion resistance.

आकृती 1: ओव्हरview of the HD Switch RH Steering Linkage Ball Joint End. This image displays the complete ball joint end, highlighting its threaded shaft and housing.
2. सुरक्षितता माहिती
Always prioritize safety when working with machinery. Read and understand all instructions before beginning installation. Wear appropriate personal protective equipment (PPE), including safety glasses and gloves. Ensure the equipment is turned off, the engine is cool, and the battery is disconnected before performing any service.
- Always use appropriate tools for the task.
- Ensure the vehicle is stable and supported before working underneath it.
- Do not overtighten or undertighten fasteners; refer to equipment manufacturer's torque specifications if available.
- मुलांना आणि पाहणाऱ्यांना कामाच्या क्षेत्रापासून दूर ठेवा.
३. स्थापना (सेटअप)
This section outlines the general procedure for replacing a steering linkage ball joint end. Specific steps may vary slightly depending on your equipment model. Refer to your equipment's service manual for detailed instructions.
- तयारी: Park the equipment on a level surface, engage the parking brake, and turn off the engine. Allow the engine to cool. Disconnect the battery to prevent accidental starting.
- Access the Steering Linkage: Depending on your equipment, you may need to remove covers or lift the front end to gain access to the steering linkage. Use jack stands for support if lifting the equipment.
- Remove Old Ball Joint:
- Locate the existing RH steering linkage ball joint end.
- Loosen and remove the castle nut or retaining nut securing the ball joint stud to the steering arm.
- Use a ball joint separator tool or a pickle fork to separate the ball joint stud from the steering arm. Exercise caution to avoid damaging surrounding components.
- Unthread the old ball joint end from the steering rod. Note the number of turns required to remove it, or measure the exposed thread length, to aid in setting the new ball joint to the correct length for alignment.
- Install New Ball Joint:
- Thread the new HD Switch ball joint end onto the steering rod. If you noted the number of turns or measured the length during removal, thread the new ball joint on to approximately the same position. This will help maintain initial steering alignment.
- Insert the ball joint stud into the steering arm.
- Secure the ball joint stud with the new castle nut or retaining nut. Tighten to the equipment manufacturer's specified torque. If no specific torque is available, tighten until snug, then align the castle nut with the cotter pin hole and insert a new cotter pin.
- अंतिम तपासणी:
- सर्व फास्टनर्स सुरक्षितपणे घट्ट केले आहेत याची खात्री करा.
- Verify that the steering linkage moves freely without binding.
- बॅटरी पुन्हा कनेक्ट करा.
- Test the steering for proper function and alignment. Professional alignment may be required after replacing steering components.
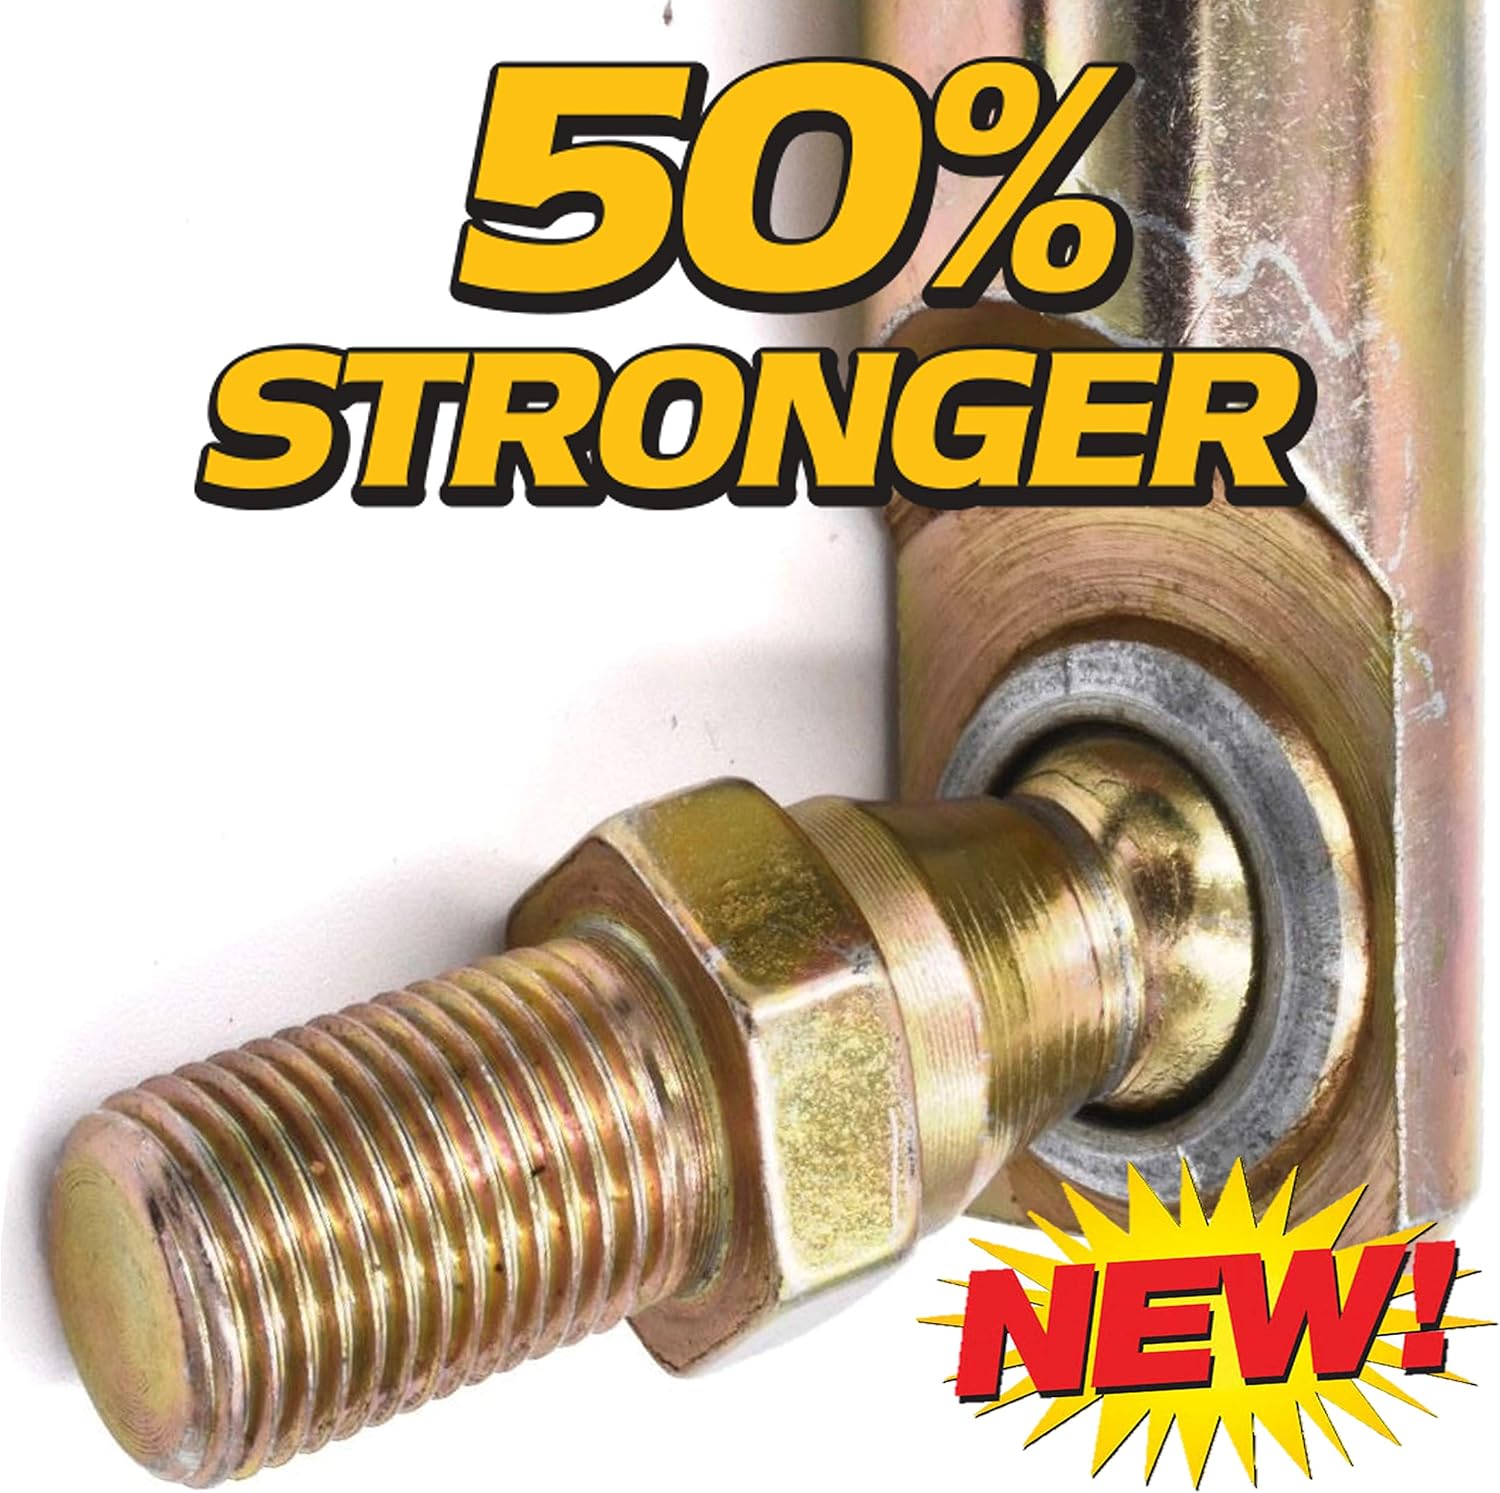
आकृती 2: Detail of the ball joint's crimped construction, engineered for increased strength and durability.
4. Function (Operating)
The RH Steering Linkage Ball Joint End is a critical component in your equipment's steering system. It connects the steering rod to the steering arm, allowing for flexible movement while transmitting steering input from the steering wheel to the wheels. This ball joint facilitates the necessary articulation for turning and absorbing minor road irregularities, ensuring precise and responsive steering control.

आकृती 3: The ball joint end, constructed from 4130 Chromoly alloy steel for superior wear resistance.
5. देखभाल
The HD Switch RH Steering Linkage Ball Joint End is designed for low maintenance due to its robust construction and protective coating. Regular inspection is recommended to ensure optimal performance and longevity.
- व्हिज्युअल तपासणी: Periodically inspect the ball joint for signs of wear, damage, or corrosion. Check the rubber boot for cracks or tears, which can allow contaminants to enter the joint.
- स्वच्छता: Keep the area around the ball joint clean from dirt, debris, and corrosive materials.
- स्नेहन: This ball joint features a sealed design and does not typically require external lubrication. If the boot is damaged, the joint may be compromised and should be replaced.
- फास्टनर तपासणी: Ensure the retaining nut remains tight. Loose fasteners can lead to premature wear and unsafe operating conditions.
6. समस्या निवारण
If you experience issues with your steering system, consider the following common problems and potential solutions related to the ball joint end:
| लक्षण | संभाव्य कारण | उपाय |
|---|---|---|
| सैल किंवा ढिला स्टीयरिंग | Worn ball joint, loose retaining nut | Inspect ball joint for play; tighten nut or replace ball joint if worn. |
| Clunking or popping noises during steering | Severely worn ball joint, damaged boot allowing dirt ingress | Inspect ball joint for excessive play or damage; replace if necessary. |
| असमान टायर पोशाख | Improper steering alignment due to worn ball joint or incorrect installation | Check ball joint for wear; ensure proper installation. Perform a steering alignment. |
| Stiff steering | Corroded or seized ball joint (less common with Zinc Yellow coating) | Inspect for corrosion or binding; replacement may be necessary. |
If troubleshooting steps do not resolve the issue, consult a qualified service technician.
7. तपशील
- भाग प्रकार: RH Steering Linkage Ball Joint End
- Replaces OEM Part Numbers: Cub Cadet, MTD 923-0448A, 723-0448A
- थ्रेड आकार: १/४"-२०
- बांधकाम: Crimped, 50% stronger design
- साहित्य: 4130 Alloy Steel (Chromoly)
- गंज संरक्षण: Zinc Yellow Coating
- ब्रँड: एचडी स्विच
8. समर्थन
For further assistance or inquiries regarding your HD Switch RH Steering Linkage Ball Joint End, please refer to the contact information provided by your retailer or the official HD Switch website. Always provide your product model and any relevant purchase details when seeking support.