
1. परिचय
This manual provides detailed instructions for the operation and maintenance of your Craig Electronics CR45365 AM/FM Projection Alarm Clock Radio. Please read this manual thoroughly before using the device to ensure proper function and to maximize your user experience. Keep this manual for future reference.
2. सुरक्षितता माहिती
- Do not expose this unit to rain or moisture to prevent fire or shock hazards.
- Do not expose this unit to direct sunlight or extreme temperatures.
- योग्य वायुवीजन सुनिश्चित करा; वायुवीजन उघडण्यांना अडथळा आणू नका.
- फक्त निर्दिष्ट पॉवर अॅडॉप्टर वापरा.
- युनिट वेगळे करण्याचा किंवा बदलण्याचा प्रयत्न करू नका. सर्व सर्व्हिसिंग पात्र कर्मचाऱ्यांना पाठवा.
- स्थानिक नियमांचे पालन करून बॅटरीची योग्य प्रकारे विल्हेवाट लावा.
3. उत्पादन संपलेview
The Craig CR45365 is an AM/FM projection alarm clock radio designed to provide time, alarm, radio, and temperature functions. Key features include:
- प्रोजेक्शन अलार्म घड्याळ
- निळ्या बॅकलाइटसह एलसीडी डिस्प्ले
- Calendar and temperature display
- Wake to buzzer or music (7 built-in musical tunes)
- एएम/एफएम रेडिओ ट्यूनर
3.1. युनिट घटक
Refer to the image below for a visual guide to the unit's components.
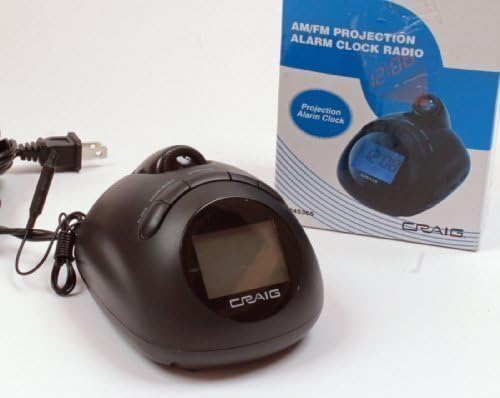
आकृती 1: Craig Electronics CR45365 AM/FM Projection Alarm Clock Radio. This image shows the black clock radio unit next to its product box. The clock features a front-facing LCD display and a projection lens on its top surface. The power cord is connected to the unit.
While specific button labels are not provided, typical controls include:
- एलसीडी डिस्प्ले: Shows time, date, and temperature.
- प्रोजेक्शन लेन्स: Projects time onto a surface.
- वेळ सेट बटण: Used to adjust the main clock time.
- Alarm Set Button(s): Used to set alarm times and modes.
- स्नूझ/लाइट बटण: Temporarily silences the alarm and activates backlight.
- Radio On/Off/Band Selector: Turns radio on/off and switches between AM/FM.
- Tuning Dial/Buttons: रेडिओ फ्रिक्वेन्सी समायोजित करते.
- आवाज नियंत्रण: ऑडिओ आउटपुट पातळी समायोजित करते.
- Projection On/Off/Focus: Controls the projection feature and its clarity.
4. सेटअप
4.1. वीज जोडणी
- AC पॉवर अॅडॉप्टरला मानक वॉल आउटलेटमध्ये प्लग करा.
- Connect the other end of the adapter to the DC input jack on the back of the unit.
- The unit will power on, and the display may flash, indicating it's ready for time setting.
4.2. बॅटरी बॅकअप स्थापना
For memory retention during power outages, install backup batteries.
- युनिटच्या तळाशी बॅटरी कंपार्टमेंट शोधा.
- बॅटरी कंपार्टमेंट कव्हर उघडा.
- योग्य ध्रुवीयता (+/-) सुनिश्चित करून, ३ AA बॅटरी घाला (समाविष्ट नाही).
- बॅटरी कंपार्टमेंट कव्हर सुरक्षितपणे बंद करा.
- टीप: Batteries are for backup only and will not power the main functions of the clock radio.
5. मूलभूत ऑपरेशन
5.1. वेळ सेट
- दाबा आणि धरून ठेवा वेळ सेट button (or similar) until the time display flashes.
- वापरा तास आणि मिनिट buttons (or +/- buttons) to adjust the hour and minute. Pay attention to AM/PM indicators.
- दाबा वेळ सेट पुन्हा पुष्टी करण्यासाठी आणि वेळ सेटिंग मोडमधून बाहेर पडण्यासाठी.
5.2. Setting the Date and Calendar
- दाबा तारीख सेट button (or similar) to enter date setting mode. The year may flash.
- Use the adjustment buttons to set the year, month, and day.
- दाबा तारीख सेट repeatedly to cycle through and confirm each setting.
- The display will show the current date and day of the week.
5.3. तापमान प्रदर्शन
The unit automatically displays the indoor temperature. No specific setting is required for this feature.
6. अलार्म फंक्शन्स
The CR45365 features an alarm function with options to wake to a buzzer, radio, or built-in musical tunes.
१. अलार्मची वेळ सेट करणे
- दाबा आणि धरून ठेवा अलार्म सेट button (or AL1/AL2 button) until the alarm time flashes.
- वापरा तास आणि मिनिट इच्छित अलार्म वेळ सेट करण्यासाठी बटणे.
- दाबा अलार्म सेट वेळ पुष्टी करण्यासाठी पुन्हा.
6.2. Selecting Alarm Mode
- After setting the alarm time, press अलार्म सेट again to cycle through alarm modes: बजर, रेडिओ, किंवा संगीत.
- निवडत असल्यास रेडिओ, ensure the radio is tuned to your preferred station before the alarm activates.
- निवडत असल्यास संगीत, the unit will play one of the 7 built-in musical tunes.
- The alarm icon will appear on the display, indicating the alarm is active.
6.3. Deactivating/Activating the Alarm
To turn the alarm off for the day, press the अलार्म बंद button (or repeatedly press अलार्म सेट until the alarm icon disappears). To reactivate, follow the alarm setting steps.
४. स्नूझ फंक्शन
जेव्हा अलार्म वाजतो, तेव्हा दाबा स्नूझ button to temporarily silence it. The alarm will sound again after a few minutes (typically 9 minutes).
५.३. रेडिओ ऑपरेशन
३. रेडिओ ट्यून करणे
- दाबा रेडिओ चालू/बंद रेडिओ चालू करण्यासाठी बटण.
- Select the desired band (AM or FM) using the बँड स्विच किंवा बटण.
- वापरा ट्यूनिंग dial or buttons to scan for your desired radio station.
- समायोजित करा व्हॉल्यूम control to a comfortable listening level.
६.३. अँटेना समायोजन
- एफएम रिसेप्शनसाठी, टेलिस्कोपिक अँटेना पूर्णपणे वाढवा.
- For AM reception, the unit has a built-in ferrite bar antenna. Rotate the unit for optimal reception.
8. Projection Feature
The CR45365 can project the time onto a wall or ceiling.
8.1. Activating and Adjusting Projection
- शोधा प्रकल्प चालू/बंद switch or button. Turn it to the "ON" position.
- Adjust the angle of the projection lens to direct the time display onto your desired surface (e.g., ceiling or wall).
- फिरवा फोकस ring around the projection lens until the projected time is clear and sharp.
- महत्त्वाची सूचना: The projection clock may need to be set separately from the main LCD display clock. Refer to the specific instructions for setting the projection time, usually found near the projection controls. Ensure the unit is positioned correctly for the projection to appear right-side up.
9. देखभाल
- स्वच्छता: मऊ, कोरड्या कापडाने युनिट पुसून टाका. अपघर्षक क्लीनर किंवा सॉल्व्हेंट्स वापरू नका.
- लेन्स काळजी: Gently clean the projection lens with a soft, lint-free cloth if dust accumulates.
- बॅटरी बदलणे: दरवर्षी किंवा कमी बॅटरी इंडिकेटर दिसल्यावर बॅकअप बॅटरी बदला.
10. समस्या निवारण
| समस्या | संभाव्य कारण | उपाय |
|---|---|---|
| युनिट चालू होत नाही. | पॉवर अॅडॉप्टर कनेक्ट केलेला नाही किंवा आउटलेटमध्ये दोष आहे. | एसी अॅडॉप्टर युनिटमध्ये आणि कार्यरत वॉल आउटलेटमध्ये सुरक्षितपणे जोडलेले असल्याची खात्री करा. |
| एलसीडी डिस्प्ले रिकामा किंवा मंद आहे. | Power issue or backlight setting. | Check power connection. Press the SNOOZE/LIGHT button to activate backlight. |
| अलार्म वाजत नाही. | Alarm not set, alarm volume too low, or alarm mode incorrect. | Verify alarm time and mode are set correctly. Increase volume if using radio alarm. Ensure alarm is activated (icon visible). |
| रेडिओ रिसेप्शन खराब आहे. | Antenna not extended/positioned correctly, or interference. | Extend FM antenna. Rotate unit for AM reception. Move away from other electronic devices. |
| अंदाजित वेळ अस्पष्ट आहे. | Projection focus not adjusted. | फिरवा फोकस ring on the projection lens until the image is clear. |
| अंदाजित वेळ उलटा आहे. | Unit orientation or projection setting. | Adjust the unit's position or the projection lens angle. Some units may have a projection rotation setting. |
| पॉवर ओयू नंतर वेळ/सेटिंग्ज रीसेट होतातtage. | बॅकअप बॅटरीज संपल्या आहेत किंवा स्थापित केलेल्या नाहीत. | Install fresh AA batteries in the backup compartment. |
11. तपशील
- ब्रँड: क्रेग
- मॉडेल: CR45365
- डिस्प्ले प्रकार: निळ्या बॅकलाइटसह एलसीडी
- उर्जा स्त्रोत: AC (Electrical Operation)
- बॅटरी बॅकअप: 3 AA बॅटरी (समाविष्ट नाही)
- वैशिष्ट्ये: AM/FM Radio, Projection Clock, Alarm, Calendar, Temperature Display
- उत्पादन परिमाणे: 5 x 4 x 3.25 इंच
- आयटम वजन: 1 पौंड
- निर्माता: क्रेग इलेक्ट्रॉनिक्स
- UPC: 731398453658
12. हमी आणि समर्थन
For warranty information or technical support, please refer to the documentation included with your purchase or contact Craig Electronics customer service directly. Keep your proof of purchase for warranty claims.
For further assistance, visit the official Craig webसाइटवर किंवा त्यांच्या सपोर्ट चॅनेलशी संपर्क साधा.