![]()
INSTRUCTION MANUAL
Helmet Bluetooth Intercom kit


![]()
Parts List

Installation Steps
2.1 Installation method with plastic clamp

- Loosen the screws on the back of clamp with the provided screw driver.
- Open the lining of helmet ,insert the clamp in the proper position on the left of helmet and fasten the screw(overly fastened screw can damage the clamp).
- Slide the receiver down into the slots on the headset clamp mount.Make sure that it is locked in securely.
- Open the lining of helmet (at ear’s position),clean the EPS surface and affix the Velcro on with the rough surface.
- Affix the hook surface of earphone to the rough surface of Velcro and properly tidy the helmet lining.
- Insert the headphone plug into the corresponding headphone jack on the receiver to finish the installation.
2.2 Installation method with vecro clamp

- Tear off the white paper on vecro and stick the Velcro onto clamp&helmet.
- Stick the clamp with Velcro onto helmet.
- Slide the receiver down into the slots on the headset clamp mount.Make sure that it is locked in securely.
Charge

- Connect the cable with device and PC USB port;
- After cable connected,the red light on and start to charge,when battery is full,the red light will be off automatically,The green light is on.
Specifications
Operating Range———————–Up to 1200meters
Bluetooth Standby Time————–Up to 200 hours
Bluetooth Time————————-Up to 16 hours
Charging Time—————————About 2.5 hours
Charging Interface———————-Type-C universal plug
Battery Type—————————–Rechargeable Li-Polymer Batteries
Power Supply—————————DC 5V 500mA
Operating Temperature————— -14F-131F(-10℃-55℃)
Storage Temperature—————— -4F-140F(-20℃-60℃)
Product Introduction

Power Detect & Notification Function
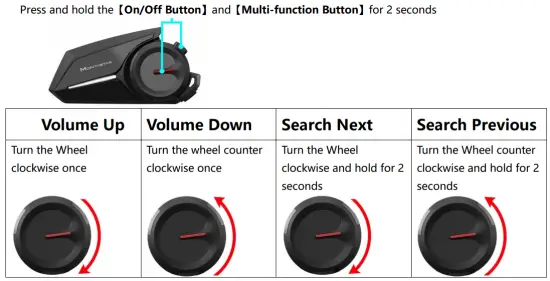
Press and hold for 2 seconds at the same time(Power on status)
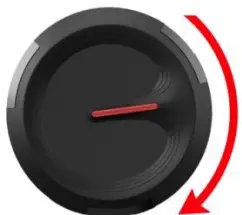
When device is on,Press and hold【On/Off Button】and turn the wheel clockwise for 2 seconds at the same time,recorded voice message will tell you:
Power over 90%
Power over 50%
Power lower than 50%
Power lower than 10%, please recharge immediately
Turn on/off
(1) Turn on
When the device is off,Press and hold the【On/Off Button】for 3 seconds

(2) Turn off
When device is on,Press and hold the【On/Off Button】for 3 seconds

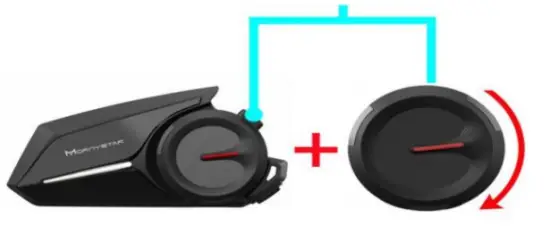
Pairing with mobile phone

Switch cellphone Bluetooth,choose S8,the pairing is complete.
After successful pairing, there will be a “device connected” prompt sound, indicating successful Bluetooth connection.
Pairing Between Two S8(A and B)

Pairing instructions:
Step 1. Ensure both S8 are within 1meter visible range of each other.
Step 2. When device A is on , Press and hold the【Multi-function Button】for 3 seconds, it will flash red and blue to enter search mode;
Step 3. When device B is off, Press and hold the【On/Off Button】for 5 seconds , it will flash red and blue to enter pairing mode.
(When these 2 headsets enter pairing status, it will automatically search for pairing, and the blue light will flash after the pairing is successful.)
Step 4. Press the【On/Off Button】of any headset to enter the intercom.
Group Intercom Settings
Pairing instructions:
Step 1. Ensure all S8 are within 1meter visible range of each other.
Step 2. Press and hold the【On/Off Button】for 5 seconds on all ABCDEF devices, and the red and blue fast flashing will enter pairing mode;

Step 3. Choose any one device,Press the【On/Off Button】once, the red and blue fast flashing will change to slow flashing,and it will automatically enter the search pairing process;
(Wait for a moment, it will automatically pair all devices, and when the connection is successful, the blue light on all devices will flash slowly.)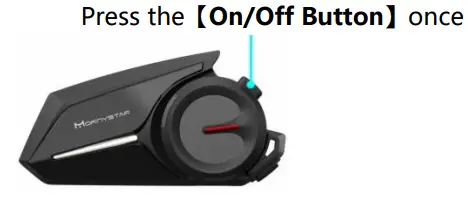 Step 4. Press the【On/Off Button】of any headset to enter the intercom.
Phone Operation

Music Function
When the device is on, proceed as follows:

FM Function
When the device is turned on, proceed as follows,It will turn on/off the FM function.
Music sharing function
Steps:
- Device A is paired with the phone via Bluetooth;
- Pairing device A and device B;
- When the pairing between two devices (AB) is successful, device A quickly double-click the【Volume + Button】to turn on/off music sharing.
Music sound selection
3 sound options:
- pure vocals;
- DJ music;
- popular music
When playing music, quickly double-click the 【Volume – Button】to switch to the next sound effect, which can be looped through.

Memory Clean
When the device is turned on,Press and hold 【On/Off Button】and turn the wheel clockwise for 5 seconds at the same time

FCC Warnning:
This equipment has been tested and found to comply with the limits for a Class B digital device, pursuant to part 15 of the FCC Rules. These limits are designed to provide reasonable protection againstharmful interference in a residential installation. This equipment generates, uses and can radiateradio frequency energy and, if not installed and used in accordance with the instructions, maycause harmful interference to radio communications. However, there is no guarantee thatinterference will not occur in a particular installation. If this equipment does cause harmfulinterference to radio or television reception, which can be determined by turning the equipmentoff and on, the user is encouraged to try to correct the interference by one or more of thefollowing measures:
- Reorient or relocate the receiving antenna.
- Increase the separation between the equipment and receiver.
- Connect the equipment into an outlet on a circuit different from that to which the receiver is connected.
- Consult the dealer or an experienced radio/TV technician for help.
Caution: Any changes or modifications to this device not explicitly approved by manufacturer could void your authority to operate this equipment.
This device complies with part 15 of the FCC Rules. Operation is subject to the following two conditions:
(1)This device may not cause harmful interference, and (2) this device must accept any interference received, including interference that may cause undesired operation.
This equipment complies with FCC radiation exposure limits set forth for an uncontrolled environment. This equipment should be installed and operated with minimum distance 0cm between the radiator and your body.
![]()
Documents / Resources
 | MORNYSTAR S8 Helmet Bluetooth Intercom Kit [pdf] Instruction Manual S2 Bluetooth headset 2BMI4-S2, 2BMI4S2, s2, S8 Helmet Bluetooth Intercom Kit, S8, Helmet Bluetooth Intercom Kit, Bluetooth Intercom Kit, Intercom Kit, Kit |