പ്രധാനപ്പെട്ട സുരക്ഷാ നിർദ്ദേശങ്ങൾ
Please read this manual carefully before operating the fan and retain it for future reference. Failure to follow these instructions may result in electric shock, fire, or serious injury.
- വൈദ്യുതി വിതരണം വോളിയം ഉറപ്പാക്കുകtage എന്നത് ഫാനിലെ റേറ്റിംഗ് ലേബലുമായി പൊരുത്തപ്പെടുന്നു.
- ഫാൻ, പ്ലഗ്, കോർഡ് എന്നിവ വെള്ളത്തിലോ മറ്റ് ദ്രാവകങ്ങളിലോ മുക്കരുത്.
- ഉപയോഗത്തിലില്ലാത്തപ്പോഴും, ഒരു സ്ഥലത്തു നിന്ന് മറ്റൊരിടത്തേക്ക് മാറ്റുമ്പോഴും, വൃത്തിയാക്കുന്നതിന് മുമ്പും ഫാൻ ഔട്ട്ലെറ്റിൽ നിന്ന് ഊരിമാറ്റുക.
- കുട്ടികൾക്കും വളർത്തുമൃഗങ്ങൾക്കും എത്തിപ്പെടാതെ ഫാൻ സൂക്ഷിക്കുക.
- കേടായ കോർഡ് അല്ലെങ്കിൽ പ്ലഗ് ഉപയോഗിച്ച് ഫാൻ പ്രവർത്തിപ്പിക്കരുത്.
- ഫാൻ പ്രവർത്തിക്കുമ്പോൾ ഗ്രില്ലിലൂടെ വിരലുകളോ മറ്റ് വസ്തുക്കളോ കടത്തരുത്.
- ഫാൻ മറിഞ്ഞു വീഴാതിരിക്കാൻ ഒരു സ്ഥിരതയുള്ളതും പരന്നതുമായ പ്രതലത്തിൽ വയ്ക്കുക.
ഉൽപ്പന്ന ഘടകങ്ങൾ
Familiarize yourself with the parts of your Midea FS40-15AR Pedestal Fan.

ചിത്രം: The Midea FS40-15AR Pedestal Fan, showing its main body, fan head, base, and the included remote control.
- ഫാൻ ഹെഡ്: Includes front and rear grilles, fan blades, and motor housing.
- നിയന്ത്രണ പാനൽ: Located on the fan body, with LED display and control buttons.
- ക്രമീകരിക്കാവുന്ന സ്റ്റാൻഡ്: ഉയരം ക്രമീകരിക്കാൻ അനുവദിക്കുന്നു.
- അടിസ്ഥാനം: Provides stability for the fan.
- റിമോട്ട് കൺട്രോൾ: ദൂരെ നിന്ന് സൗകര്യപ്രദമായ പ്രവർത്തനത്തിന്.
സജ്ജീകരണവും അസംബ്ലിയും
Follow these steps to assemble your Midea FS40-15AR Pedestal Fan.
- അടിസ്ഥാന അസംബ്ലി: Attach the fan stand to the base. Ensure it is securely fastened.
- ഉയരം ക്രമീകരിക്കൽ: The fan features an adjustable stand. Loosen the height adjustment knob, extend or retract the stand to the desired height, and then tighten the knob securely.

ചിത്രം: Illustration of the fan's adjustable height mechanism, showing arrows indicating upward and downward movement.
- ഫാൻ ഹെഡ് അസംബ്ലി: Secure the rear grille, fan blades, and front grille to the motor housing according to the diagrams in the full manual (not provided here). Ensure all components are correctly aligned and locked into place.
- പ്ലേസ്മെൻ്റ്: Place the assembled fan on a firm, level surface. Ensure there is adequate space around the fan for optimal airflow and oscillation.
- പവർ കണക്ഷൻ: പവർ കോർഡ് അനുയോജ്യമായ ഒരു ഇലക്ട്രിക്കൽ ഔട്ട്ലെറ്റിലേക്ക് (220-240V) പ്ലഗ് ചെയ്യുക.
പ്രവർത്തന നിർദ്ദേശങ്ങൾ
Your Midea FS40-15AR fan can be operated using the control panel on the unit or the included remote control.
നിയന്ത്രണ പാനൽ


ചിത്രം: Icons illustrating key features: 3 modes, 26 speeds, and a low noise level of 30 dB.
- പവർ ബട്ടൺ: ഫാൻ ഓണാക്കാനോ ഓഫാക്കാനോ അമർത്തുക.
- വേഗത ക്രമീകരണം: Use the speed control buttons to select from 26 available speed settings. The current speed will be displayed on the LED screen.
- മോഡ് ബട്ടൺ: Cycle through the available modes:
- സാധാരണ മോഡ്: Provides continuous airflow at the selected speed.
- സ്വാഭാവിക മോഡ്: ഫാൻ വേഗതയിൽ വ്യത്യാസമുണ്ടാക്കി പ്രകൃതിദത്ത കാറ്റിനെ അനുകരിക്കുന്നു.
- സ്ലീപ്പ് മോഡ്: Operates at a very low speed and noise level (as low as 27 dB) for quiet operation, ideal for sleeping.
- ECO മോഡ്: Adjusts fan speed automatically based on room temperature to optimize energy consumption.
- ഓസിലേഷൻ ബട്ടൺ: Press to activate or deactivate the 80-degree oscillation function, which distributes air across a wider area.
- ടൈമർ ബട്ടൺ: Set the fan to automatically turn off after a specified period, up to 12 hours. Each press typically increases the timer by 1 hour.
റിമോട്ട് കൺട്രോൾ
The remote control allows for convenient operation of all fan functions from a distance.

ചിത്രം: The remote control for the Midea FS40-15AR fan, highlighting the power button and the 12-hour timer function.

ചിത്രം: A hand holding the remote control, pointing towards the Midea FS40-15AR fan, demonstrating wireless operation.
- Insert batteries into the remote control (type and orientation usually indicated inside the battery compartment).
- Point the remote control towards the fan's receiver for optimal response.
- All functions available on the control panel are also accessible via the remote control.
മെയിൻ്റനൻസ്
പതിവായി വൃത്തിയാക്കലും അറ്റകുറ്റപ്പണികളും നിങ്ങളുടെ ഫാനിന്റെ മികച്ച പ്രകടനവും ദീർഘായുസ്സും ഉറപ്പാക്കും.
- പുറം വൃത്തിയാക്കൽ:
- വൃത്തിയാക്കുന്നതിന് മുമ്പ് എല്ലായ്പ്പോഴും ഫാൻ അൺപ്ലഗ് ചെയ്യുക.
- ഒരു മൃദുവായ, ഡി ഉപയോഗിച്ച് ബാഹ്യ പ്രതലങ്ങൾ തുടയ്ക്കുകamp തുണി. ഉരച്ചിലുകളുള്ള ക്ലീനറുകളോ ലായകങ്ങളോ ഉപയോഗിക്കരുത്.
- മോട്ടോർ ഹൗസിംഗിലോ ഇലക്ട്രിക്കൽ ഘടകങ്ങളിലോ വെള്ളം കയറുന്നില്ലെന്ന് ഉറപ്പാക്കുക.
- ഗ്രില്ലുകളും ബ്ലേഡുകളും വൃത്തിയാക്കൽ:
- Periodically remove the front grille (refer to assembly instructions for removal) to clean dust from the fan blades.
- Use a soft cloth or a vacuum cleaner with a brush attachment to remove dust.
- Ensure all parts are completely dry before reassembling and operating the fan.
- സംഭരണം:
- ഫാൻ കൂടുതൽ നേരം സൂക്ഷിക്കുകയാണെങ്കിൽ, അത് നന്നായി വൃത്തിയാക്കുക.
- Store it in its original packaging or cover it to protect it from dust.
- തണുത്തതും ഉണങ്ങിയതുമായ സ്ഥലത്ത് സൂക്ഷിക്കുക.
ട്രബിൾഷൂട്ടിംഗ്
If you encounter any issues with your Midea FS40-15AR fan, refer to the following common problems and solutions.
| പ്രശ്നം | സാധ്യമായ കാരണം | പരിഹാരം |
|---|---|---|
| ഫാൻ ഓണാകുന്നില്ല. | വൈദ്യുതി വിതരണം ഇല്ല. പവർ കോർഡ് ശരിയായി പ്ലഗ് ഇൻ ചെയ്തിട്ടില്ല. | പവർ ഔട്ട്ലെറ്റ് പ്രവർത്തിക്കുന്നുണ്ടോയെന്ന് പരിശോധിക്കുക. Ensure the power cord is securely plugged into the outlet and the fan. |
| ദുർബലമായ വായുസഞ്ചാരം. | ഫാൻ വേഗത വളരെ കുറവായി സജ്ജീകരിച്ചിരിക്കുന്നു. Grilles or blades are dusty. | ഫാൻ വേഗത ക്രമീകരണം വർദ്ധിപ്പിക്കുക. Unplug the fan and clean the grilles and blades as per maintenance instructions. |
| ഫാൻ അസാധാരണമായ ശബ്ദമുണ്ടാക്കുന്നു. | അയഞ്ഞ ഭാഗങ്ങൾ. ഫാൻ ബ്ലേഡുകളിൽ തടസ്സം. | Unplug the fan and check for any loose components or foreign objects. Ensure the fan is on a stable surface. |
| റിമോട്ട് കൺട്രോൾ പ്രവർത്തിക്കുന്നില്ല. | ഡെഡ് ബാറ്ററികൾ. റിമോട്ടിനും ഫാനും ഇടയിലുള്ള തടസ്സം. | റിമോട്ട് കൺട്രോളിൽ ബാറ്ററികൾ മാറ്റിസ്ഥാപിക്കുക. റിമോട്ടിനും ഫാനിന്റെ റിസീവറിനും ഇടയിൽ വ്യക്തമായ ഒരു കാഴ്ച രേഖ ഉണ്ടെന്ന് ഉറപ്പാക്കുക. |
| ഓസിലേഷൻ പ്രവർത്തിക്കുന്നില്ല. | ഓസിലേഷൻ ഫംഗ്ഷൻ ഓഫാണ്. മെക്കാനിക്കൽ തടസ്സം. | Press the oscillation button to activate it. Check for any obstructions preventing the fan head from rotating. |
ഈ പരിഹാരങ്ങൾ പരീക്ഷിച്ചതിന് ശേഷവും പ്രശ്നം നിലനിൽക്കുകയാണെങ്കിൽ, ദയവായി ഉപഭോക്തൃ പിന്തുണയുമായി ബന്ധപ്പെടുക.
സ്പെസിഫിക്കേഷനുകൾ
Technical details for the Midea FS40-15AR DC Pedestal Fan.
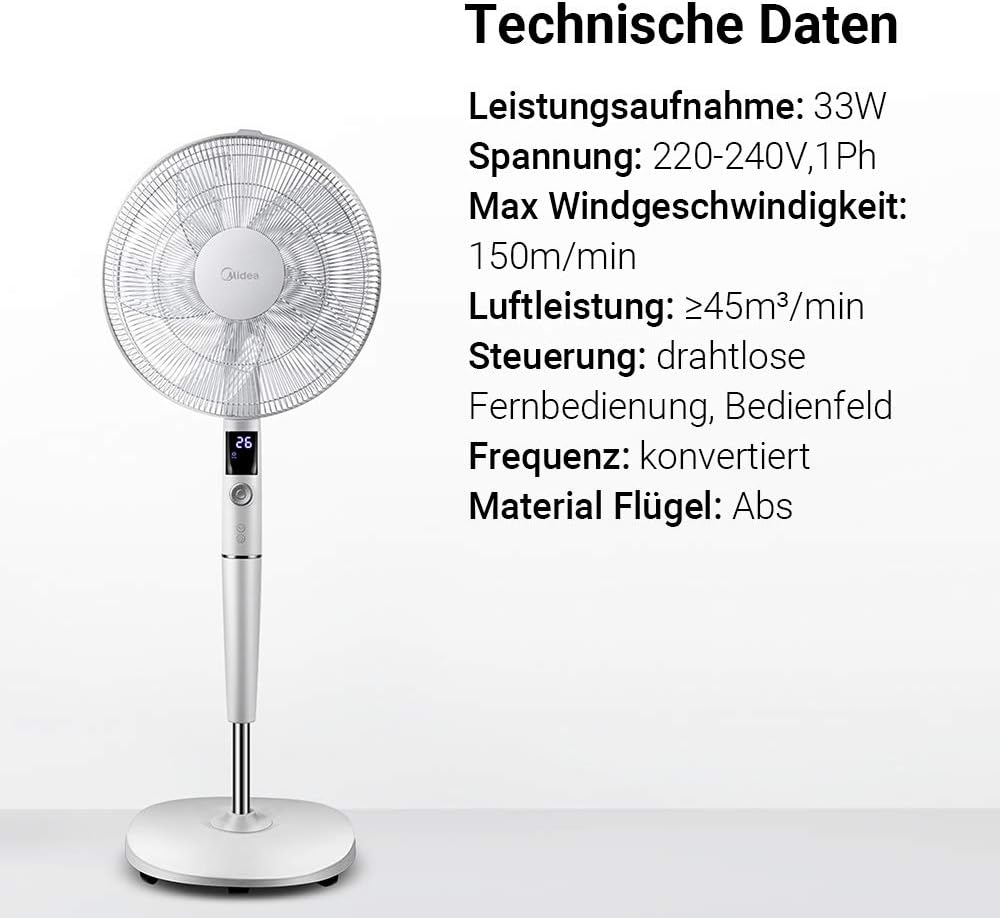
ചിത്രം: A visual representation of the Midea FS40-15AR fan alongside its technical data, including power consumption, voltage, and control methods.
| ഫീച്ചർ | വിശദാംശങ്ങൾ |
|---|---|
| മോഡൽ നമ്പർ | FS40-15AR |
| ബ്രാൻഡ് | മിഡിയ |
| ടൈപ്പ് ചെയ്യുക | ഡിസി പെഡസ്റ്റൽ ഫാൻ |
| വൈദ്യുതി ഉപഭോഗം | 30 വാട്ട്സ് |
| വാല്യംtage | 220-240V |
| പരമാവധി കാറ്റിന്റെ വേഗത | 150 മീറ്റർ/മിനിറ്റ് |
| എയർ ഫ്ലോ | ≥45 m³/min |
| വേഗതകളുടെ എണ്ണം | 26 |
| ശബ്ദ നില | 27 Decibels (min) |
| ആന്ദോളന ആംഗിൾ | 80 ഡിഗ്രി |
| ടൈമർ പ്രവർത്തനം | 12 മണിക്കൂർ വരെ |
| നിയന്ത്രണ രീതി | Wireless Remote Control, On-unit Control Panel |
| മെറ്റീരിയൽ (ബ്ലേഡുകൾ) | എബിഎസ് പ്ലാസ്റ്റിക് |
| ഉൽപ്പന്ന അളവുകൾ (L x W x H) | 45.3 x 40 x 137 സെ.മീ |
| ഭാരം | 7.8 കി.ഗ്രാം |
| പ്രത്യേക സവിശേഷതകൾ | Adjustable Height, Tiltable Head, ECO Mode, Sleep Mode |
വാറൻ്റിയും പിന്തുണയും
വാറന്റി വിവരങ്ങൾക്കും ഉപഭോക്തൃ പിന്തുണയ്ക്കും, ദയവായി നിങ്ങളുടെ ഉൽപ്പന്നത്തിനൊപ്പം ഉൾപ്പെടുത്തിയിരിക്കുന്ന വാറന്റി കാർഡ് പരിശോധിക്കുക അല്ലെങ്കിൽ ഔദ്യോഗിക മിഡിയ സന്ദർശിക്കുക. webസൈറ്റ്. വാങ്ങിയതിന്റെ തെളിവായി നിങ്ങളുടെ വാങ്ങൽ രസീത് സൂക്ഷിക്കുക.
For technical assistance or service inquiries, please contact Midea customer service through their official channels.
- ഓൺലൈൻ പിന്തുണ: www.midea.com/global/support
- ബന്ധപ്പെടാനുള്ള വിവരങ്ങൾ: Refer to your regional Midea website for local contact details.