1. Kupu Whakataki
The Audizio Desio is a versatile digital radio that combines classic aesthetics with modern audio technology. It features DAB, DAB+, and FM tuning for clear radio reception, along with Bluetooth 5.0 for wireless streaming, a USB port for media playback, and a 3.5mm AUX input for wired connections. The radio is equipped with a 2.4-inch color LCD display and integrated stereo speakers, making it suitable for various environments such as living rooms, kitchens, or bedrooms.
This manual provides detailed instructions for setting up, operating, and maintaining your Audizio Desio radio. Please read it thoroughly before use to ensure proper functionality and to maximize your listening experience.
2. Nga korero haumaru
- Me whakarite te urutau hiko voltage taurite ana ki to tuku hiko rohe i mua i te hono.
- Kaua e tukuna te waeine ki te ua, te makuku, te wera nui ranei.
- A ape i te whakanoho i te waeine ki te taha o nga puna wera, ki te ra tika ranei.
- Kaua e whakatuwheratia te casing; tirohia nga ratonga katoa ki nga kaimahi whai tohu.
- Tiakina te waeine mai i nga papa autō kaha.
- Horoia te waeine ki te kakahu ngohengohe, maroke anake.
3. Ihirangi mokete
Tena koa tirohia kei te noho nga taonga katoa i te wa e wetewete ana:
- Audizio Desio DAB/DAB+/FM Radio
- Pūurutau Hiko (DC 5V)
- Mana Mamao
- Pukapuka Kaiwhakamahi
4. Nga Mana me nga Hononga
Mana Paewhiri Mua
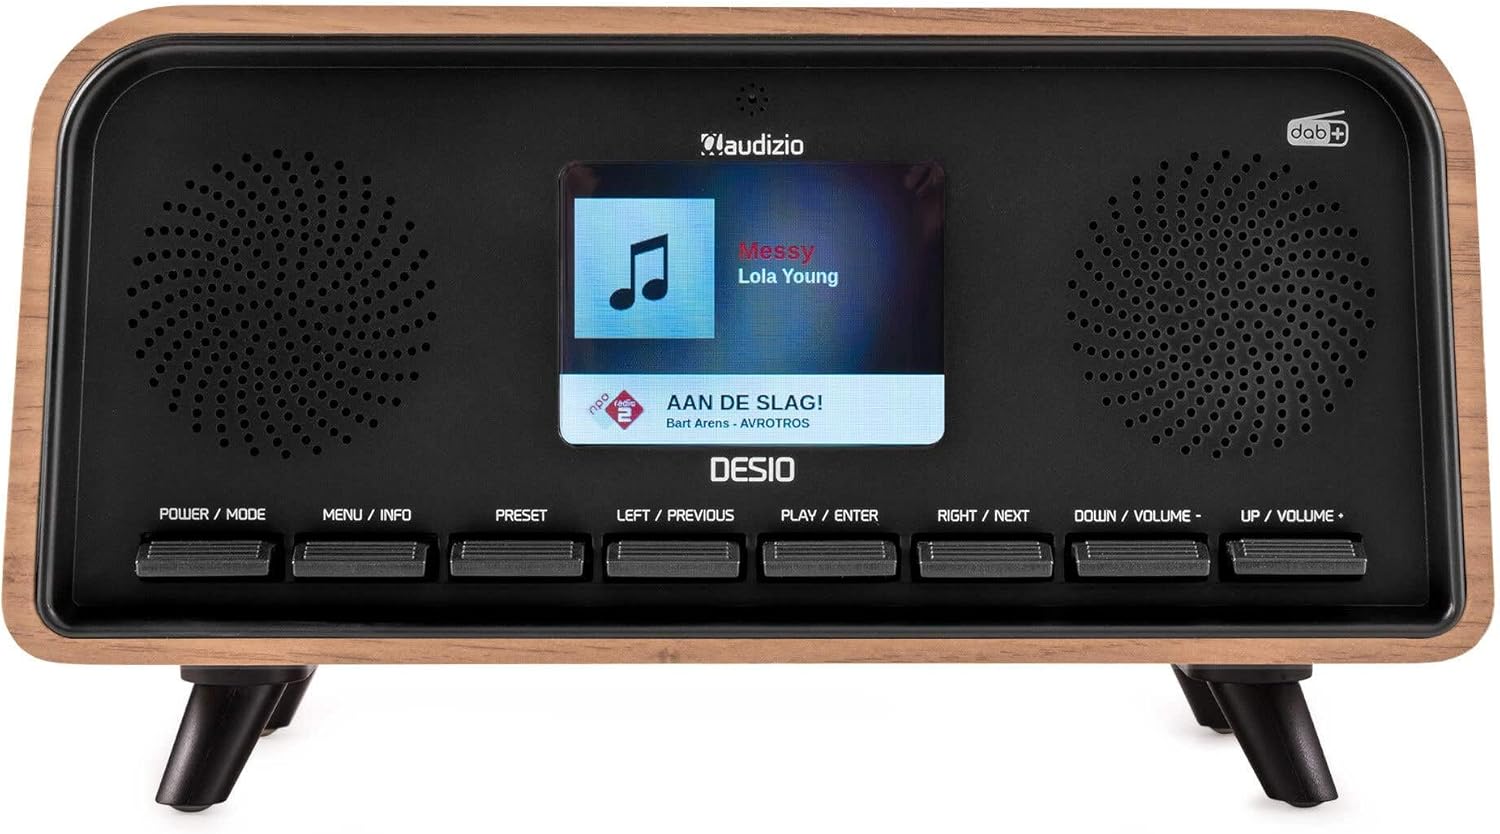
Mua view of the Audizio Desio radio, showing the display playing music with artist and track information. The control buttons are visible below the screen.
- POWER / MODE: Press to turn on/off. Press and hold to switch between DAB, FM, Bluetooth, USB, and AUX modes.
- MENU / INFO: Press to access menu options. In playback mode, press to cycle through information display.
- tatūkē: Press to recall saved stations. Press and hold to save current station.
- LEFT / PREVIOUS: Navigate left in menus, or skip to previous track/station.
- PLAY / ENTER: Confirm selection in menus, or play/pause media.
- RIGHT / NEXT: Navigate right in menus, or skip to next track/station.
- DOWN / VOLUME -: Decrease volume, or navigate down in menus.
- UP / VOLUME +: Increase volume, or navigate up in menus.
Hononga Paewhiri Whakamuri
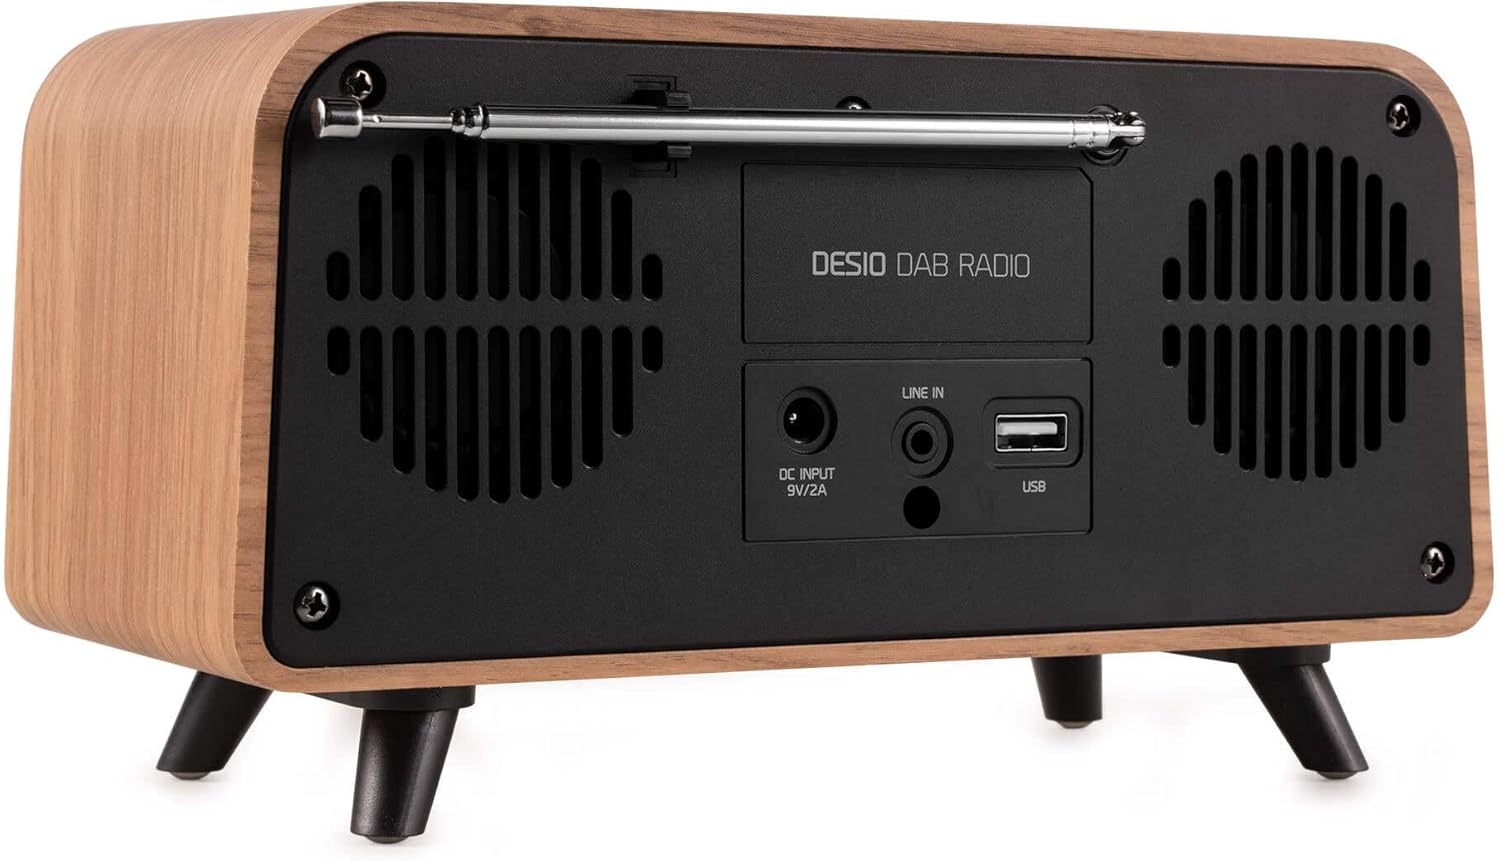
Whakamuri view of the Audizio Desio radio, highlighting the DC INPUT 9V/2A, LINE IN (3.5mm AUX), and USB ports. The telescopic antenna is extended.
- DC INPUT 9V/2A: Tūhonohia te pūurutau hiko kua whakaratohia ki konei.
- LINE IN (3.5mm AUX): Honoa nga taputapu oro o waho ma te whakamahi i te taura ororongo 3.5mm.
- USB: Whakauruhia he puku kohiko USB hei purei i te MP3.
- Antenna Telescopic: Extend fully for optimal DAB/DAB+ and FM reception.
5. Tatūnga Tuatahi
- Hono Hono: Plug the provided DC 5V power adapter into the DC INPUT port on the rear of the radio, then plug the adapter into a wall outlet.
- Toroa Antenna: Fully extend the telescopic antenna located on the rear of the unit for best reception.
- Whakahiko: Pehia te MANA / MODE pātene hei whakakā i te reo irirangi.
- First-time DAB Scan: Upon first power-on, the radio will automatically perform a full scan for DAB/DAB+ stations. This may take a few minutes. The display will show the scanning progress.
- Tautuhi Wā/Rā: The time and date will usually be set automatically via DAB signal. If not, you can manually set them via the menu.
6. Nga Tohutohu Whakahaere
6.1 Te Mahi Irirangi DAB/DAB+

Mua view of the Audizio Desio radio, displaying a DAB radio station ('NPO Klassiek') and current time.
- Select DAB Mode: Pehia te MANA / MODE button repeatedly until 'DAB' is displayed.
- Matawai mo nga Teihana: If no stations are found or you wish to rescan, press MENU / INFO, ka whakamahi LEFT / PREVIOUS or TATAU / NEXT to select 'Full Scan' and press PLAY / ENTER.
- Select Station: Whakamahia te LEFT / PREVIOUS or TATAU / NEXT buttons to browse available stations. Press PLAY / ENTER ki te tohu i tetahi teihana.
- Tiaki Tatūkē: Hei tiaki i tetahi teihana, pehia me te pupuri i te TAITAIHI pātene. Whakamahi LEFT / PREVIOUS or TATAU / NEXT to choose a preset number (1-50), then press PLAY / ENTER ki te whakau.
- Mahara Tatūkē: To recall a saved station, press the TAITAIHI button (do not hold). Use LEFT / PREVIOUS or TATAU / NEXT to select the desired preset, then press PLAY / ENTER.

Mua view of the Audizio Desio radio, showing the 'Preset Recall' menu on the display, indicating empty preset slots.
6.2 FM Radio Mahi
- Tīpakohia te Aratau FM: Pehia te MANA / MODE button repeatedly until 'FM' is displayed.
- Karapa Aunoa: Pēhi me te pupuri PLAY / ENTER to automatically scan for and save available FM stations.
- Whakatika ā-ringa: Whakamahi LEFT / PREVIOUS or TATAU / NEXT to fine-tune the frequency.
- Save/Recall Presets: Follow the same procedure as for DAB radio (Section 6.1).
6.3 Bluetooth (BT) Operation

Mua view of the Audizio Desio radio, with the display showing 'BT' (Bluetooth) mode and 'Connected' status.
- Select BT Mode: Pehia te MANA / MODE button repeatedly until 'BT' is displayed. The radio will enter pairing mode, indicated by a flashing Bluetooth icon.
- Pūrere Takirua: On your smartphone, tablet, or laptop, enable Bluetooth and search for available devices. Select 'Audizio Desio' from the list.
- Tūhono: Once paired, the display will show 'Connected'. You can now stream audio from your device to the radio.
- Mana Whakahoki: Whakamahia tō pūrere hono, ngā reo irirangi rānei PLAY / ENTER, LEFT / PREVIOUS, a TATAU / NEXT nga paatene hei whakahaere i te purei ano.
6.4 Whakahoki USB

Mua view of the Audizio Desio radio, with the display showing 'USB' mode, current time, and details of an MP3 file e whakatangihia ana.
- Kōkuhu Puku USB: Insert a USB flash drive (formatted to FAT32) containing MP3 files into the USB port on the rear of the radio.
- Tīpakohia te Aratau USB: Pehia te MANA / MODE button repeatedly until 'USB' is displayed. The radio will automatically start playing the first compatible audio file.
- Whakatere Files: Whakamahi LEFT / PREVIOUS or TATAU / NEXT to skip tracks. Press PLAY / ENTER ki te okioki/whakahaere ano te purei.
6.5 AUX Whakauru
- Hono Pūrere: Connect an external audio device (e.g., MP3 player, smartphone) to the 'LINE IN' (3.5mm AUX) port on the rear of the radio using a 3.5mm audio cable (not included).
- Tīpakohia te Aratau AUX: Pehia te MANA / MODE button repeatedly until 'AUX' is displayed.
- Mana Whakahoki: Playback is controlled directly from your connected external device. Adjust volume using the radio's volume controls.
6.6 Alarm and Timer Functions
- Tautuhinga Whakaoho: Access the alarm settings via the MENU / INFO button. You can set multiple alarms with customizable sources (DAB, FM, Buzzer), volume, and recurrence (daily, weekdays, weekends).
- Waka Moe: The sleep timer allows the radio to turn off automatically after a set period. Access this function via the MENU / INFO button and select the desired duration.
- Mahinga Tohu: When an alarm sounds, press any button (except Power) to activate the snooze function for a short period.
7. Tiaki
- Te horoi: Use a soft, dry, lint-free cloth to clean the radio's surface. Do not use abrasive cleaners, waxes, or solvents.
- Tiaki Antenna: Kia āta pupuri i te pūihi karu tirotiro kia kore ai e piko, e whati rānei.
- Rokiroki: If storing the radio for an extended period, disconnect it from the power supply and store it in a cool, dry place.
8. Te Raru
| Raruraru | Take pea | Rongoā |
|---|---|---|
| Karekau he kaha | Ko te urutau hiko kaore i te hono, kei te he te putanga. | Tirohia te hononga o te urutau hiko, ka whakamātau i tētahi atu putanga. |
| He pai te manaaki a DAB/FM | Ko te Antenna kaore i tino roa, he ngoikore ranei te waahi tohu. | Fully extend the antenna. Try repositioning the radio. Perform a full scan. |
| Nihokikorangi kore hono | Radio not in BT mode, device not in pairing mode, or too far away. | Ensure radio is in BT mode. Put your device in pairing mode. Move device closer to the radio (within 10m). |
| Ko te purei USB kaore e mahi | USB drive not inserted correctly, unsupported file format, or drive not FAT32. | Reinsert USB drive. Ensure files are MP3. Check USB drive format (FAT32). |
| Kāore he oro mai i te AUX | Radio not in AUX mode, cable faulty, or external device volume low. | Select AUX mode. Check 3.5mm cable. Increase volume on both radio and external device. |
9. Whakatakotoranga Hangarau
- Waitohu: Audizio
- Tauira: Desio
- Hangarau Tuner: FM, DAB+
- Nihokikorangi: Version 5.0 (Range: 10m)
- Kōwhiringa Whakahoki: Bluetooth, USB, 3.5mm AUX input
- Teihana tatūkē: 50
- Whakaatu: 2.4 inihi LCD Tae
- Nga Mahi: Alarm, Sleep Timer, Snooze, Dimming, Week/Weekend Alarm
- Max Speaker Power: 30 Waata
- Tuku Hiko: DC 5V (Power Adapter)
- Rahi Hua (H x W x D): 32 x 16 x 18 cm
- Taumaha: 1.66 kg
10. Pūtāhui me te Tautoko
This product comes with a standard manufacturer's warranty. For detailed warranty terms and conditions, please refer to the documentation provided at the time of purchase or contact your retailer.
For technical support, troubleshooting assistance, or service inquiries, please contact the Audizio customer support team or your local dealer. Please have your product model number (Desio) and purchase information ready when contacting support.