
1. Kupu Whakataki
Thank you for choosing the Neoteck RCA to HDMI & Optical to AV DAC Converter Bundle. This bundle provides two essential converters to modernize your audio and video connections. The RCA to HDMI converter allows older analog devices (like VCRs and DVD players) to connect to modern HDTVs, while the Optical to AV DAC converter converts digital optical audio signals to analog RCA audio for stereo systems. This manual provides comprehensive instructions for installation, operation, and troubleshooting to ensure optimal performance.
2. Nga korero haumaru
- Me ata panui nga tohutohu katoa i mua i te whakamahi.
- Keep the devices away from water, moisture, and extreme temperatures.
- Do not attempt to disassemble or repair the devices. Refer all servicing to qualified personnel.
- Use only the provided or recommended power adapters (5V/1A USB power adapter for RCA to HDMI converter if needed).
- Ensure proper ventilation around the devices during operation.
3. Ihirangi mokete
Tena koa tirohia nga ihirangi o te kete kia mohio kei te noho katoa nga taonga:
- Neoteck RCA to HDMI Converter (with built-in RCA and USB power cables)
- Neoteck 192kHz Optical to RCA DAC Converter
- USB Power Cable for DAC Converter
- Pukapuka Kaiwhakamahi (tenei tuhinga)
4. Hua Neke Atuview
4.1. RCA to HDMI Converter
This converter transforms analog RCA composite signals into digital HDMI signals, allowing older devices to connect to modern displays. It supports 1080P (60Hz) and 720P (60Hz) output.
- Hoahoa Whakauru: Features built-in RCA and USB power cables for simplified setup.
- Aspect Ratio Switch: Includes a toggle switch to select between 4:3 and 16:9 aspect ratios.
- Tukatuka Tohu Mamati: Utilizes advanced electronic components and intelligent chips for signal conversion.

Whakaahua: Roto view of the Neoteck RCA to HDMI converter, highlighting the digital signal processor and integrated cables.
4.2. Optical to RCA DAC Converter
This 192kHz Digital to Analog Converter (DAC) converts digital SPDIF optical audio signals to analog RCA audio, enabling connection of modern digital audio sources to analog stereo ampkaiwhakaora, kai korero ranei.
- Te Rawa Sampreiti ling: Supports up to 192kHz 24-bit audio sampreiti reiti.
- Ororongo Hanga-i roto AmpKaiwhakaora: Features a professional audio amplifier chip and dual-channel operational amplifier for clear sound.
- Parenga Iahiko Poto: Designed with protection features for enhanced durability.
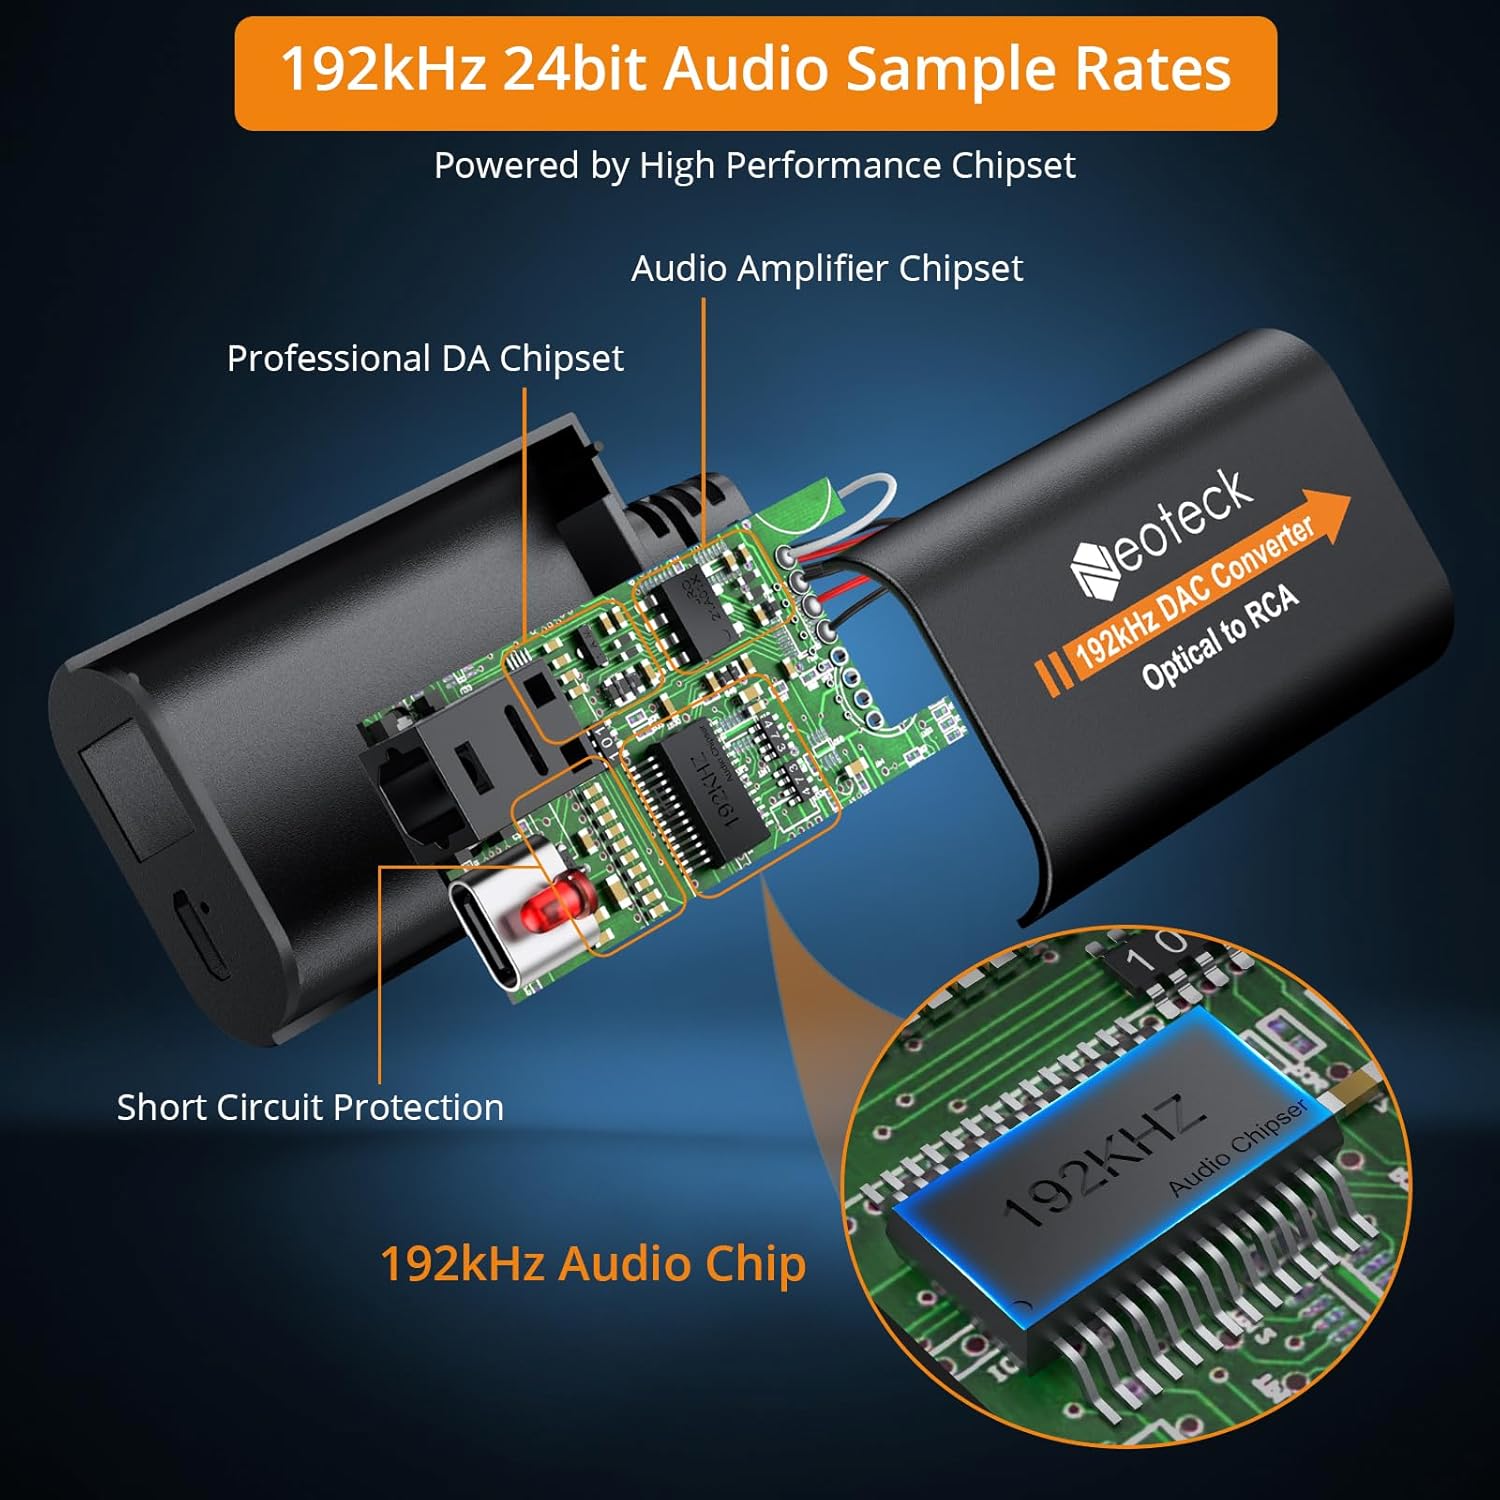
Whakaahua: Roto view of the Neoteck 192kHz Optical to RCA DAC Converter, showing the audio amplifier chipset and 192kHz audio chip.
5. Tohutohu Tatūnga
5.1. RCA to HDMI Converter Setup
- Connect the male RCA (red, white, yellow) cables from the converter to the RCA output ports of your source device (e.g., DVD player, VCR). Ensure color matching.
- Connect the HDMI output of the converter to an available HDMI input port on your HDTV or monitor.
- Connect the integrated USB power cable to a 5V/1A USB power source (e.g., TV USB port, USB wall adapter). This is crucial for stable operation.
- Power on your source device and HDTV. Select the correct HDMI input on your HDTV.
- Use the 4:3/16:9 toggle switch on the converter to adjust the aspect ratio as desired.
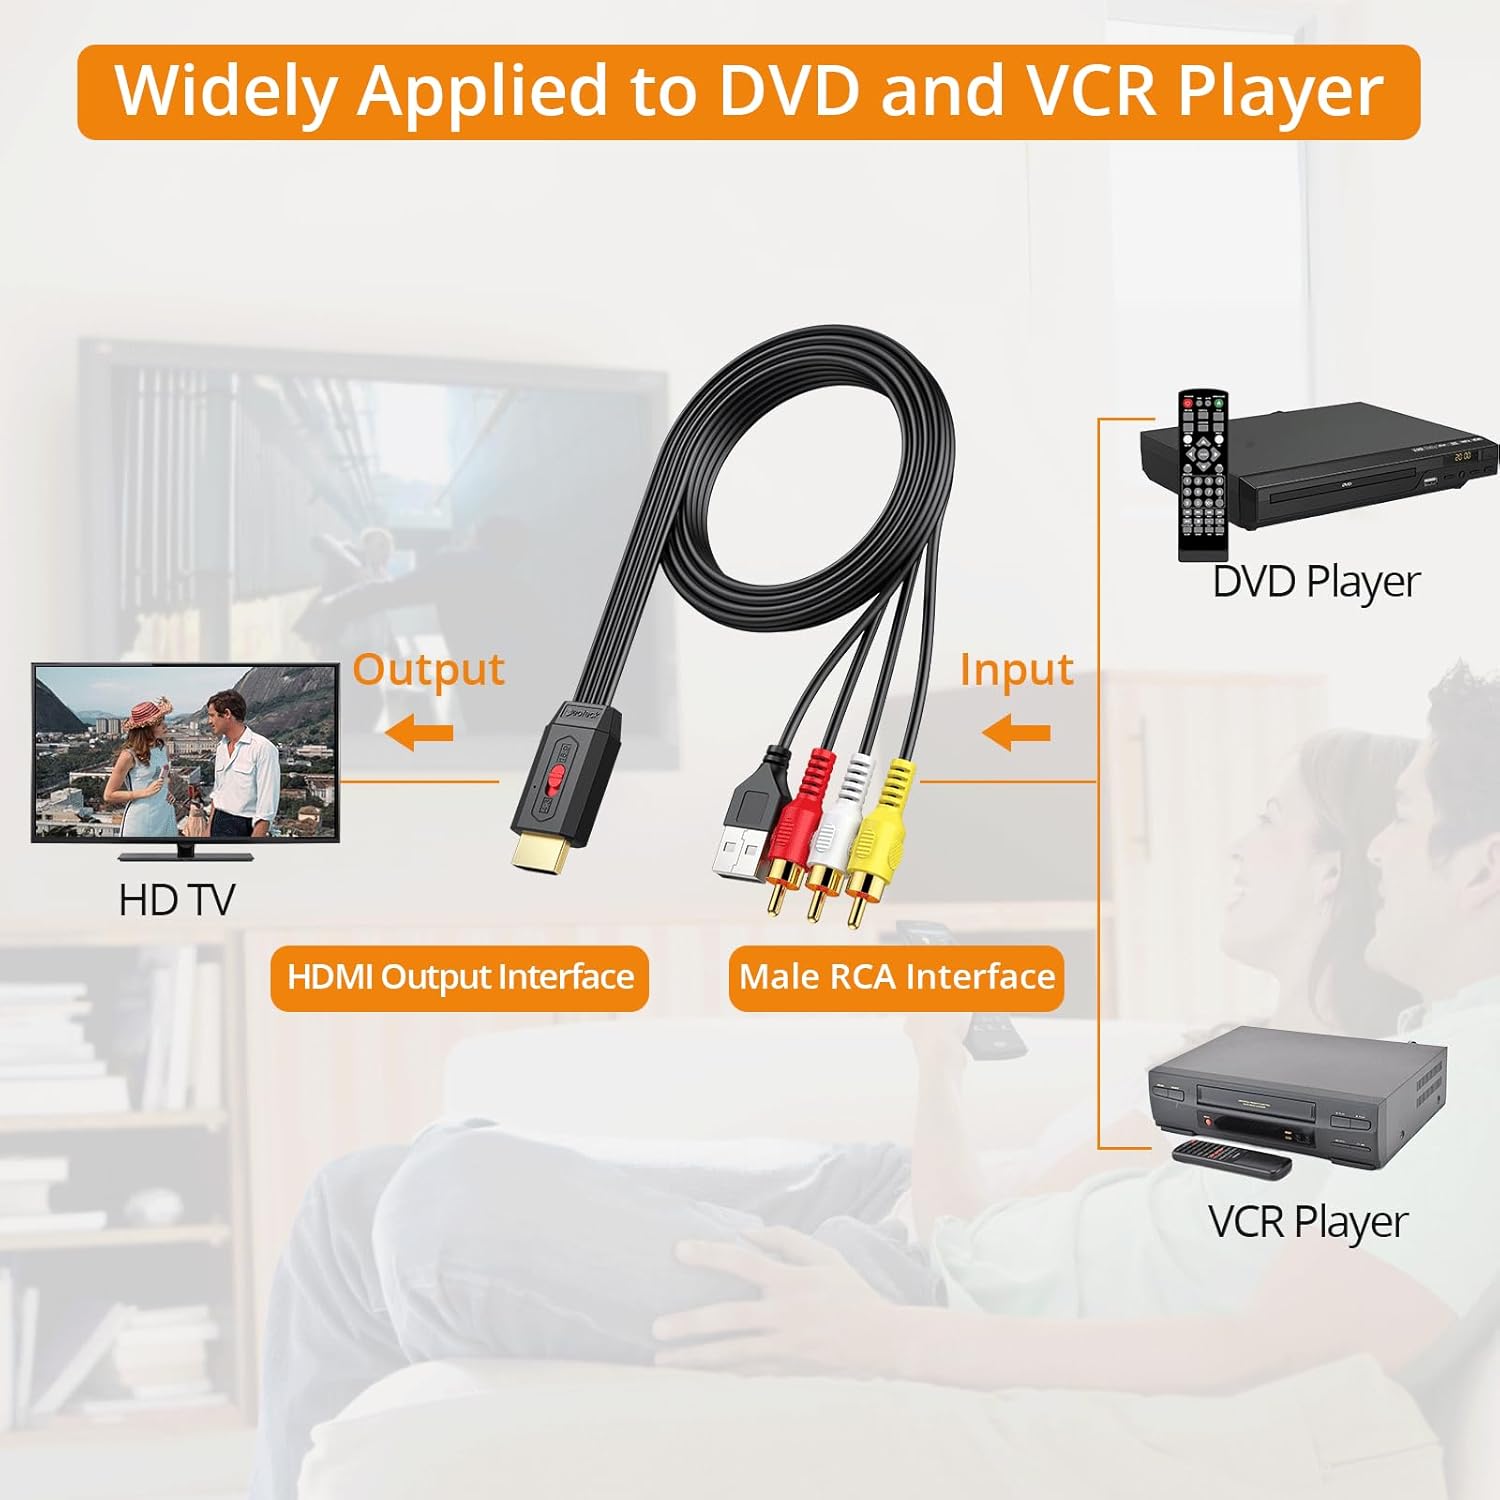
Image: Diagram illustrating the connection of the RCA to HDMI converter between a DVD/VCR player and an HDTV.

Whakaahua: Taipitopito view of connecting the RCA to HDMI converter's HDMI output to an HDTV, RCA inputs to a source device, and USB power to a TV's USB port.
5.2. Optical to RCA DAC Converter Setup
- Connect the optical (Toslink) cable from your digital audio source (e.g., HDTV, Blu-ray player, game console, set-top box) to the optical input port of the DAC converter.
- Connect RCA audio cables (red for right, white for left) from the RCA output ports of the DAC converter to the analog RCA input ports of your stereo ampkaikorero kaha ranei.
- Connect the provided USB power cable to the DAC converter and then to a 5V/1A USB power source.
- Whakawerahia nga taputapu hono katoa.
- Hiranga: Ensure your digital audio source's audio output format is set to PCM. This converter does not support Dolby AC3, DTS, or other 5.1 channel signals. Refer to section 6.2 for detailed instructions on setting PCM output.

Image: Diagram showing how to connect the Optical to RCA DAC converter from an HDTV, set-top box, DVD/Blu-ray player, or game console to a stereo audio system.
6. Nga Tohutohu Whakahaere
6.1. RCA to HDMI Converter Operation
Once connected and powered, the converter will automatically scale the analog RCA signal to 1080P or 720P HDMI output. The primary operational control is the aspect ratio switch.
- Aspect Ratio Switch (4:3 / 16:9): Use the physical toggle switch on the converter to select the desired display aspect ratio. This helps restore the original output ratio of older DVD/VCR players.

Image: The RCA to HDMI converter featuring a toggle switch for 4:3 and 16:9 aspect ratio selection, with visual examples of how content appears in each ratio.
6.2. Optical to RCA DAC Converter Operation
The DAC converter operates automatically once connected and powered, converting the digital optical signal to analog RCA. The critical step for proper operation is configuring the audio source.
- Setting Audio Output to PCM: The converter is designed for PCM (Pulse Code Modulation) stereo audio. If your source device outputs Dolby AC3, DTS, or other multi-channel formats, you will not get sound. You must change the audio output setting on your source device (e.g., TV, Blu-ray player) to PCM.
General steps to set PCM output (may vary by device):
- Go to your device's (e.g., TV, Blu-ray player) Tautuhinga tahua.
- Whakatere ki Tangi or Tautuhinga Ororongo.
- Rapua Tautuhinga Tohunga or Tautuhinga Ororongo Arā Atu Anō.
- Kimihia Hōpututanga Putanga Ororongo Mamati or Hōputu Ororongo.
- Tīpakohia PCM (or Stereo) from the available options.

Image: A television screen displaying audio settings, with the 'Audio Format' option set to 'PCM', demonstrating the necessary configuration for the Optical to RCA DAC converter.
7. Te Raru
- No Picture (RCA to HDMI):
- Ensure the converter is properly powered via the USB cable. Try a different USB power source or a dedicated 5V/1A USB wall adapter.
- Verify all RCA and HDMI cables are securely connected.
- Check that your HDTV is set to the correct HDMI input.
- The converter cannot improve the clarity of the original signal source. If the source signal is poor, the HDMI output will also be poor.
- Image Flickering or Noise (RCA to HDMI):
- Ensure the USB power cable is connected to a stable 5V/1A power source. Insufficient power can cause signal instability.
- Check if the RCA cable connections are fully seated.
- No Sound (Optical to RCA DAC):
- Verify the DAC converter is powered.
- Ensure the optical cable is securely connected and not damaged.
- Crucially, check that your digital audio source's output format is set to PCM. This converter does not support Dolby AC3, DTS, or other 5.1 channel formats. Refer to section 6.2.
- Tirohia te taumata oro i runga i tō amplifier/speakers. The volume level can only be adjusted on the output device.
- Poor Audio Quality (Optical to RCA DAC):
- Ensure all cables are connected firmly.
- Whakamātauria ki tētahi atu taura whatu mēnā ka taea.
- Verify the source audio quality.
8. Whakatakotoranga
8.1. RCA to HDMI Converter
- Tāuru: RCA Composite (Yellow, White, Red)
- Putanga: HDMI 1080P/720P @ 60Hz
- Ahuatanga ōwehenga: 4: 3/16: 9 Ka taea te Whakawhiti
- Mana: USB 5V/1A (integrated cable)
8.2. Optical to RCA DAC Converter
- Tāuru: Optical (Toslink)
- Putanga: RCA L/R Audio
- Sampreiti ling: Up to 192kHz 24-bit
- Hōputu Ororongo: PCM Stereo (Does NOT support Dolby AC3, DTS, etc.)
- Mana: USB 5V/1A
9. Tiaki
- Keep the devices clean by wiping with a soft, dry cloth.
- A ape i te whakamahi i te wai, i te aerosol ranei.
- Penapenahia ngā taputapu ki te wāhi hauhautanga, maroke hoki ina kore e whakamahia.
- Kaua e aukati i nga tomokanga hau.
10. Pūtāhui me te Tautoko
Neoteck products are designed for reliability and performance. For warranty information or technical support, please refer to the contact details provided with your purchase or visit the official Neoteck webpae. Tena koa pupurihia to tohu mo te hoko mo nga kereme whakamana.