1. Hua Neke Atuview
The avedio links VHS to Digital Converter is a USB capture device designed to convert analog video signals from various sources into a digital USB format. This allows for the preservation and playback of older media on modern computers.
- Tauritenga ki te Tahuri Mamati: Converts analog video (RCA/Composite) to digital USB signals, supporting resolutions up to 1080p at 30Hz.
- Hototahi Whānui: Ideal for connecting old camcorders, set-top boxes, DVD players, VHS recorders, and DVRs.
- Mono & Purei: Designed for ease of use with most current laptops, ensuring stable video recording and transmission.
- Taura Whakaroa: Features a 1-meter USB cable for flexible connection options.
- Tautoko Pūnaha: Compatible with Windows and macOS operating systems.
- Whakauru Pūmanawa: Works seamlessly with popular recording software such as OBS and PotPlayer for video capture and screen recording.

Image 1.1: The avedio links VHS to Digital Converter, showing its RCA (yellow, white, red) and S-Video input connectors, and the USB output connector. This device facilitates the conversion of analog audio and video to a digital format.
2. Ihirangi mokete
Manatokona kei roto katoa nga mea kei roto i te kete:
- RCA and S-Video to USB Capture Adapter
- USB-A ki USB-C Converter
- CD taraiwa
- Pukapuka Tohutohu (tenei tuhinga)
3. Tohutohu Tatūnga
Follow these steps to set up your avedio links VHS to Digital Converter:
- Tāuta Atekōkiri: Insert the included Driver CD into your computer's CD/DVD drive and follow the on-screen instructions to install the necessary drivers. If your computer does not have a CD drive, drivers may be available for download from the avedio links support webpae.
- Hono Pūtake Analog: Connect your analog video source (e.g., VCR, camcorder, DVD player) to the converter using the appropriate RCA (yellow for video, white for left audio, red for right audio) or S-Video cables. Ensure all connections are secure.
- Hono ki Rorohiko: Plug the USB connector of the capture device into an available USB 2.0 port on your laptop or PC. If your computer only has USB-C ports, use the provided USB-A to USB-C converter.
- Install Recording Software: Install your preferred video recording software (e.g., OBS Studio, PotPlayer). These applications are widely available and offer robust features for video capture.
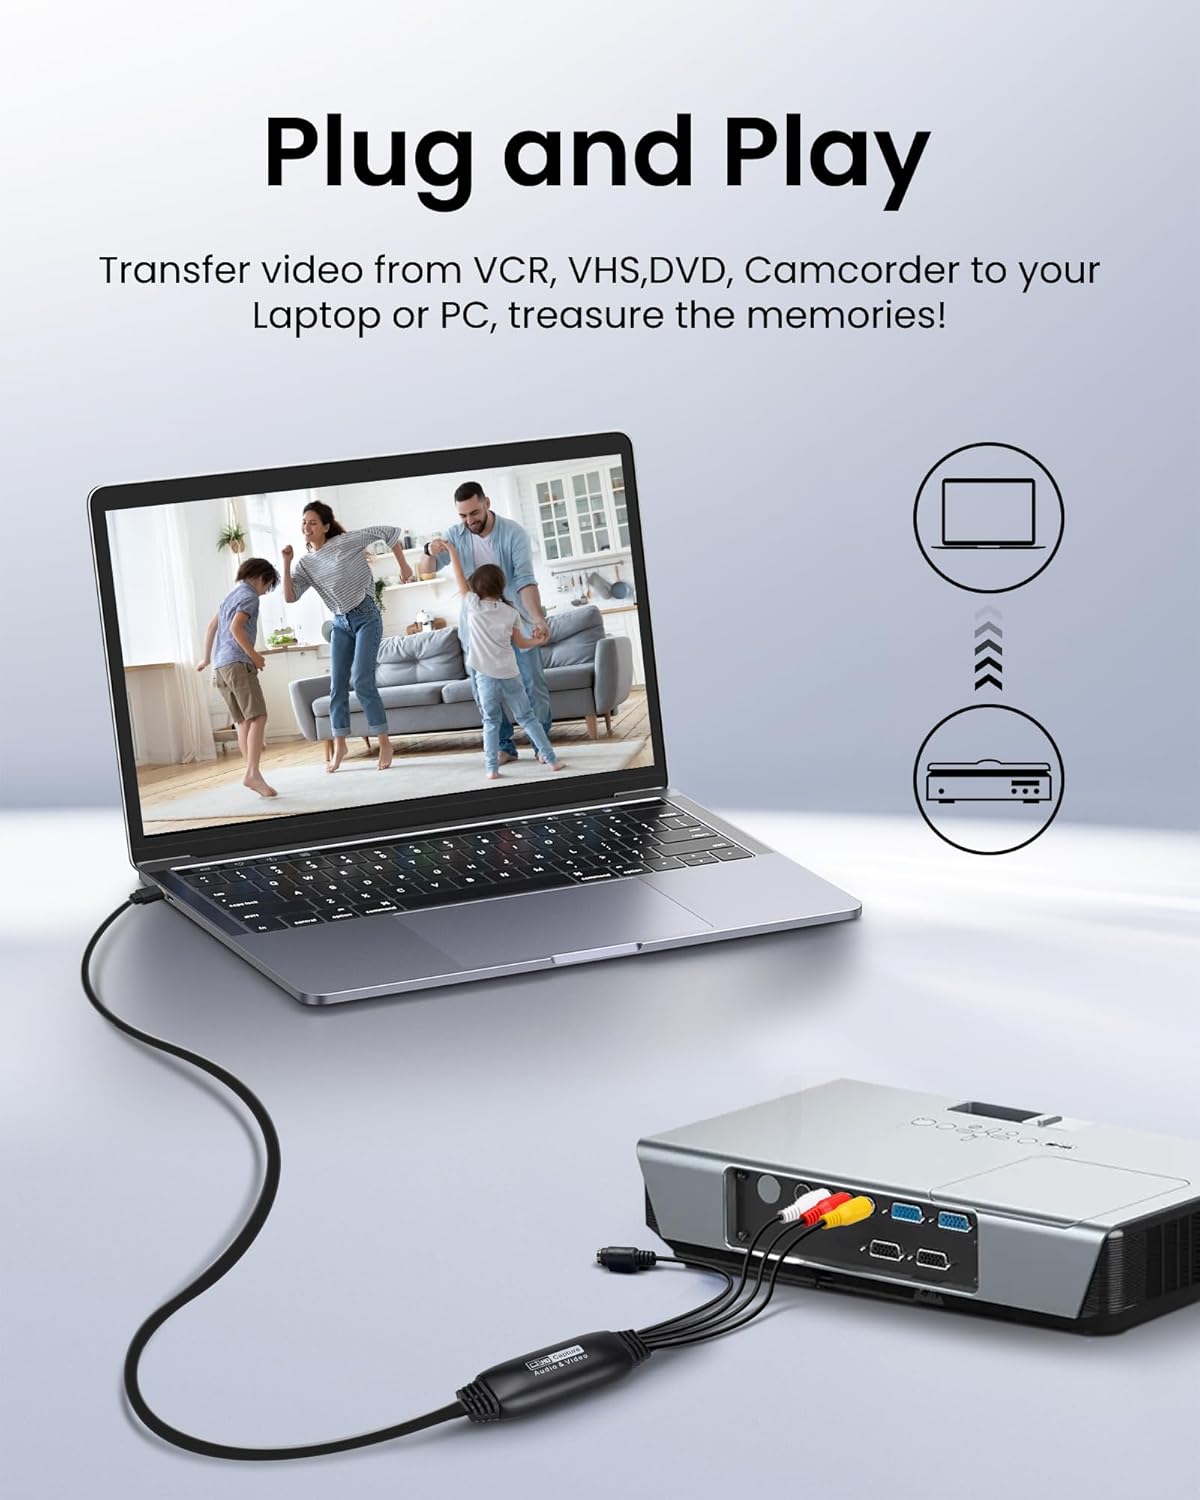
Image 3.1: Connection diagram illustrating how to connect an analog source (VCR) to the avedio links converter and then to a laptop for digital conversion.

Image 3.2: The converter is compatible with various operating systems including Mac OS, Windows, Android, and Linux, and supports software like OBS, Xsplit, VLC, and Skype for video capture.
4. Nga Tohutohu Whakahaere
Once the setup is complete, follow these steps to capture video:
- Hiko i nga taputapu: Ensure your analog video source (VCR, camcorder) and computer are powered on.
- Pūmanawa Whakarewa: Open your chosen video recording software (e.g., OBS Studio).
- Select Video Input: In the software settings, locate the video input source selection. Choose the avedio links capture device (it may appear as 'USB Video Device' or similar).
- Select Audio Input: Similarly, select the audio input source, which should also correspond to the avedio links capture device.
- Whirihorahia nga Tautuhinga: Adjust video resolution, frame rate, and audio settings within the software as needed. For optimal quality, aim for 1080p at 30Hz if supported by your source and software.
- Tīmata Whakahoki: Begin playing the video on your analog source device.
- Tīmata te tuhi: In your software, click the 'Record' button to begin capturing the video. Monitor the preview window to ensure the signal is being received correctly.
- Kati te tuhi: Once the playback is complete, stop the recording in your software. Save the captured video file ki to waahi e hiahiatia ana i runga i to rorohiko.
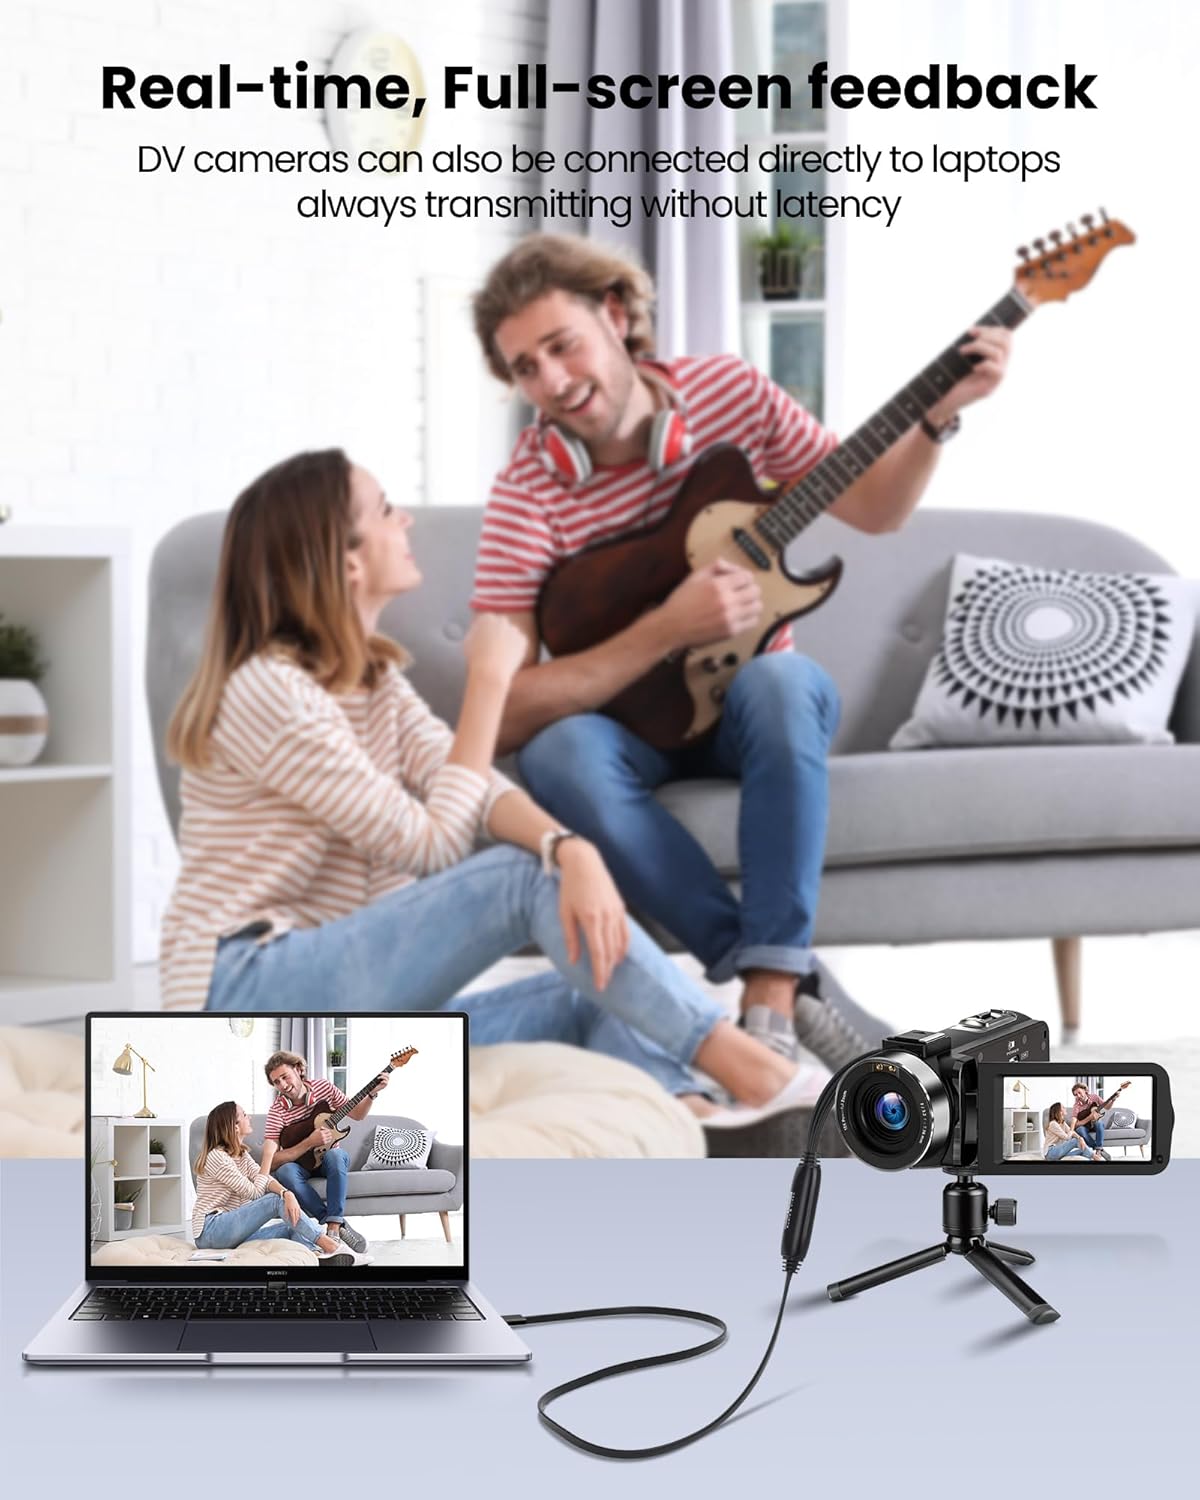
Image 4.1: Demonstrates real-time, full-screen feedback when a DV camera is connected directly to a laptop using the converter, ensuring no latency during transmission.

Image 4.2: The converter supports up to 1080P@30Hz output, as shown with a gaming console connected to a television.
5. Tiaki
To ensure the longevity and optimal performance of your avedio links converter:
- Te horoi: Whakamahia he kakahu maeneene, maroke hei horoi i te taputapu. A ape i nga kai horoi wai, i nga taonga abrasive ranei.
- Rokiroki: Penapenahia te kaitahuri ki te wāhi hauhautanga, maroke, kia matara atu i te rā tika me ngā pāmahana tino kino.
- Tiaki taura: Avoid bending or kinking the cables excessively. Do not pull on the cables to disconnect the device.
- Whakahōu Pūmanawa: Periodically check for updated drivers or software for your operating system and recording application to ensure compatibility and performance.
6. Te Raru
If you encounter issues, refer to the following troubleshooting tips:
- Kāore he Tohu Ataata/Ororongo:
- Ensure all cables (RCA/S-Video, USB) are securely connected.
- Verify that the analog source device (VCR, camcorder) is powered on and playing content.
- Check if the correct video and audio input sources are selected in your recording software.
- Confirm that the drivers for the capture device are correctly installed. Reinstall if necessary.
- Ataata/Kounga Ororongo kino:
- Ensure the analog source is providing a clean signal. Test with a different tape or DVD if possible.
- Check cable quality. Damaged or low-quality cables can degrade the signal.
- Adjust resolution and bitrate settings in your recording software. Higher settings generally result in better quality but larger file rahi.
- Pūmanawa Kāore i te Āhukahuka i te Pūrere:
- Ensure drivers are installed correctly. Try uninstalling and reinstalling them.
- Tīmata anō i tō rorohiko i muri i te tāutanga o te taraiwa.
- Whakamātauria tētahi tauranga USB rerekē i tō rorohiko.
- Update your recording software to the latest version.
- Ngā Take Tāutanga Pūmanawa:
- If you experience issues installing software from the CD, try downloading the latest version directly from the software developer's website (e.g., OBS Studio).
- Me whakarite kia tutuki i tō pūnaha whakahaere ngā whakaritenga iti rawa mō te pūmanawa.
7. Whakatakotoranga
| Waitohu | hononga avedio |
| Tau tauira | 9799240a-5448-44ed-a7ce-1925c09da1aa |
| Hunga Hua | 16.3 x 13.1 x 1.5 cm |
| Taumaha | 110 karamu |
| Tae | Pango |
| Atanga Input | RCA (Composite), S-Video |
| Atanga Huaputa | USB 2.0 (with USB-A to USB-C converter) |
| Whakatau Rawa | 1080p@30Hz |
| Pūrere Hototahi | Pona, PC |
| Pūnaha Whakahaere | Windows, macOS (also compatible with Android, Linux) |

Image 7.1: The avedio links converter featuring its 1-meter extended USB cable, providing increased flexibility for connections.
8. Pūtāhui me te Tautoko
For technical support, driver updates, or warranty inquiries, please visit the official avedio links webpaetukutuku, whakapā atu ranei ki ta raatau ratonga kaihoko. Puritia to rihiti hoko mo nga kereme whakamana.