Kupu Whakataki
This manual provides detailed instructions for the installation, operation, and maintenance of your Generic HI-M505 Radio Receiver. Designed for 12V and 24V systems, this unit features DAB, AM, FM radio, USB connectivity, and Bluetooth, making it suitable for various applications, including compatibility with Komatsu, Kobelco, and Sumitomo excavator parts.
Ihirangi mokete
Tirohia koa ko nga mea katoa kei raro nei kei roto i to kete:
- 1 x Car Radio Stereo With Frame
- 1 x GPS Cable
- 2 x Tauira USB
- 1 x Power Cable With Canbus
- 1 x RCA Taura
- 1 x Taura Tāuru Kāmera
- 1 x Taura Whakawhiti Reo Irirangi
- 1 x Pukapuka Kaiwhakamahi (tēnei tuhinga)
Tatūnga me te Tāuta
He mea nui te tāutanga tika mō te mahi tino pai. Mena kāore koe i te tino mōhio ki tētahi o ngā mahi, whakapā atu ki tētahi tohunga hangarau whai tohu.
1. Whakatupato Haumaru
- Momotuhia te pākahiko o te waka i mua i te tīmatanga o te tāutanga hei ārai i ngā poto hiko.
- Ensure the unit is compatible with your vehicle's electrical system (12V or 24V).
- Kaua e tāuta te waeine ki ngā wāhi ka ārai i te ara o te taraiwa view ka pokanoa ranei ki te mahi waka.
2. Whakapiki i te Waehe
- Carefully remove the existing radio or blank panel from the dashboard.
- Insert the HI-M505 radio stereo with its frame into the dashboard opening.
- Secure the unit using appropriate mounting hardware (not included unless specified).
3. Hononga Waea
Connect the provided cables as follows:
- Power Cable with Canbus: Connect to the vehicle's power supply and ground. Ensure correct polarity. The Canbus connection facilitates communication with the vehicle's system.
- Radio Adapter Cable: Connect to the vehicle's antenna input.
- GPS Cable: Connect the GPS antenna to the unit and mount the antenna in a location with a clear view o te rangi.
- USB Cables (x2): Connect to the unit's USB ports. These can be routed to a convenient location for connecting USB devices.
- Taura RCA: Mo te hono ki waho amplifiers or other audio/video devices.
- Taura Tāuru Kāmera: Mo te hono ki muriview camera (camera not included).
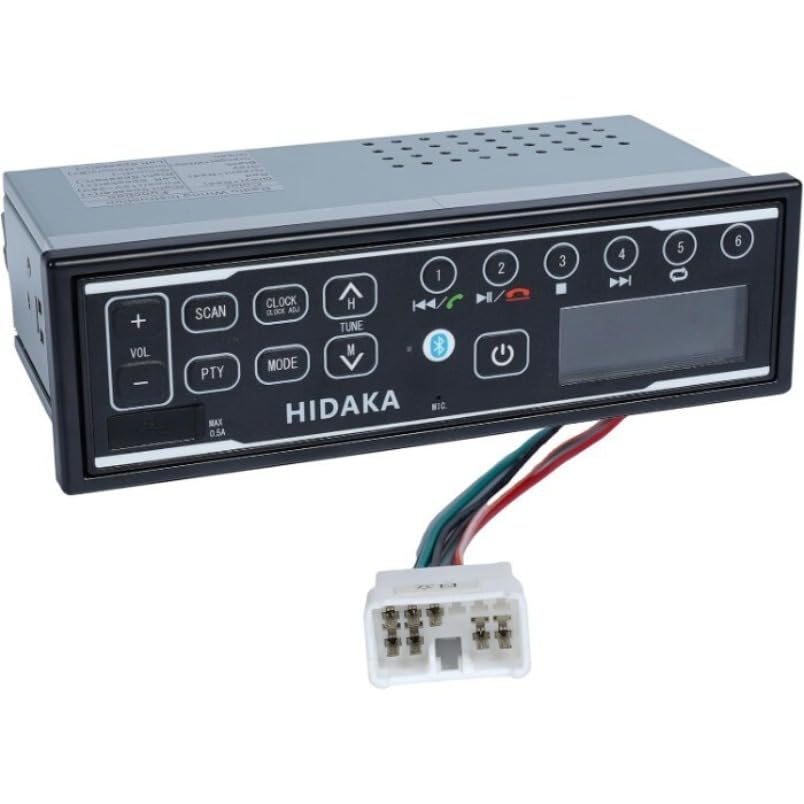
Whakaahua: Mua view of the HI-M505 Radio Receiver, showing the display and control buttons. This image illustrates the general appearance of the unit.
Nga Tohutohu Whakahaere
The HI-M505 operates on an Android platform, offering a user-friendly interface.
1. Te Hiko / Whakaweto
Press and hold the power button (usually marked with a power symbol) to turn the unit on or off. A short press typically mutes the audio or changes the source.
2. Radio Functions (DAB, AM, FM)
- Kōwhiringa Pūtake: Tap the "Radio" icon on the main screen or use the source button to select AM, FM, or DAB (if available in your region).
- Matawai: Use the seek buttons to automatically scan for available stations.
- Tatūkē: Tiakina o teihana tino pai ki te tautuhi i nga paatene mo te uru tere.
3. Whakahoki USB
Insert a USB drive into one of the provided USB ports. The unit will automatically detect the drive and display its contents. Use the media player application to browse and play audio or video files.
4. Hononga Nihokikorangi
- Go to the unit's settings menu and select "Bluetooth".
- Enable Bluetooth and make the unit discoverable.
- On your mobile device, search for available Bluetooth devices and select "HI-M505" (or similar name).
- Whakaūhia te waehere takirua mena ka akiakihia.
- Kia honoa, ka taea e koe te rere oro, te waea kore-ringa rānei.
5. Wi-Fi and Apple CarPlay
- Wi-Fi: Access the Wi-Fi settings to connect to a local Wi-Fi network or a mobile hotspot. This enables internet access for apps and updates.
- Apple CarPlay: Connect your iPhone via USB to activate Apple CarPlay. This allows you to use compatible iPhone apps directly on the unit's display.
Te tiaki
Regular maintenance ensures the longevity and optimal performance of your HI-M505 radio receiver.
- Te horoi: Use a soft, dry cloth to clean the display and exterior. Avoid abrasive cleaners or solvents.
- Whakahōu Pūmanawa: Periodically check for software updates via Wi-Fi to ensure you have the latest features and bug fixes.
- Hononga taura: Me whakarite kia mau te hononga o ngā taura katoa, ā, kia kore he pakaru.
Raparongoā
Mena ka raru koe, tirohia nga raru me nga otinga e whai ake nei:
- Kore Mana:
- Check the power cable connections and ensure they are secure.
- Me whakarite kia kore e pakaru te fiusi o te waka mō te reo irirangi.
- Ensure the vehicle's battery is charged and connected.
- Kore Oro:
- Check the volume level and ensure the unit is not muted.
- Manatokohia ngā hononga o te kaikorero.
- Mena kei te whakamahi i waho ampte pūhiko, tirohia tōna hiko me ngā hononga.
- Te Manaaki Reo Irirangi Kino:
- Ensure the radio antenna is properly connected and not damaged.
- Check for obstructions or interference in the area.
- Nga Take Takirua Nihokikorangi:
- Ensure Bluetooth is enabled on both the unit and your mobile device.
- Mukua ngā hononga o mua i runga i ngā pūrere e rua, ka ngana anō ki te hono.
- Move closer to the unit to ensure a strong signal.
- Kāore i te Mōhiotia te Pūrere USB:
- Ensure the USB device is formatted correctly (e.g., FAT32).
- Try a different USB device or cable.
- Check if the USB port is damaged.
Mena kei te haere tonu te raru, me waea atu ki te tautoko a nga kaihoko.
Whakatakotoranga
| Āhuahira | Taipitopito |
|---|---|
| Tauira | HI-M505 |
| Waitohu | Whakanuia |
| Hangarau Hononga | Nihokikorangi, Wi-Fi |
| Momo Kaiwhakahaere | Android |
| Nga waahanga motuhake | Apple CarPlay, Built-In Wi-Fi |
| Pūrere Hototahi | Ampkaikawe |
| Momo Tuhono | Momo USB A |
| Aratau Putanga Ororongo | Tirooro |
| Taumaha Tūemi | 4.4 Pauna |
| Whakauru Mana | 12V / 24V DC (as per product description) |
Nga korero Whakaputanga
Specific warranty terms and conditions for the Generic HI-M505 Radio Receiver are provided by the seller at the time of purchase. Please refer to your purchase documentation or contact the seller directly for detailed warranty coverage, duration, and claim procedures.
Tautoko Kiritaki
For technical assistance, troubleshooting beyond this manual, or inquiries regarding your HI-M505 Radio Receiver, please contact the seller or retailer from whom you purchased the product. They will be able to provide the most accurate and timely support.