
1. Kupu Whakataki
This instruction manual provides detailed guidance for the installation, operation, and maintenance of your Light My Bricks 2.0 Light Kit for the LEGO Harry Potter Diagon Alley Wizarding Shops #76444. This kit is designed to enhance your LEGO model with a variety of lights, including warm white, cool white, yellow, red, and green LEDs, illuminating every section of the iconic street. Please read this manual thoroughly before beginning installation to ensure a smooth and successful experience.
2. Nga korero haumaru
Whakatūpato: Mōrearea ki te kōroke - he iti ngā wāhanga. Kāore e tika mō ngā tamariki kei raro iho i te 3 tau te pakeke.
- Always handle LED components and wires with care to prevent damage.
- Ensure all connections are secure to avoid short circuits.
- Do not expose the lighting components to water or excessive moisture.
- Use only the recommended power sources (USB Power Bank or USB Wall Adaptor) to prevent damage to the kit.
- Keep the kit away from extreme temperatures.
3. He aha kei roto
Your Light My Bricks 2.0 Light Kit includes the following components:
- 38 x Rama
- 5 x Whitiki
- 5 x Tauranga
- 1 x Mana Rere
- 8 x Tautoko
- 32 x Pereki Whakaranu
- Nga Wae Rarama
Note: A USB Power Bank or USB Wall Adaptor (to connect to a mains outlet) is required but not included in this light kit.
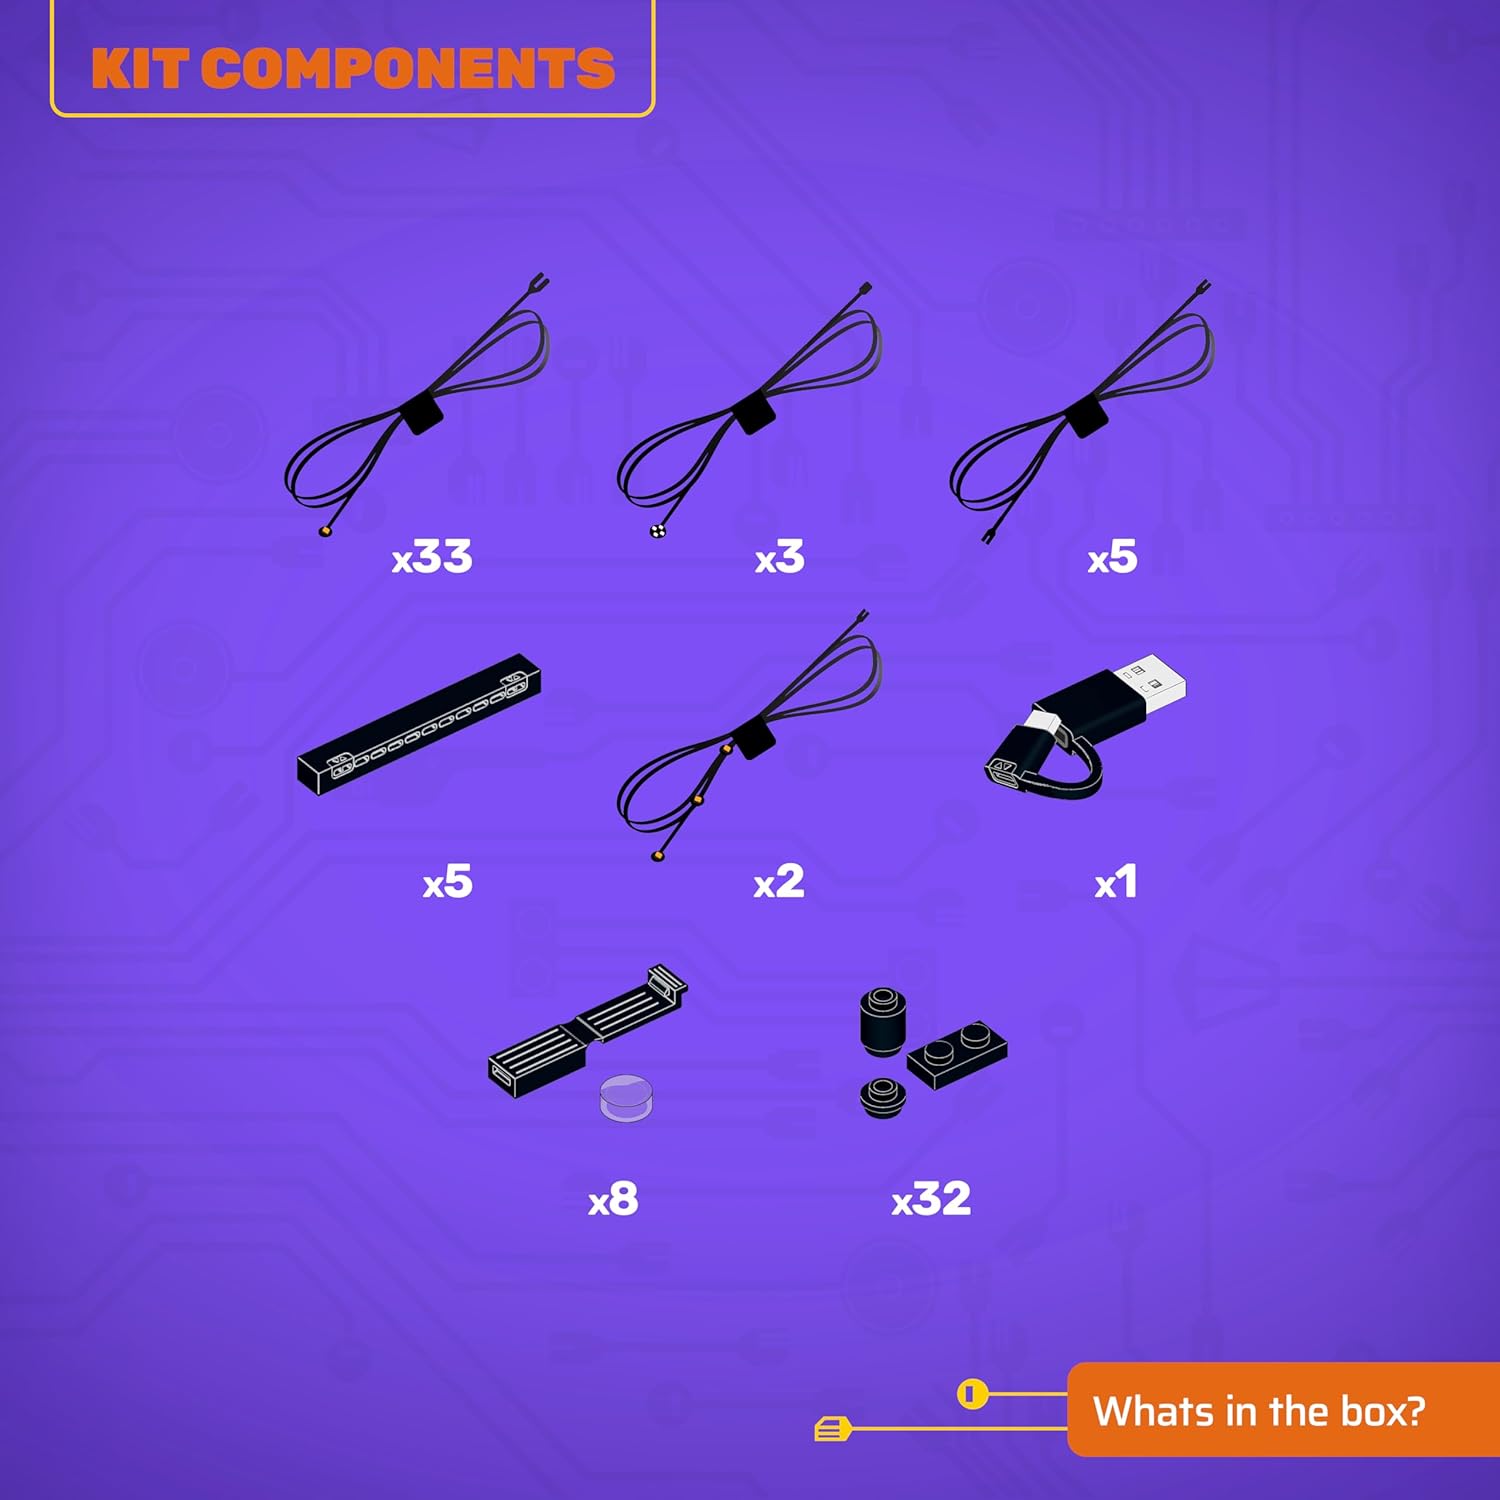
Figure 3.1: Kit Components Overview
4. Tatūnga & Tāuta
This LEGO Light Kit is designed for flexible installation. You can choose to light your LEGO model as you build it, or after the model is fully assembled. For detailed, step-by-step instructions, please refer to the 3D installation guides provided by Light My Bricks.
4.1 Accessing 3D Installation Guides
To access the comprehensive 3D installation guides, scan the QR code located on the side of the product box. These guides are carefully crafted to ensure precise placement of every brick and component, regardless of your chosen building method.
4.2 Hononga Hiko
Once the lighting components are installed according to the 3D guide, connect the Flux Power unit to a compatible USB Power Bank or USB Wall Adaptor. Ensure the power source is stable and provides adequate power for all connected lights.
5. Nga Tohutohu Whakahaere
After successful installation and power connection, your Light My Bricks kit will illuminate your LEGO model. Some kits may include a remote control for adjusting lighting effects, brightness, or turning lights on/off. Refer to your specific kit's instructions for remote control functionality.
Video 5.1: Demonstration of the Light My Bricks kit illuminating the LEGO Diagon Alley model, showcasing various lighting effects and remote control operation.
Video 5.2: Another demonstration of the LED Light Kit for LEGO 76444 Diagon Alley Wizarding Shops, highlighting the vibrant illumination of different sections.
6. Tiaki
Hei whakarite i te roa o te wā me te mahi tino pai o tō kete rama:
- Keep the components clean and free from dust. Use a soft, dry cloth for cleaning.
- Avoid bending or pulling the wires excessively, as this can cause internal damage.
- Store the kit in a cool, dry place when not in use or if disassembled.
7. Te Raru
If you encounter any issues with your light kit, please refer to the following common solutions:
- Nga rama e kore e ka ana:
- Check if the power source (USB Power Bank or Wall Adaptor) is properly connected and functional.
- Ensure all wires are securely plugged into the expansion boards and the Flux Power unit.
- Verify that the power source is providing sufficient power.
- Individual lights not working:
- Inspect the specific light and its connection for any loose or damaged wires.
- Ensure the light is correctly inserted into its designated brick or component.
- Nga rama kapiki:
- Tirohia mo nga hononga korekore.
- Me whakarite kia mau tonu te puna hiko me te kore e taumaha.
Ki te kore ēnei mahi e whakatau i te raruraru, whakapā atu ki te ratonga kiritaki a Light My Bricks mō ētahi atu āwhina.
8. Whakatakotoranga
| Āhuahira | Taipitopito |
|---|---|
| Ingoa Waitohu | Whakamarama aku Pereki |
| Ingoa Tauira | Light Kit Compatible with LEGO Harry Potter Diagon Alley Wizarding Shops #76444 |
| Tau tauira | 2.0-76444 |
| Momo Rawa | Rarama LED |
| Te maha o nga wahi | 89 (lighting components and assorted bricks) |
| Te Ahu o te Tuemi | 5.7 x 4.5 x 2.75 inihi (whakapakoko) |
| Huihuinga e hiahiatia ana | Ae |
| Whakaahuatanga Awhe Age | Adult (Manufacturer Minimum Age: 144 Months) |
| Nga waahanga taapiri | Rarama LED |
9. Whakaaturanga Hua
Explore how the Light My Bricks kit transforms your LEGO Harry Potter Diagon Alley model with these illuminated views.

Figure 9.1: Illuminated Diagon Alley - Wide View

Figure 9.2: Illuminated Diagon Alley - Street Level Detail

Figure 9.3: Illuminated Diagon Alley - Front View

Figure 9.4: Illuminated Diagon Alley - Detailed Front View
10. Raihana me te Tautoko
Light My Bricks products are designed for quality and durability. For information regarding warranty coverage, returns, or technical support, please visit the official Light My Bricks webpaetukutuku, whakapā atu ranei ki ta raatau ratonga kaihoko. Puritia to riiki hoko hei tohu mo te hoko.