1. Kupu Whakataki
This manual provides detailed instructions for the installation, operation, and maintenance of your Kviflon 36-inch Modern Flush Mount Ceiling Fan with Light. This fan features a low-profile design, 5 reversible curved blades, 6 speed settings, 3 CCT dimmable LED lights, and convenient control via remote or smartphone application. Please read this manual thoroughly before installation and use to ensure safe and efficient operation.
2. Nga Korero Haumaru Nui
Me whai i nga wa katoa i nga whakatupatotanga haumaru ina whakauru me te whakahaere i nga taputapu hiko hei whakaiti i te tupono o te ahi, te wiri hiko, me te whara whaiaro.
- Me mohio kua whakawetohia te hiko i te ara iahiko i mua i te whakaurunga, te tiaki ranei.
- Me rite ngā waea katoa ki ngā ture hiko ā-motu me ā-rohe.
- Mena kāore koe i te tino mōhio mō te waea, te tāutanga rānei, whakapā atu ki tētahi tohunga hiko whai tohu.
- Whakamauhia te pā hau ki tētahi kurupae tuanui, ki tētahi hanganga tautoko rānei ka taea te tautoko i te taumaha o te pā hau.
- Kaua e whakahaeretia te powhiriwhiri mena kua pakaru tetahi waahanga.
- Keep hands, hair, and clothing away from moving blades.
3. He aha kei roto i te Pouaka
Manatokona kei te noho nga waahanga katoa i mua i te tiimata o te whakaurunga:
- Fan Motor Huihui
- Te Poari Whakairi
- 5 Matatahi Kaiwhaiwhai
- Lampwhakamarumaru
- Kaiwhiwhi
- Mana Mamao
- Peke Tepara
- Pukapuka Tohutohu
Whakaahua 1: Included components of the Kviflon 36-inch ceiling fan. This image displays the fan body assembly, hanging board, five fan blades, lampshade, receiver, remote control, screw bag, and the instruction manual.
4. Tatūnga me te Tāuta
Follow these steps for proper installation. It is recommended to install the fan blades and light fixtures first, then mount the fan to the ceiling.
- Prepare the Fan Body: Attach the LED light board to the fan motor assembly using the provided screws. Ensure the screws are tightened securely.
- Whakapirihia nga Matatahi Kiritaki: The screws for the blades are pre-installed on the motor. Align each of the 5 fan blades with the designated holes on the motor assembly and secure them.
- Tāuta Lampwhakamarumaru: Me ata whakatakoto te lampshade onto the fan body, twisting or clicking into place as per the design.
- Mount the Hanging Board: Secure the hanging board to the ceiling junction box using appropriate screws. Ensure it is firmly attached to a structural support.
- Hononga Waea: Connect the household wiring to the fan's wiring. Typically, this involves connecting live, neutral, and ground wires. Refer to the wiring diagram in the included instruction manual for specific color codes.
- Whakairihia te Pahi: Carefully lift the fan assembly and hang it onto the safety hook of the ceiling mounting bracket. This allows for hands-free wiring.
- Whakamaua te Pā: Once wiring is complete, align the fan body with the hanging board and secure it with the remaining screws.
- Wall Control Compatibility: This fan is designed for use with conventional wall switches for light on/off control. It is kaore compatible with dimmer switches or fan gear switches.
Ataata 1: Installation steps for the Kviflon 8922 ceiling fan light, demonstrating LED board and blade attachment.

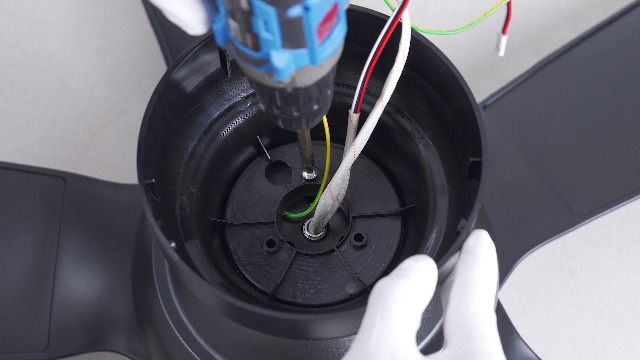
Whakaahua 2: Taipitopito view of the fan's components and wiring connections for installation.

Whakaahua 3: Illustration of wall switch compatibility. The fan works with standard on/off switches but not dimmer or gear switches.
5. Nga Tohutohu Whakahaere
Your Kviflon ceiling fan can be controlled using the included remote control or the dedicated smartphone application.
5.1 Mana Mamao
The remote control allows for easy adjustment of fan speed, light settings, and other functions from anywhere in the room.

Whakaahua 4: Layout of the remote control, detailing buttons for power, light on/off, fan off, 6 speed settings, color temperature adjustment, night light, brightness control, forward/reverse function, 2-hour timer, and code matching.
- Hiko Whakaka/Weto: Pēhia te pātene hiko hei whakakā i te powhiriwhiri me te rama ki runga, whakaweto ranei.
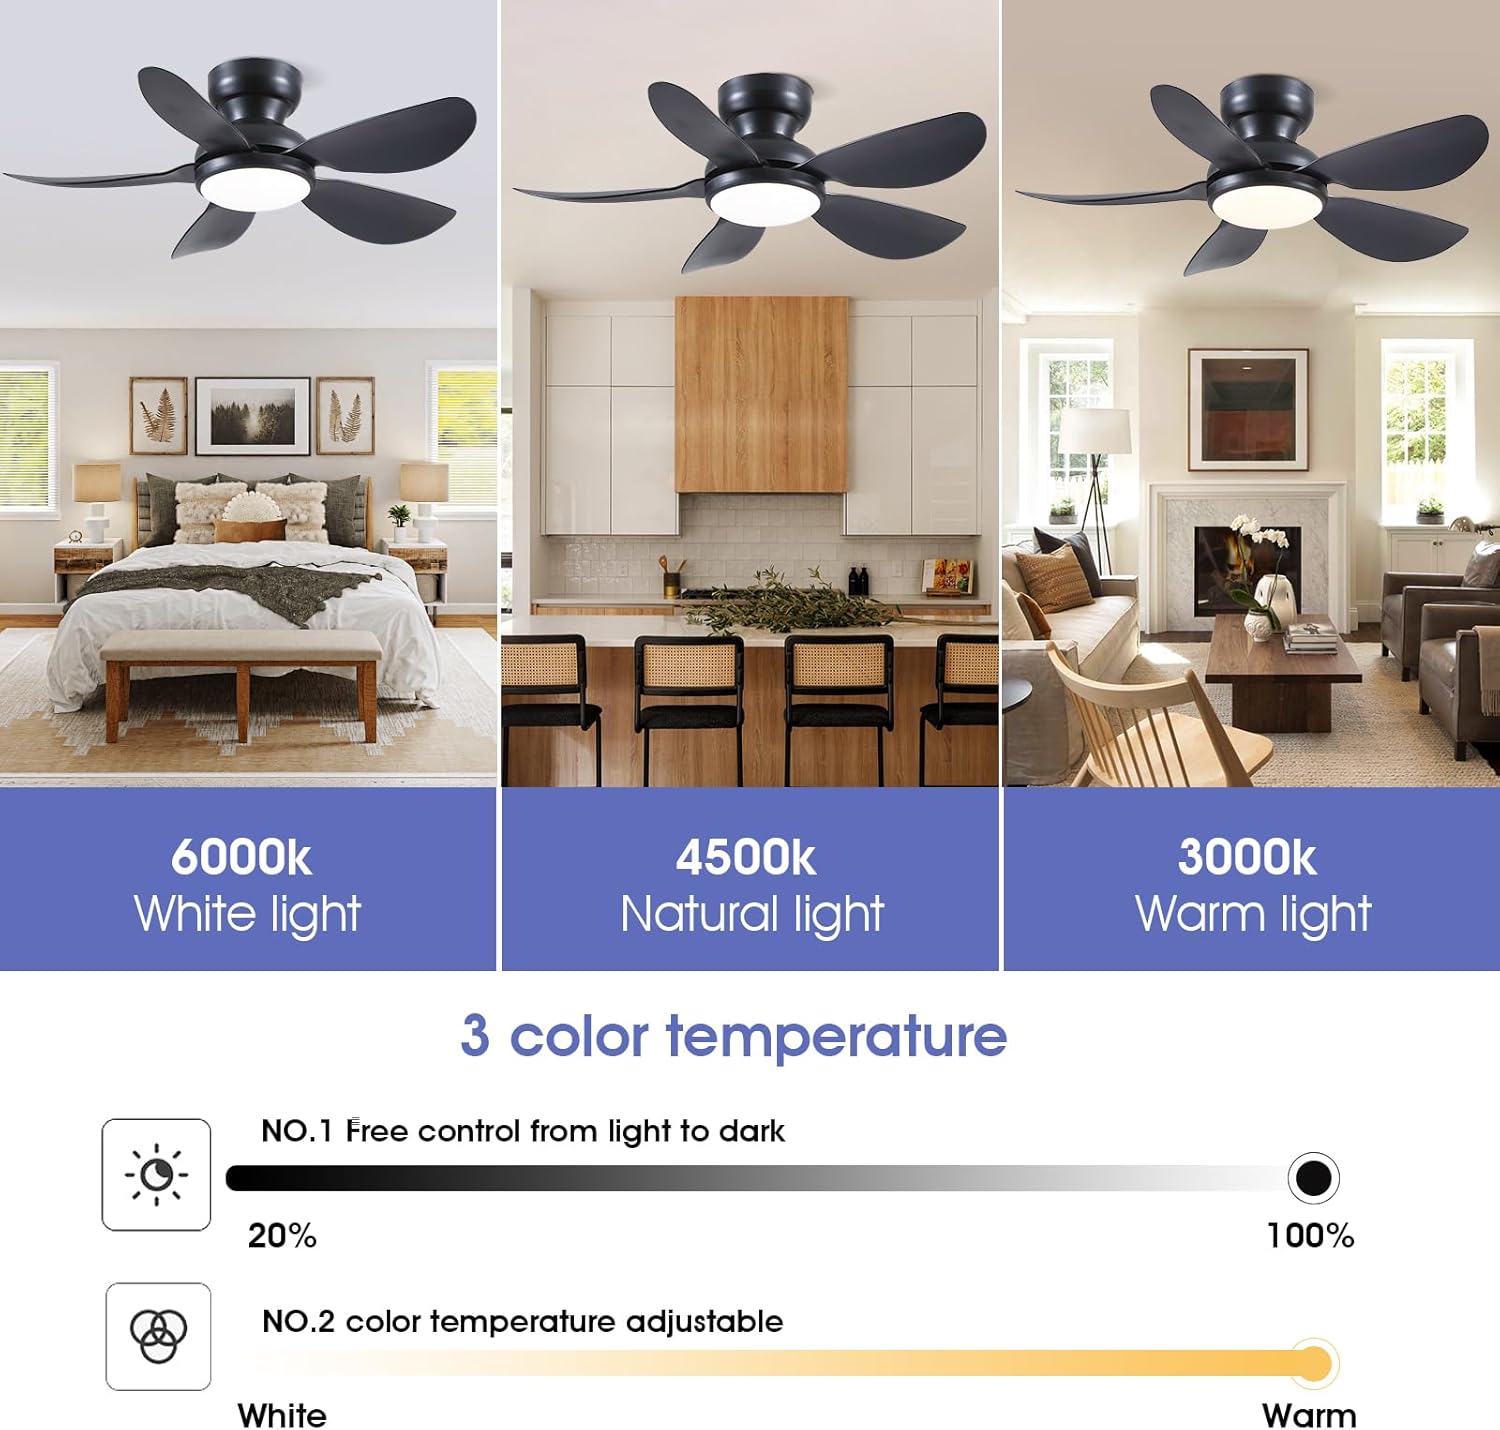
- Mana Maama: Use the light on/off button to toggle the light. Adjust brightness (20%-100%) and color temperature (3000K Warm, 4500K Natural, 6000K White) using the dedicated buttons. A night light mode is also available.
- Tere Kiri: Select from 6 fan speeds using the numbered buttons (1-6). Speed 1-2 is suitable for sleep, 3-4 for leisure, and 5-6 for fitness/strong airflow.
- Mahi Whakamuri: Press the F/R (Forward/Reverse) button to change the direction of the fan blades. This function helps circulate air efficiently in both summer (downward airflow) and winter (upward airflow to redistribute warm air). The fan will stop completely for 5-8 seconds before reversing direction.
- Matawā: Set the fan to turn off automatically after 2 hours using the 2H timer button.

Whakaahua 5: The fan's LED light offers three color temperatures (Warm, Natural, Cool) and adjustable brightness from 20% to 100%.
Whakaahua 6: The fan provides 6 adjustable speeds to suit various activities and comfort levels.

Whakaahua 7: Reversible motor function for year-round comfort, providing downward airflow in summer and upward airflow in winter.
5.2 Mana Taupānga
Control your fan conveniently from your smartphone using the "Fan Lamp Pro" application.
- Tikiake i te Taupānga: Scan the QR code provided in the manual or on the product page to download the "Fan Lamp Pro" app. You can also visit http://www.jasonghost.com/fanlamppro/.
- Whakahohe Nihokikorangi: Whakakāhia te Nihokikorangi i runga i to waea atamai.
- Whakatuwheratia te Taupānga ka Tāpirihia he Pūrere: Open the "Fan Lamp Pro" app, navigate to the main page, and tap the "+" icon to add a new fan lamp.
- Takirua: Turn on the main power to the fan. Within 5 seconds, repeatedly click the connecting button in the app until the fan light blinks twice or beeps, indicating a successful connection.
- Nga Mahi Mana: Once paired, you can control fan speed, light brightness, color temperature, and set timers directly from the app interface.
Ataata 2: Demonstrates the process of connecting and controlling the ceiling fan via the smartphone application.
6. Tiaki
Ko te tiaki i nga wa katoa ka whakarite i te roa me te mahi tino pai o to mea powhiriwhiri tuanui.
- Te horoi: Hei karo i te kino o te mutunga, horoia te powhiriwhiri ki te ngohengohe, damp kakahu. Kaua e whakamahi i nga kai horoi me nga whakarewa.
- Whakapai Mata: Dust the fan blades regularly to prevent dust buildup, which can affect airflow and balance.
- Whakatikia nga Tiu: Periodically check all screws for tightness. Due to the fan's movement, some connections may loosen over time.
- Rama LED: The integrated LED light is designed for long-term use and is not user-replaceable.
7. Te Raru
Mena ka pa ki a koe nga raru me to kaiwhaiwhai, tirohia nga rongoa e whai ake nei:
| Raruraru | Take pea | Rongoā |
|---|---|---|
| Kaore e timata te Fan | No power to the fan; loose wiring; remote/app not paired. | Check circuit breaker. Ensure all wiring connections are secure. Re-pair remote/app following instructions in Section 5. |
| Kaore te marama e mahi | No power to the light; incorrect light setting; remote/app issue. | Check power supply. Verify light is turned on via remote/app. Ensure brightness is not set to minimum. |
| Ka wiri te Fan | Ngā mata wetekina; te whakamau hē; ngā mata kāore i te taurite. | Ensure all blade screws are tight. Verify mounting bracket is securely fastened to the ceiling. Check for bent or damaged blades. |
| Kāore te Mamao/Taupānga e aro mai | Low battery in remote; app not connected; interference. | Replace remote batteries. Re-pair the app with the fan. Ensure no strong interference sources are nearby. |
| Ka haruru te Fan | Loose screws; motor issue; blades hitting an obstruction. | Check all screws for tightness. Ensure no objects are in the path of the blades. If noise persists, contact customer support. |
8. Whakatakotoranga
| Āhuahira | Taipitopito |
|---|---|
| Waitohu | Kviflon |
| Tau tauira | 8922 |
| Hunga Hua | 36"D x 36"W x 9.8"H |
| Hiko Hiko Hoahoa | Te Peera Taapiri |
| Puna Mana | DC |
| Kāhua | Hou |
| Nga waahanga motuhake | App Operable, LED Light, Remote Control, Reversible |
| Momo Whakaeke | Maunga Huruhuru |
| Momo Kaiwhakahaere | Mana Taupānga, Mana Pātene, Mana Mamao |
| Te maha o nga tere | 6 |
| Taumata Haruru | 30 Decibels |
| Wattage | 24 watts |
| Te maha o nga Matatahi | 5 |
| Voltage | 110 Volts |
| Rauemi | Te whakarewa, te Kirihou |
| Rauemi Mata | Kirihou |
9. Nga Korero Whakaputanga
This Kviflon ceiling fan comes with a 1-tau iti pūtāhui from the date of purchase. This warranty covers manufacturing defects in materials and workmanship under normal use. It does not cover damage resulting from improper installation, accident, misuse, abuse, or unauthorized modifications. Please retain your proof of purchase for warranty claims.
10. Tautoko Kiritaki
For further assistance, technical support, or warranty inquiries, please contact Kviflon customer service:
- Īmēra: support@kviflon.com
- Webpae: Tirohia te Kviflon Store on Amazon mō ngā FAQ me ngā rauemi tāpiri.