Kupu Whakataki
This manual provides detailed instructions for the setup, operation, and maintenance of your Prechen 10.1 inch Portable Touchscreen Monitor, Model HD-101. Please read this manual thoroughly before using the device to ensure proper functionality and to prevent damage.
Nga waahanga hua
- Portable Touchscreen: This 10.1-inch monitor is compact and lightweight, designed for portability. The touchscreen functionality allows for intuitive navigation and interaction, enhancing productivity on the go.
- High-Resolution IPS Display: Features a 1920x1200 resolution with a 16:10 aspect ratio, delivering clear and vibrant visuals. IPS technology provides wide viewing angles and accurate color reproduction, suitable for various applications.
- Hononga maha: Equipped with HDMI and USB-C ports, offering flexible connection options. It can be easily connected to Windows PCs, laptops, and gaming consoles like Xbox. Note: USB-C is for touch functionality and power.
- Kaikōrero whakauru: Built-in speakers provide clear and dynamic audio, eliminating the need for external speakers during media consumption, gaming, or virtual meetings.
- VESA Maunga Hototahi: The monitor supports VESA mounting standards, allowing for attachment to compatible stands or arms for customized workspace setups and comfortable viewnga koki.
Tatūnga
Ihirangi mokete
Manatokona kei roto katoa nga mea kei roto i te kete:
- Prechen 10.1 inch Portable Touchscreen Monitor
- Tauera HDMI
- USB-C ki USB-C Cable
- USB-A to USB-C Cable (for power/touch)
- Pūurutau Hiko
- Pukapuka Kaiwhakamahi (tenei tuhinga)
Te hono i te Aroturuki
- Hononga Hiko: Connect the provided power adapter to the DC Power Port on the monitor and plug it into a power outlet. Alternatively, if your device supports power delivery, connect a USB-C to USB-C cable to the USB-C (Power & Touch) port for both power and signal.
- Hononga Ataata:
- HDMI: Connect one end of the HDMI cable to the HDMI port on the monitor and the other end to the HDMI output of your computer or device.
- USB-C (DisplayPort Alternate Mode): If your device supports DisplayPort Alternate Mode over USB-C, connect a USB-C to USB-C cable to the USB-C (Power & Touch) port on the monitor and your device. This single cable can provide video, power, and touch functionality.
- Taumahinga Pa: For touch functionality, ensure the USB-C (Power & Touch) port is connected to your device. If using HDMI for video, you will also need to connect a USB-A to USB-C cable from your device's USB-A port to the monitor's USB-C (Power & Touch) port.
- Putanga Ororongo: If you wish to use external headphones or speakers, connect them to the 3.5mm Audio Port on the monitor.
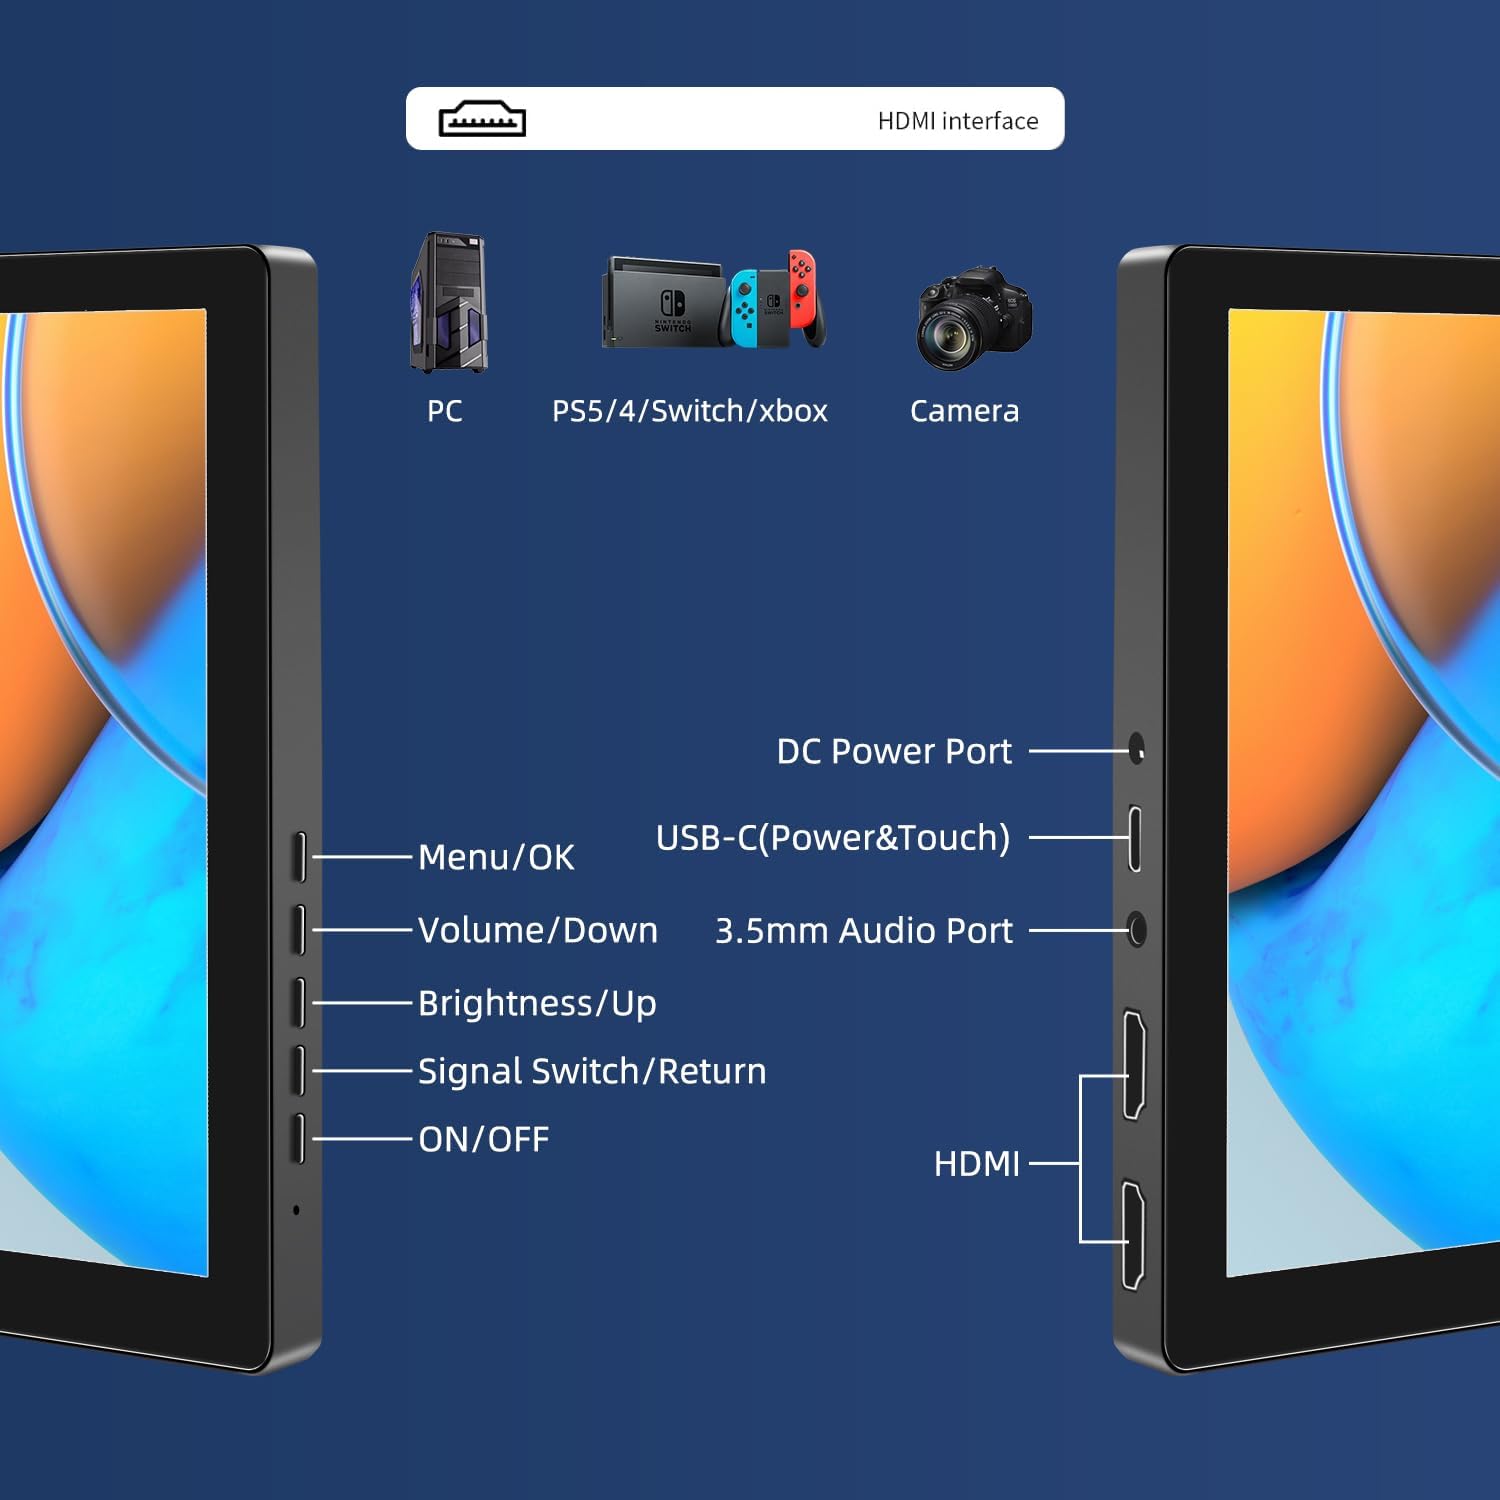
Whakaahua: Ka mutuview of the monitor's ports including DC Power, USB-C (Power & Touch), 3.5mm Audio, HDMI, and control buttons.
Nga Tohutohu Whakahaere
Te Hia/Weto
- To power on the monitor, press the ON/OFF pātene.
- Ki te whakaweto, patohia kia mau te ON/OFF button for a few seconds until the screen turns off.
Ma te whakamahi i te Tahua Whakaaturanga-Mata (OSD)
The OSD menu allows you to adjust various display settings.
- Pehia te Tahua / OK pātene hei whakatuwhera i te tahua OSD.
- Whakamahia te Volume / Raro a Tiaho / Runga ngā pātene hei whakatere i ngā kōwhiringa tahua.
- Perehi Tahua / OK hei tīpako i tētahi kōwhiringa, hei whakaū rānei i tētahi tautuhinga.
- Pehia te Signal Switch/Return button to go back to the previous menu or exit the OSD.
Adjusting Display Modes
The monitor supports multiple display modes when connected to a computer:
- Aratau Tārite: Displays the same content on both your primary screen and the portable monitor.
- Aratau Whakaroa: Extends your desktop across both screens, providing more workspace.
- Aratau Mata Tuarua: Ka whakamahia anake te mata kawe hei whakaaturanga.
These modes are typically configured through your operating system's display settings (e.g., Windows Display Settings, macOS System Preferences).
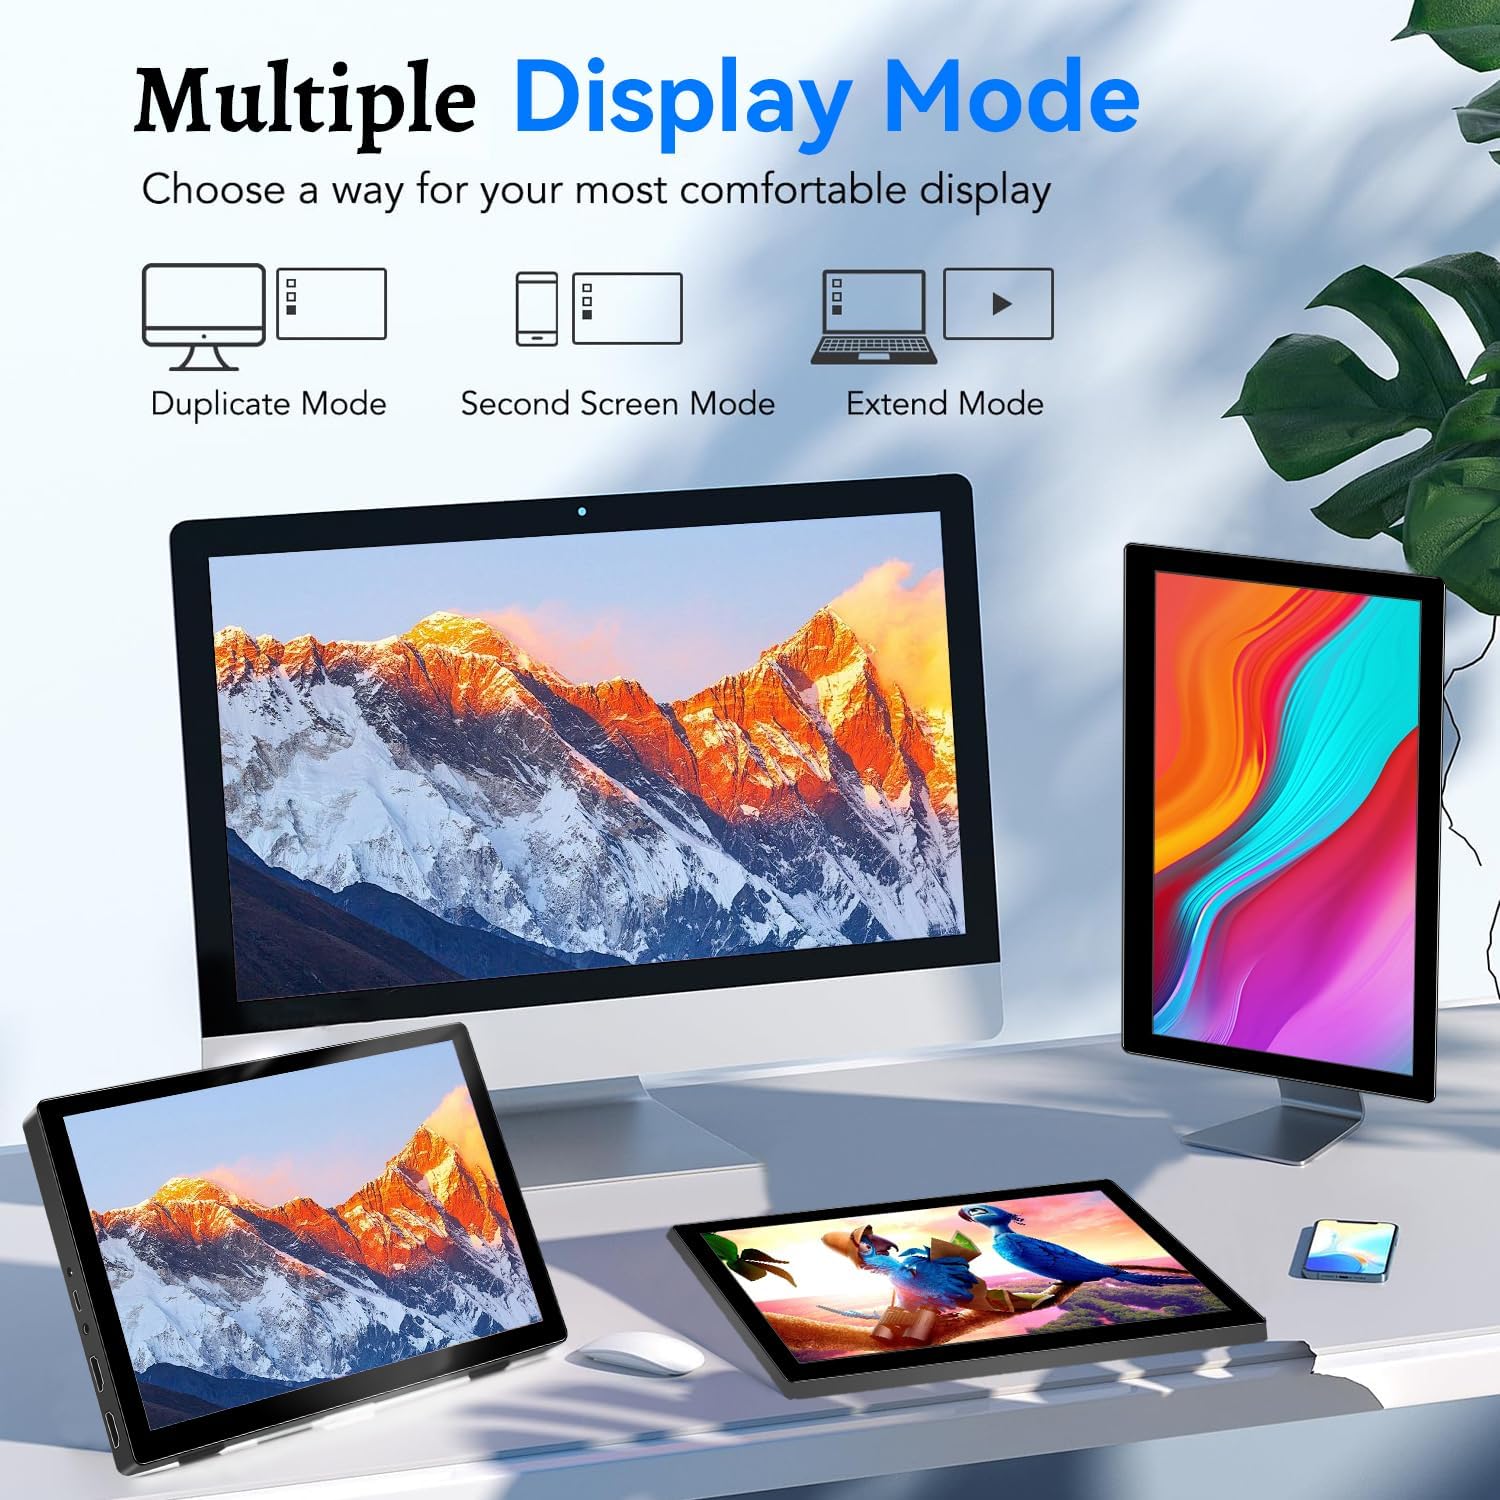
Image: Visual representation of Duplicate, Second Screen, and Extend display modes.
Using Touchscreen Functionality
The monitor supports 10-point touchscreen technology. Ensure the USB-C (Power & Touch) port is correctly connected to your device for touch input to function.

Whakaahua: Examples of 10-point touchscreen gestures for interaction.
Te tiaki
- Te horoi i te Mata: Whakamahia he kakahu ngohengohe, karekau he ngongo paku dampened with water or a non-abrasive screen cleaner. Do not spray cleaner directly onto the screen.
- Te horoi i te Casing: Ūkuia te aroturuki casinHoroia ki te kakahu ngohengohe, maroke. Kaua e whakamahi i ngā hopi horoi kaha, i ngā whakarewa rānei.
- Rokiroki: Mena kāore e whakamahia ana, rongoatia te matao ki te wāhi hauhautanga, maroke, kia matara atu i te rā tika me te pāmahana tino kino.
- Te whakahaere: Avoid dropping or subjecting the monitor to strong impacts. Do not place heavy objects on top of the monitor.
Raparongoā
| Raruraru | Take pea | Rongoā |
|---|---|---|
| Karekau he mata whakaatu/pango |
|
|
| Karekau te mata pa e whakautu |
|
|
| Kaore he ororongo mai i nga kaikorero |
|
|
| Image quality issues (blurry, distorted) |
|
|
Whakatakotoranga
| Āhuahira | Taipitopito |
|---|---|
| Waitohu | Prechen |
| Tau tauira | HD-101 |
| Rahi Mata | 10.1 inihi |
| Whakatau | 1920 x 1200 (UXGA Wide) |
| Aspect Ratio | 16:10 |
| Momo Paewhiri | IPS |
| Rere tāmata | 60 Hz |
| Wā Whakautu | 1 ms |
| Hononga | 1x HDMI, 1x USB-C (Power & Touch), 1x 3.5mm Audio Jack, 1x DC Power Port |
| Ahu (L x W x H) | 21.8 x 15.8 x 1.4 cm |
| Taumaha | 990 karamu |
| Kaihanga | Shenzhen Kenowa Electronics Co., LTD |
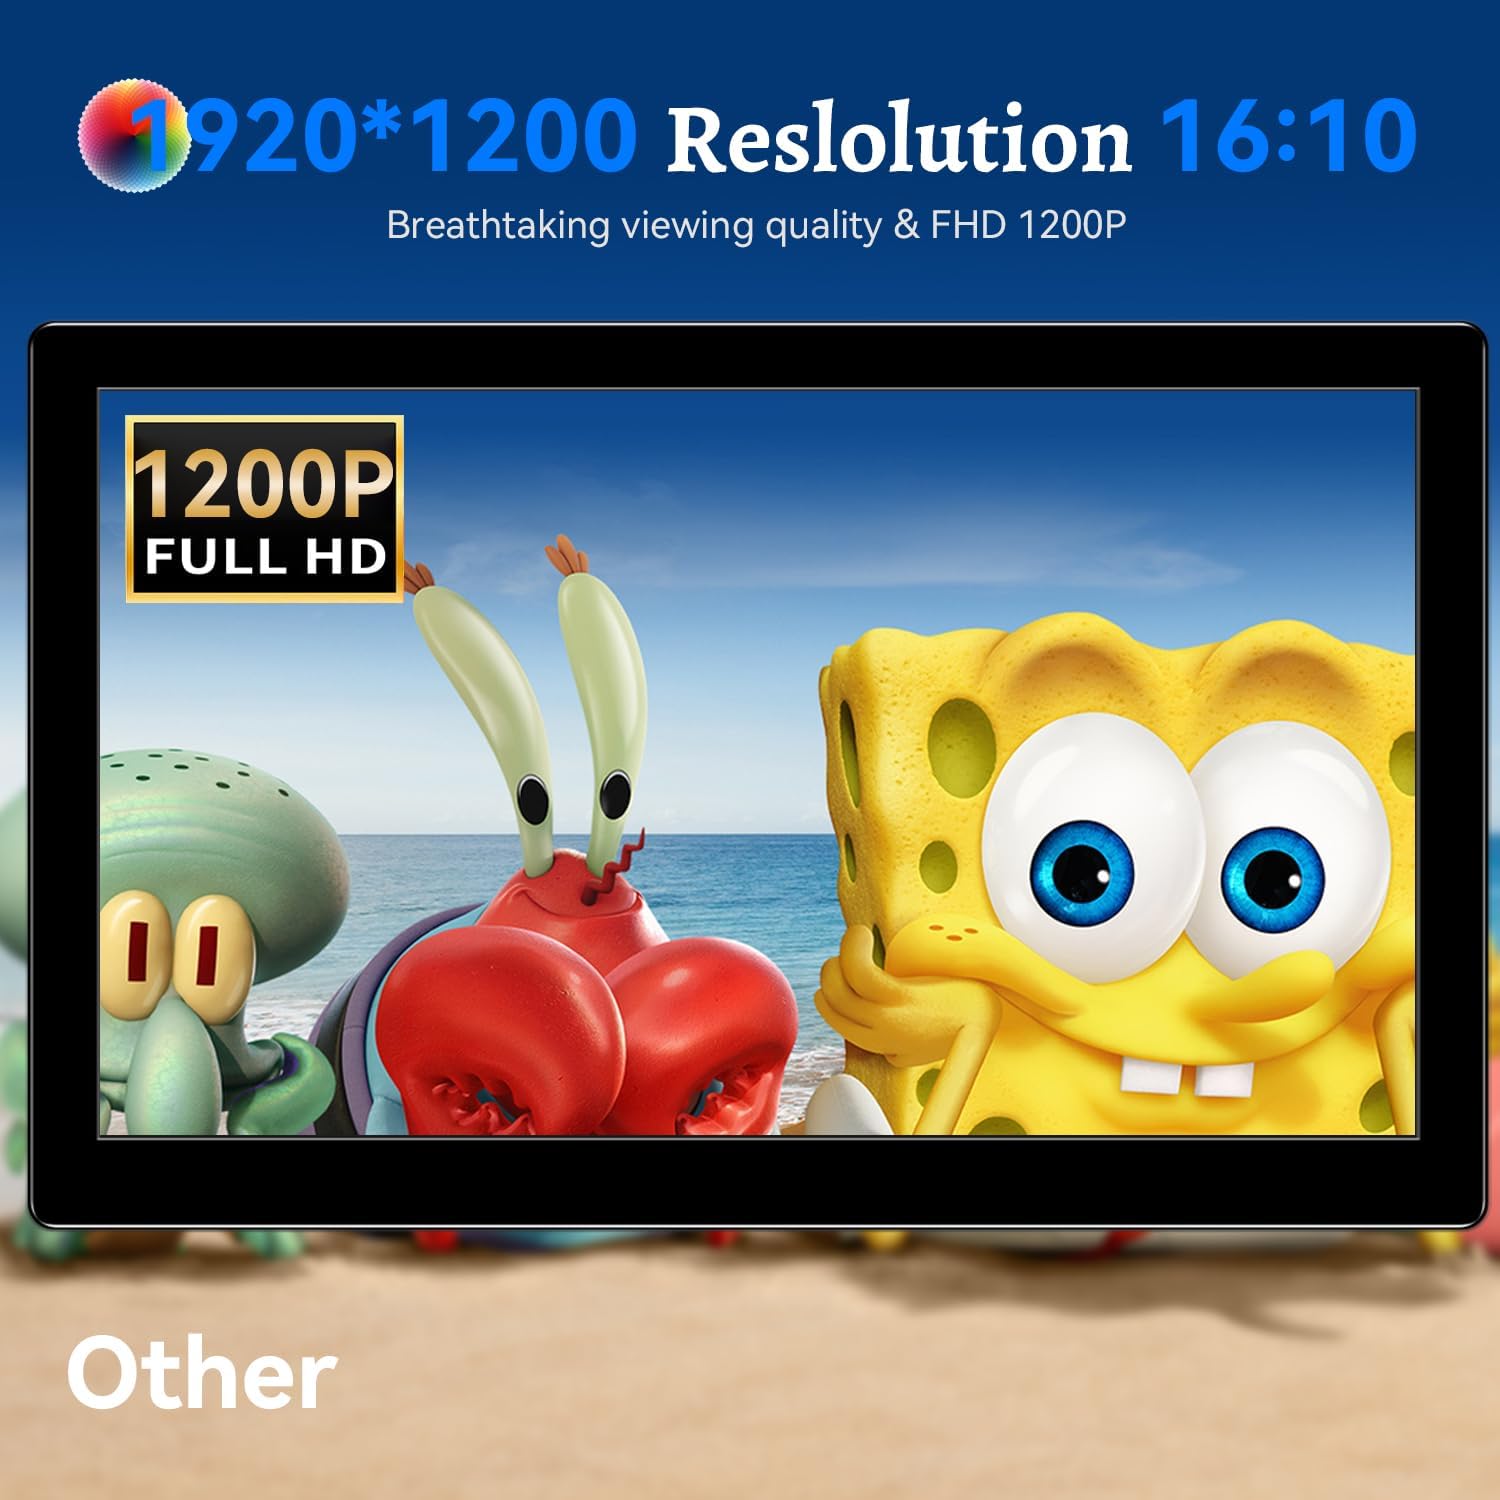
Whakaahua: Ko te whakaaturanga aroturukicasing its 1920x1200 Full HD resolution.

Image: The monitor's IPS panel offering wide viewing angles and rich colors.
Pūtāhui me te Tautoko
For warranty information and technical support, please refer to the warranty card included with your product or contact Prechen customer service through their official website. Please have your model number (HD-101) and purchase details ready when contacting support.