Artillery Sidewinder X3 Plus
Artillery Sidewinder X3 Plus 3D Printer Manual Kaiwhakamahi
Model: Sidewinder X3 Plus
1. Kupu Whakataki
This manual provides essential information for the safe and efficient operation of your Artillery Sidewinder X3 Plus 3D Printer. Please read this manual thoroughly before operating the printer and keep it for future reference.

Figure 1.1: Artillery Sidewinder X3 Plus 3D Printer Overview
The Artillery Sidewinder X3 Plus is a high-speed FDM 3D printer designed for both beginners and experienced users, featuring a large build volume and advanced functionalities.
Whakatupato Haumaru
- Whakahaerehia te pūreretā i ngā wā katoa i te wāhi whai hā pai.
- Do not touch the hot nozzle or heated bed during operation.
- Keep children and pets away from the printer while it is in use.
- Ensure the power supply is stable and correctly connected.
- Wewetehia te taputapu i mua i te mahi tiaki, horoi ranei.
2. Ihirangi mokete
Manatokohia kei te noho nga waahanga katoa i roto i te kete:
- Artillery Sidewinder X3 Plus 3D Printer
- 4.3-inch full-color touch screen
- Waea Hiko
- Tool Kit (e.g., wrenches, screwdrivers, spare nozzle)
- Tauira USB
- SD Card / USB Drive with sample models and software
- Filament Sample
3. Aratohu Tatūnga
3.1 Huihuinga
The Artillery Sidewinder X3 Plus comes largely pre-assembled. Follow these steps to complete the setup:

Figure 3.1: Simplified Assembly Steps
The image illustrates the main assembly steps: 1. Attach the gantry to the base. 2. Secure the gantry. 3. Install the diagonal tie rods for stability. 4. Mount the filament holder. 5. Connect the touchscreen. 6. Connect the power cable.
- Carefully remove the printer and all components from the packaging.
- Attach the gantry (upper frame) to the base unit using the provided screws.
- Connect the necessary cables between the gantry and the base, ensuring secure connections.
- Install the diagonal tie rods to enhance structural stability during printing.
- Mount the filament holder at the designated position.
- Connect the 4.3-inch full-color touchscreen to the printer.
- Ensure all screws are tightened and cables are properly routed and secured.
3.2 Initial Power-On and Interface
Once assembled, connect the power cable and turn on the printer. The 4.3-inch full-color touchscreen provides an intuitive interface for all printer functions.
3.3 Te Whakataurite Moenga Aunoa
The Sidewinder X3 Plus features a 7x7 (49-point) automatic bed leveling system for precise first layer adhesion.

Figure 3.2: Smart Auto Leveling System
The printer uses a 49-point advanced virtual heightmap calculation to ensure accuracy across the entire print bed, simplifying the leveling process for users.
- Navigate to the "Leveling" or "Auto-Level" option on the touchscreen.
- Initiate the automatic leveling process. The printer will probe multiple points on the print bed to create a mesh.
- Once completed, the printer is ready for printing. Minor Z-offset adjustments may be required for optimal first layer quality.
4. Nga Tohutohu Whakahaere
4.1 Uta kakawaea
The printer is equipped with a Dual Gear Direct Drive Extruder for powerful and stable filament propulsion.

Figure 4.1: Dual-Gear Direct Extruder Mechanism
This extruder design ensures consistent and precise filament feeding, leading to smoother model surfaces and reliable printing.
- Whakatakotoria te pōkai miro ki runga i te pupuri miro.
- Preheat the nozzle to the recommended temperature for your filament type (e.g., PLA: 200°C, ABS: 240°C).
- Insert the filament into the extruder's intake hole until it is gripped by the gears.
- On the touchscreen, select the "Load Filament" option. The extruder will pull the filament through until it exits the nozzle.
- Once filament flows smoothly from the nozzle, loading is complete.
4.2 Timata i te Taa
The Sidewinder X3 Plus supports high-speed printing up to 300mm/s.

Figure 4.2: High-Speed Printing Capability
Achieve faster print times with the printer's optimized drivetrain and acceleration capabilities, significantly reducing project completion time.
- Prepare your 3D model using a compatible slicing software (e.g., Cura, PrusaSlicer) and save it as a G-code file to a USB drive or SD card.
- Insert the USB drive/SD card into the printer's designated slot.
- On the touchscreen, navigate to "Print" and select your desired G-code file.
- Confirm print settings and start the print. The printer will automatically preheat and begin printing.
4.3 Nozzle Auto-Cleaning
The printer features an auto-cleaning nozzle that supports printing up to 300°C, compatible with various filaments including PLA, TPU, PETG, ABS, and Nylon.
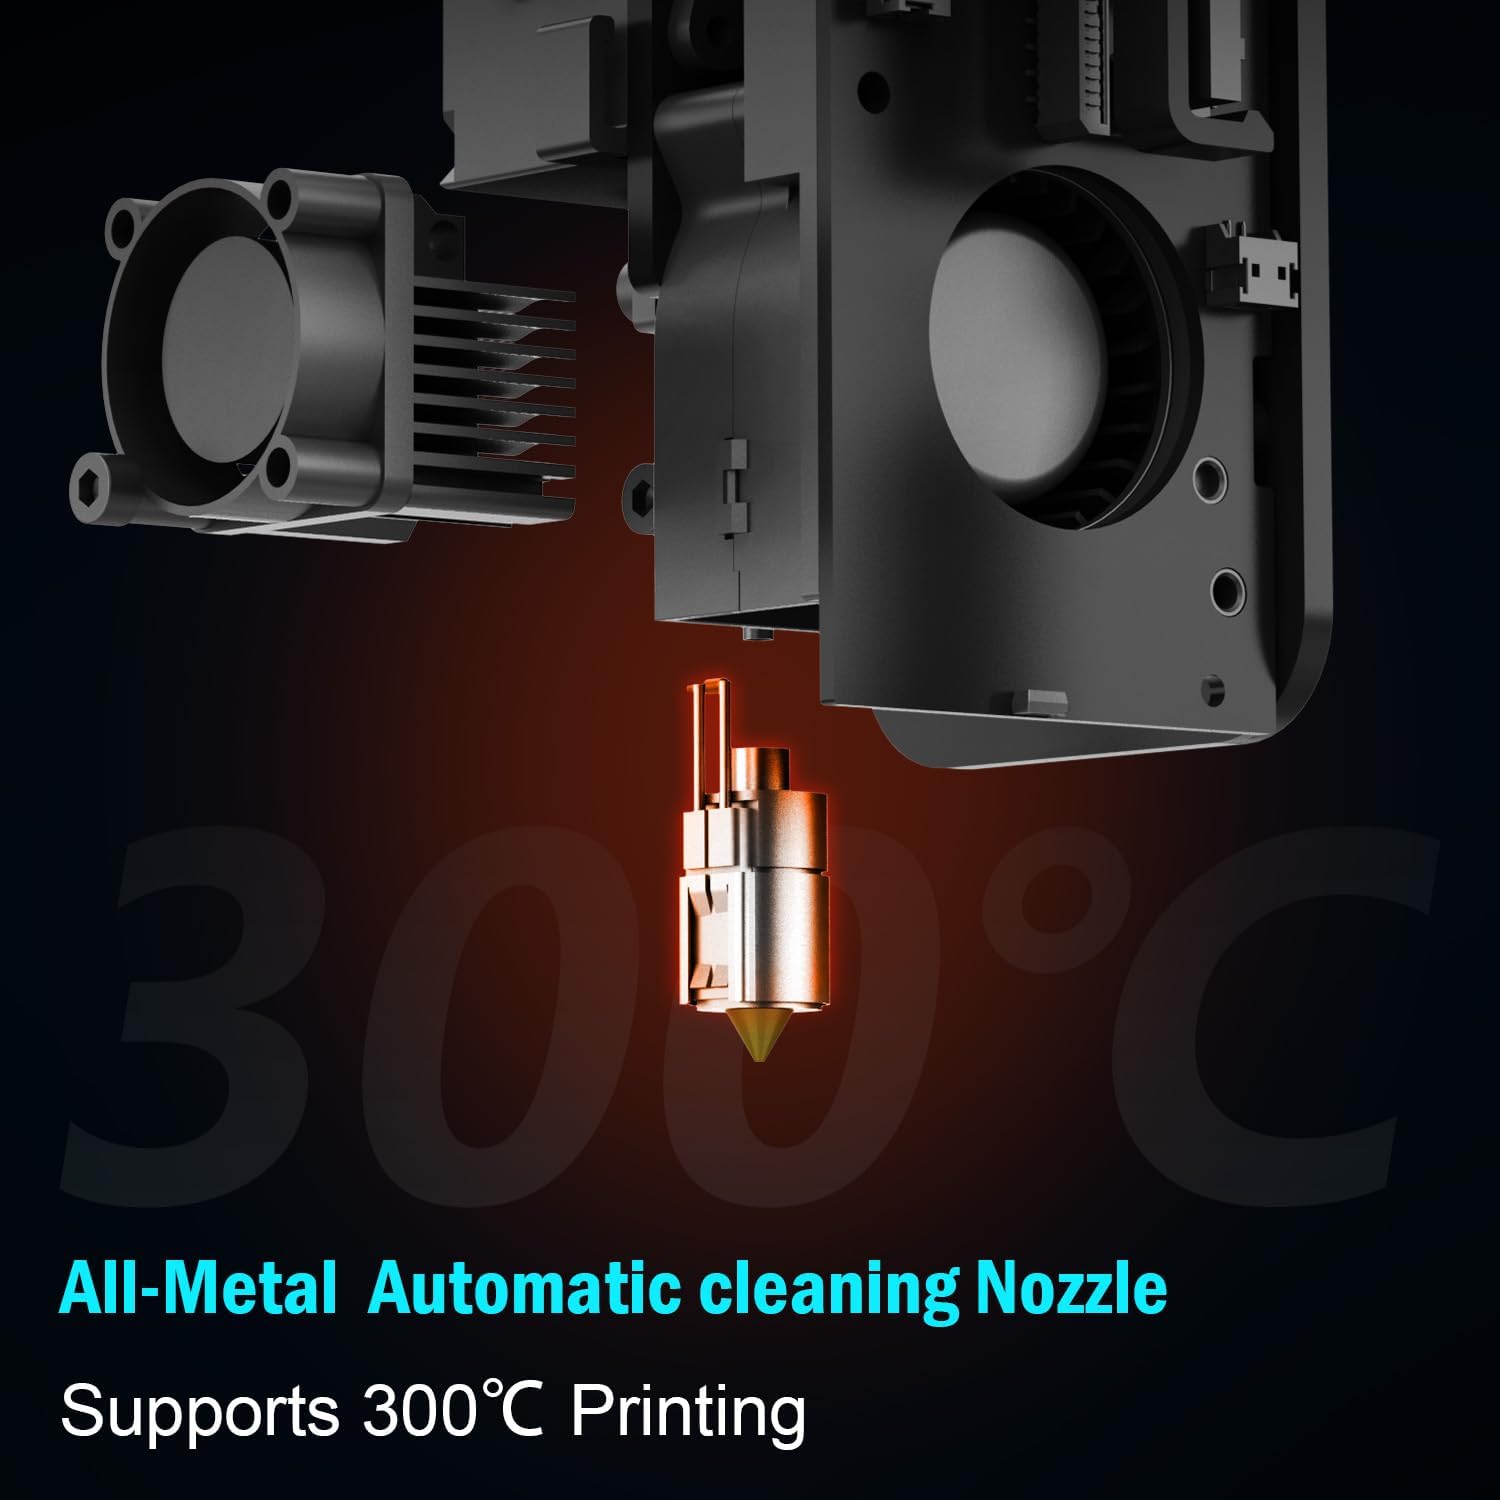
Figure 4.3: High-Temperature Auto-Cleaning Nozzle
The all-metal nozzle can reach temperatures up to 300°C, allowing for a wider range of filament materials. Its auto-cleaning function minimizes manual intervention.
The nozzle auto-cleaning function is integrated into the printer's startup routine or can be initiated manually via the touchscreen. This helps maintain optimal print quality by removing residual filament.
5. Tiaki
5.1 Tiakitanga Whanui
- Keep the printer clean and free of dust and filament debris. Use a soft brush or compressed air.
- Regularly check all screws and connections for tightness.
- Ensure the printer is placed on a stable, level surface. The metal diagonal tie rods contribute to stable printing by minimizing vibration.
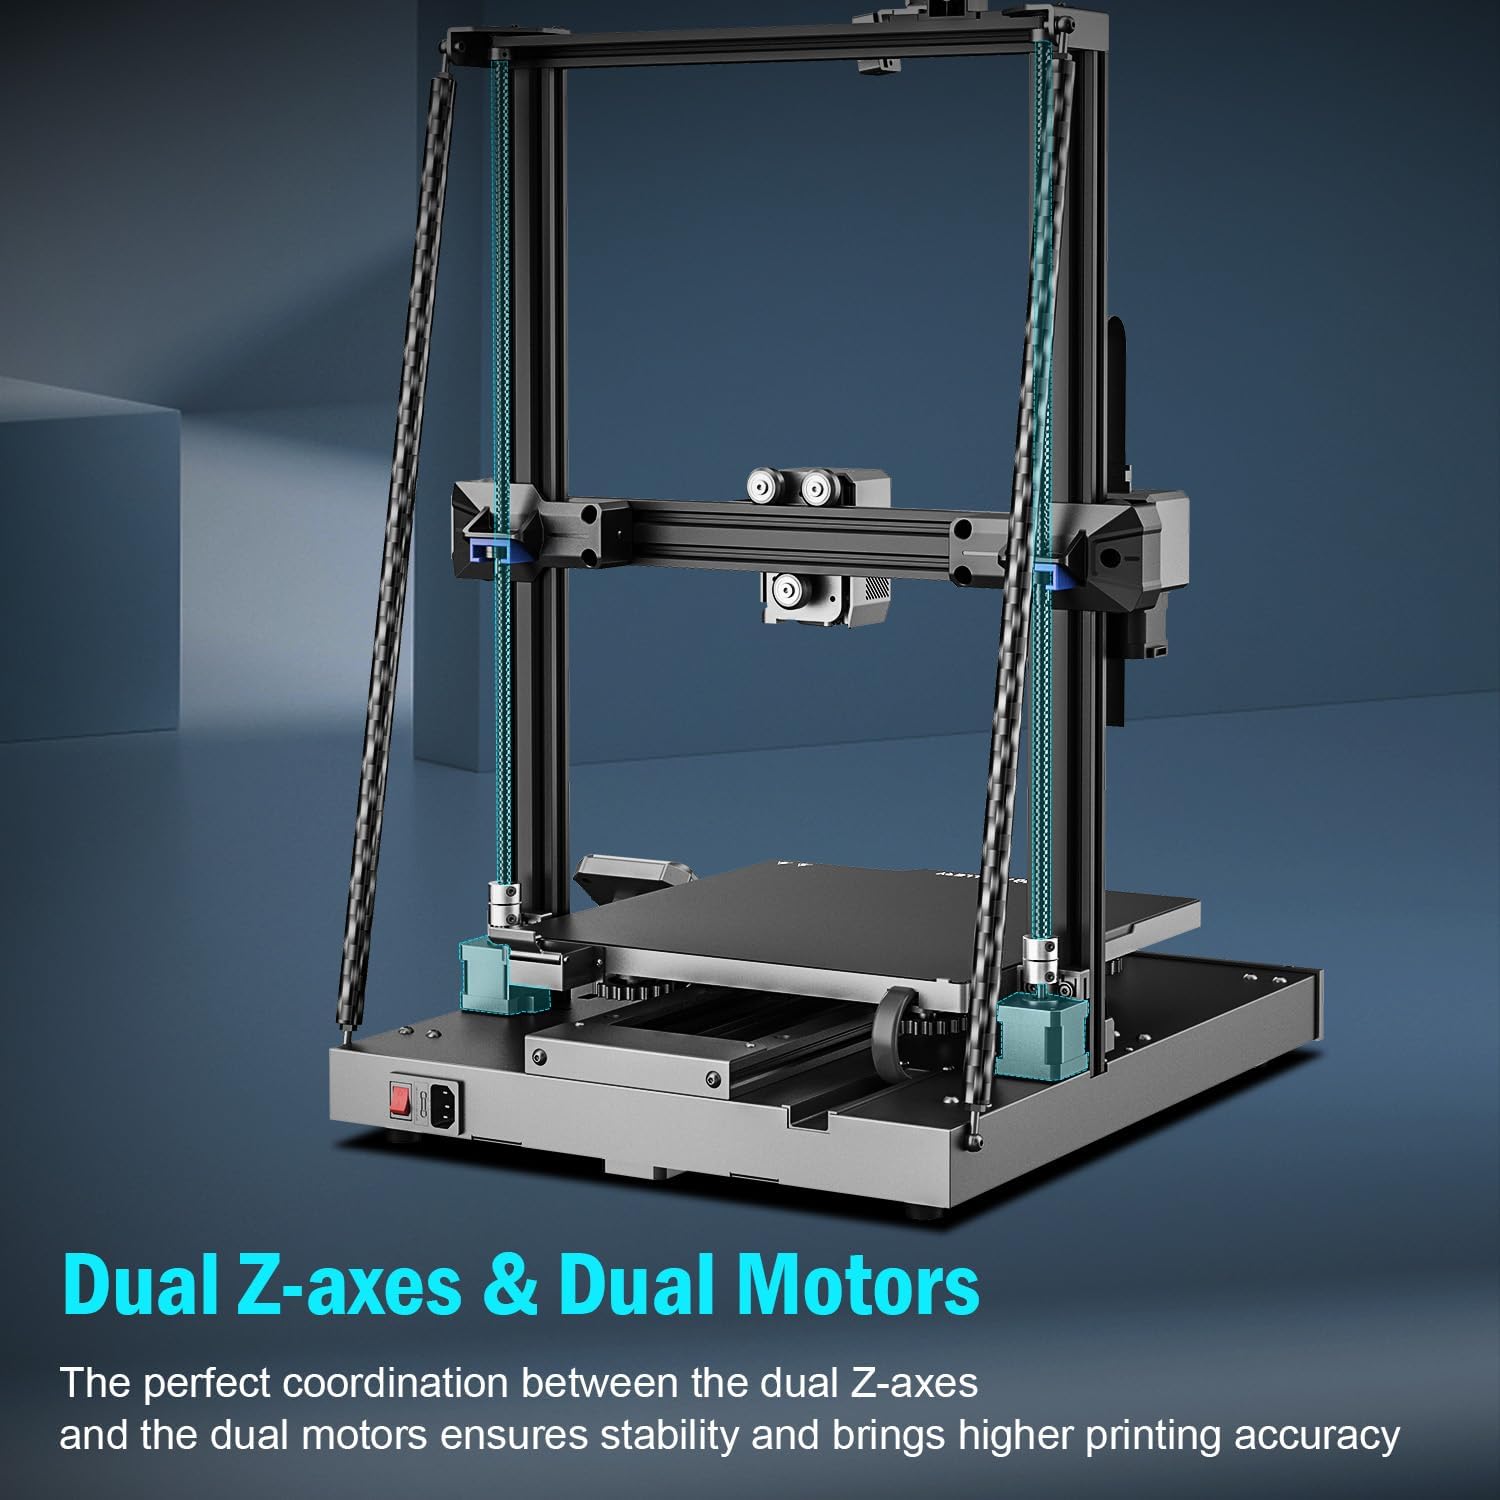
Figure 5.1: Dual Z-axes and Dual Motors for Stability
The dual Z-axes and dual motors work in coordination to ensure stability and higher printing accuracy, reducing the need for frequent adjustments.
5.2 Print Platform Care
The PEI magnetic platform makes model removal easier.

Figure 5.2: Flexible PEI Magnetic Build Plate
The flexible PEI magnetic build plate allows for easy removal of printed models by simply bending the plate after it cools down.
- Clean the print surface with isopropyl alcohol before each print to ensure good adhesion.
- Avoid scratching the PEI surface with sharp tools.
- Allow the print bed to cool down before removing prints to prevent damage to the print or the surface.
5.3 Tiaki Tangata me te Puha
- Periodically check the extruder gears for filament residue and clean as needed.
- If the nozzle becomes clogged, use the provided needle or a cold pull method to clear it. Refer to online resources for detailed instructions on cold pull.
- Ensure the hotend fan is clear of obstructions to prevent heat creep.
6. Te Raru
Ko tenei waahanga e aro ana ki nga take noa ka pa ki a koe i te wa e mahi ana.
| Raruraru | Take pea | Rongoā |
|---|---|---|
| Kakawaea e kore e puta | Pūwero puru, miro whiri, pāmahana hē. | Clean nozzle, untangle filament, verify temperature settings. |
| He kino te whakapiri paparanga tuatahi | Bed not level, dirty print surface, incorrect Z-offset. | Perform auto-leveling, clean print surface, adjust Z-offset. |
| Prints detaching from bed | Insufficient bed temperature, cooling too fast, poor adhesion. | Increase bed temperature, reduce cooling for first layers, ensure clean bed. |
| Te nuku apa | Loose belts, motor issues, excessive print speed. | Check and tighten belts, reduce print speed. |
| He haruru rerekē kei te whakaputa pūreretā | Loose components, fan issues, motor grinding. | Inspect for loose parts, check fans, contact support if motor noise persists. |
For more detailed troubleshooting, refer to the official Artillery support resources or community forums.
7. Whakatakotoranga

Figure 7.1: Large Build Volume
The generous build volume of 11.8 x 11.8 x 15.7 inches provides ample space for larger prints and batch production.

Figure 7.2: Overall Product Dimensions
The physical dimensions of the printer are 20 inches deep, 20 inches wide, and 26 inches high.
| Waitohu | Te mau pū |
| Tauira | Sidewinder X3 Plus |
| Hanga Rōrahi | 11.8 x 11.8 x 15.7 inihi (300 x 300 x 400 mm) |
| Hunga Hua | 20 x 20 x 26 inihi |
| Taumaha Tūemi | 36.5 pauna |
| Rauemi | ABS, Whakarewa |
| Te Mahana Nozzle Max | 300°C |
| Tere Tā Max | 300 mm/s |
| Momo Extruder | Dual Gear Direct Drive Extruder |
| Taumata Moenga | 7x7 (49-point) Automatic Bed Leveling |
| Kawau Hototahi | PLA, TPU, PETG, ABS, Nylon |
| Whakaatu | 4.3-inihi Mata Paa Tae Katoa |
8. Pūtāhui me te Tautoko
For warranty information, technical support, and service inquiries, please visit the official Artillery webpaetukutuku, whakapā atu ranei ki ta raatau tari ratonga kaihoko. Puritia to riirii hoko hei tohu mo te hoko mo nga kereme whakamana.
Official Artillery Store: Artillery Store on Amazon
Ask a question about this manual
Ask about setup, troubleshooting, compatibility, parts, safety, or missing instructions. Manuals+ will review the question and use this page’s manual context to help answer it.