1. Nga Korero Haumaru Nui
Tena koa panuihia nga tohutohu katoa i mua i te huihuinga me te whakamahi. Puritia tenei pukapuka hei tohutoro a meake nei.
- Raukaha Taumaha: Do not exceed the maximum weight capacity of 200 pounds (90.7 kg) for the TV stand. Overloading can cause instability and potential injury.
- Huihuinga: Assemble the unit on a soft, clean surface to prevent scratches. Ensure all parts are securely fastened before use.
- Pūmautanga: For added safety, consider anchoring the TV stand to a wall, especially if children or pets are present. Wall anchoring hardware may not be included.
- Electrical Safety (LED Lights): Ensure the LED light strip is installed and connected according to instructions. Do not expose electrical components to water or excessive moisture.
- Tamariki: Puritia nga waahanga iti me nga taonga kapi mai i nga tamariki i te wa e huihui ana.
2. Ihirangi mokete
Manatokohia kei te noho nga waahanga katoa i mua i te tiimata o te huihuinga. Mena kei te ngaro, kua pakaru ranei etahi waahanga, tena koa whakapiri atu ki te tautoko a nga kaihoko.
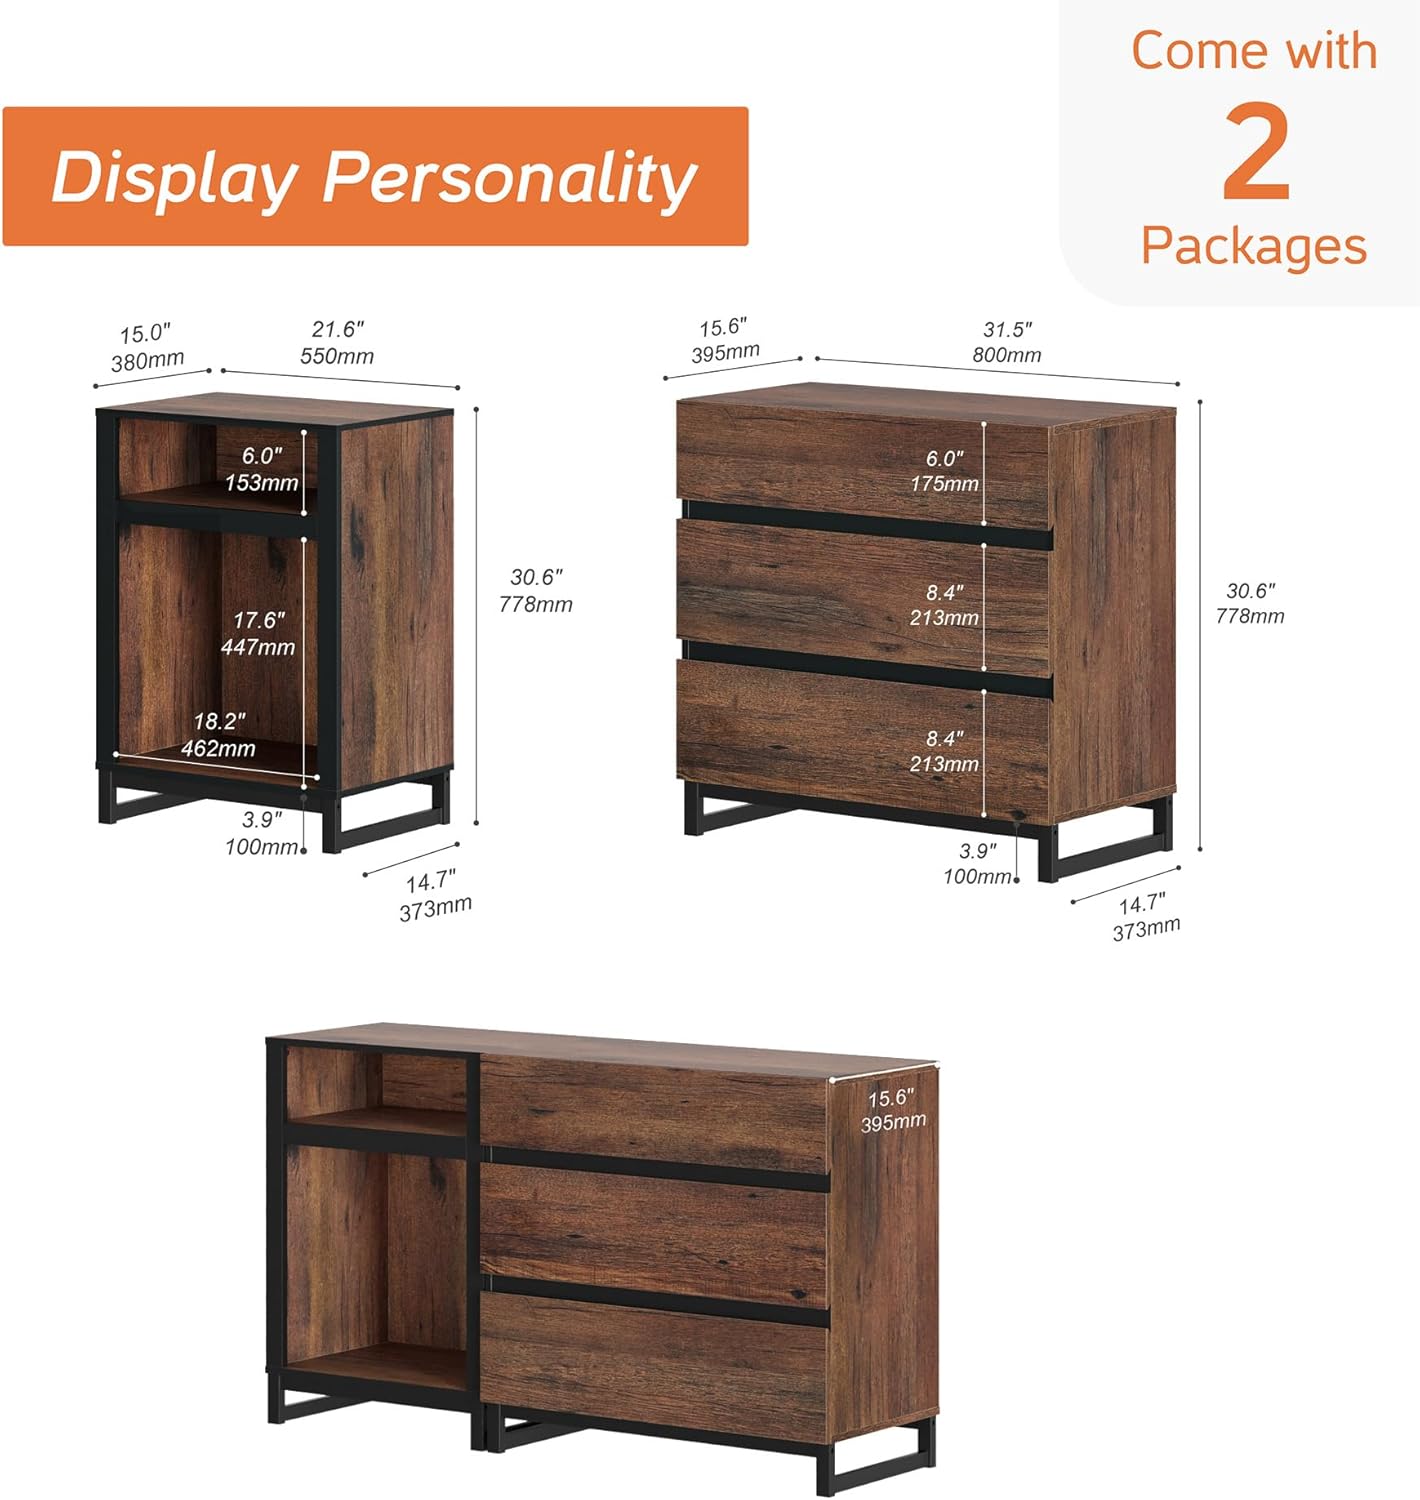
Image: Detailed diagram illustrating the dimensions of the individual components of the TV stand, including the open shelving unit and the three-drawer cabinet. This helps in identifying parts and understanding the overall structure.
2.1 Parts List (Example - refer to actual manual for full list)
- Main Top Panel
- Ngā Paewhiri Taha (Mauī, Matau)
- Paewhiri Raro
- Panui Hoki
- Drawer Fronts, Sides, and Backs
- Raro Kaituku
- Metal Legs/Base
- Tiri Maama LED
- Hardware Pack (Screws, Dowels, Cam Locks, Drawer Slides, etc.)
2.2 Hardware List (Example - refer to actual manual for full list)
- Nga Kameera
- Nga Raka Kameera
- Nga Pouaka Rakau
- Screws (various types)
- Drawer Slides (Left & Right)
- Ko Allen Wrench
- LED Light Controller and Power Adapter
3. Nga Tohutohu Huihuinga
Follow these steps carefully. It is recommended to have two people for assembly.
- Whakapaia te Rohe: Whakawāteahia he wāhi whānui, ma, ngohengohe hoki hei huihuinga hei ārai i te kino o ngā tāonga.
- Tautuhia nga waahanga: Lay out all panels and hardware. Match them with the diagrams in your included instruction booklet. Each part is typically labeled with a code.
- Huihuia te turanga: Attach the metal legs to the bottom panels of both the open shelf unit and the drawer unit using the provided screws. Ensure they are securely tightened.

Image: Close-up details of the TV stand, highlighting the sturdy metal feet, the sleek handleless design of the drawers, and the smooth operation of the metal drawer slides. This image provides visual guidance for assembly steps involving these components.
- Construct the Open Shelf Unit:
- Insert wood dowels and cam bolts into the designated holes on the side panels.
- Attach the top and bottom panels to the side panels using cam locks.
- Slide the back panel into the grooves.
- Construct the Drawer Unit:
- Assemble the drawer boxes by attaching the sides, front, and back panels, then slide in the drawer bottoms.
- Install the drawer slides onto the inner side panels of the main unit and onto the assembled drawer boxes.
- Attach the main top and bottom panels to the side panels using cam locks and dowels.
- Slide the back panel into the grooves.
- Join the Units: Carefully align and connect the open shelf unit and the drawer unit using the provided connectors or screws, ensuring a flush fit.
- Tāutahia nga rama rama:
- Whakapaihia te mata ki reira ka hoatuhia te riu LED.
- Peel off the adhesive backing from the LED strip and carefully press it onto the desired location within the open shelf compartment.
- Connect the LED strip to the controller and then to the power adapter.
- Monohia te urutau hiko ki te putanga pakitara.
- Taki Whakamutunga: Ensure all screws and fasteners are tight. Gently move the unit to its desired location.
4. Ngā Tohutohu Whakahaere (Ngā Rama LED)
Ko te WAMPAT TV Stand features integrated LED lighting to enhance your living space.
4.1 Kei te Hiko / Weto
- Once the LED light strip is connected to the power adapter and plugged into an outlet, it should be ready for operation.
- Use the provided remote control or inline switch (if applicable) to turn the lights on or off.
4.2 Changing Colors and Modes
- The LED lights offer 16 changeable colors. Use the color selection buttons on the remote control to choose your desired hue.
- Various modes (e.g., flash, strobe, fade, smooth) may be available. Refer to the specific LED light remote control instructions for detailed mode selection.
- Adjust brightness using the designated buttons on the remote.

Image: The WAMPAT TV Stand displayed in a modern living room, showcasing the blue LED lighting within the open shelf, providing ambient illumination.

Image: The WAMPAT TV Stand positioned in a dining room, featuring the purple LED lighting in the open shelf area, demonstrating its versatility in different home environments.
5. Tiaki me te Tiaki
Proper care will help maintain the appearance and longevity of your TV stand.
- Te horoi: Horoia nga mata ki te kakahu maroke, ngawari. Mo nga tohu pakeke, he paku damp ka taea te whakamahi i te kakahu ka whai i te kakahu maroke. A ape i nga kaihoroi awhiowhio me nga matū kino.
- Maringi: Immediately wipe up any spills to prevent damage to the engineered wood finish.
- Te Ra: A ape i te noho roa ki te ra tika kia kore ai e memenge, te paheketanga ranei.
- Te wera me te makuku: Keep the unit away from direct heat sources and areas of high humidity.
- Pūmārō: Takitaki ia ia nga wa katoa nga wiri me nga here kia mau tonu. Whakapaia ano mehemea e tika ana.
6. Te Raru
Tirohia tenei waahanga mo nga take noa me o raatau otinga.
| Raruraru | Take pea | Rongoā |
|---|---|---|
| Nga Rarama LED Kaore i te Mahi |
|
|
| Kāore ngā pouaka e reti māeneene |
|
|
| Unit Feels Unstable |
|
|
7. Whakatakotoranga Hua
Detailed specifications for the WAMPAT TV Stand.
| Āhuahira | Taipitopito |
|---|---|
| Waitohu | WAMPAT |
| Tau tauira | W11S4082Q+W04S-3060Q |
| Tae | Paraone |
| Rauemi | Rakau Hangaia, Whakarewa |
| Rahi Hua (D x W x H) | 15.6" D x 53.1" W x 30.6" H (39.6 cm D x 134.9 cm W x 77.7 cm H) |
| Rahi Whakaata Whakaata | Tae atu ki te 60 inihi |
| Taumaha Taumaha | 200 Pauna (90.7 kg) |
| Tuhinga o nga Kaitoi | 3 |
| Te maha o ngā wāhanga tuwhera | 1 (with 2 shelves) |
| Rarama LED | 16 Colors Changeable |
| Huihuinga e hiahiatia ana | Ae |
| Momo Whakaeke | Maunga Papa |

Image: A visual representation of the TV stand with superimposed outlines of 40-inch, 50-inch, and 60-inch televisions, demonstrating the recommended TV size compatibility.
8. Pūtāhui me te Tautoko Kiritaki
WAMPAT stands behind the quality of its products. For specific warranty details, please refer to the warranty card included with your purchase or visit the official WAMPAT webpae.
If you encounter any issues, require replacement parts, or have questions regarding assembly or operation, please contact WAMPAT customer support:
- Tautoko Aipurangi: Tirohia te WAMPAT Store on Amazon mō ngā Pātai Auau me ngā taipitopito whakapā.
- Īmēra: Tirohia ngā tuhinga hoko mō te tautoko īmēra tika.
Please have your model number (W11S4082Q+W04S-3060Q) and purchase date ready when contacting support.