1. Kupu Whakataki
Mauruuru koe mo te hokoasing the SHARP YC-MG252AE-W Microwave Oven with Grill. This appliance combines the convenience of a 900W microwave with the versatility of a 1000W grill, offering 25 liters of capacity for various cooking needs. Featuring 11 power levels, 8 automatic programs, and a defrost function, this oven is designed for efficient and flexible food preparation. Please read this manual carefully before operating your new appliance to ensure safe and optimal use.

Whakaahua 1: Mua view of the SHARP YC-MG252AE-W Microwave Oven with Grill.
2. Nga Tohutohu Haumaru Nui
I te wā e whakamahi ana i ngā taputapu hiko, me whai tonu i ngā mahi whakatūpato haumaru hei whakaiti i te tūponotanga o te ahi, te ru hiko, te whara o te tangata, te pānga rānei ki te kaha nui rawa o te ngaruiti.
- Kaua e ngana ki te whakahaere i tenei oumu me te tuwhera te kuaha na te mea ka puta he kino ki te hiko ngaruiti.
- Kaua e waiho he ahanoa i waenganui i te mata o mua o te oumu me te kuaha, kaua ranei e waiho te oneone, te toenga pokekore ranei kia whakaemi ki runga i nga mata hiri.
- Kaua e whakamahia te oumu mena kua whara. He mea nui kia kati tika te kuaha o te oumu kia kore ai he kino o te: (1) kuaha (piko), (2) hinge me nga pou (pakaru, kua wewete ranei), (3) hiiri kuaha me nga papa taatiraa.
- Kaua e whakatikaia, e whakatika ranei te oumu ma tetahi atu engari ko nga kaimahi ratonga e tika ana.
- Me whakarite kia tika te hau huri noa i te taputapu. Kaua e araia nga whakatuwheratanga hau.
- Never use metal containers or foil in microwave mode, as this can cause arcing and damage the oven.
- Mataki i nga tamariki i nga wa katoa e whakamahia ana te taputapu.
- Ko nga wai me etahi atu kai kaua e whakamahana ki roto i nga ipu kua hiri na te mea ka pahū.
3. Ihirangi mokete
Carefully unpack your new microwave oven and ensure all items are present and undamaged. If any items are missing or damaged, please contact your retailer.
- SHARP YC-MG252AE-W Microwave Oven Unit
- Matapihi Matapihi
- Raka Tunutunu
- Pukapuka Kaiwhakamahi
4. Hua Neke Atuview
Familiarize yourself with the main components and control panel of your microwave oven.
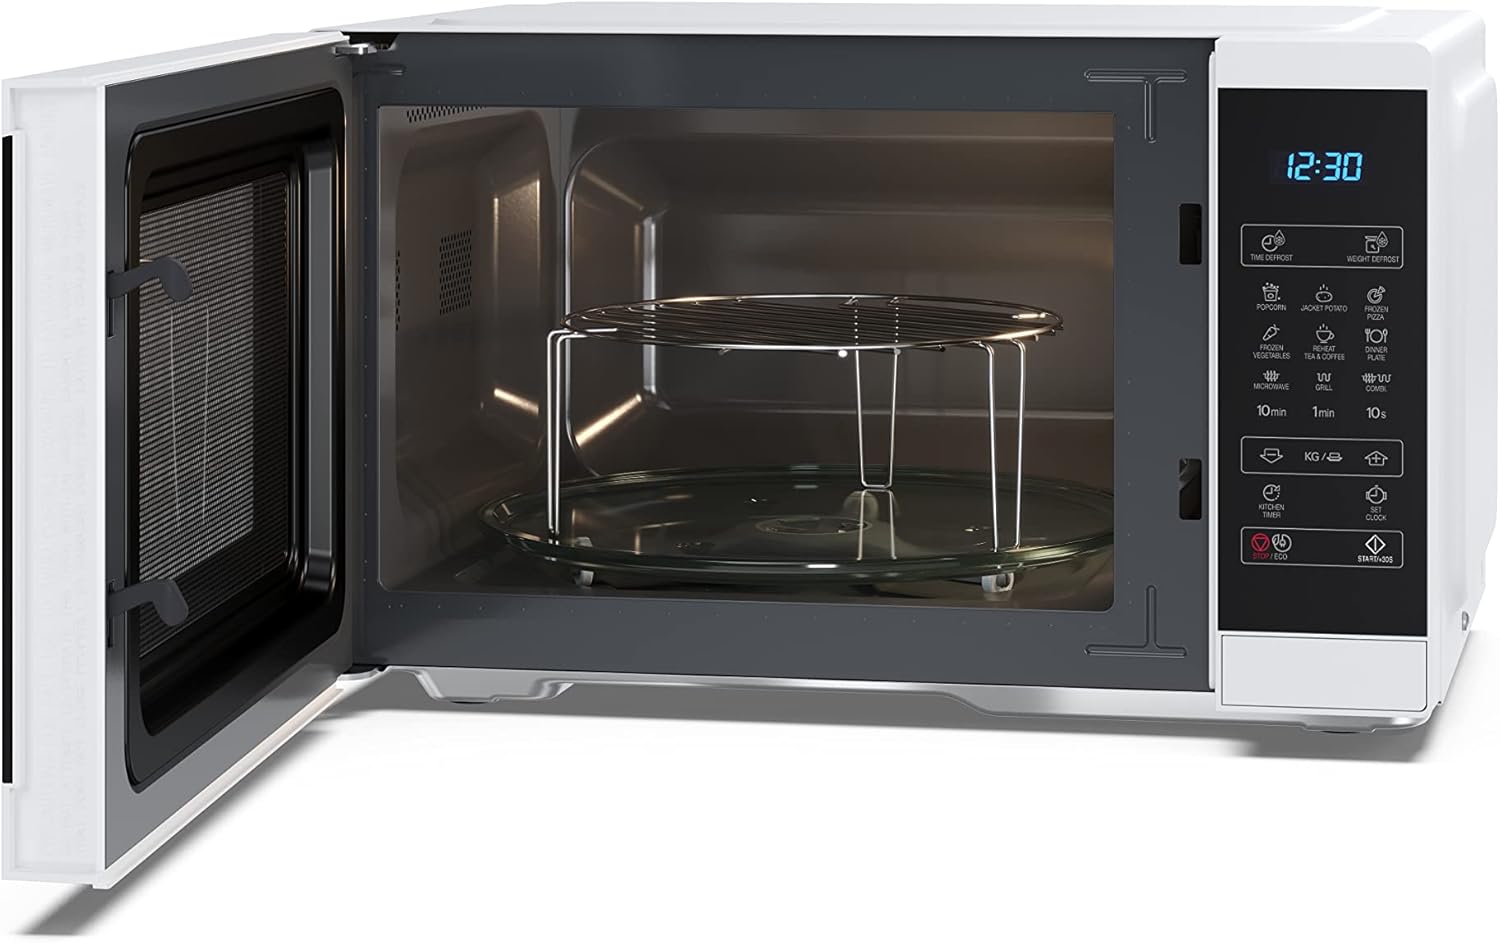
Whakaahua 2: Roto view with turntable and grill rack.

Figure 3: Control Panel and Display.
Nga Mahi Paewhiri Mana:
- Whakaaturanga Mamati: E whakaatu ana i te wā, te taumata mana, me te tūnga tunu kai.
- Time Defrost / Weight Defrost: Buttons for defrosting food by time or weight.
- Popcorn / Jacket Potato / Frozen Pizza / Frozen Vegetables / Dinner Plate / Tea & Coffee: One-touch auto cooking programs.
- Microwave / Grill / Combi: Buttons to select cooking modes.
- 10min / 1min / 10s: Buttons for quick time setting.
- KG / g / ↑ / ↓: Buttons for weight input and adjusting settings.
- Kitchen Timer / Clock: Functions for setting a kitchen timer or the current time.
- Start / +30s / ECO: Start cooking, add 30 seconds, or activate ECO mode.
- Kati / Maama: Ka mutu te tunu kai, ka whakakore ranei i nga tautuhinga.
5. Tatūnga
5.1 Te Wetewete me te Whakanoho
- Remove all packaging materials and accessories. Inspect the oven for any damage such as dents or a broken door. Do not install if damaged.
- Place the oven on a flat, stable surface that is strong enough to hold the oven and the food you will be placing in it.
- Ensure there is adequate ventilation space: at least 20 cm of space above the oven, 10 cm at the rear, and 5 cm on both sides. Do not block the air vents.
5.2 Turntable and Grill Rack Installation
- Place the turntable support ring in the center of the oven cavity.
- Place the glass turntable securely on the turntable support. Ensure it rotates freely.
- For grill cooking, place the metal grill rack directly on the glass turntable.
5.3 Hononga Hiko
Plug the power cord into a standard 220V, 50Hz grounded electrical outlet. Do not use extension cords or multiple adapters.
6. Nga Tohutohu Whakahaere
6.1 Te whakatu i te Karaka
- In standby mode, press the 'Clock' button once.
- Use the time buttons (e.g., '10min', '1min', '10s') to set the hour.
- Press 'Clock' again.
- Use the time buttons to set the minutes.
- Press 'Clock' to confirm.
6.2 Tunu Ngaruiti
- Whakatakotoria te kai ki roto i tētahi ipu haumaru mō te ngaruiti, i runga i te tēpu hurihuri karāhe. Katia te tatau.
- Press the 'Microwave' button repeatedly to select the desired power level (e.g., P100 for 100% power, P80 for 80% power). There are 11 power levels available.
- Use the time buttons ('10min', '1min', '10s') to set the cooking time.
- Press 'Start / +30s' to begin cooking.
6.3 Tunu Tunu
- Place food on the grill rack (placed on the glass turntable). Close the door.
- Pēhia te pātene 'Grill'.
- Use the time buttons to set the grilling time.
- Press 'Start / +30s' to begin grilling.
6.4 Mahi Whakakore
The oven offers both time defrost and weight defrost options.
- Taumaha Whakahau: Press 'Weight Defrost'. Use the 'KG / g' buttons to input the food weight. The oven will automatically set the defrost time. Press 'Start / +30s'.
- Wā Whakahau: Press 'Time Defrost'. Use the time buttons to set the desired defrosting time. Press 'Start / +30s'.
6.5 Papatono Aunoa
The oven has 8 pre-set auto cooking programs for common foods. Refer to the labels on the control panel for specific programs like Popcorn, Jacket Potato, Frozen Pizza, etc.
- Whakanohoia te kai ki te oumu.
- Press the desired auto program button (e.g., 'Popcorn').
- If applicable, use the 'KG / g' buttons to select the weight or quantity.
- Press 'Start / +30s' to begin.
6.6 Tatama Kihini
- In standby mode, press the 'Kitchen Timer' button.
- Use the time buttons to set the desired countdown time.
- Press 'Start / +30s'. The timer will count down without cooking.
6.7 Mahi ECO
Press the 'ECO' button to activate the energy-saving mode. The display will dim or turn off to conserve power when the oven is not in use.
6.8 Maukati Haumaru Tamariki
Hei ārai i te mahi kāore i te whakaarohia, inā koa e ngā tamariki:
- Hei whakahohe: In standby mode, press and hold the 'Stop / Clear' button for 3 seconds. A lock indicator will appear on the display.
- Hei whakaweto: Press and hold the 'Stop / Clear' button for 3 seconds again. The lock indicator will disappear.
7. Tiaki me te Whakapai
Ko te horoi i nga wa katoa ka awhina i te mahi me te roa o to oumu ngaruiti.
- I mua i te horoi: Always unplug the oven from the power outlet.
- Umu o roto: Horoia te poka i muri i ia whakamahinga ki te adamp kakahu. Mō ngā paru uaua, whakamahia he hopi horoi ngawari. Kaua e whakamahi i ngā mea horoi whakakoi, i ngā papa horoi rānei.
- Umu Waho: Whakapaihia te waho me te panuiamp cloth and mild soap. Avoid getting water into the ventilation openings.
- Ngā Hiri o te Tatau me ngā Hiri o te Tatau: Wipe the door, door seals, and adjacent parts frequently with a damp kakahu hei tango i ngā maringi me ngā tauhiuhi.
- Glass Turntable and Grill Rack: These can be washed in warm soapy water or in a dishwasher. Ensure they are completely dry before placing them back in the oven.
8. Te Raru
If you encounter any issues with your microwave oven, please refer to the following common problems and solutions before contacting service.
| Raruraru | Take pea | Rongoā |
|---|---|---|
| Kare te umu e timata | Ko te taura hiko kaore i te mono; Karekau te kuaha i kati tika; Kua pupuhihia, kua takahia ranei te wehenga ara iahiko. | Me whakarite kia mau te mono ki te putanga hiko; Katia te tatau kia mau; Tirohia te fiusi o te whare, te tautuhi anō rānei i te pakaru hiko. |
| Kai kore whakamahana | Kāore i te tika te whakatakoto i te wā tunu/taumata hiko; Kāore i te tika te kati o te tatau. | Adjust time and power settings; Close door securely. |
| Papa hurihuri kaore i te hurihuri | Kaore i tika te noho o te tepu hurihuri; Te aukati i raro i te tepu hurihuri. | Ensure turntable and support ring are correctly positioned; Remove any obstructions. |
| Haruru rereke i te wa e mahi ana | ipu kai e pa ana ki nga pakitara oumu; Kaore i tika te noho o te tepu hurihuri. | Use a smaller container; Re-seat turntable and support ring. |
9. Whakatakotoranga
Technical specifications for the SHARP YC-MG252AE-W Microwave Oven with Grill.
| Āhuahira | Whakatakotoranga |
|---|---|
| Waitohu | koi |
| Tau tauira | YC-MG252AE-W |
| Te kaha | 25 rita |
| Te Mana Ngaruiti | 900 Watts |
| Te Mana Tunu | 1000 Watts |
| Taumata Mana | 11 |
| Rahi Hua (L x W x H) | 47.2 x 34.5 x 28 cm (18.58 x 13.58 x 11.02 inihi) |
| Te Taahi Tahuri | 31.5 cm (12.4 inihi) |
| Tae | Mā |
| Rauemi | Kowiri tira, Karaehe |
| Nga waahanga motuhake | Defrost, Timer, Turntable, Programmable, Child Safety, LED Lighting, ECO Function |
| Voltage | 220 Volts |
| Taumaha | 12.5 Kirokaramu |

Whakaatu 4: Nga Ahua Hua.
10. Pūtāhui me te Tautoko
This SHARP YC-MG252AE-W Microwave Oven with Grill comes with a commitment to quality. Parts availability is guaranteed for 5 years from the date of purchase.
For technical assistance, warranty claims, or to inquire about spare parts, please contact your retailer or the official Sharp customer support in your region. Always have your model number (YC-MG252AE-W) and proof of purchase ready when contacting support.