1. Kupu Whakataki
Thank you for choosing the Xigmatek Lux M Micro-ATX Mini Tower PC Case. This manual provides detailed instructions for the installation, operation, and maintenance of your new PC chassis. Please read this manual carefully before beginning the assembly process to ensure proper installation and to maximize the performance and longevity of your system.
The Lux M case is designed to offer a robust and aesthetically pleasing housing for your computer components, featuring a tempered glass side panel, a metallic front panel with a unique cut-out pattern, and pre-installed fixed RGB fans for optimal cooling and visual appeal. It supports Micro-ATX and Mini-ITX motherboards and is compatible with various cooling solutions, including water cooling.
2. Nga korero haumaru
Kia mau ki nga whakatupato haumaru e whai ake nei i te wa e whakauru ana me te mahi:
- Momotuhia i nga wa katoa te hiko mai i te putanga o te pakitara i mua i te whakauru, te tango ranei i nga waahanga hei aukati i te ru hiko.
- Handle all components with care. Avoid touching circuit boards directly; hold them by their edges.
- Wear an anti-static wrist strap when handling sensitive electronic components to prevent electrostatic discharge (ESD) damage.
- Keep the case and components away from liquids, excessive heat, and direct sunlight.
- Me whakarite kia tika te hau huri noa i te pouaka PC kia kore ai e wera rawa.
- Puritia ngā wāhanga iti me ngā tīwiri kia kore e taea e ngā tamariki te toro atu.
3. Ihirangi mokete
Verify that all items are present in your package. If any items are missing or damaged, please contact your retailer.
- Xigmatek Lux M Micro-ATX Mini Tower PC Case
- Accessory box (containing screws, standoffs, cable ties, etc.)
- Pukapuka Kaiwhakamahi (tenei tuhinga)
4. Hua Neke Atuview
Familiarize yourself with the various parts of your Xigmatek Lux M PC case.
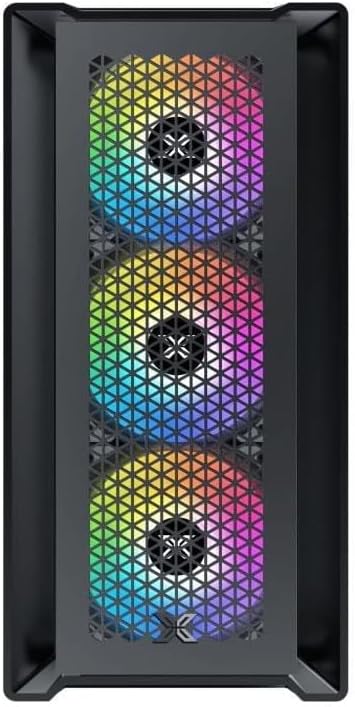
Whakaahua 4.1: Mua View. This image displays the front of the Xigmatek Lux M case, highlighting the metallic mesh panel with a triangular design and the three pre-installed 120mm fixed RGB fans.

Figure 4.2: Angled Top-Front View. This perspective shows the tempered glass side panel, offering a clear view of the interior, and the top panel with its I/O ports (USB, audio) and power button.
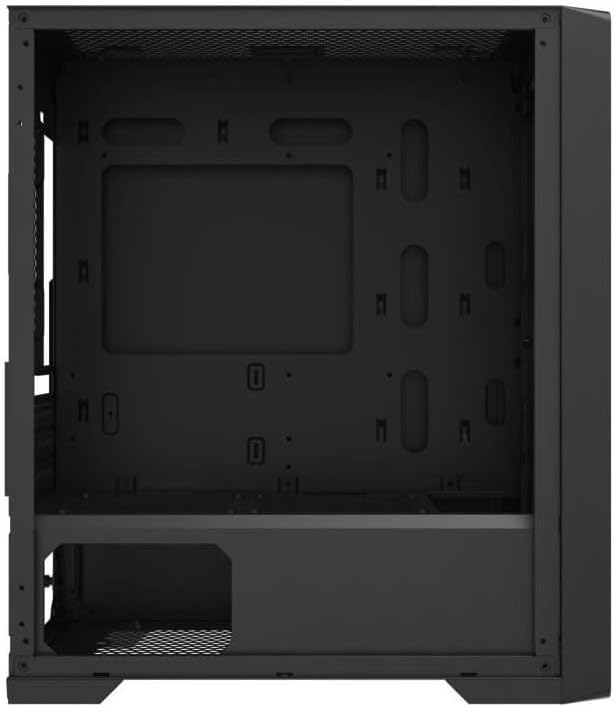
Pikitia 4.3: Tahora o roto. The internal structure of the case, featuring the motherboard mounting tray, cutouts for cable management, and the power supply shroud at the bottom.
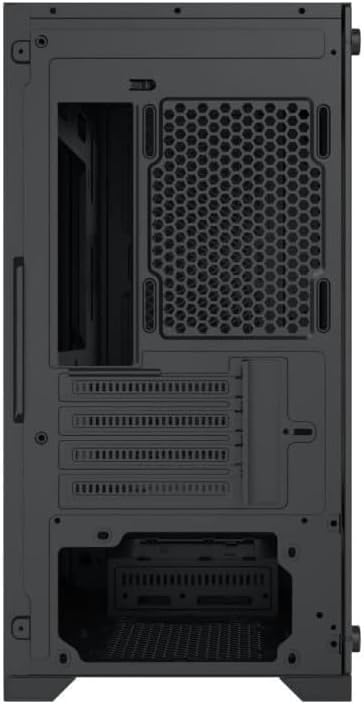
Whakaahua 4.4: Whakamuri View. This image illustrates the rear of the case, including the expansion slots for graphics cards and other add-in cards, the rear fan mounting area, and the power supply mounting bracket.
5. Tatūnga me te Tāuta
Follow these steps to install your computer components into the Xigmatek Lux M case.
5.1. Te whakarite i te keehi
- Whakanohoia te keehi ki runga i te mata papatahi, pumau.
- Remove the tempered glass side panel by unscrewing the thumb screws and carefully lifting it off. Set it aside on a soft, non-abrasive surface.
- Remove the opposite steel side panel by unscrewing the thumb screws and sliding it backward.
5.2. Whakauranga Papa Matua
The Lux M supports Micro-ATX and Mini-ITX motherboards.
- Install the I/O shield (if not pre-installed on your motherboard) into the rear opening of the case.
- Whakahāngaihia te papahoahoa ki ngā tūāpapa kua tāutahia i mua. Me whakarite kia ōrite ngā kōhao tīwiri katoa o te papahoahoa ki ngā tūāpapa.
- Secure the motherboard using the provided motherboard screws. Do not overtighten.
5.3. Te Waenga Whakawhiwhi Hiko (PSU).
The PSU mounts at the rear bottom of the case.
- Tāpirihia te PSU ki roto i tōna wāhanga kua tohua mai i muri o te pouaka.
- Align the PSU's screw holes with the holes on the case's rear panel.
- Secure the PSU with the provided screws.
5.4. Storage Drive Installation (2.5"/3.5" Drives)
The case supports 2x 2.5"/3.5" storage drives.
- Locate the drive cage beneath the PSU shroud or dedicated 2.5" mounting points behind the motherboard tray.
- For 3.5" HDDs, slide the drive into a drive tray (if applicable) and secure it with screws.
- For 2.5" SSDs, secure them directly to the mounting points using the provided screws.
5.5. Graphics Card (VGA) and Expansion Card Installation
Ka tautokohia e te keehi nga kaari whakairoiro tae atu ki te 320mm te roa.
- Tangohia ngā taupoki mokowā whakawhānui e tika ana mai i te tuarongo o te pouaka.
- Whakauruhia tō kāri whakairoiro, tō kāri whakawhānui rānei ki te mokamoka PCIe e tika ana i runga i tō papahoahoa.
- Secure the card to the case using the expansion slot screws.
5.6. Cooling System Installation (Optional)
The Lux M comes with 4x 120mm X24F fixed RGB fans. It supports additional cooling options.
- Matao CPU: Max height of 160mm. Install your CPU cooler according to its manufacturer's instructions.
- Tautoko Radiator: The case supports radiators of 360mm, 240mm, or 120mm. Refer to your radiator's manual for installation. Common mounting locations include the front and top panels.
5.7. Whakahaerenga Taura
Whakamahia nga tapahi ararere taura me nga tohu here ki muri i te paepae papahoahoa hei whakarite taura. Ma tenei ka pai ake te rere o te hau me te rerehua.
5.8. Huihuinga Whakamutunga
- Once all components are installed and cables are managed, reattach the steel side panel and secure it with thumb screws.
- Carefully reattach the tempered glass side panel and secure it with thumb screws.
6. Nga Tohutohu Whakahaere
After completing the installation, connect your peripherals (monitor, keyboard, mouse) and power cable to the PC. Press the power button located on the top panel of the case to start your system.
The pre-installed X24F RGB fans feature fixed RGB lighting, which will illuminate automatically upon system power-on. No additional software or controller is required for their basic operation.
Ensure that the case's ventilation is not obstructed to maintain optimal airflow and cooling performance.
7. Tiaki
Mā te tiaki auau ka roa te ora me te mahi tino pai o ngā wāhanga o tō rorohiko.
- Whakapai puehu: Periodically clean dust filters (if present) and the interior of the case using compressed air or a soft brush. Dust accumulation can hinder airflow and lead to overheating.
- Horoi o waho: Horoia nga mata o waho ki te ngohengohe, damp cloth. Avoid harsh chemicals that may damage the finish or tempered glass.
- Karaehe Maama: Clean the tempered glass panel with a glass cleaner and a microfiber cloth to avoid scratches and streaks.
8. Te Raru
If you encounter issues during or after installation, consider the following common troubleshooting steps:
- Kore Mana:
- Me whakarite kei te hono tika te taura hiko ki te PSU me te putanga hiko i te pakitara.
- Check that the PSU switch is in the 'ON' position.
- Manatokohia kei te tika te hono o te taura pana hiko o te papa o mua ki te pane o te papa o mua o te papa.
- Fans Not Spinning / RGB Not Lighting:
- Ensure all fan power cables are securely connected to the motherboard or a fan controller.
- For RGB, confirm that any necessary RGB headers are connected to the motherboard (though the included fans are fixed RGB and should light up with power).
- Kore Putanga Whakaatu:
- Verify that your monitor cable is connected to the graphics card (if installed) and not the motherboard's integrated graphics port.
- Whakanohoia ano te kaari whakairoiro ki tana mokamoka PCIe.
- Te wera nui:
- Ensure all case fans are spinning and oriented correctly for optimal airflow (intake/exhaust).
- Horoia ngā tātari puehu me ngā wāhanga o roto.
- Verify that the CPU cooler is properly seated and making good contact with the CPU.
For more complex issues, consult your component manuals or seek assistance from Xigmatek support or a qualified technician.
9. Whakatakotoranga
| Āhuahira | Whakatakotoranga |
|---|---|
| Waitohu | Xigmatek |
| Ingoa Tauira | Lux M |
| Tau tauira | EN48540 |
| Momo Take | Mini Menara |
| Papamatua Hototahi | Micro-ATX, Iti-ITX |
| Rauemi | Tempered Glass (side panel), Metal (front panel) |
| Tae | Pango |
| Paanui kua whakauruhia i mua | 4 x 120mm X24F Fixed RGB Fans |
| Tautoko Radiator | 360mm, 240mm, 120mm |
| Max CPU Cooler Teitei | 160mm |
| Te Roa VGA Mōrahi | 320mm |
| Max PSU Roa | 165mm |
| Nga Waipukenga | 2x 2.5"/3.5" |
| Nga waahanga motuhake | RGB Lighting, Triangular Mesh Front Design |
10. Pūtāhui me te Tautoko
Xigmatek products are manufactured to the highest quality standards. For warranty information and technical support, please refer to the warranty card included with your product or visit the official Xigmatek webpae. Tena koa pupurihia to tohu mo te hoko mo nga kereme whakamana.
For further assistance, you may contact Xigmatek customer support through their official channels.