Nga Korero Haumaru Nui
Please read these instructions carefully before installation and retain them for future reference. All electrical connections must be in accordance with local and national electrical codes. If you are unsure about any part of the installation, consult a qualified electrician.
- WHAKATŪPATO: To avoid the risk of electric shock, always disconnect power at the main circuit breaker or fuse box before beginning installation or maintenance.
- WHAKATŪPATO: Ko tenei taputapu mo te whakamahi i roto anake. Kaua e pa ki te wai me te makuku.
- Me whakarite kia mau nga hononga katoa me te whakamaarama tika.
- Kaua e neke ake i te wat teiteitage kua tohua mo nga topuku.
- Kia tupato ki te hapai i nga waahanga karaihe kia kore ai e pakaru.
Ihirangi mokete
Carefully unpack your new lighting fixture and lay out all parts on a clean, soft surface. Ensure all components listed below are present before discarding packaging materials.
- Mounting Canopy (Black, Round)
- Pendant Light Assemblies (3 units, with gold sockets and adjustable cords)
- Glass Shades (3 units, clear cylindrical)
- Mounting Hardware Kit (screws, wire nuts, mounting bracket)
- Pukapuka Tohutohu

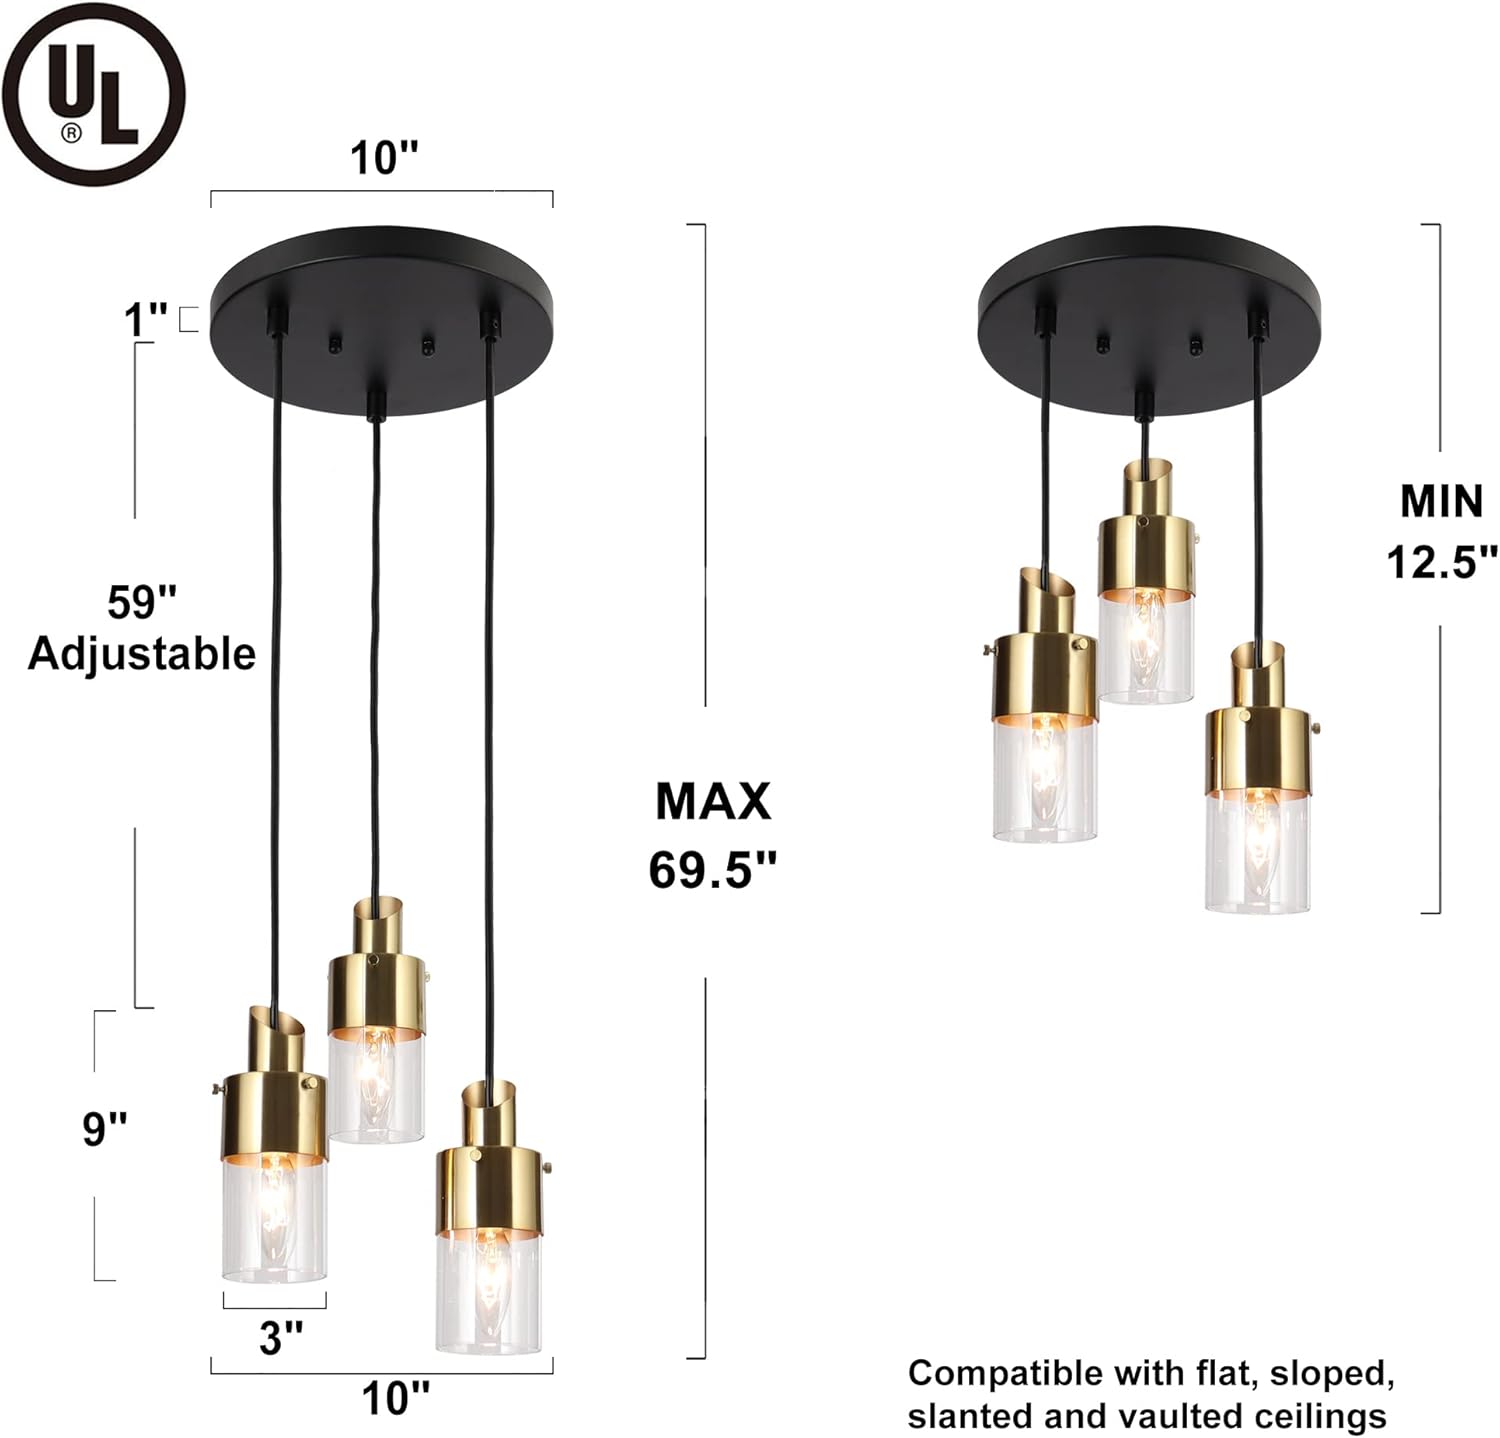
Whakaahua 1: Nga Waahanga Whakauru
Whakatakotoranga
| Waitohu | ZEVNI |
| Tauira | Motu Moutere Marama |
| Rauemi | Metara, Karaehe |
| Tae Whakatikatika | Gold (Pendants), Black (Canopy) |
| Tae Taumaru | Maamaa |
| Te maha o nga rama | 3 |
| Putunga Pupura | E12 (Miraira) |
| Max Wattage ia Pupura | 40W |
| Voltage | 120 Volts |
| Karekau | Yes (with compatible dimmer switch, not included) |
| Awhe Teitei Whakaritea | 12.5 inihi ki te 69.5 inihi |
| Te Taone o te Koru | 10 inihi |
| Pendant Shade Dimensions | Approximately 3 inches (width) x 9 inches (height) |
| Taumaha Taumaha | 4 Pauna |
| Momo Whakaeke | Ceiling Mount, Semi Flush Mount |
| Recommended Room Use | Dining Room, Kitchen, Living Room, Lobby |
Whakaahua 2: Nga Ahua Hua
Tatūnga me te Tāuta
I mua i te tāutanga, me whakaweto te hiko i te pūwhakaweto hiko. E taunakihia ana kia rua ngā tāngata hei tāutanga.
- Whakaritea mo te Tāuta: Turn off the main power supply at the circuit breaker. Remove the old fixture if applicable.
- Āpiti Taiapa Whakapuru: Secure the mounting bracket to the junction box in your ceiling using the provided screws. Ensure it is firmly attached.
- Whakaritea te Roa Waea: Determine the desired hanging height for each pendant. Loosen the set screws on the canopy to adjust the length of each cord. Once the desired length is achieved, tighten the set screws to secure the cords. The fixture is adjustable from 12.5 inches (minimum) to 69.5 inches (maximum) from the ceiling.
- Hononga Waea: Connect the fixture's wires to your household electrical wires. Connect the black wire (Live/Hot) from the fixture to the black wire from the junction box. Connect the white wire (Neutral) from the fixture to the white wire from the junction box. Connect the ground wire (bare copper or green) from the fixture to the ground wire from the junction box. Secure all connections with wire nuts and wrap with electrical tape for added safety.
- Maunga Canopy: Carefully push the canopy up to the ceiling, aligning the holes in the canopy with the screws on the mounting bracket. Secure the canopy in place with the decorative nuts or screws provided.
- Assemble Pendants:
- Attach the gold socket component to the end of each pendant cord.
- Carefully slide each clear glass shade over the gold socket component.
- Secure the glass shade in place, typically by screwing a retaining ring onto the socket.
- Tāuta Topuku: Screw E12 base bulbs (not included, max 40W each) into each socket. Do not overtighten.
- Whakaora i te Mana: Kia oti te whakaurunga me te haumaru katoa o nga hononga, whakahokia te hiko ki te waahi ara iahiko.
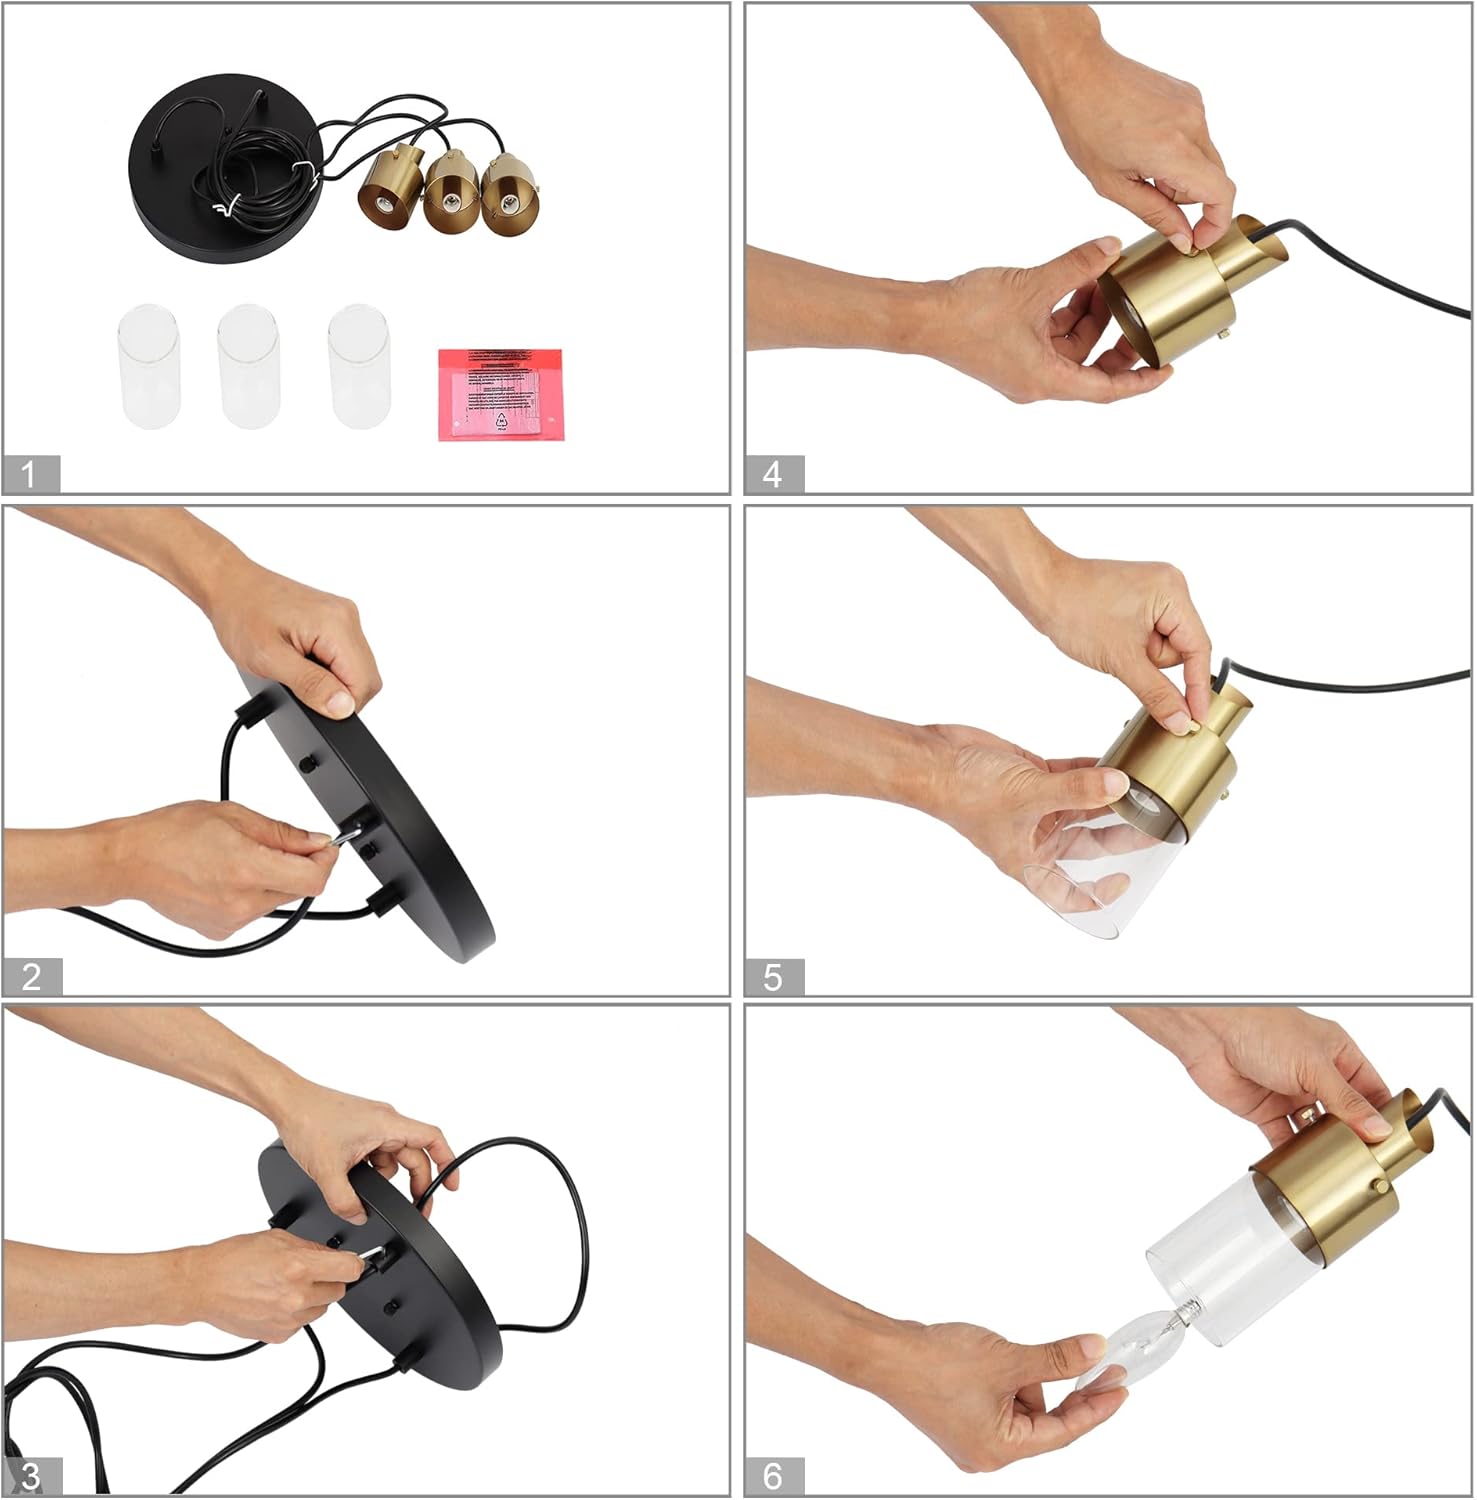
Figure 3: Assembly Steps
Nga Tohutohu Whakahaere
This ZEVNI lighting fixture is designed for simple operation.
- Hiko Whakaka/Weto: Whakahaerehia te rama mā te whakamahi i tētahi pana pakitara paerewa e hono ana ki te ara iahiko.
- Taumahinga Moama: This fixture is fully dimmable. To utilize the dimming feature, you must install compatible E12 dimmable bulbs and connect the fixture to a compatible dimmer switch (both sold separately).
- Nga whakaritenga morama: Uses 3 E12 base bulbs, maximum 40 watts per bulb. LED bulbs are recommended for energy efficiency and longer lifespan.

Figure 4: Light On/Off States
Te tiaki
Ma te tiaki i nga wa katoa ka pupuri i te ahua me te mahi o to rama rama.
- Te horoi: Always turn off the power before cleaning. Use a soft, dry cloth to wipe down the metal parts. For glass shades, a slightly damp cloth can be used, followed by a dry cloth to prevent water spots. Avoid using abrasive cleaners, solvents, or polishes as they may damage the finish.
- Whakakapi Purama: Ensure the power is off and the bulbs have cooled before attempting to replace them. Unscrew the old bulb and screw in a new E12 base bulb (max 40W).
- Tirotiro: Tirohia nga hononga katoa me nga taputapu whakapuru kia noho haumaru.
Raparongoā
If you encounter issues with your ZEVNI lighting fixture, refer to the following common problems and solutions:
| Raruraru | Take pea | Rongoā |
|---|---|---|
| Kaore e marama te rama. | Kaore he mana ki te huringa. Hononga waea wewete. Pupura hapa. | Check circuit breaker. Ensure wall switch is on. Verify all wire connections are secure. Replace bulb. |
| Ka whiti marama. | Pupuku wetekina. He pana/porowhita whakaitiiti kore hototahi. Hononga waea wewete. | Tighten bulb. Ensure dimmer and bulbs are compatible. Check wire connections. |
| Hungi whakakao. | Whakawhiti dimmer hotokore. | Replace with a high-quality, compatible LED dimmer switch. |
Ki te kore enei mahi e whakatau i te take, tena koa whakapā atu ki te tautoko a te kaihoko.
Pūtāhui me te Tautoko
This ZEVNI lighting fixture comes with a manufacturer's warranty. For specific warranty details, please refer to the documentation included with your purchase or contact the retailer.
For technical assistance, replacement parts, or any questions regarding your product, please contact ZEVNI customer support through their official webte waahi, te kaihokohoko ranei i hokona ai te hua.