1. Hua Neke Atuview
The Vividia TVS-507 Telescopic Pole Video Inspection Camera is designed for detailed visual inspections in hard-to-reach areas. It features a strong, extendable carbon fiber pole, a high-resolution 5MP camera, and a video viewing system with DVR recording capabilities. This system is ideal for various applications including roof and building inspections, gutter cleaning, and examining areas inaccessible by direct view.
Ko nga ahuatanga matua ko:
- Flexible gooseneck camera head with a Φ18mm diameter, extendable up to 5 meters (16 feet).
- 1/3 inch 5MP resolution sensor with a 90° field of view.
- 12 high-intensity white LED lights with adjustable brightness, providing visibility over 5 meters in total darkness.
- 7-inch LCD touchscreen monitor with photo and video recording functions.
- Control box with DVR controls, SD card slot (max 32GB), LED brightness adjustment, and AV/photo selection.
- High-capacity 7500mAh lithium battery for over 5 hours of continuous operation.

Figure 1: The Vividia TVS-507 Telescopic Pole Video Inspection Camera Borescope System, showing the extended pole, monitor, and camera head.
2. Waenga Pūnaha
The Vividia TVS-507 system includes the following main components:
- Pou Telescopic: Extendable carbon fiber pole for reaching elevated or distant areas.
- Waterproof Camera Head: High-resolution 5MP camera with 12 adjustable LED lights, mounted on a flexible gooseneck.
- 7-inch LCD Touchscreen Monitor: Mō te wā tūturu viewing, recording, and playback.
- Pouaka Mana: Integrated with the monitor, featuring DVR controls, SD card slot, and power management.
- Pūhiko Lithium Rechargeable: Provides portable power for extended operation.
- Sturdy Carry Case: For safe transport and storage of the entire system.
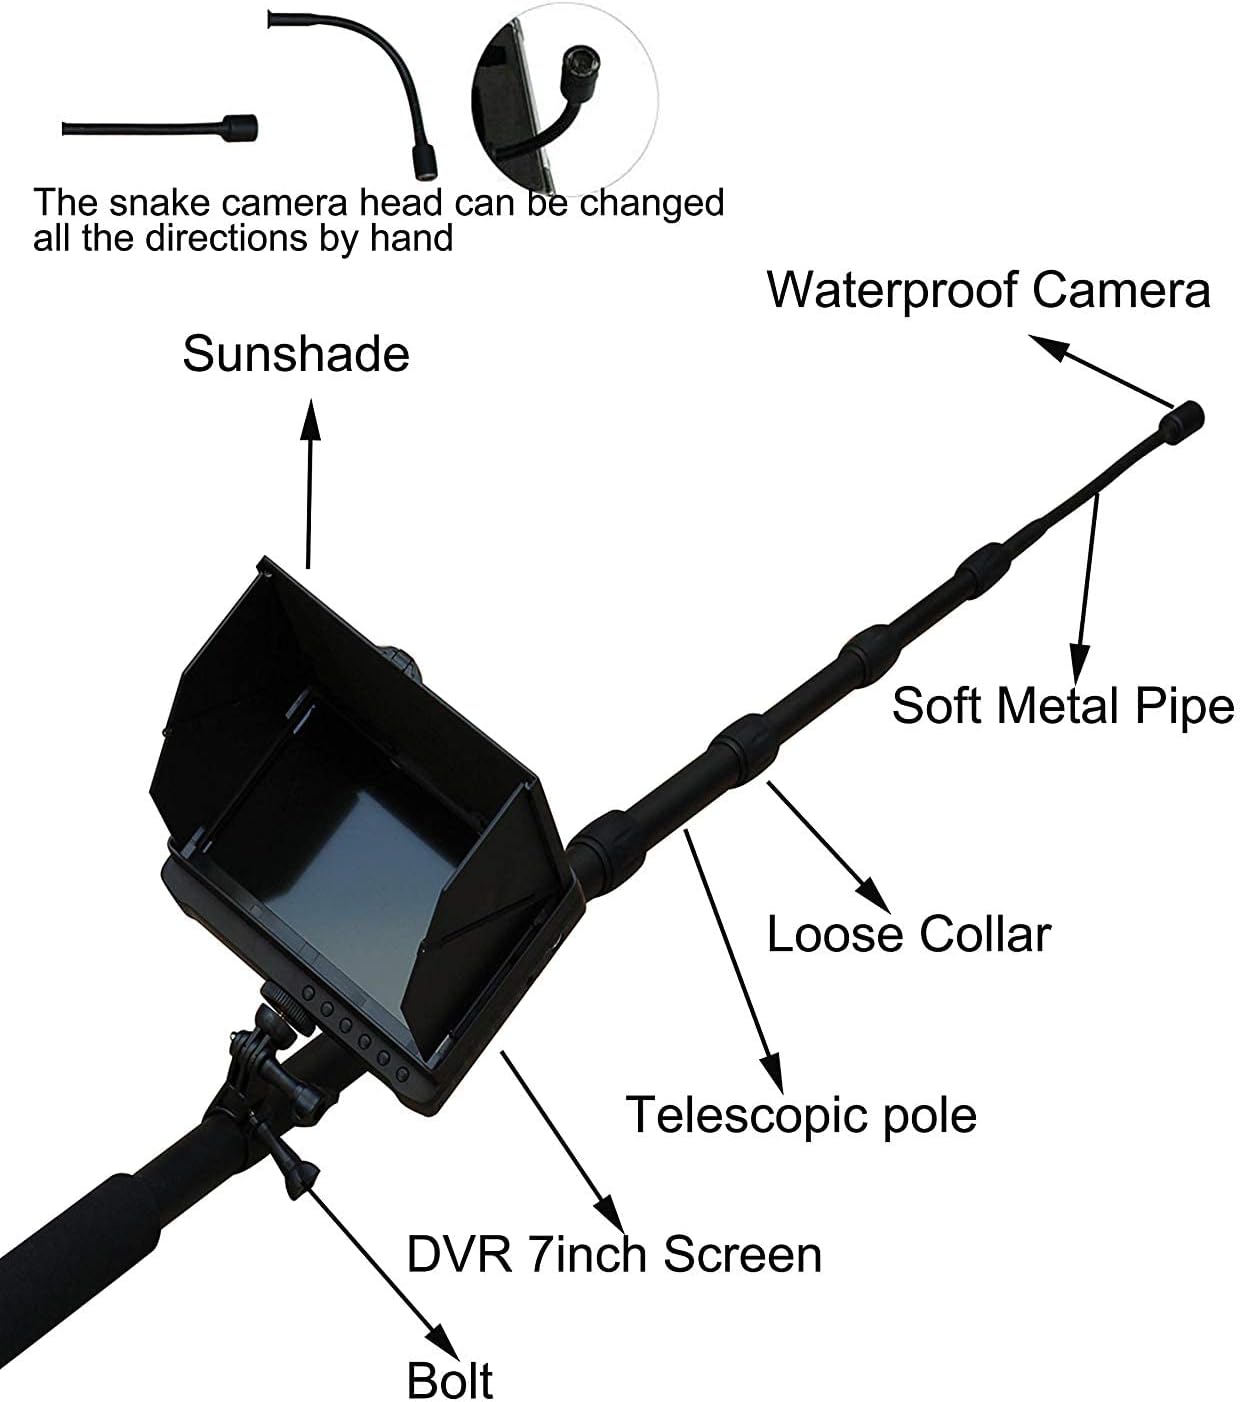
Figure 2: Main components of the Vividia TVS-507 system, illustrating the sunshade, camera, pole sections, and monitor.

Figure 3: Detailed structural diagram of the inspection system, highlighting the flexible camera and audio sensor.
3. Aratohu Tatūnga
3.1 Te Wetewete me te Tirotiro Tuatahi
Carefully remove all components from the sturdy carry case. Inspect each part for any signs of damage. Ensure all listed components are present.
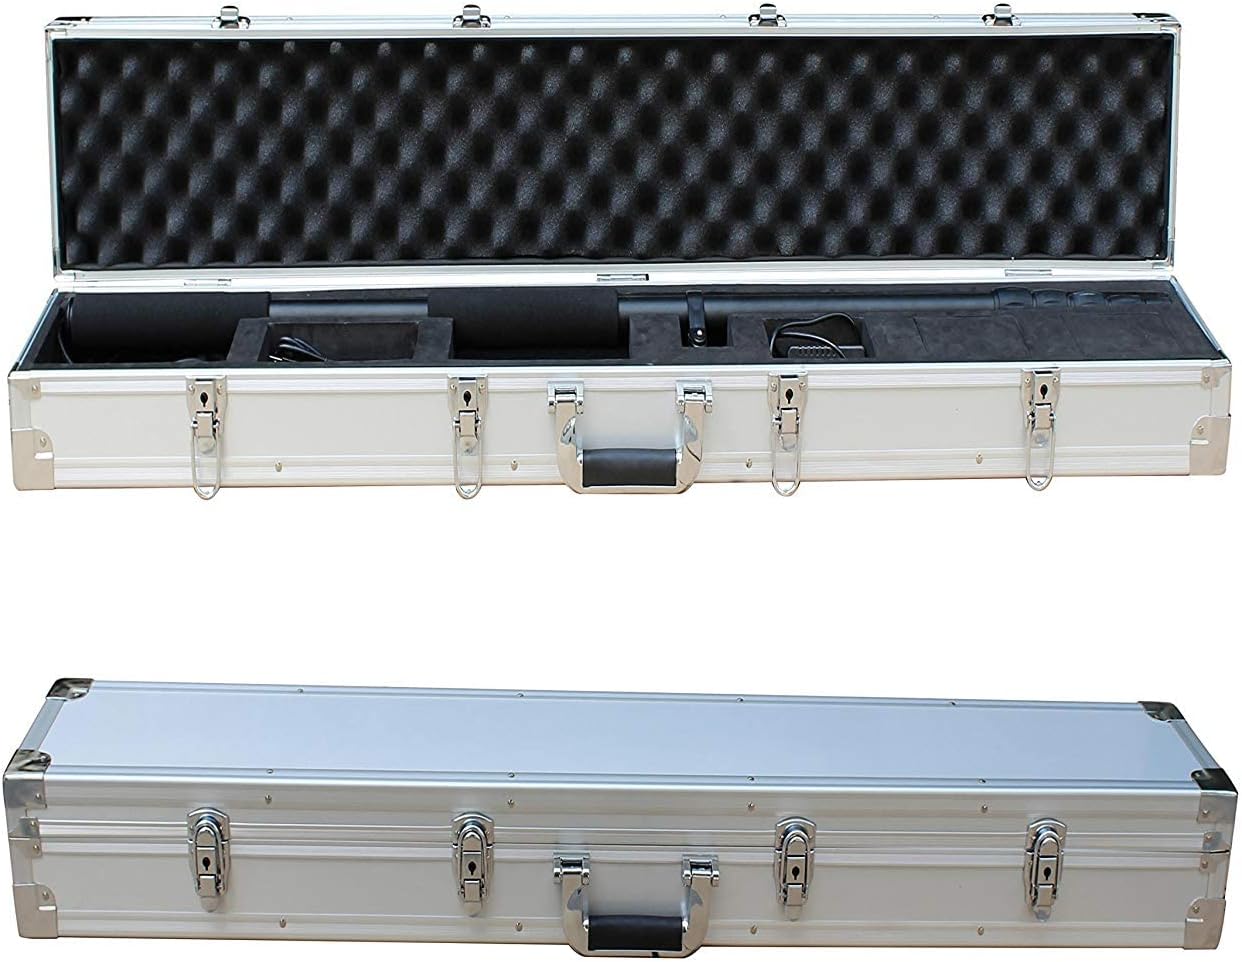
Figure 4: The system components neatly arranged within the protective carry case.
3.2 Assembling the Pole and Camera
- Extend the telescopic pole sections by twisting and pulling them to the desired length. Secure each section by twisting in the opposite direction.
- Attach the flexible gooseneck camera head to the top of the pole. Ensure it is securely fastened.
- Connect the camera cable to the designated port on the control box/monitor unit.
3.3 Attaching the Monitor and Control Box
- Mount the 7-inch LCD touchscreen monitor onto the pole using the provided bracket. Adjust the viewkoki mo te tirohanga tino pai.
- Ensure all connections between the monitor, control box, and pole are firm.

Figure 5: The 7-inch LCD monitor and control panel, detailing input/output ports and control buttons.
3.4 Inserting the SD Card and Charging the Battery
- Locate the SD card slot on the control box. Insert a compatible SD card (up to 32GB) for recording photos and videos.
- Connect the power adapter to the control box and a power outlet to fully charge the lithium battery before first use. The charging indicator will show the battery status.
For a visual guide on assembly and basic operation, please refer to the video below. Note that this video features the TVS-500 model, but the general assembly and operational principles are similar.
Ataata 1: Ka mutuview of the Vividia Telescopic Pole Inspection Camera (TVS-500 model shown), demonstrating its features and applications. This video provides a general understanding of the system's capabilities.
4. Nga Tohutohu Whakahaere
4.1 Kei te Hiko / Weto
To power on the system, press and hold the 'Power ON/OFF' button on the control box until the LCD screen illuminates. To power off, press and hold the same button until the screen shuts down.
4.2 Adjusting Camera and Lighting
- Camera Direction: The flexible gooseneck camera head can be manually bent and adjusted to the desired viewkoki.
- Tiaho LED: Use the 'LED brightness adjusting knob' on the control box to increase or decrease the intensity of the camera's LED lights. This helps optimize visibility in varying light conditions.
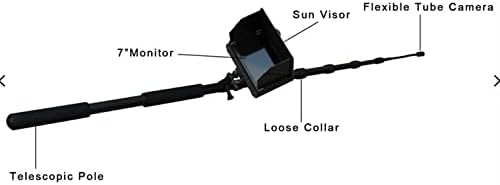
Figure 6: The flexible camera head, which can be adjusted manually for optimal viewing.
4.3 Recording Video and Photos
The system supports both video recording and still image capture. Ensure an SD card is inserted before recording.
- Whakawhiti Aratau: Use the 'AV&photo selection' button to toggle between video and photo modes.
- Hopu Ataata: In video mode, press the 'Record' button to start recording. Press it again to stop.
- Whakaahua: In photo mode, press the 'Photo' button to capture a still image.
- Mana hopuoro: Use the 'On/off MIC control button' to enable or disable audio recording.
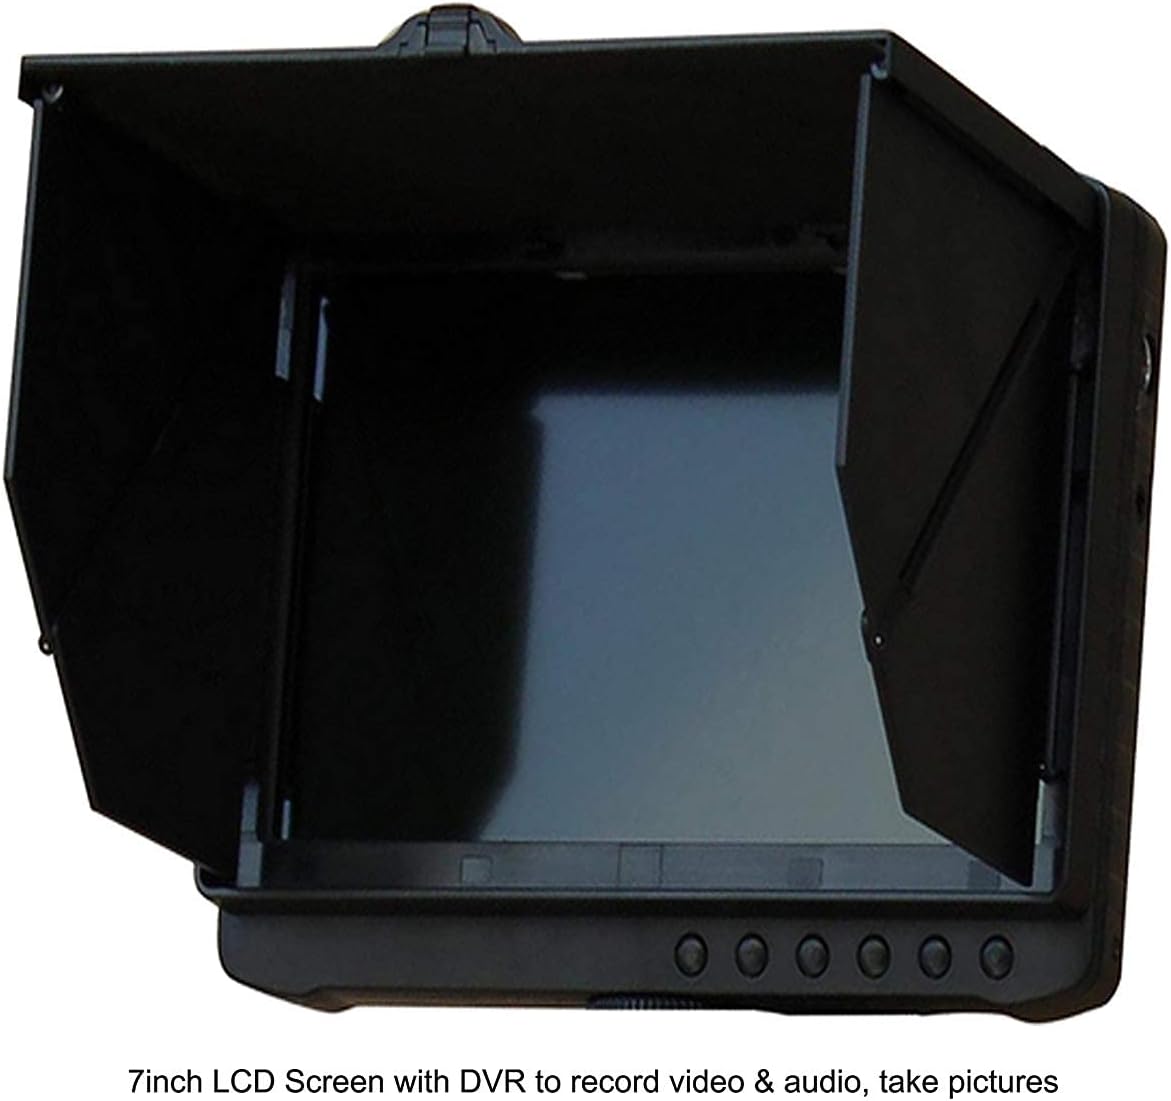
Figure 7: The 7-inch LCD screen showing the live camera feed and recording status.
4.4 Playback and Data Transfer
- On-Device Playback: Use the 'Play' button and navigation controls on the control box to review recorded videos and photos directly on the monitor.
- Te whakawhiti Files: Remove the SD card from the control box and insert it into a computer or compatible device to transfer and view your recorded media.
5. Tiaki
5.1 Te horoi
- Upoko kāmera: Gently wipe the camera lens with a soft, lint-free cloth. For stubborn dirt, use a small amount of lens cleaning solution. Ensure the camera head is dry before storage.
- Monitor and Control Box: Use a dry, soft cloth to clean the monitor screen and control box. Avoid abrasive cleaners or excessive moisture.
- Pou: Wipe down the telescopic pole with a damp cloth to remove dirt and debris. Dry thoroughly.
5.2 Rokiroki
When not in use, store the Vividia TVS-507 system in its original sturdy carry case in a cool, dry place, away from direct sunlight and extreme temperatures. Ensure the pole is fully retracted and all components are securely placed to prevent damage.
5.3 Tiaki Pūhiko
To prolong battery life, fully charge the battery before long-term storage and recharge it every 3-6 months if not in regular use. Avoid completely draining the battery frequently.
6. Te Raru
| Raruraru | Take pea | Rongoā |
|---|---|---|
| Kaore he ahua o te mata | Camera cable loose; Battery low; System not powered on. | Check camera cable connection; Charge battery; Press and hold power button to turn on. |
| Cannot record video/photos | No SD card inserted; SD card full; SD card corrupted. | Kōkuhu kāri SD; Mukua tawhito files or use a new SD card; Format SD card (this will erase all data). |
| Ko nga rama LED e kore e mahi | LED brightness knob set to minimum; Faulty connection. | Adjust LED brightness knob; Check camera head connection. |
| Te kounga whakaahua kounga | Dirty camera lens; Insufficient lighting; Camera too far from object. | Clean camera lens; Increase LED brightness; Move camera closer to the inspection area. |
7. Whakatakotoranga
| Āhuahira | Taipitopito |
|---|---|
| Tau tauira | VV-TVS-507DVR |
| Camera Head Diameter | Φ18mm |
| Pole Length (Min-Max) | 1.1m (3.7 ft) - 5m (16 ft) |
| Rahi Pūoko | 1/3 inihi |
| Whakataunga kamera | 5MP |
| Marae o View | 90° |
| Rarama LED | 12 high-intensity white LEDs (adjustable) |
| Rahi Aroturuki | Mata Pa LCD 7-inihi |
| Pupuri Puka | SD Card (max 32GB) |
| Pūhiko Raukaha | 7500mAh Pūhiko Lithium |
| Nga haora mahi | Tata ki te 5 haora |
| Waterproof Rating (Camera) | IP68 |
| Whakataunga Hopu Ataata | 720p |
| Aratau Whakapupuri | Pikitia |
| Momo Mana Whakaaturanga | ā-ringa |
8. Pūtāhui me te Tautoko
For warranty information, technical support, or service inquiries, please contact Vividia customer service. Details can typically be found on the product packaging or the official Vividia webpae.
Ka taea hoki e koe te toro atu ki te rangatira VIVIDIA Store on Amazon mo etahi atu korero hua me nga rauemi tautoko.