1. Kupu Whakataki
Thank you for choosing the CREATE SILKAIR CONNECT 3-in-1 Mobile Air Conditioner. This versatile appliance is designed to provide cooling, dehumidification, and fan functions for your living space. With its Wi-Fi connectivity, you can conveniently control the unit via a mobile application. Please read this manual thoroughly before operation to ensure safe and efficient use.
Tauira: 64274_145198
Waitohu: HANGA
2. Nga korero haumaru
Me whai i nga wa katoa i nga whakaritenga haumaru ina whakamahi taputapu hiko hei whakaiti i te tupono o te ahi, te ru hiko, me te whara.
- Me whakarite kia rite te toha hiko ki te voltage kua tohua ki te tapanga whakatauranga.
- Kaua e whakahaeretia te waeine me te taura pakaru, te mono ranei.
- Tiakina te waahanga mai i nga puna wera me te ra tika.
- Kaua e araia nga urunga hau, nga putanga ranei.
- Momotuhia te mono i te waeine i mua i te horoinga, i te tiaki rānei.
- Ka whakamahia e tenei taputapu te whakamahana R290. Kaua e werohia te iahiko whakamatao.
- Aroturukihia ngā tamariki, kia kore hoki rātou e tākaro ki te taputapu.
3. Ihirangi mokete
Carefully unpack your air conditioner and check that all items are present and in good condition.
- CREATE SILKAIR CONNECT Mobile Air Conditioner Unit
- Ngongo ngongo
- Window Sealing Kit (Adjustable window slider, hose adapter)
- Mana Mamao
- Pukapuka Kaiwhakamahi

Figure 1: The CREATE SILKAIR CONNECT Mobile Air Conditioner unit shown alongside a smartphone displaying its control application interface.
4. Hua Neke Atuview
4.1 Paewhiri Mana

Figure 2: Close-up of the top-mounted control panel, featuring an LED display and touch-sensitive buttons for various functions such as power, mode selection, fan speed, and timer.
4.2 Ngā Wāhanga me ngā Ahu
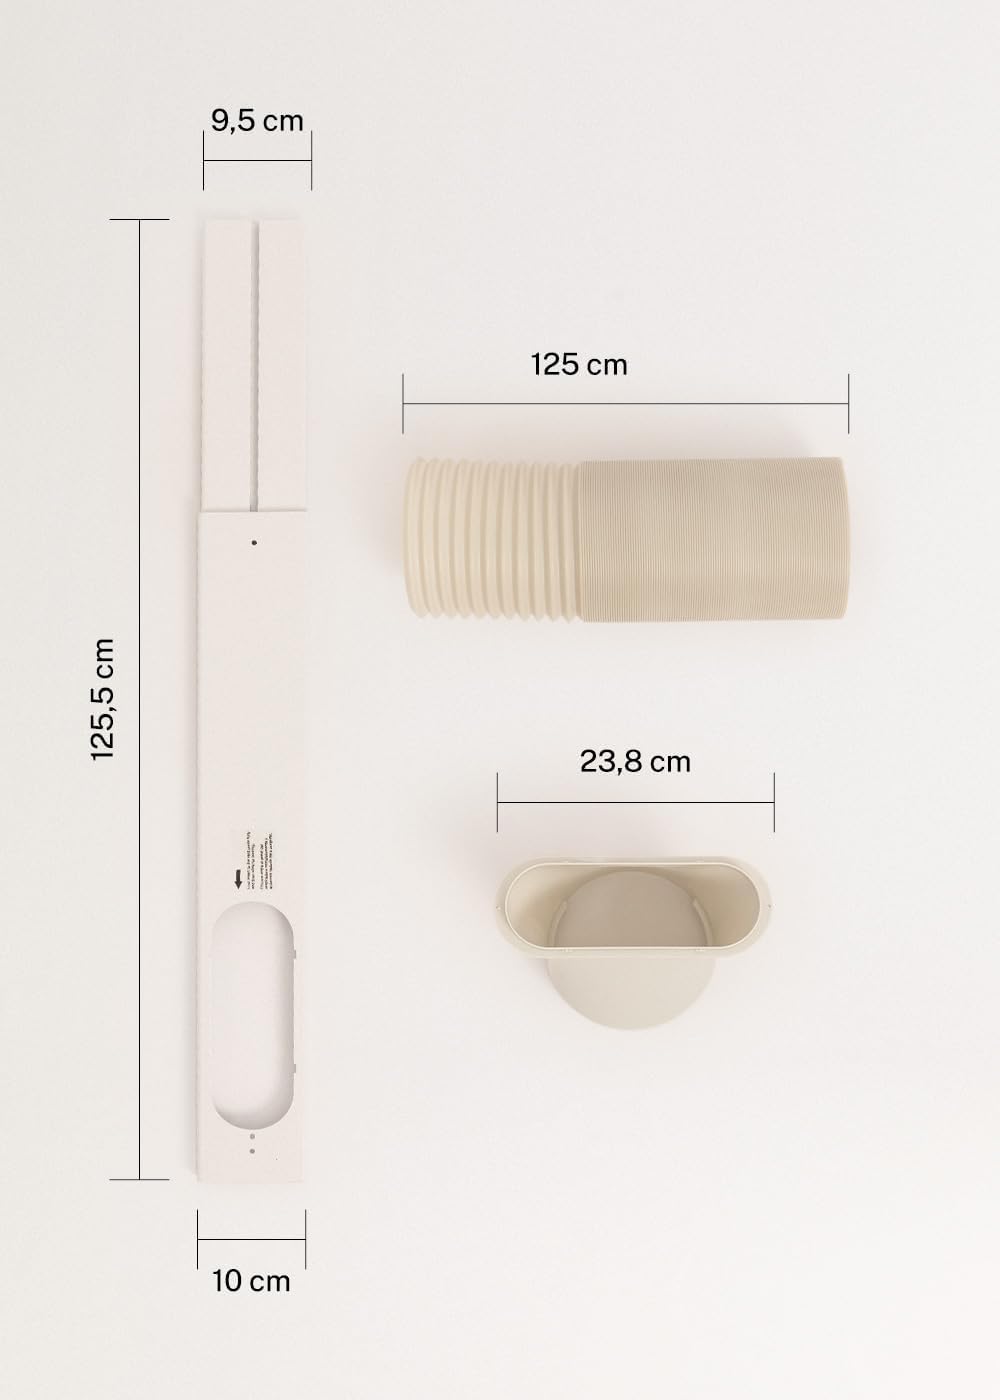
Figure 3: Detailed diagram illustrating the dimensions of the window sealing plate (125.5 cm length, 10 cm width, 9.5 cm adjustable width) and the exhaust hose (125 cm length) with its adapter (23.8 cm diameter).
5. Tatūnga me te Tāuta
Proper installation is crucial for the efficient operation of your mobile air conditioner.
5.1 Te Whakanoho i te Waeine
- Whakanohia te waahanga ki runga i te papa papatahi, papa hoki.
- Me whakarite kia 30 henemita te iti rawa o te wāhi huri noa i te taputapu kia pai ai te rere o te hau.
- Whakanohoia te waeine ki te taha o te matapihi, te whakatuwhera ranei mo te ngongo ngongo.
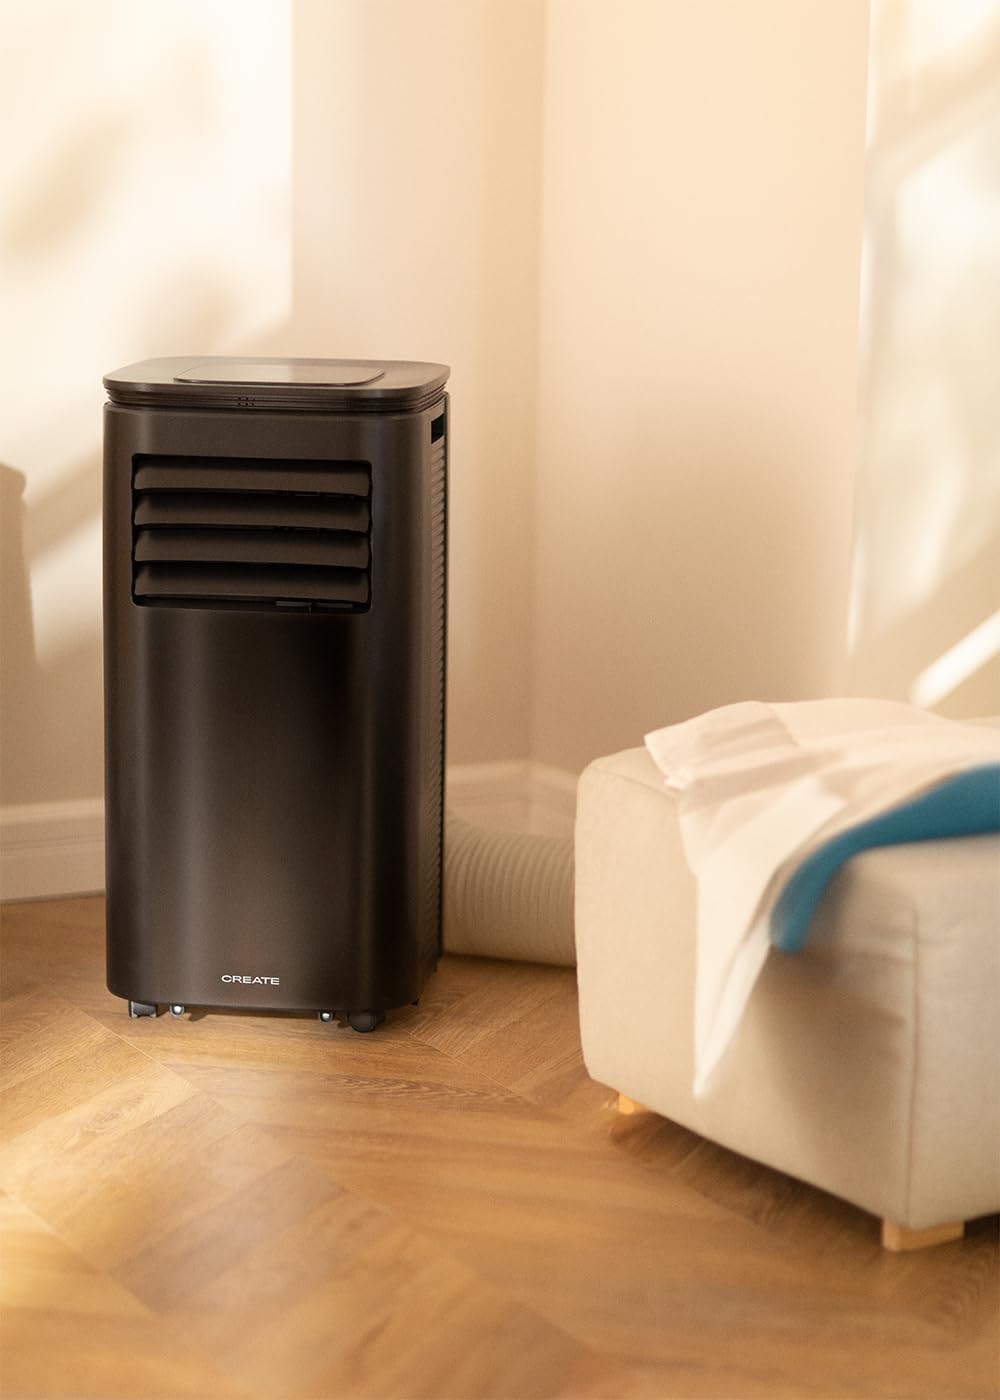
Figure 4: The air conditioner unit positioned in a room, demonstrating the typical setup with the exhaust hose directed towards a window for heat expulsion.
5.2 Te Tāuta i te Ngongo Puta me te Kete Matapihi
- Whakauruhia te urutau ngongo ki tetahi pito o te ngongo ngongo.
- Honoa te tahi pito o te ngongo ngongo ki te putanga hau kei muri o te waeine.
- Install the adjustable window sealing kit in your window opening. Extend it to fit the window frame.
- Insert the hose adapter into the opening of the window sealing kit.

Figure 5: Illustrates the secure connection of the flexible exhaust hose to the designated port at the rear of the air conditioning unit.
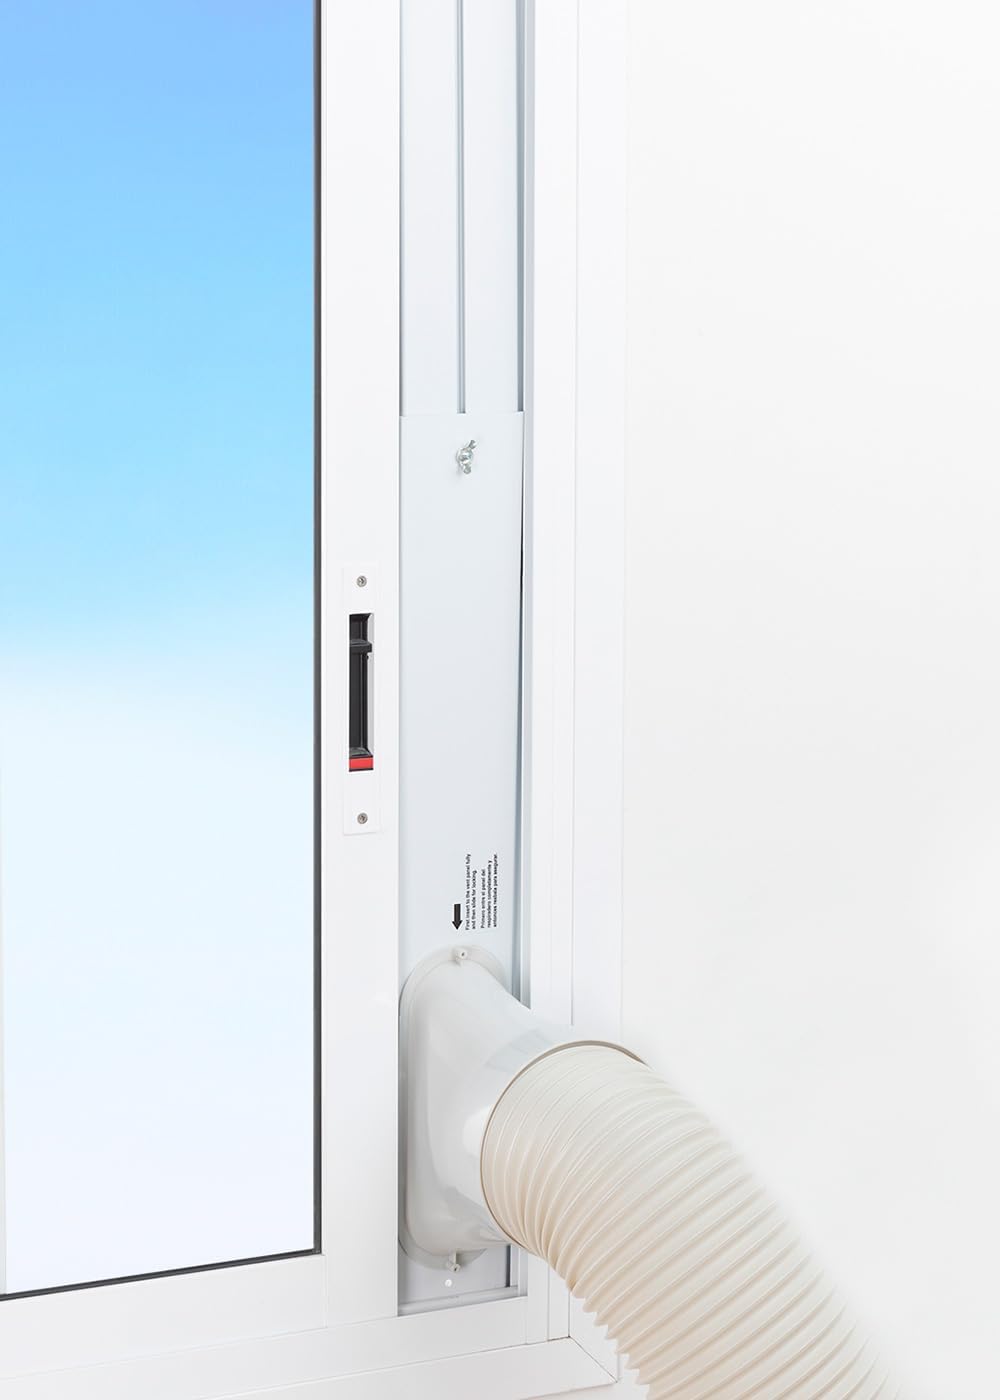
Figure 6: The window sealing kit is shown properly installed in a window frame, with the exhaust hose securely fitted into the kit's opening to vent hot air outside.
6. Nga Tohutohu Whakahaere
6.1 Te whakamahi i te Paewhiri Mana
The control panel on top of the unit allows direct operation.
- Pātene Hiko: Pēhia ki te whakakā i te waeine ki te ON, ki te OFF ranei.
- Patene Aratau: Cycle through Cooling, Fan, and Dehumidifier modes.
- Pātene Tere Kiri: Adjust fan speed (Low, High).
- Ngā Pātene Mahana (+/-): Adjust desired temperature in Cooling mode.
- Pātene Matawā: Set the auto-on or auto-off timer (up to 24 hours).
- Pātene Aratau Moe: Activates a quieter operation mode for nighttime use.
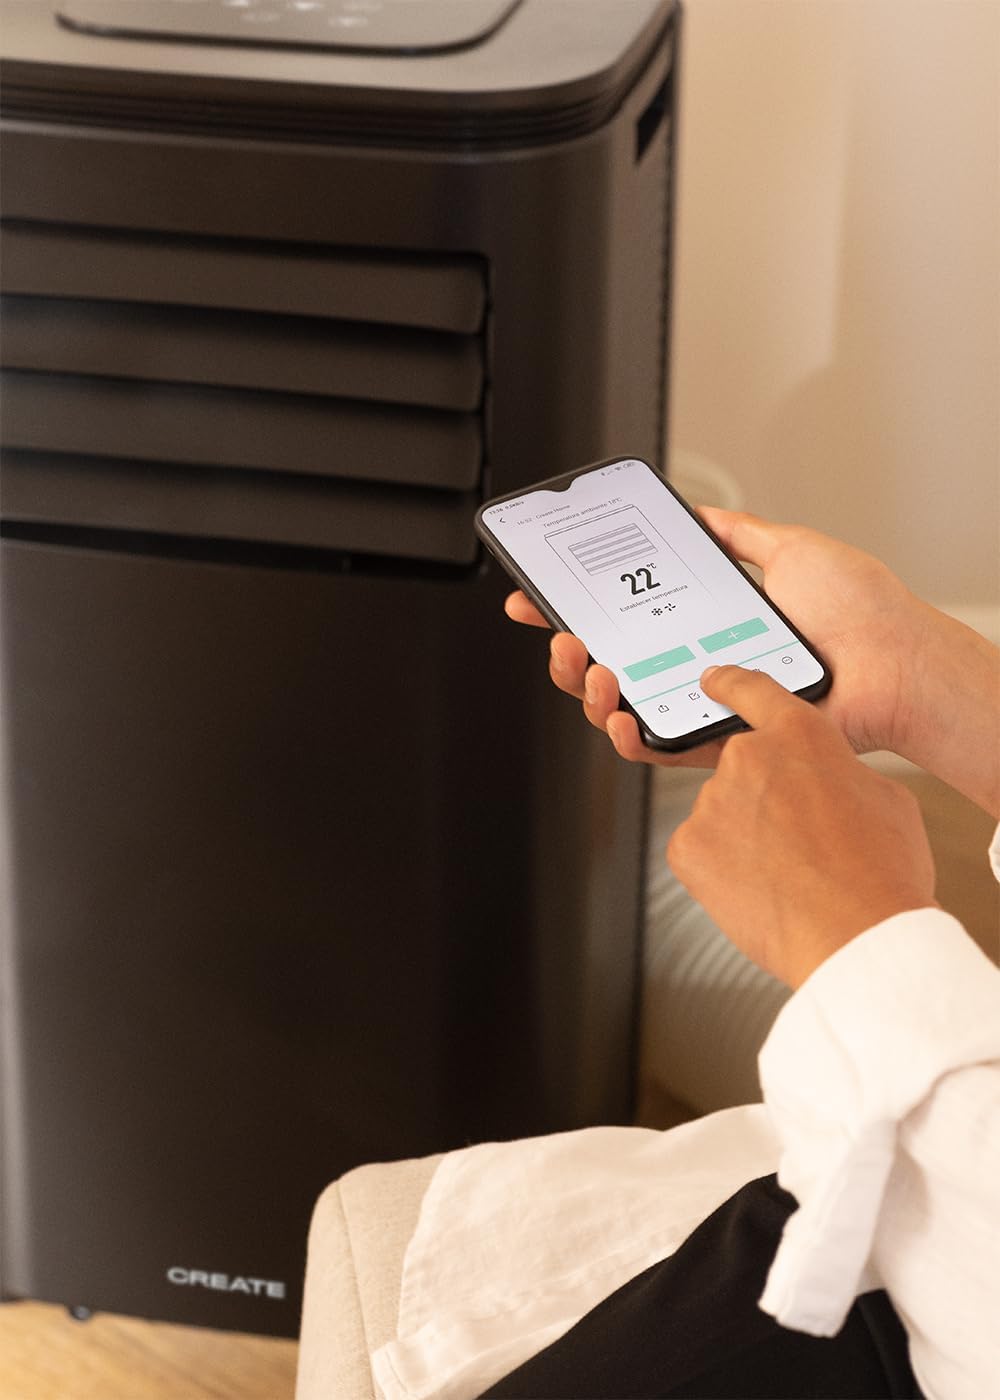
Figure 7: A user's hand interacting with the touch-sensitive control panel located on the top surface of the air conditioner, demonstrating direct manual operation.
6.2 Te whakamahi i te Mana Mamao
Ka whakaratohia e te mana mamao he mahi watea mai i tawhiti.

Figure 8: A hand holding the dedicated remote control for the air conditioner, illustrating its use for convenient operation from a distance.
6.3 Wi-Fi me te Mana Taupānga
Download the CREATE Home app from your smartphone's app store. Follow the in-app instructions to connect your air conditioner to your home Wi-Fi network. Once connected, you can control all functions of the unit from your smartphone, including mode selection, temperature adjustment, fan speed, and timer settings.
Figure 9: A user interacting with the mobile application on a smartphone to remotely control the air conditioner, showcasing the Wi-Fi connectivity feature.
7. Tiaki
Ko te tiaki i nga wa katoa ka tino pai te mahi me te whakaroa i te roanga o to waahanga.
7.1 Te horoi i te Tātari Hau
Me horoi te tātari hau ia rua wiki, nui ake ranei i runga i te whakamahinga me te kounga o te hau.
- Whakawetohia te waeine ka unu mai i te putanga hiko.
- Locate the air filter panel on the back of the unit.
- Tango ata te tātari.
- Clean the filter with warm, soapy water or a vacuum cleaner. Rinse thoroughly and allow it to air dry completely before reinserting.

Figure 10: Demonstrates the process of removing the air filter from the rear of the air conditioner unit for cleaning or replacement.
7.2 Whakaheke Wai
In Dehumidifier mode or high humidity conditions, the internal water tank may fill up. The unit will stop operating when the tank is full. Drain the water from the drainage port at the bottom rear of the unit.
8. Te Raru
| Raruraru | Take pea | Rongoā |
|---|---|---|
| Karekau te waeine e ka ana | No power; Power cord not plugged in; Water tank full. | Tirohia te putanga hiko; Mono ki te taura hiko; Taaka wai. |
| Ko te waeine kaore i te whakamatao pai | He paru te tātari hau; Kāore i te tika te tāutanga o te ngongo hau; He nui rawa te rūma; He tuwhera ngā tatau/matapihi. | Clean air filter; Ensure hose is sealed; Use in recommended room size (14-25 m²); Close doors/windows. |
| Haruru nui | Kaua te wae i runga i te papa papatahi; Te aukati i roto i te powhiriwhiri. | Place on flat surface; Check for obstructions. |
| Nga take hononga Wi-Fi | Incorrect Wi-Fi password; Router too far; App issues. | Verify password; Move unit closer to router; Restart app/unit. |
9. Whakatakotoranga
| Āhuahira | Whakatakotoranga |
|---|---|
| Tau tauira | 64274_145198 |
| Te Whakamaoho | 9000 BTU / 2270 Watt |
| Raukaha Whakakorea | 24 Rita/Ra |
| Rererangi | Tae atu ki te 350 m³/h |
| Rahi Rūma Manakohia | 14-25 m² |
| Taumata Haruru | 65 dB |
| Whakamaoho | R290 (ECO-friendly) |
| Voltage | 240 Volt |
| Wattage | 2600 Waata |
| Ahu (L x W x H) | 35.5 x 36.5 x 71.3 cm |
| Rauemi | ABS |
| Karaehe Pungao Pungao | A |

Figure 11: The energy efficiency label for the CREATE SILKAIR CONNECT, indicating an A-class energy rating, 2.6 kW cooling capacity, and a noise level of 65 dB. More details can be found at eprel.ec.europa.eu/qr/1580267.
10. Pūtāhui me te Tautoko
For warranty information and technical support, please refer to the warranty card included with your product or visit the official CREATE webpae. Puritia to riiki hoko hei tohu mo te hoko.
Kaihanga: HANGA
Whakapā: Refer to CREATE's official support channels.