1. Kupu Whakataki me nga Korero Haumaru
Thank you for choosing the ANENG V8 Digital Multimeter. This device is designed for safe and accurate measurement of AC/DC voltage, AC/DC current, resistance, capacitance, frequency, temperature, diode, continuity, and battery testing. Please read this manual thoroughly before use to ensure proper operation and to prevent potential hazards.
1.1 Whakatupato Haumaru
- Always ensure the multimeter is in good working condition before use. Inspect test leads for damage.
- Kaua e tono voltage or current that exceeds the maximum rated values for the multimeter.
- Kia tino tupato ki te mahi me te voltages above 36V DC or 25V AC RMS, as these can pose a shock hazard.
- Momotuhia i nga wa katoa te hiko ki te ara iahiko ka tuku i nga puia teitei katoatagngā pūnga iahiko i mua i te ine i te ātete, te haere tonu, ngā diode, te capacitance rānei.
- Ensure the rotary switch is in the correct position for the desired measurement before connecting the test leads to the circuit.
- Kaua e whakahaerehia te mita maha i roto i ngā taiao pahū, te kohu, te puehu rānei.
- Whakakapia tonutia ngā pākahiko ina puta mai te tohu pākahiko iti hei whakarite kia tika ngā pānui.
2. Hua Neke Atuview
2.1 Ihirangi mokete
The ANENG V8 Digital Multimeter package typically includes the following items:
- ANENG V8 Digital Multimeter
- Nga Tohu Whakamatau (Whero me te Pango)
- Te Huringa Pawera
- Te Kawe i te Keehi
- Pukapuka Kaiwhakamahi

Image: ANENG V8 Digital Multimeter with its standard accessories, including test leads, a temperature probe, and a protective carrying case.
2.2 Mana me te Whakaatu
The multimeter features an 8000-count LCD backlight display for clear readings in various lighting conditions. Key controls include a rotary switch for function selection and buttons for range, data hold, and other features.

Whakaahua: Taipitopito view of the multimeter's front panel, highlighting the LCD screen, the central rotary selector, and various control buttons.
3. Tatūnga
3.1 Tāuta Pūhiko
The ANENG V8 Digital Multimeter is powered by batteries. To install or replace batteries:
- Me mohio kua whakawetohia te mita maha ka momotuhia nga arataki whakamatautau katoa.
- Kimihia te uhi o te wahanga pākahiko kei muri o te taputapu.
- Whakamahia he tīwiri hei wetekina i ngā tīwiri e mau ana i te taupoki pākahiko.
- Tangohia te uhi.
- Insert new batteries, observing the correct polarity (+ and -) as indicated inside the compartment. The device typically uses AA batteries.
- Whakakapia te uhi o te pākahiko ka mau ki te (ng) tīwiri.
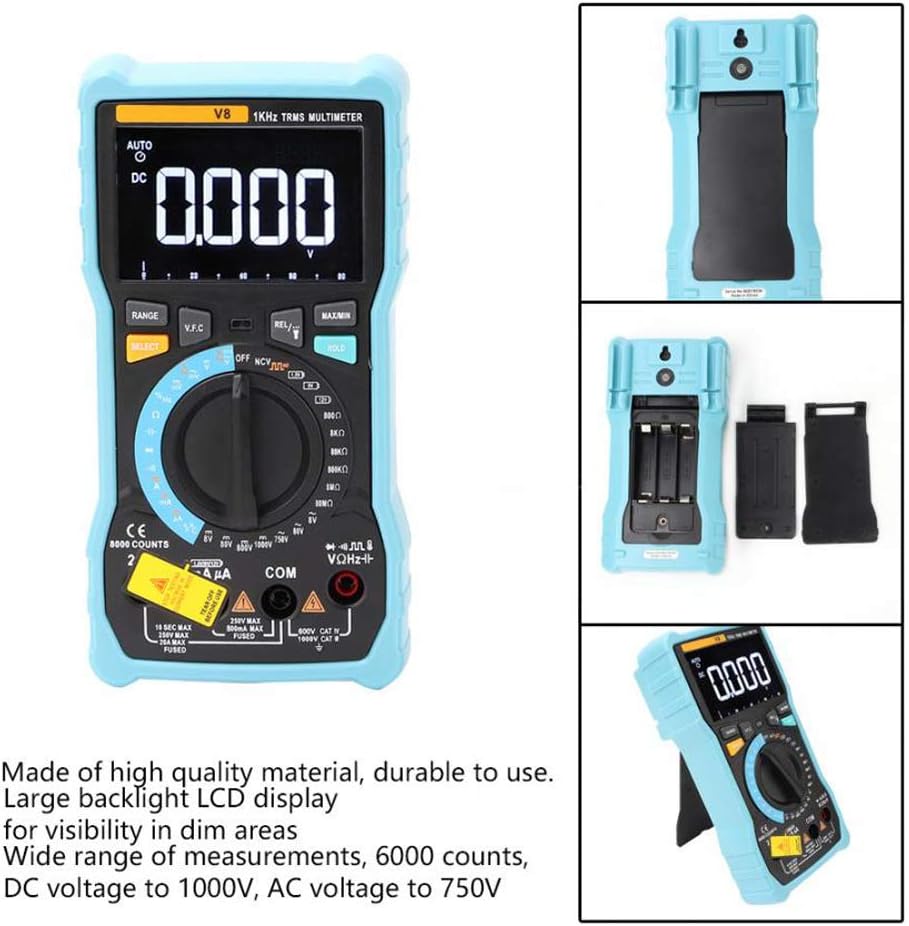
Whakaahua: Te muri view of the multimeter with the battery compartment open, illustrating the correct placement for three AA batteries.
4. Nga Tohutohu Whakahaere
Before any measurement, ensure the test leads are correctly inserted into the input jacks and the rotary switch is set to the appropriate function.
4.1 Measuring DC/AC Voltage
- Set the rotary switch to the 'V–' (DC Voltage) or 'V~' (AC Voltage) tūnga.
- Connect the red test lead to the 'VΩmA' jack and the black test lead to the 'COM' jack.
- Honoa ngā taura whakamātautau kia whakarara ki te ara iahiko, ki te wāhanga rānei e hiahia ana koe ki te ine.
- Pānuihia te voltage uara kei runga i te whakaaturanga.
4.2 Measuring DC/AC Current
- Set the rotary switch to the 'A–' (DC Current) or 'A~' (AC Current) position. For milliampere (mA) moroiti rāneiampere (µA) measurements, select the corresponding range.
- For current up to 800mA, connect the red test lead to the 'VΩmA' jack. For current up to 20A, connect the red test lead to the '20A' jack. Connect the black test lead to the 'COM' jack.
- Disconnect power to the circuit. Open the circuit where you want to measure current. Connect the multimeter in series with the circuit.
- Tāpirihia te hiko ki te ara iahiko, ka pānui i te uara o nāianei kei runga i te whakaaturanga.
4.3 Te Ine Atete
- Whakatakotoria te pana hurihuri ki te tūranga 'Ω' (Ātete).
- Connect the red test lead to the 'VΩmA' jack and the black test lead to the 'COM' jack.
- Ensure the circuit is de-energized and all capacitors are discharged. Connect the test leads across the component to be measured.
- Panuihia te uara aukati kei runga i te whakaaturanga.
4.4 NCV (Kore-Whakapā Voltage) Rapunga
- Set the rotary switch to the 'NCV' position.
- Move the top end of the multimeter near the conductor or outlet.
- Ka tangi te mita maha i tētahi tangi pī, ā, ka mura te rama tohu NCV mēnā ka puta te hau ACtage is detected, indicating the presence of live voltage kore e pa ki te tinana.
4.5 Te Ineina o te Hahana
- Set the rotary switch to the '°C/°F' (Temperature) position.
- Connect the temperature probe to the 'VΩmA' and 'COM' jacks, observing polarity if applicable.
- Whakatakotoria te pito o te ine pāmahana ki runga, ki te taha rānei o te mea e hiahia ana koe ki te ine.
- Pānuihia te uara pāmahana kei runga i te whakaaturanga.
4.6 Ētahi atu Mahi
- Te kaha: Set the rotary switch to the 'F' position. Connect leads across the discharged capacitor.
- Auautanga/Hanga Mahi: Set the rotary switch to the 'Hz/%' position. Connect leads to the signal source.
- Whakamatau Whakatautau: Set the rotary switch to the 'Diode' position. Connect leads across the diode.
- Whakamātautau Tonu: Set the rotary switch to the 'Continuity' position. Connect leads across the circuit. An audible beep indicates continuity.
- Whakamātautau Pūhiko: Set the rotary switch to the 'Battery' position. Connect leads to the battery terminals (1.5V, 9V, or 12V).
- Pupuri Raraunga: Pēhia te paatene 'HOLD' hei whakatio i te panui o naianei kei te whakaaturanga. Patohia ano kia tukuna.
- Rama Whakamuri/Rama Whakamuri: Press the backlight button to turn on/off the display backlight or flashlight.
- Whakaweto Aunoa: Ka whakaweto aunoa te mita maha i muri i te kore mahi mō tētahi wā hei penapena i te roa o te pākahiko.
5. Tiaki
5.1 Te horoi
Mukua te keehi me te panuiamp kakahu me te horoi ngawari. Kaua e whakamahi i te abrasive me te whakarewa. Kia noho kore he paru me te makuku nga pito whakauru.
5.2 Whakakapinga Puka
Ki te kore e mahi te mahi ine i te au, me whakakapi pea te fiusi. Tirohia ngā whakaritenga mō te momo fiusi me te whakatauranga tika. Me mahi anake te whakakapinga fiusi e ngā kaimahi whai tohu.
5.3 Rokiroki
When not in use for extended periods, remove the batteries to prevent leakage and store the multimeter in a dry, cool place.
6. Te Raru
- Kore Whakaatu: Tirohia te tāutanga o te pākahiko, ā, ka whakakīia. Whakakapia ngā pākahiko mēnā e tika ana.
- Pānui hē: Ensure the rotary switch is set to the correct function and range. Check test lead connections. Verify battery charge.
- Kāore te Ine o Nāianei e Mahi Ana: Check the fuse. Replace if blown (refer to fuse replacement section).
- Kaore te NCV e kitea: Ensure the NCV function is selected and the multimeter is close enough to the AC voltage puna.
7. Whakatakotoranga
| Tawhā | Uara |
|---|---|
| Whakaatu | 8000 Counts LCD with Backlight |
| DC Voltage (V) | 8.000V / 80.00V / 800.0V / 1000V |
| DC Voltage (mV) | 800mV |
| AC Voltage (V) | 8.000V / 80.00V / 750V |
| AC Voltage (mV) | 800mV |
| DC Naianei (A) | 8.000A / 20.00A |
| DC Ake (mA) | 8.000mA / 80.00mA / 800.0mA |
| DC Naianei (µA) | 800µA / 8000µA |
| AC o nāianei (A) | 8.000A / 20.00A |
| AC Onāianei (mA) | 8.000mA / 80.00mA / 800.0mA |
| AC Naianei (µA) | 800µA / 8000µA |
| Ātete | 800.0Ω / 8.000kΩ / 80.00kΩ / 800.0kΩ / 8.000MΩ / 80.00MΩ |
| Te kaha | 9.999nF / 99.99nF / 999.9nF / 9.999µF / 99.99µF / 999.9µF / 9.999mF / 99.99mF |
| Auautanga | 9.999Hz / 99.99Hz / 999.9Hz / 9.999kHz / 99.99kHz / 999.9kHz / 9.999MHz |
| Huringa Mahi | 1% ~ 99% |
| Awhe Pawera | -20°C ~ 1000°C (-4°F ~ 1832°F) |
| Whakamātautau Pūhiko | 1.5V / 9V / 12V |
| Awheawhe | Auto / Pukapuka |
| Reiti Whakahou | 3 nga wa / tuarua |
| RMS pono | Ae |
| Pupuri Raraunga | Ae |
| Rarama Whakamuri/Rarama | Ae |
| Matohi Puhiko Iti | Ae |
| Whakaweto Aunoa | Ae |
| Rauemi | ABS / PVC |
| Puna Mana | Pūhiko Powered |
8. Pūtāhui me te Tautoko
This product is covered by a standard manufacturer's warranty against defects in materials and workmanship. Please refer to the warranty card included with your purchase for specific terms and conditions. For technical support or service inquiries, please contact your retailer or the manufacturer's customer service department.
9. Ataata Hua Whaimana
Kaore he ataata hua mana mai i te kaihoko e waatea ana mo te whakauru i tenei wa.