
1. Fampidirana
This manual provides detailed instructions for the installation, operation, and maintenance of your ALTHY PRE-1 Whole House Spin Down Sediment Water Filter. Please read this manual thoroughly before installation and use to ensure proper function and safety.
The ALTHY PRE-1 filter is designed to remove sediment, rust, dust, and sand particles from your household water supply, protecting downstream appliances and improving overall water quality.
2. Information momba ny fiarovana
- Always turn off the main water supply before installing or performing maintenance on the filter.
- Depressurize the water system before opening the filter housing.
- Ataovy azo antoka ny fifandraisana rehetra mba hisorohana ny fivoahana.
- Do not install the filter in direct sunlight or in areas where it may freeze. Freezing can cause damage to the filter housing and lead to leaks.
- Use only genuine ALTHY replacement parts and filters.
- Raha tsy azonao antoka ny momba ny dingana fametrahana, dia miresaha amin'ny plumber mahay.
3. Vokatra singa
The ALTHY PRE-1 Whole House Spin Down Sediment Water Filter package typically includes the following components:
- Filter Unit (Housing, Filter Screen)
- Valve tatatra
- Special Wrench for Filter Housing
- 1/2" Internal 304 Stainless Steel Thread Adapters (2 pieces)
- Boky torolalana

Image 3.1: ALTHY PRE-1 Filter Unit and Included Accessories. This image displays the main filter unit, two filter screens, and a black wrench.

Image 3.2: What's in the Box. This image shows the filter unit, two stainless steel thread adapters, a drain valve, and the special wrench.
4. Fametrahana
The ALTHY PRE-1 filter should be installed on the main water line entering your home, after the main shut-off valve and before any other water treatment systems or appliances.
4.1 Lohahevitra mialoha ny fametrahana
- Ataovy azo antoka fa voamarikao avokoa ireo singa rehetra voatanisa ao amin'ny Fizarana 3.
- Gather necessary tools: pipe wrench, thread sealant tape (Teflon tape), pipe cutter (if modifying existing pipes), measuring tape.
- Choose a suitable installation location:
- Lavitry ny tara-masoandro mivantana.
- Voaro amin'ny hafanana mangatsiaka.
- Azo idirana amin'ny fikojakojana.
- Near a drain for flushing.
4.2 Dingana fametrahana
- Turn off Main Water Supply: Locate your main water shut-off valve and turn it off. Open a faucet in your home to relieve pressure and drain water from the pipes.
- Omano ny fantsona: Cut a section of the main water line where you intend to install the filter. Ensure the cut is clean and straight. The filter should be installed with the water flow direction matching the "IN" and "OUT" markings on the filter head.
- Install Adapters: Apply thread sealant tape to the threads of the 1/2" internal 304 Stainless Steel Thread Adapters. Screw these adapters into the inlet and outlet ports of the filter head.

Image 4.1: Flexible Installation for Water Pipe. This diagram illustrates how different pipe sizes (1/2", 3/4", 1") can be adapted for connection to the filter using the included adapters.
- Connect the Filter: Connect the filter unit to the cut sections of your main water line. Ensure the flow direction is correct (water enters the "IN" side and exits the "OUT" side). Tighten all connections securely, but do not overtighten.
- Install Drain Valve: Attach the drain valve to the bottom of the filter housing. Ensure it is securely tightened.
- Jereo raha misy leak: Slowly turn on the main water supply. Carefully inspect all connections for any leaks. If leaks occur, turn off the water, depressurize the system, and re-tighten the connections.
- Flush ny rafitra: Once installed and leak-free, open the drain valve at the bottom of the filter for a few minutes to flush out any air and fine particles from the new filter. Close the drain valve.
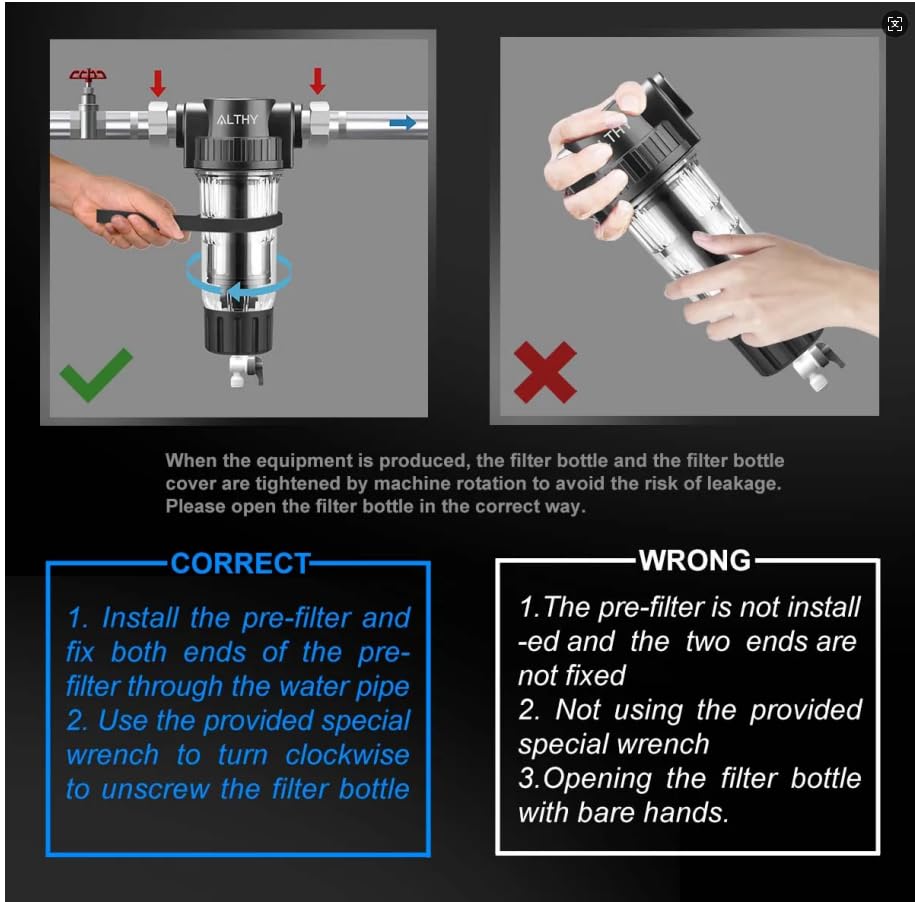
Image 4.2: Correct and Incorrect Installation/Opening. This image highlights the proper way to install the pre-filter and use the special wrench to unscrew the filter bottle, contrasting it with incorrect methods.
Video 4.1: ALTHY PRE-1 Pre-Filter Spin Sediment Filter Introduction. This video provides an overview of the ALTHY PRE-1 filter, its components, and basic functionality, including installation context within a whole house water purification system.
5. Fampandehanana
Once installed, the ALTHY PRE-1 filter operates continuously to filter your incoming water supply. The transparent housing allows for visual inspection of the filter screen and accumulated sediment.
5.1 Flushing the Filter
Regular flushing is essential to maintain filter efficiency and extend the life of the filter screen. The frequency of flushing depends on your water quality and usage.
- Locate the Drain Valve: The drain valve is at the bottom of the filter housing.
- Open the Drain Valve: Slowly turn the handle of the drain valve to the "ON" or open position. You will see water and accumulated sediment flush out.
- Flush Duration: Allow water to flush for 30-60 seconds, or until the water runs clear.
- Close the Drain Valve: Turn the handle back to the "OFF" or closed position.
It is recommended to flush the filter at least once a month, or more frequently if you notice a decrease in water pressure or visible sediment accumulation in the housing.
6. Fikojakojana
Beyond regular flushing, periodic cleaning of the filter screen is necessary to ensure optimal performance.
6.1 Fanadiovana ny Efijerin'ny Sivana
The ALTHY PRE-1 features a reusable and flushable stainless steel filter screen with a built-in double-sided scraper for efficient cleaning.
- Vonoy ny famatsiana rano: Turn off the main water supply and open a nearby faucet to relieve pressure.
- tatatra rano: Open the drain valve at the bottom of the filter to drain water from the housing. Close the drain valve once drained.
- Esory ny fonosan'ny sivana: Use the provided special wrench to carefully unscrew the transparent filter housing from the filter head. Turn counter-clockwise.

Image 6.1: Using the Special Wrench. The image demonstrates the correct use of the special wrench to unscrew the filter housing for maintenance.
- Remove Filter Screen: Carefully pull out the stainless steel filter screen from the housing.
- Ecran madio: Rinse the filter screen thoroughly under running water. The built-in double-sided scraper helps dislodge trapped particles. You can also use a soft brush if necessary.

Image 6.2: Double-sided Scraper. This diagram shows the internal double-sided scraper mechanism designed for 360-degree cleaning of the filter screen from the inside out.
- Jereo ny peratra O: Check the O-rings on the filter housing and head for any signs of wear, cracks, or damage. Replace if necessary. Lubricate O-rings with food-grade silicone grease to ensure a good seal.
- Manangona indray: Insert the clean filter screen back into the housing. Carefully screw the filter housing back onto the filter head, ensuring it is hand-tightened first, then use the special wrench for a final snug fit. Do not overtighten.
- Avereno amin'ny laoniny ny famatsian-drano: Slowly turn on the main water supply and check for leaks.
It is recommended to clean the filter screen every 3-6 months, depending on your water quality.
7. Famahana olana
| OLANA | Antony mety hitranga | vahaolana |
|---|---|---|
| Fidirana rano |
|
|
| Tosidra ambany rano |
|
|
| Visible Sediment After Filtration |
|
|
8. Famaritana
| endri-javatra | antsipirihany |
|---|---|
| Laharana modely | Taloha-1 |
| Filtration Rating | 40-Micron |
| Material Filter | 316L Stainless Steel Mesh |
| Fitaovana trano | BPA-free, Food Grade Material |
| Taham-pidirana | Up to 20 GPM (Gallons Per Minute) |
| Fifandraisana fidirana / fivoahana | 3/4" NPT (includes 1/2" adapters) |
| Ny refin'ny vokatra | 3.74 x 8.86 x 4.33 santimetatra |
| Lanja entana | 2.89 kilao |
| Endri-javatra manokana | Rust Resistant, Reusable/Flushable Filter, Built-in Double-sided Scraper |
| Pressure Tested | 150,000 cycle water hammer tests (1Mpa), 1000psi hydrostatic test |

Image 8.1: Filter Performance Overview. This image highlights the filter's ability to remove up to 99% of impurities and its flow rate of up to 20 GPM.

Image 8.2: Featured Material and Testing. This image emphasizes the filter's BPA-free, food-grade construction and its successful completion of 150,000 cycle water hammer tests and a 1000psi hydrostatic test.
9. Warranty sy fanohanana
ALTHY products are manufactured to high-quality standards. For warranty information, technical support, or to purchase replacement parts, please contact ALTHY customer service through the retailer where you purchased the product or visit the official ALTHY website.
Azafady, tehirizo ny porofon'ny fividiananao ho an'ny fitakiana fiantohana.