
Supersonic SC-37HT Home Theatre System
Instruction Manual
Safety Information
WARNING: To reduce the risk of fire and electric shock, do not expose this unit to rain or moisture.
CAUTION: To reduce the risk of fire and electric shock, do not remove the cover (or back) of the unit. Refer servicing only to qualified service personnel.
The lightning flash with arrowhead symbol, within an equilateral triangle, is intended to alert the user to the presence of uninsulated "dangerous voltage" within the product's enclosure that may be of sufficient magnitude to constitute a risk of electric shock.
The exclamation point within an equilateral triangle is intended to alert the user to the presence of important operation and servicing instructions in the literature accompanying the appliance.
WARNING: TO REDUCE THE RISK OF FIRE OR ELECTRIC SHOCK, DO NOT EXPOSE THIS APPLIANCE TO RAIN OR MOISTURE.
CAUTION: TO PREVENT ELECTRIC SHOCK, MATCH WIDE BLADE OF PLUG TO WIDE SLOT, FULLY INSERT.
Important Safeguards
Safety is a major factor in the design of every instrument. Please read these instructions carefully before operation and using your video product.
Installation
Read all instructions carefully, even if you are familiar with the appliance.
- This appliance is not intended for use by children or infirm persons without supervision.
- Children should be prevented from playing with the appliance.
- This appliance should be placed on a dry, level surface before it is operated.
- INDOOR USE ONLY: This appliance is not intended for outdoor use.
- Do not expose this appliance to rain or moisture. Do not immerse the appliance in water or any other liquid.
- Do not place items filled with liquids, such as vases, on the appliance. Do not expose the appliance to dripping or splashing liquids.
- This appliance is not intended for use in bathrooms, laundry areas or similar moist locations. Never locate this appliance in the immediate surroundings of, or where it may fall into, a bath, basin, washtub, shower or swimming pool.
- Do not place naked flame sources, such as candles, on the appliance.
- Do not locate the appliance or cord near heat sources such as radiators, heaters, air ducts or direct sunlight.
- Do not block any of the ventilation openings. Ensure that vents are not covered by newspapers, tablecloths, curtains, etc. Do not install in a tight-fitting cabinet.
- Do not insert or allow foreign objects to enter any grille openings.
- Do not run the cord under carpeting. Instead, arrange the cord away from traffic areas where it will not become a trip hazard.
- To disconnect the appliance, turn the appliance off, switch off the power outlet and remove the plug from the power outlet.
- Do not misuse the cord. Never carry the appliance by the cord or pull to disconnect it from the outlet. Instead, grasp the plug and pull to disconnect.
- Do not operate the appliance if it has a damaged cord or plug; after the appliance malfunctions; or has been dropped or damaged in any way. Consult a Service Technician for examination.
- Use of controls or adjustments, or performance of procedures other than those specified herein, may result in hazardous radiation exposure.
Caution: Do not open, do not attempt to repair, disassemble or modify this appliance. Dangerous high voltages exist inside this appliance. This appliance is only to be serviced by a Service Technician. There are no user-serviceable parts inside. Do not look at the laser pick-up directly. Do not touch the lens.
Installation Warnings
Ventilation slots and openings in the case are provided for ventilation to ensure reliable operation of the video product and to protect it from overheating. These openings must not be blocked or covered. The openings should never be blocked by placing the product on a bed, sofa, rug, or heat register. This product should not be placed in a built-in installation such as a bookcase or rack, unless proper ventilation is provided or the video product manufacturer instructions have been followed.
Outdoor Antenna Grounding
If an outside antenna or cable system is connected to the video product, be sure the antenna or cable system is grounded so as to provide some protection against voltage surges and built-up static charges. ANSI/NFPA No. 70-1984 provides information with respect to proper grounding of the mast and supporting structure, grounding of the lead-in wire to an antenna-discharge unit, connection to grounding electrodes, and requirements for the grounding electrode.
Power Lines
An outside antenna system should not be located in the vicinity of overhead power lines, other electric light or power circuits, or where it can fall into such power lines or circuits. When installing an outside antenna system, extreme care should be taken to keep from touching or approaching such power lines or circuits, as contact with them might be fatal. Installing an outdoor antenna can be hazardous and should be left to a professional antenna installer.
Lightning
For added protection for this product during a lightning storm, or when it is left unattended and unused for long periods of time, unplug it from the wall outlet and disconnect the antenna or cable system. This will prevent damage to the video product due to lightning and power line surges.
Compulsory Warnings
If the supply cord is damaged, it must be replaced by a Service Technician, in order to avoid a hazard. This product has not been designed for any uses other than those specified in this booklet.
Laser Safety
This compact disc player is classified as a CLASS 1 LASER PRODUCT. Only qualified service personnel should remove the cover or attempt to service this device due to possible eye injury. Invisible laser radiation when open and interlock failed or defeated. Avoid direct exposure to beam.
Features
- DVD, CD, MP3, Picture CD compatible
- CD-R, CD-RW capable
- TV format: 4:3 / 16:9 screen format select
- Video output: Composite Video output, S-Video output, YPbPr output
- Audio output: Down-mix stereo output, 5.1 Channel output, Coaxial output
- DVD features: Multi Subtitle select, Multi Language select, Multi Angle select
- Other features: On screen control menu, Digital zooming, Slow motion forward, Auto screen saver
Packing List
- Remote control - 1 piece
- AV connection line - 1 piece
- Battery - 1 pair (2XAAA Size Battery)
- User's Manual - 1 book
- 5.1CH Audio Cable - 1 set
Content
- Brief Instruction of Controls
- Preparations
- Accessories
- Battery installation of remote controller
- System connection
- Play mode setting
- Basic operation
- Play disc
- Description of function
- Screen OSD
- Return
- Subtitle
- Angle
- Language
- Title
- Menu
- Direction key
- Number key
- Time
- PBC play
- DVD and convert between USB
- Repeat
- Zoom
- Program
- Slow
- Setting of The System
- Operation of Mp3 function
- JPEG
- A USB interface operating instructions
- Trouble shooting
- Disc protection
- FM RADIO operating instructions
- BLUETOOTH
- SPECIFICATIONS
1. Brief Instruction of Controls
1.1 Front panel and rear panel illustration
FRONT PANEL
Controls:
- ① POWER ON/OFF
- ② OPEN/CLOSE
- ③ PLAY/PAUSE
- ④ NEXT
- ⑤ USB
- ⑥ MIC VOLUME
- ⑦ MIC
- ⑧ PREV
REAR PANEL
Connections:
- ① VIDEO output jack
- ② Y/Pb/Pr output jack
- ③ SW output jack
- ④ FR output jack
- ⑤ FL output jack
- ⑥ SL output jack
- ⑦ SR output jack
- ⑧ CEN output jack
- ⑨ Right channel output jack
- ⑩ Left channel output jack
- ⑪ Digital signal COAXIAL output jack
- ⑫ S-Video output jack
- ⑬ FM ANT
Unit Information:
- Model No: SC-37HT
- POWER SUPPLY: AC 90-240V~, 50/60Hz
- POWER CONSUMPTION: 15W
- MADE IN CHINA
1.2 Remote Control
Buttons:
- 1. POWER
- 2. Numerics button (0-9, 10+)
- 3. REPEAT
- 4. DVD/USB
- 5. SETUP
- 6. UP/DOWN ARROW KEY
- 7. LEFT/RIGHT ARROW KEY
- 8. ENTER
- 9. MENU/PBC
- 10. PLAY/PAUSE
- 11. STOP
- 12. REV
- 13. FWD
- 14. MIC ON/OFF
- 15. SLOW
- 16. PROG
- 17. DVD/FM/BT
- 18. RESET
- 19. R/L
- 20. VOL+/VOL-
- 21. PREV
- 22. NEXT
- 23. RETURN
- 24. TITLE
- 25. ZOOM
- 26. CLEAR
- 27. ANGLE
- 28. TIME
- 29. LANGUAGE
- 30. SUBTITLE
- 31. OSD
- 32. MUTE
- 33. OPEN/CLOSE
2. PREPARATIONS
2.1 Accessories
- Remote control
- Audio/Video cable
- User's manual
- 2XAAA Size Battery (check whether be fully equipped after open the box)
- 5.1CH Audio Cable
2.2 Battery installation of remote controller
Place two batteries in the battery compartment. Be sure the polarities are correct. There should be no large obstacles between the remote controller and the main unit.
2.3 System connection (Optional according to your back panel)
- When making connection between this unit and other components, be sure all connections are made with the power off.
- Audio/Video cables are connected according to the different colour identification and they should be fitted firmly.
- Yellow to video terminal
- White to audio terminal L,
- Red to audio terminal R,
- Scheme of connection
5.1 CHANNEL CONNECTION
Description of connections for speakers:
- Connect the DVD 5.1CH connections with Subwoofer 5.1CH Input.
- Connect the Subwoofer 5.1CH Output with 5 speakers.
- Make sure the connections match the connecting jacks.
- After correct and safe connection, to make sure the Setup is well done. Press "Setup" in the remote control, Highlight "Audio", and make sure Bass management is “ON”.
Speaker Setup Page:
| DOWNMIX | LT/RT |
|---|---|
| Front Speaker | STEREO |
| Center Speaker | 5.1CH |
| Rear Speaker | |
| Subwoofer |
If no sound is heard from the Rear speakers and Center, make sure to switch to 5.1CH in the back side of the Subwoofer.
When switch to 2.1CH in Subwoofer, there are only Front Right & Front Left speakers working. Do not mix up the Subwoofer Input and Output, else, there will be no sound.
NOTE:
- Keep the subwoofer speaker out of reach of children so as to prevent them from inserting their hands or alien substances into the duct (hole) of the subwoofer speaker.
- If you place a speaker near your TV set, screen colour may be distorted because of the magnetic field generated by the speaker. If this occurs, place the speaker away from your TV set.
2.4 Play mode setting
If you find the picture could not spread all screen or no colour, please select PAL, NTSC or auto. By pressing the play mode key, the DVD disc could support the picture with different proportions in the condition of TV mode. Also can satisfy the proportion of screen of your discs. Select Normal /Full, Normal/mailbox, wide screen under the System setup. Operate as below: Press (SETUP) key to get General setup, press (PLAY) key, use direction key up/down, to select TV mode, then press left/right key to select Normal /Full, Normal/Mailbox, wide screen according to your need. At last press (PLAY).
3. BASIC OPERATION
Once all the connection of the system have been done, this machine will be ready for service. Prior to play, make sure to complete the following Preparatory operations.
- Switch on TV and select AV mode. If it's S-Video connect, select S-Video mode.
- Switch on amplifier if it connected, select AC-3 or DVD mode.
- Plug-in of DVD player.
Step 1: Press POWER key, DISC LOADING shown on screen:
[Image: Screen showing 'DISC LOADING']
If there is no disc, NO DISC shown on screen:
[Image: Screen showing 'NO DISC']
Step 2: Press OPEN/CLOSE key, the tray comes out automatically:
[Image: Hand pressing OPEN/CLOSE button, tray extending]
Step 3: Place disc on the tray, press OPEN/CLOSE key to close the tray, the disc type will be shown on the up-left corner of the screen.
Note: Press POWER key on the remote controller to bring the unit into standby status. The power consumption is about 7W.
3.1 Play disc
When Disc read-in, this machine will start playing automatically.
- If it is a DVD, the machine will show the DVD menu or title menu.
- If it is a VCD2.0 disc, the machine will activate PBC playback control status.
- If it is a CD, this machine will start playing in the sequence.
Press FWD key to get 2X, 4X, 8X, 16X, 32X, normal play circular fast Forward function of DVD disc playing. Press FWD key to get 2X, 4X, 8X, 16X, 32X, normal play circular fast Forward function of other type of disc playing.
[Image: Hand pressing FWD button, screen showing fast forward]
Press PAUSE key:
[Image: Hand pressing PAUSE button, screen showing paused playback]
Press REV key to get 2X, 4X, 8X, 16X, 32X, normal play circular fast reverse function of DVD disc playing. Press REV key to get 2X, 4X, 8X, 16X, 32X, normal play circular fast reverse function of other disc playing.
[Image: Hand pressing REV button, screen showing fast reverse]
Press PREV key:
[Image: Hand pressing PREV button, screen showing previous track]
Press NEXT key:
[Image: Hand pressing NEXT button, screen showing next track]
Press STOP key to get memory stop of disc playing and press PLAY key to get memory playing. Press STOP key again to stop playing.
[Image: Hand pressing STOP button, screen showing stop]
4. DESCRIPTION OF FUNCTION
4.1 Screen OSD
In the condition of DVD disc playing, press OSD key on the remote controller to get following displays.
For first time pressing OSD key:
[Image: Screen showing 'Title on Display Title']
For fifth time pressing OSD key, display off. In PBC ON condition of VCD, SVCD disc playing to get following display.
For first time pressing OSD key:
[Image: Screen showing 'Title02/12 Chapters04/06']
For second time pressing OSD key:
[Image: Screen showing 'SINGLE ELAPSED 00:00:25']
For second time pressing OSD key:
[Image: Screen showing 'SINGLE REMAIN 01:44:34']
For third time pressing OSD key:
For third time pressing OSD key, display off. In PBC OFF condition to get following displays.
For first time pressing OSD key:
[Image: Screen showing 'TOTAL ELAPSED 00:05:29']
For fourth time pressing OSD key:
[Image: Screen showing 'SINGLE ELAPSED 00:00:45']
For second time pressing OSD key:
[Image: Screen showing 'SINGLE REMAIN 00:00:47']
For example, to select language 2 Chinese from 8 options.
[Image: Hand pressing SUBTITLE button, screen showing subtitle options]
For third time pressing OSD key:
[Image: Screen showing 'TOTAL ELAPSED 00:57:23']
For fourth time pressing OSD key:
[Image: Screen showing 'TOTAL REMAIN 00:10:29']
For fifth time pressing OSD key, display off.
4.2 Return
While playing a VCD2.0 disc which attaching title menu, press this key can return to the previous title.
4.3 Subtitle
This function may enable you to select multi subtitle languages (as many as 32 kinds and only for the disc with multi subtitle encoded). Press SUBTITLE key to get desired display.
4.4 Angle
During athletic match, concert or theatrical program, press ANGLE key continually on remote controller to select various angle to view the same image (This operation works only for the disc with multi angle encoded).
[Image: Hand pressing ANGLE button, screen showing different angles]
4.5 Language
There are 8 kinds of language for selection (4 kinds of language for SVCD/CVD). Press LANGUAGE key to select language (This operation works only for the disc with multi subtitle encoded).
[Image: Hand pressing LANGUAGE button, screen showing language options]
For example, to select language 1 from language 2 options, sound Volume effected by AC-3, 2 CH, and English.
4.6 Title
Press TITLE key to get title menu. (This operation works only for the disc with multi subtitle encoded).
4.7 Menu
Press MENU key to return to main menu for DVD disc playing (This operation works only for the disc with multi subtitle encoded).
4.8. Direction key
During playing discs, the four direction keys enable you to select at your option in title, menu or setup.
4.9 Number key
Press relevant number key to play the favorite pictures according to the series Number of the menu.
4.10 Time
For DVD disc playing, press TIME key to get following displays.
First time pressing TIME key:
[Image: Screen showing time information: TITLE 01/02 CHAPTER 06/28]
Press left or right direction key to select title and chapter. Select desired episode by pressing number in subtitle or title chapter, then press play key.
Second time pressing TIME key:
[Image: Screen showing time information: TITLE 01/02 TIME- ]
You can select any time under the title to display, e.g. 01:02:50 means this disc has two titles, new the selected playing time of title 1 is 1 hour 2 minutes and 50 seconds.
In the condition of SVCD, VCD disc in PBC OFF:
[Image: Screen showing GOTO--: ]
Related Documents
 | Supersonic SC-37HT: 5.1 Channel DVD Home Theater System with USB & Karaoke Detailed specifications and features of the Supersonic SC-37HT 5.1 Channel DVD Home Theater System, including USB input, karaoke function, and product details. |
 | Supersonic SC-38HT 5.1 Channel DVD Home Theater System Explore the Supersonic SC-38HT 5.1 Channel DVD Home Theater System. This system offers immersive surround sound, karaoke functionality, USB playback, and FM radio. Detailed product specifications, dimensions, and included accessories are provided for this high-quality home audio solution. |
 | SuperSonic SC-25 Instruction Manual This manual provides comprehensive instructions for the SuperSonic SC-25 DVD player, covering safety information, installation, remote control operation, troubleshooting, and specifications. |
 | Supersonic SC-2412 24-Inch Widescreen LED HDTV with DVD Player Detailed specifications and features for the Supersonic SC-2412 24-inch Widescreen LED HDTV with built-in DVD player, including product details, general specifications, and connectivity options. |
 | Supersonic SC-2121BT Compact Disc Player, Radio, Cassette Recorder, Bluetooth Audio System The Supersonic SC-2121BT is a versatile audio system featuring a compact disc player, multi-band stereo radio, double cassette recorder, and Bluetooth connectivity. This instruction manual provides detailed guidance on operation, safety, and maintenance for optimal use. |
 | Supersonic SC-1126BT Bluetooth Multimedia Speaker System Installation Manual Installation manual for the Supersonic SC-1126BT Bluetooth Multimedia Speaker System, detailing setup, functions, remote control, technical specifications, and connectivity. |
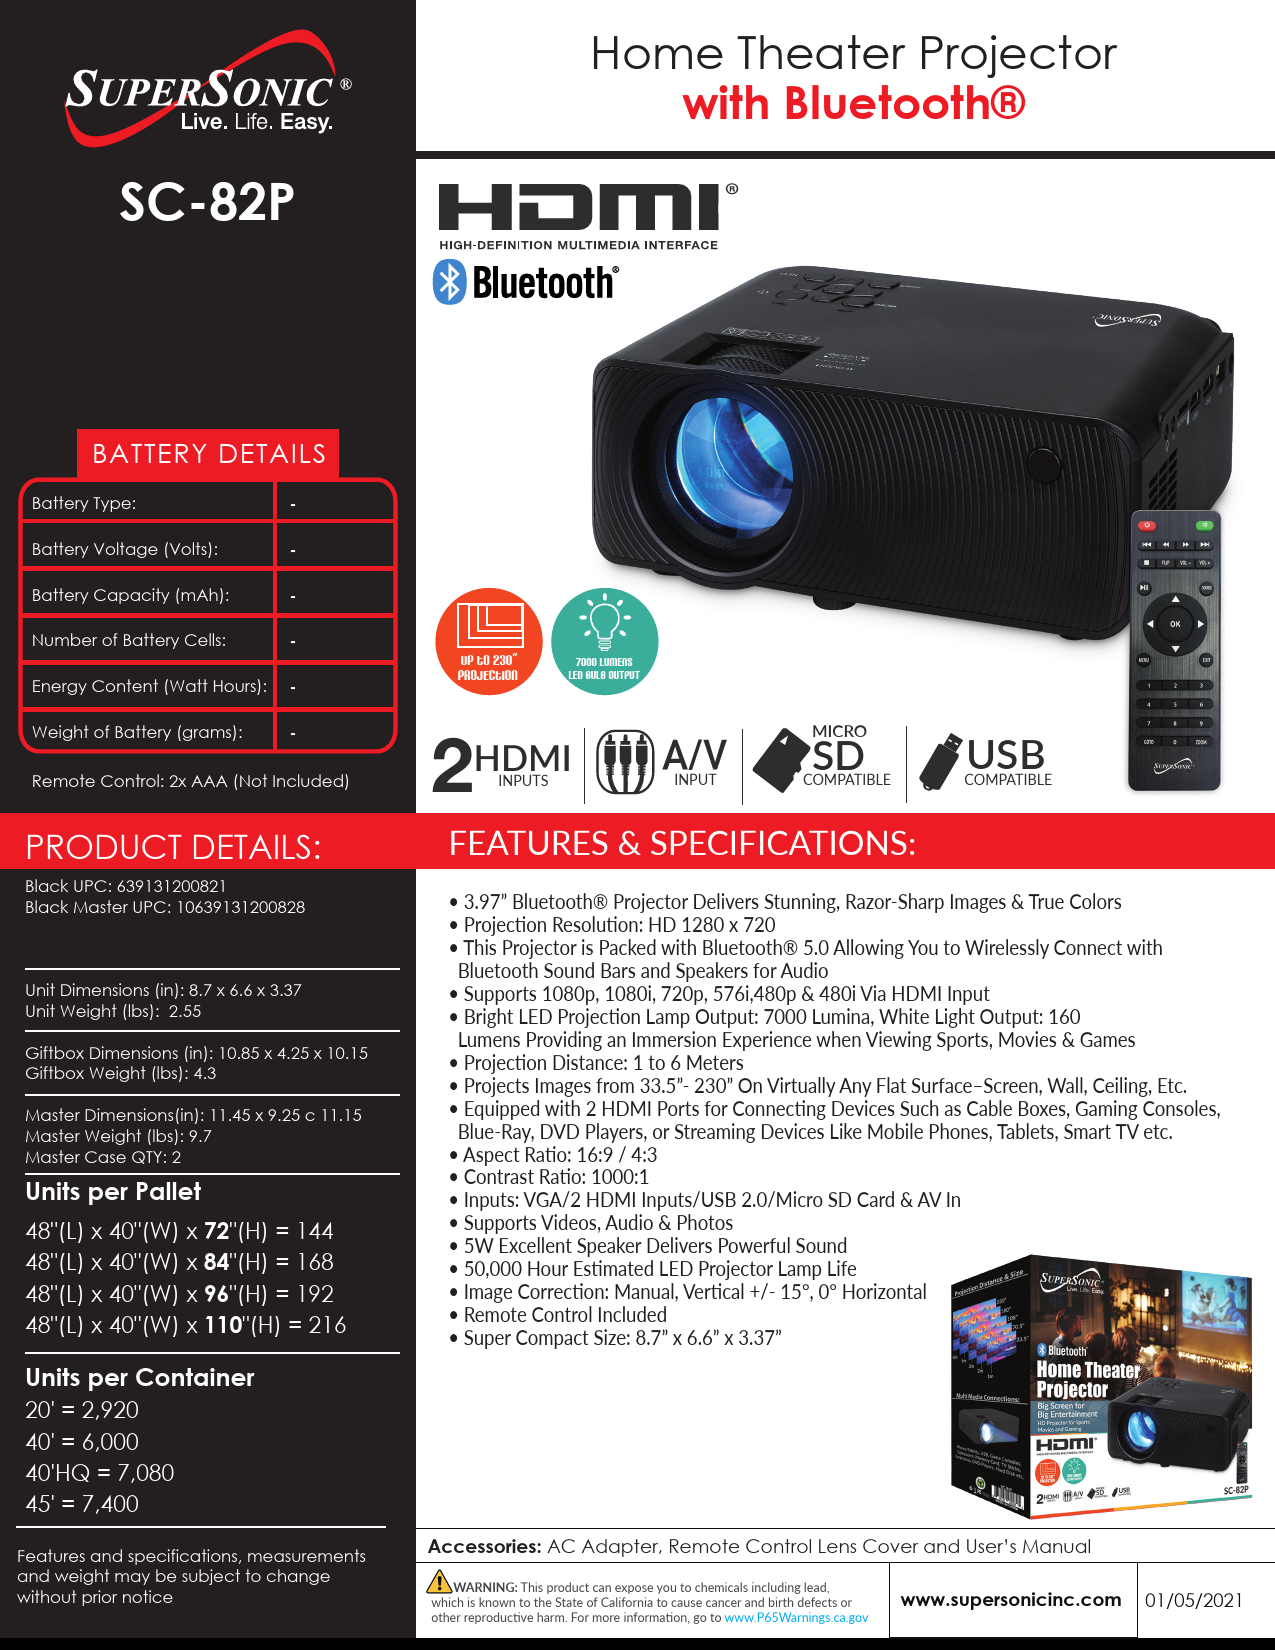 | Supersonic SC-82P Home Theater Projector with Bluetooth - Product Specifications Detailed specifications for the Supersonic SC-82P Home Theater Projector, featuring Bluetooth 5.0 connectivity, HD resolution, 7000 lumens, and multiple input options. |
 | Supersonic SC-2412 24-Inch Widescreen LED HDTV with Built-in DVD Player Discover the Supersonic SC-2412, a 24-inch widescreen LED HDTV featuring a built-in DVD player. This versatile television offers HDMI, USB, and SD card inputs, AC/DC compatibility, and multiple audio/video terminals, making it suitable for various entertainment needs. |