![]() OIP-N60D_OIP-N60D , Dante AV-H
OIP-N60D_OIP-N60D , Dante AV-H
Quick Installation Guide
Product connection
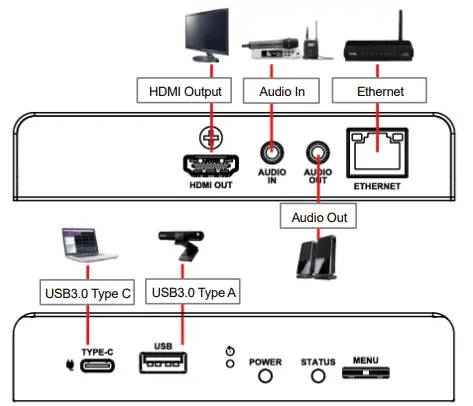
*Decoder supports PoE (IEEE 802.3af) network switches or USB-C power supply
Instruction for Installation
- Using the accessory metal plates
(1) Lock the accessory metal plate with screws (M3 x 4) to the lock holes on both sides of the decoder (2) Install the metal plate and decoder under the table according to the spatial area
Use tripod
The camera can be mounted on a 1/4”-20 UNC PTZ tripod deck by using the lock holes on the side for the tripod of decoder

Operation Methods
Operate through the body button
Connect the HDMI OUT to the display, press the Menu dial to enter the OSD menu. Through the Menu dial to navigate the menu and adjust the parameters.

- Left/Right rotation: Adjust parameters and navigate the menu
- Press: Perform “confirm” action
Operate via webpages
3.1 Confirm the IP address
Refer to Operate through the body button, confirm the IP address in Status (If the decoder is directly connected to the computer, the default IP is 192.168.100.200. Please manually set the computer’s IP address in the same network segment.)

3.2 Open the browser and input the IP address, e.g. 192.168.4.161, to access the login interface.
![]()
3.3 Please enter the account / password to log in

Virtual USB Network Camera
Oip-N Decoder can convert IP signal source into USB (UVC) for seamless integration with video conferencing platforms.
4.1 Connection Method
- Connect the decoder to LAN
- Connect the computer to the decoder using USB-C cable

Note:
The computer connects to the OIP-N decoder via USB-C and uses the RTSP/NDI source as USB network camera
4.2 Webpage Settings
- [System] > [Output], open [Virtual USB Setting]
- [ Source ] > [ Search new Source ] > Select the desired output device > Click [ Play ] to output device signal source
4.3 USB Camera Screen Output
- Launch a video software like Skype, Zoom, Microsoft Teams, or other similar software
- Choose the video source, to output USB network camera images
* Video Source Name: Lumens OIP-N60D Decoder/ Lumens OIP-N60D, Dante AV-H Decoder
USB Network Camera Extension (OIP-N40E Encoder Required)
When used with the OIP-N encoder and decoder, it can extend the range of USB network cameras through the network to improve installation flexibility.
5.1 Connection Method
- Connect the OIP-N encoder/decoder to the local network
- Connect the USB camera to the decoder using USB-A cable
- Connect the monitor to the decoder using HDMI cable
- Connect the computer to the encoder using USB-C cable

Note:
- Computers can use USB-C to connect to encoder and use USB network camera
- Computers can project images onto a TV through a USB-C connection to encoder
5.2 OIP-N decoder Webpage Settings
[ System ] > [ Output ], open [ USB Extender ]
5.3 OIP-N40E Webpage Settings
- [ System ] > [ Output ] > [ Extender Source List ]
- [ Search new Source ] > Click [ Available ] to select OIP-N decoder > Connection displays [ Connected ]
5.4 USB Camera Screen Output
- Launch a video software like Skype, Zoom or Microsoft Teams, or other similar software
- Choose the video source, to output USB camera images
*Video Source Name: Select according to the USB Camera
※ For questions about the installation, please scan the QR Code.
A support person will be assigned to assist you.
 http://service.mylumens.com
www.MyLumens.com
Copyright© Lumens Digital Optics Inc. All rights reserved.
Documents / Resources
 | Lumens N60D AV Over IP and NDI HX 4K Decoder [pdf] Installation Guide N60D, Dante AV-H, N60D AV Over IP and NDI HX 4K Decoder, N60D, AV Over IP and NDI HX 4K Decoder, IP and NDI HX 4K Decoder, NDI HX 4K Decoder, HX 4K Decoder, 4K Decoder, Decoder |


