
Delclynee 16" x 24" Slide Out Heat Press Machine (Model B0D95PYNMC)
„Delclynee“ 16 colių x 24 colių ištraukiamo šiluminio presavimo mašinos naudotojo vadovas
Model: 16" x 24" Slide Out Heat Press Machine (B0D95PYNMC)
1. Svarbi saugos informacija
Please read all instructions carefully before operating the Delclynee Heat Press Machine. Retain this manual for future reference.
- Elektros sauga: Įsitikinkite, kad prietaisas prijungtas prie įžeminto lizdo su tinkamu įtampos lygiutage (110V). Do not operate with damaged cords or plugs.
- Nudegimo pavojus: The heating platen reaches high temperatures. Avoid direct contact with the heating element and heated surfaces during operation and cool-down. Use heat-resistant gloves if necessary.
- Suspaudimo taškai: Keep hands and fingers clear of moving parts, especially when closing the press.
- Vėdinimas: Operate the machine in a well-ventilated area to dissipate any fumes from materials being pressed.
- Vaikai ir augintiniai: Laikykite vaikus ir naminius gyvūnus atokiau nuo prietaiso veikimo metu ir jam vėstant.
- Degios medžiagos: Do not place flammable materials near the heat press.
- Avarinis išjungimas: Familiarize yourself with the power switch location for quick shut-off in an emergency.
2. Produktas baigtasview
2.1 Pagrindinės savybės
- 16" x 24" Non-Stick Coated Heat Platen: Provides a large working area for various projects.
- Slide-Out Lower Platen: Extends up to 12.25 inches for safe and easy garment placement, featuring an automatic locking function.
- Additional Lower Pad Cover: Helps keep the bottom pad clean and prevents sliding of garments.
- Additional Room Underneath the Heat Press: Facilitates threading T-shirts onto the lower platen for single-sided transfers.
- Automatic Floatation Feature: Automatically adjusts the top platen to apply even pressure on uneven or thicker items.
- Upgraded Digital Time/Temperature Gauge: Displays temperatures with 5-degree accuracy and provides 5 beeps when the set temperature is reached.
- ttage: 110V; Galia: 1400 W.
2.2 Komponentai
Familiarize yourself with the main components of your Delclynee Heat Press Machine.

2.1 paveikslas: Apskritai view of the Delclynee 16" x 24" Slide Out Heat Press Machine. This image shows the clamshell design with the upper platen raised and the lower platen in its standard position, ready for operation.
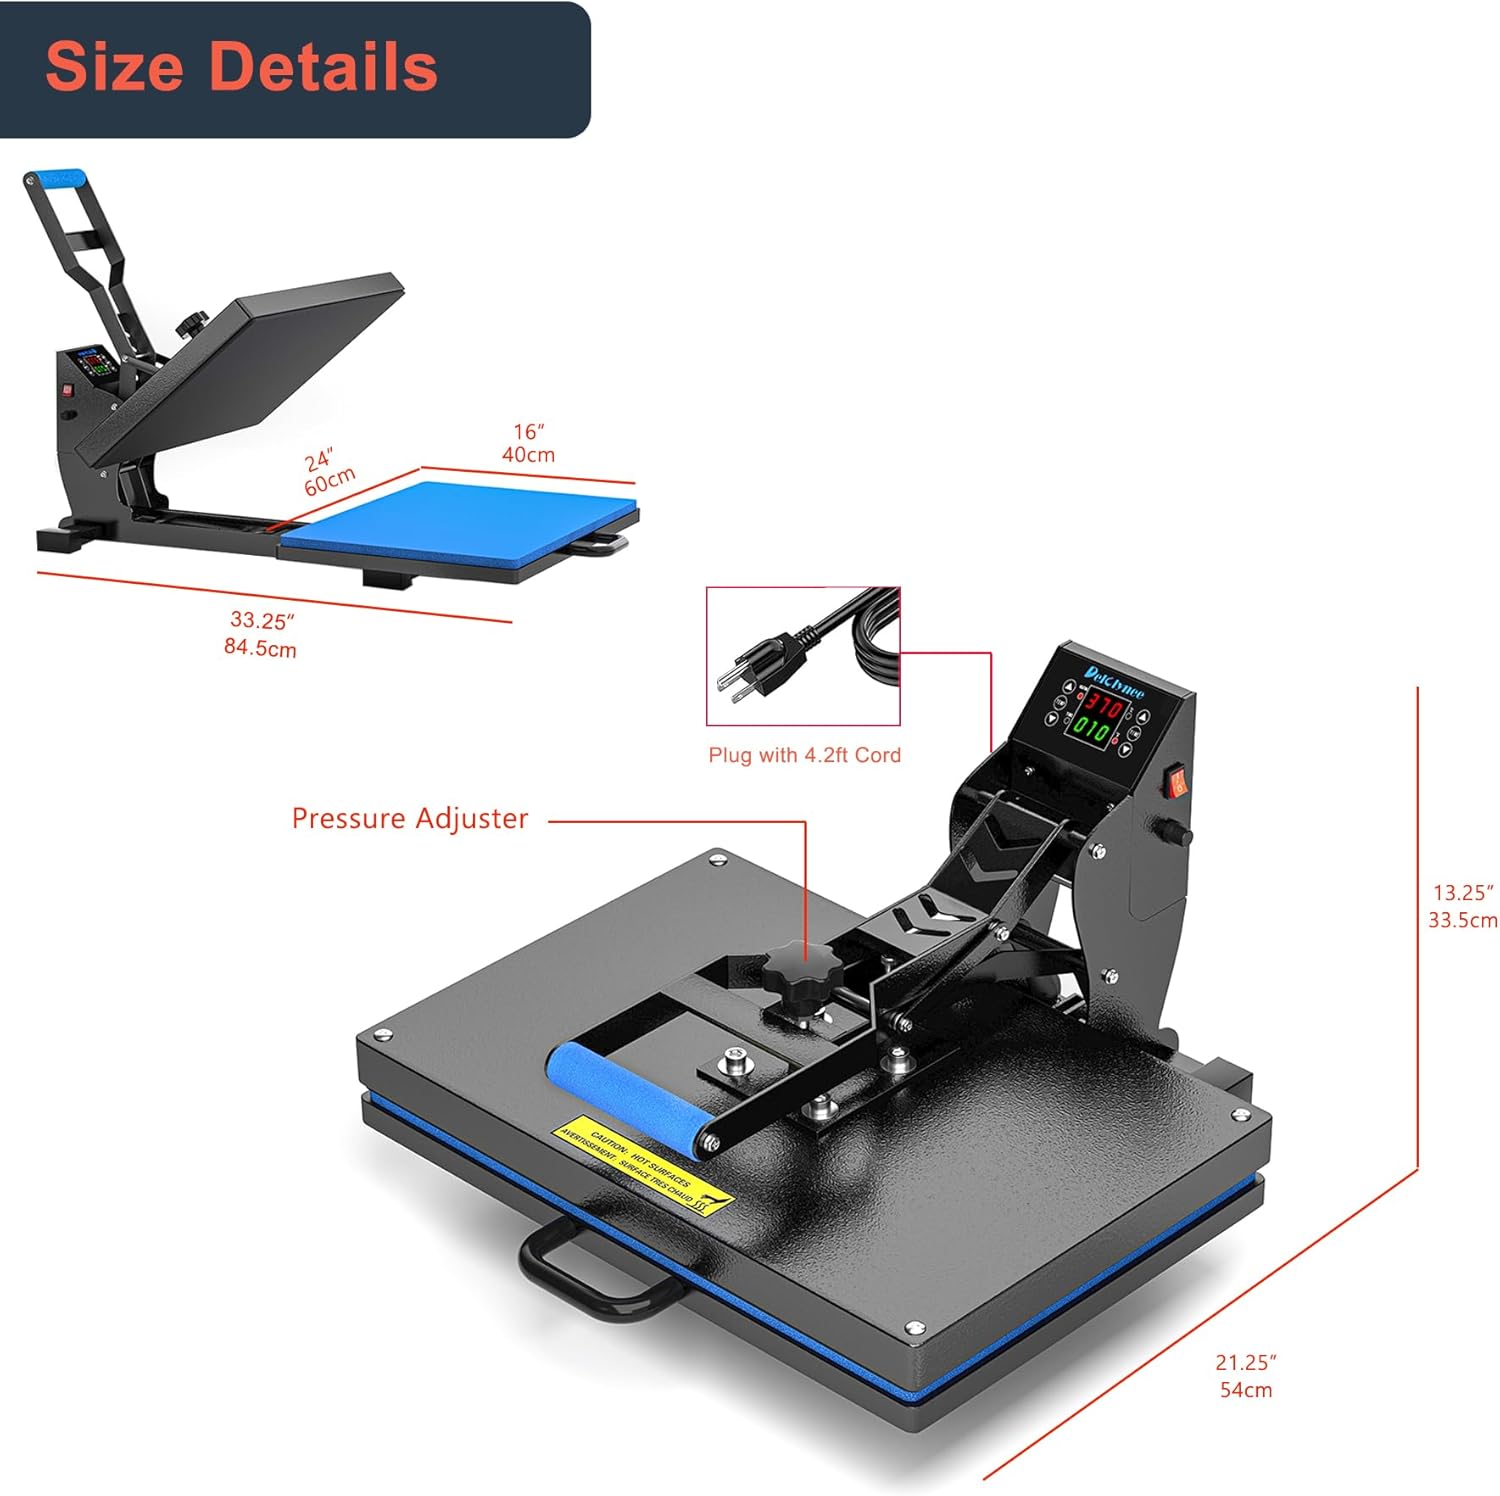
2.2 paveikslas: Išsamus view of the heat press machine highlighting key dimensions (24" x 16" platen, 33.25" length, 21.25" width, 13.25" height) and the location of the pressure adjuster. The power cord with a 4.2ft length is also indicated.

2.3 paveikslas: Close-up of the digital control board, displaying temperature and time settings. The control panel includes buttons for setting temperature, time, and a power switch, allowing precise control over the heat transfer process.
3. Sąranka
- Išpakavimas: Carefully remove the heat press from its packaging. Inspect for any shipping damage. Report any damage to the retailer immediately.
- Vieta: Place the machine on a sturdy, level, and heat-resistant surface capable of supporting its 41-pound weight. Ensure adequate clearance around the machine for ventilation and safe operation.
- Maitinimo jungtis: Plug the power cord into a standard 110V grounded electrical outlet. Ensure the power switch on the machine is in the "ON" position before plugging it in.
- Pradinis valymas: Before first use, wipe down the non-stick coated heat platen with a clean, dry cloth to remove any manufacturing residues.
- Install Lower Pad Cover (Optional): If using the additional lower pad cover, place it over the silicone pad on the lower platen. This helps secure garments and keeps the pad clean.
4. Naudojimo instrukcijos
4.1 Pagrindinės operacijos
- Maitinimas: Flip the red power switch (located near the digital control board) to the "ON" position. The digital display will illuminate.
- Nustatyti temperatūrą: Press the "SET" button on the digital control board. Use the "UP" and "DOWN" arrows to adjust the desired temperature. Press "SET" again to confirm. The machine will begin heating, and the current temperature will be displayed.
- Nustatyti laiką: After setting the temperature, press "SET" again to enter time setting mode. Use the "UP" and "DOWN" arrows to adjust the desired transfer time in seconds. Press "SET" to confirm.
- Temperature Reached Notification: Once the set temperature is reached, the machine will emit 5 beeps to alert you.
- Sureguliuokite slėgį: The pressure knob, located on top of the upper platen, allows you to adjust the clamping pressure. Turn clockwise for more pressure, counter-clockwise for less. Test on a scrap material to ensure even pressure.
4.2 Preparing for Transfer
- Slide Out Lower Platen: Pull the handle on the lower platen towards you. The platen will slide out up to 12.25 inches, providing a safe working area away from the hot upper platen. You will hear a click when it is fully extended and locked.

4.1 paveikslas: The lower platen extended, showing the maximum pull-over distance of 12.25 inches. This feature allows for safe and easy placement of garments without risk of contact with the hot upper platen.
- Place Lower Pad Cover: If not already in place, position the provided white lower pad cover over the blue silicone pad. This cover helps prevent the garment from sliding and keeps the pad clean.

4.2 paveikslas: The heat press with the optional white lower pad cover placed on the blue silicone pad. This cover aids in keeping the pad clean and stabilizes the garment during placement.
- Thread Garment (for single-sided transfers): For T-shirts or similar garments, you can thread the item onto the lower platen. This utilizes the additional room underneath the platen, ensuring that pressure and heat are applied only to the top layer of the garment, preventing transfer to the back.

4.3 paveikslas: A user demonstrating how to thread a T-shirt onto the lower platen. This technique allows for single-sided heat transfers by isolating the top layer of the garment.
- Position Transfer Material: Place your heat transfer vinyl (HTV), sublimation paper, or other transfer material onto the garment in the desired location. Use heat-resistant tape if needed to secure it.
4.3 Performing a Transfer
- Retract Lower Platen: Gently push the lower platen back into the machine until it is fully seated under the upper platen.
- Uždarykite spaudą: Bring the handle down firmly to close the upper platen onto the lower platen. The automatic floatation feature will adjust to ensure even pressure across the entire surface, even for slightly uneven or thicker items.

4.4 paveikslas: The upper platen with its Teflon-coated heating plate and upgraded heating element, shown glowing red. This indicates the platen is at operating temperature, ready for heat transfer.
- Pradėti laikmatį: The timer will automatically begin counting down once the press is closed.
- Atidarykite spaudą: Once the timer reaches zero and the alarm sounds, lift the handle to open the press.
- Remove Garment: Carefully slide out the lower platen again. Remove the transfer material (peel hot or cold according to your material's instructions) and then remove the finished garment.

4.5 paveikslas: A finished sublimation print on a rigid substrate, demonstrating the quality of transfer achievable with the heat press. This image illustrates the final product after a successful heat transfer process.
- Pakartokite: For subsequent transfers, repeat steps 6-14.
5. Priežiūra
- Cleaning the Heat Platen: Leiskite prietaisui visiškai atvėsti. Naudokite minkštą, sausą šluostę.amp cloth to wipe down the non-stick coated heat platen. For stubborn residues, a specialized heat press platen cleaner can be used, following the cleaner's instructions. Avoid abrasive cleaners or tools that could damage the coating.
- Silikono pagalvėlės valymas: The blue silicone pad and the white lower pad cover can be wiped clean with a damp cloth. Ensure they are dry before next use.
- Bendras valymas: Periodically wipe down the exterior of the machine with a dry or slightly damp šluoste dulkėms ir šiukšlėms pašalinti.
- Saugykla: When not in use, store the heat press in a clean, dry environment. It is recommended to keep the upper platen slightly open to prevent the silicone pad from compressing over long periods.
- Patikra: Regularly inspect the power cord for any signs of damage. Check all connections and moving parts for proper function.
6. Problemų sprendimas
Šiame skyriuje aptariamos dažniausiai pasitaikančios problemos, su kuriomis galite susidurti eksploatacijos metu.
| Problema | Galima priežastis | Sprendimas |
|---|---|---|
| Aparatas neįsijungia. | Power cord not plugged in; power switch off; faulty outlet. | Ensure power cord is securely plugged in. Turn power switch to "ON". Test outlet with another device. |
| Temperatūra nepasiekia nustatytos vertės. | Neteisingas temperatūros nustatymas; sugedęs kaitinimo elementas. | Verify temperature setting on digital display. Allow sufficient time for heating. If issue persists, contact support. |
| Uneven pressure or transfer. | Pressure knob not adjusted correctly; uneven substrate. | Adjust the pressure knob to achieve even pressure. The automatic floatation feature should help, but manual adjustment may be needed. Ensure substrate is flat. |
| Transfer material not adhering properly. | Incorrect temperature; insufficient time; insufficient pressure; wrong peel method. | Check recommended temperature and time for your specific transfer material. Increase pressure if needed. Ensure you are using the correct hot/cold peel method. |
| Lower platen not sliding smoothly. | Debris in tracks; mechanism needs lubrication. | Clean the tracks of the slide mechanism. Apply a small amount of high-temperature lubricant if necessary (consult support if unsure). |
7. Specifikacijos
| Funkcija | Detalė |
|---|---|
| Prekės ženklas | Delclynee |
| Modelis | 16" x 24" Slide Out Heat Press Machine (B0D95PYNMC) |
| Šildomos plokštės dydis | 16" x 24" (Non-Stick Coated) |
| ttage | 110 V |
| Galia | 1400 W |
| Medžiaga | Aliuminis, Nerūdijantis plienas |
| Spalva | Juoda |
| Gaminio matmenys (I x P x A) | 15" ilgio x 24" pločio x 16.5" aukščio (bendras) |
| Prekės svoris | 41 svaro |
| Lower Platen Slide-Out Distance | Iki 12.25 colių |
8. Garantija ir palaikymas
Delclynee stands behind the quality of its products.
- Šildymo elementas: Visą gyvenimą trunkanti garantija
- Heat Press Machine: 1 metų garantija
For warranty claims, technical assistance, or any questions regarding your Delclynee Heat Press Machine, please contact Delclynee customer support through the retailer's platform or the official brand websvetainę.
Please have your purchase information and product model (B0D95PYNMC) ready when contacting support.
Ask a question about this manual
Ask about setup, troubleshooting, compatibility, parts, safety, or missing instructions. Manuals+ will review the question and use this page’s manual context to help answer it.