1. Įvadas
The EPEVER MPPT XTRA-N series solar charge controller utilizes advanced Maximum Power Point Tracking (MPPT) technology to ensure optimal power harvesting from your solar panels. Designed for various solar power systems, this controller offers high efficiency, comprehensive protection features, and compatibility with multiple battery types, including lead-acid and lithium-ion batteries. This manual provides essential information for the safe and efficient operation of your XTRA 1210N controller.

1 pav.: priekis view of the EPEVER MPPT XTRA-N Solar Charge Controller.
2. Pagrindinės savybės
- Pažangi MPPT technologija: Ensures maximum power point tracking efficiency of over 99.5% and conversion efficiency up to 98%, leading to 20-30% more power from your solar panel.
- Universalus baterijų suderinamumas: Supports various battery types including lead-acid (AGM, GEL, Flooded, USER) and lithium-ion batteries.
- Multifunction LCD Display: Provides real-time energy statistics and allows manual setting of battery types and charge control parameters.
- Visapusiška elektroninė apsauga: Includes safeguards against PV reverse polarity, PV overload current, PV short-circuit, input overvoltage/undervoltage, battery reverse polarity, battery overvoltage/overdischarge, load short-circuit/overload, and overheating.
- Automatic Limiter: Features automatic charge power and current limiting.
- Wide MPP Operating Voltage Diapazonas: Optimizes performance across varying solar conditions.
- Negative Grounding: Designed with negative grounding on the poles.
- Programuojamos funkcijos: Fully programmable via PC software for advanced customization.
- Keli darbo režimai: Offers various working modes for load control.

Figure 2: High efficiency and versatile compatibility of the controller.

Figure 3: Supported battery types for the EPEVER MPPT controller.
3. Sąranka ir diegimas
3.1 Saugos įspėjimai
- WARNING: The controller may be damaged if the maximum PV open circuit voltage (Voc) exceeds 100V (for XTRA**10N models) at minimum operating ambient temperature.
- ATTENTION: When PV modules are connected in series, the PV open circuit voltage must not exceed 92V (for XTRA**10N models) at an ambient temperature of 25℃.
3.2 Sujungimas baigtasview
Ensure all connections are secure and correct before powering on the system. Refer to the diagrams below for proper wiring and port identification.

Figure 4: Labeled ports on the EPEVER MPPT Solar Charge Controller.
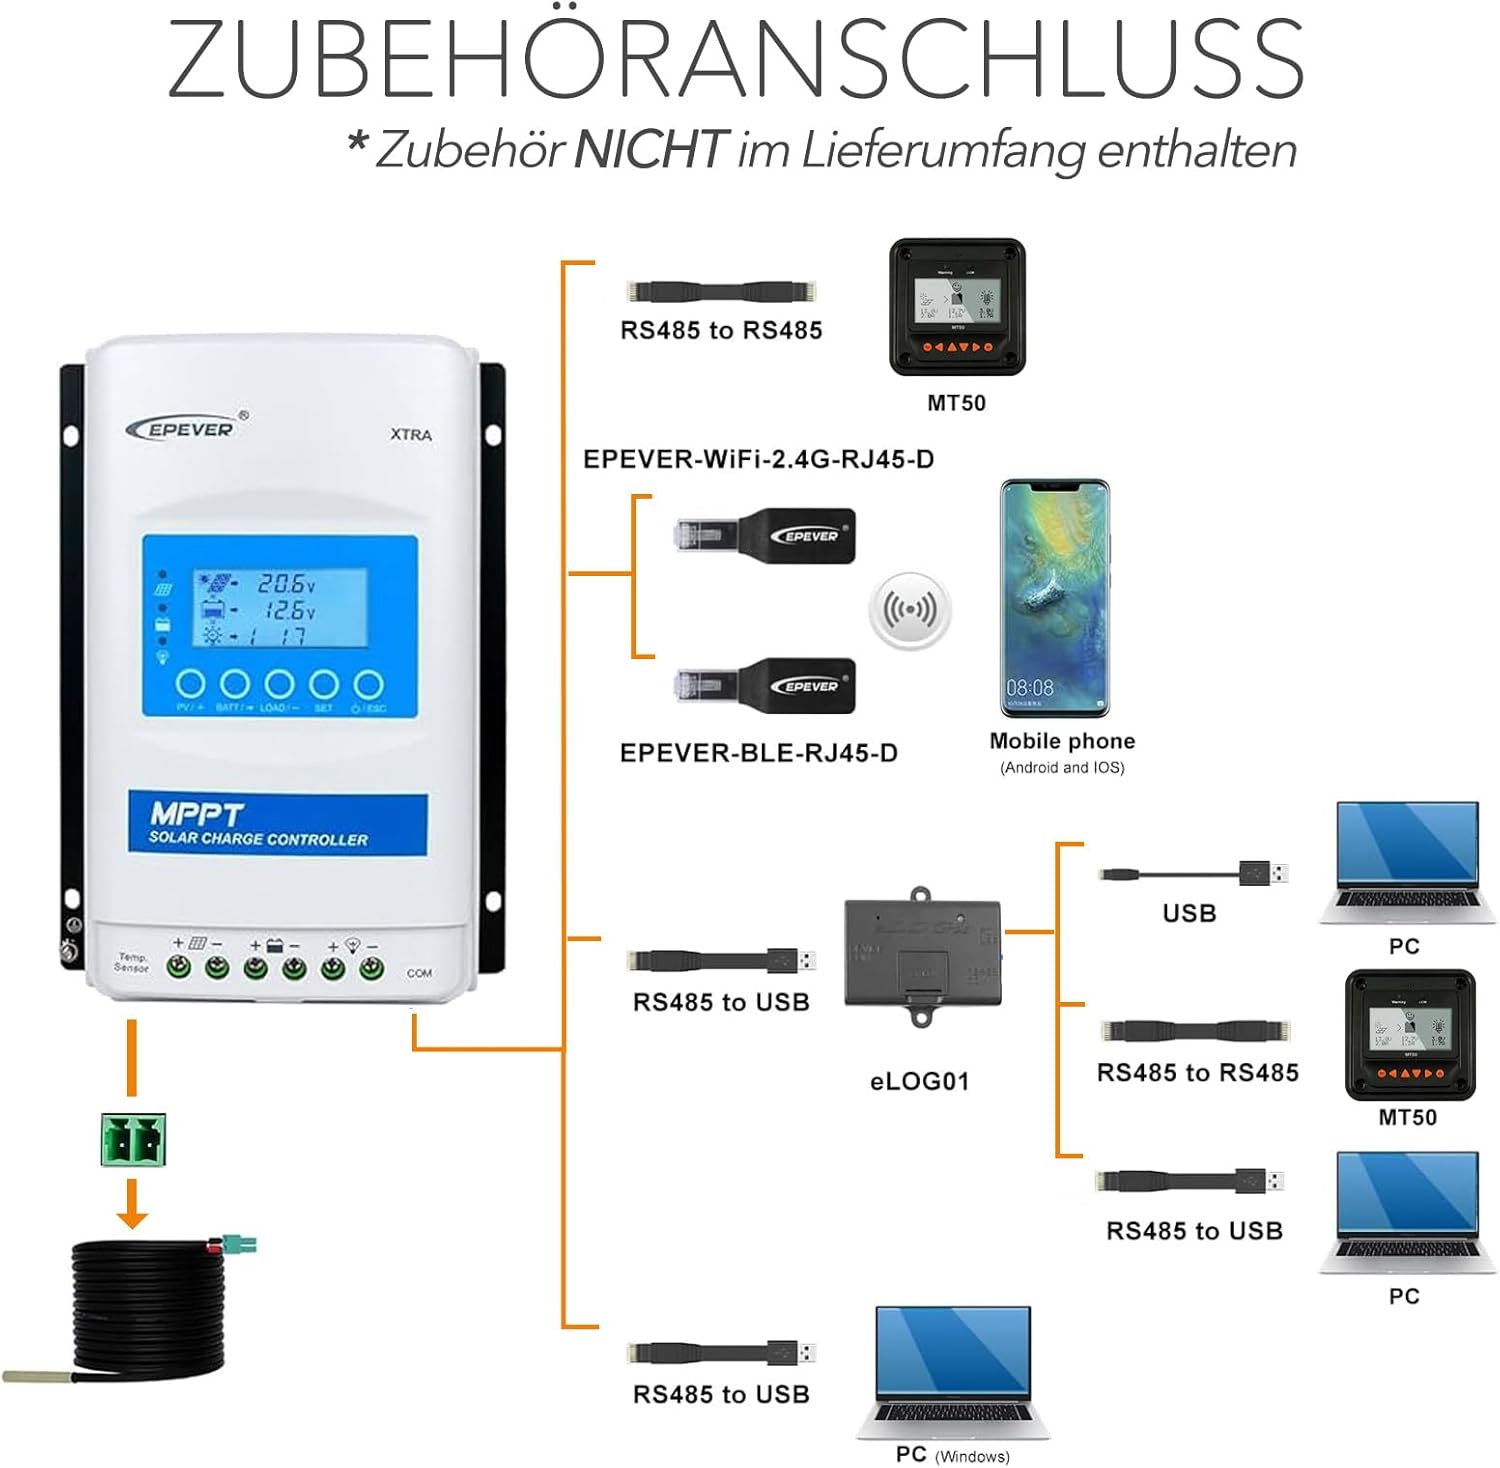
Figure 5: Accessories connection diagram for the controller.
3.3 Prijungimo seka
Follow these steps for a safe and correct installation:
- Connect the battery to the charge controller. Ensure correct polarity.
- Connect the load to the charge controller (if applicable). Ensure correct polarity.
- Connect the solar panel(s) to the charge controller. Ensure correct polarity and that the PV open circuit voltage neviršija valdiklio maksimalaus įėjimo tūriotage.

Figure 6: Basic installation diagram.

7 pav. Pvzample connection sequence for solar modules and battery.
4. Naudojimo instrukcijos
The EPEVER XTRA-N controller features a multifunction LCD display for monitoring system status and adjusting parameters. Upon successful connection, the controller will automatically detect the system voltage (12V/24VDC auto work).
4.1 LCD ekranas ir mygtukai
The LCD provides real-time data such as battery voltage, PV input voltage, charging current, and load status. Use the buttons below the display to navigate menus and adjust settings. Refer to the detailed product manual for specific menu navigation and parameter adjustment procedures.
4.2 Baterijos tipo nustatymas
It is crucial to set the correct battery type for optimal charging and battery longevity. This can be done manually via the LCD display. The controller supports lead-acid (AGM, GEL, Flooded, USER) and lithium-ion batteries. Incorrect settings can damage your battery.
4.3 Apkrovos valdymo režimai
The controller offers multiple working modes for load control, allowing you to customize when the load is powered. These modes can typically be configured through the LCD display or via PC software.
5. Priežiūra
Regular maintenance ensures the longevity and optimal performance of your EPEVER MPPT XTRA-N controller.
- Patikrinkite jungtis: Periodically inspect all wiring connections to ensure they are tight and free from corrosion. Loose connections can lead to power loss or overheating.
- Valykite valdiklį: Keep the controller clean and free from dust and debris. Use a dry cloth to wipe the surface. Ensure ventilation openings are not blocked.
- Patikrinkite, ar nėra pažeidimų: Visually inspect the controller for any signs of physical damage, such as cracks or discoloration.
- Stebėti našumą: Regularly check the LCD display for normal operation and energy statistics to ensure the system is performing as expected.
6. Problemų sprendimas
If you encounter issues with your EPEVER MPPT XTRA-N controller, consider the following basic troubleshooting steps:
- Nėra ekrano / maitinimo: Patikrinkite akumuliatoriaus jungtis ir įsitikinkite, kad akumuliatoriaus įtampatage is within the operating range. Verify the fuse or circuit breaker is not tripped.
- Nėra įkrovimo: Įsitikinkite, kad saulės baterijos tinkamai prijungtos ir gauna pakankamai saulės šviesos. Patikrinkite PV įėjimo tūrį.tage on the display. Verify PV polarity.
- Įkrovimas neveikia: Check load connections and ensure the load current does not exceed the controller's rating. Verify the load control mode settings.
- Klaidų kodai: Jei LCD ekrane rodomas klaidos kodas, konkrečius apibrėžimus ir sprendimus rasite išsamiame gaminio vadove.
- Perkaitimas: Ensure the controller is installed in a well-ventilated area and not exposed to direct sunlight or excessive heat sources. Check for blocked ventilation fins.
For persistent issues, contact EPEVER customer support or a qualified technician.
7. Specifikacijos

Figure 8: Physical dimensions and weight of the controller.
| Parametras | Vertė |
|---|---|
| Modelis | XTRA 1210N (Xtra-N) |
| Nominal System Voltage | 12/24VDC Auto Work |
| Nominali įkrovimo srovė | 10A |
| Nominali iškrovimo srovė | 10A |
| Maks. PV atviros grandinės ttage | 100 V |
| Maks. Įkraukite galią | 130W/12V, 260W/24V |
| Ekrano tipas | LCD |
| Darbinė temperatūra | -25°C iki +45°C |
| Apsaugos indeksas | IP30 |
| Matmenys (I x P x A) | 17.5 x 14.3 x 4.8 cm |
| Svoris | 0.57 kg |
| Medžiaga | Metal or Metallic Composite |

Figure 9: Model and certification details on the controller's label.
8. Garantija ir palaikymas
The EPEVER MPPT XTRA-N Solar Charge Controller comes with a 2 metų gamintojo garantija. Ši garantija apima medžiagų ir gamybos defektus normaliai naudojant.
For technical support, warranty claims, or further assistance, please refer to the contact information provided with your product packaging or visit the official EPEVER websvetainę.