
EPEVER IP1500-12 Plus
EPEVER IPower-Plus Series IP1500-12 Plus Pure Sine Wave Inverter
Naudotojo instrukcija
1. Įvadas
This manual provides detailed instructions for the installation, operation, and maintenance of your EPEVER IPower-Plus Series IP1500-12 Plus Pure Sine Wave Inverter. This 1500W 12VDC to 230VAC inverter is designed for off-grid systems, household lighting, vehicle-mounted systems, and other applications requiring reliable AC power from a DC source.
The IPower-Plus series features a 180-degree rotatable LCD display, compatibility with lithium batteries, a USB port (for 12V/24V models), and transient suppression on the input side to protect battery cells and Battery Management Systems (BMS) from transient current damage. It also boasts low idle current consumption.
2. Svarbios saugos instrukcijos
Prieš montuodami ir naudodami atidžiai perskaitykite visas instrukcijas ir įspėjimus. Nesilaikant šių instrukcijų, gali kilti elektros smūgis, gaisras arba sunkūs sužalojimai.
- Ensure the inverter is installed in a well-ventilated area, away from flammable materials and moisture.
- Saugokite keitiklį nuo lietaus, sniego, purslų ar kitų skysčių.
- Nenaudokite keitiklio, jei jis buvo kaip nors pažeistas.
- All electrical installations must comply with local and national electrical codes.
- Elektros prijungimus turėtų atlikti tik kvalifikuoti darbuotojai.
- Disconnect all power sources before performing any maintenance or troubleshooting.
- Įsitikinkite, kad DC įvesties ttage matches the inverter's rated voltage (šiam modeliui – 12 V nuolatinė srovė).
- Do not connect the inverter to an AC utility grid.
- Saugokite vaikus nuo keitiklio.
3. Produktas baigtasview
The EPEVER IPower-Plus inverter is designed for robust performance and ease of use. Below are key components and their functions.

3.1 pav.: priekis View su LCD ekranu. This image shows the front of the EPEVER IPower-Plus inverter, highlighting the central LCD display which provides real-time operational data such as output voltage and fault indicators. The display is rotatable for optimal viewing.
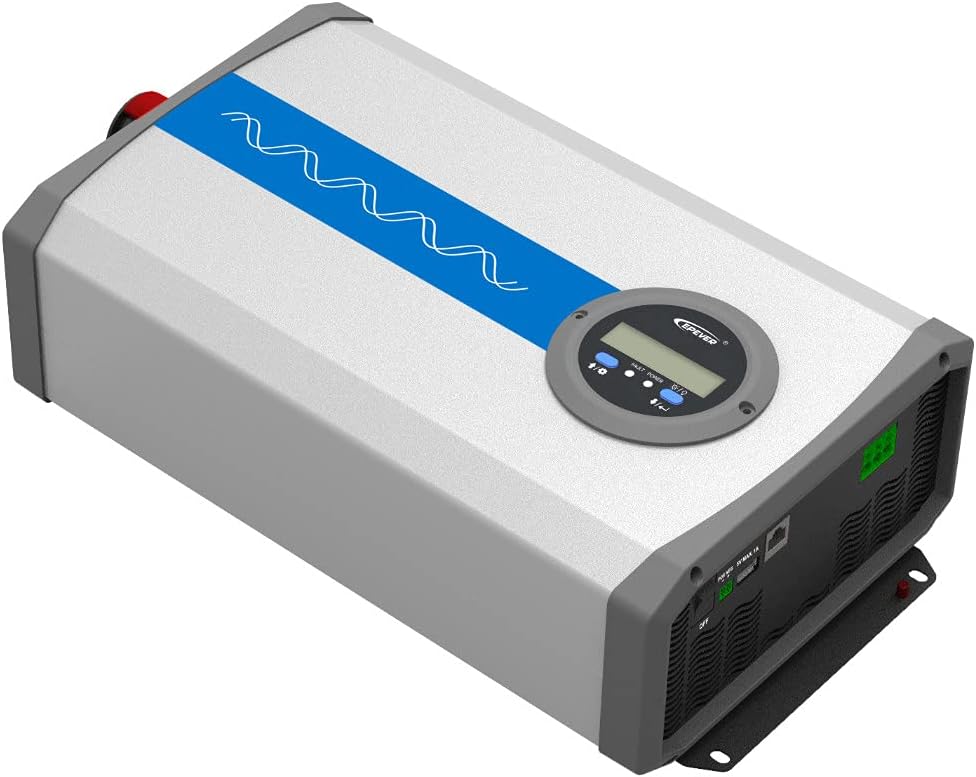
3.2 pav.: Kampinis viršus View. This perspective shows the overall compact design of the inverter, with the blue stripe indicating the pure sine wave output capability. The robust casing ensures durability.

Figure 3.3: Angled Bottom View. Tai view highlights the mounting brackets at the base of the inverter, designed for secure installation on various surfaces.

3.4 pav.: Galinio skydelio jungtys. The rear panel features the AC output terminals (N, L), an RS485 communication interface for remote monitoring, a 5VDC/1A USB output port, and the main ON/OFF power switch.

Figure 3.5: Front Panel DC Input and Fans. This image displays the DC input terminals (positive and negative) for connecting to the battery bank, along with the integrated cooling fans that ensure optimal operating temperature.

3.6 pav.: šonas View with Product Label. The side of the inverter shows the product label, which includes model information, serial number, and certification marks.
4. Sąranka ir diegimas
4.1 Svetainės pasirinkimas
- Install the inverter indoors, away from direct sunlight, high temperatures, and high humidity.
- Ensure adequate airflow around the inverter for proper cooling. Maintain at least 15 cm (6 inches) of clearance around all sides.
- Mount the inverter vertically on a non-flammable surface.
4.2 Laidų jungtys
- DC įvesties jungtis:
- Įsitikinkite, kad keitiklio įjungimo/išjungimo jungiklis yra „išjungta“ padėtyje.
- Connect the positive (+) terminal of the battery bank to the positive (+) DC input terminal of the inverter.
- Connect the negative (-) terminal of the battery bank to the negative (-) DC input terminal of the inverter.
- Use appropriate gauge cables for the DC connections to minimize voltagnumeskite ir užtikrinkite saugumą.
- Tighten all connections securely to prevent loose contacts and overheating.
- Kintamosios srovės išvesties jungtis:
- Connect your AC loads to the AC output terminals (N, L) on the rear panel.
- Ensure the total power consumption of your AC loads does not exceed the inverter's continuous output power (1500W).
- For safety, it is recommended to connect the inverter's chassis to an earth ground.
- Optional Connections (RS485 & USB):
- The RS485 interface allows for remote monitoring and control via PC software or mobile app. Connect an RS485 communication cable if desired.
- The USB port provides a 5VDC/1A output for charging small electronic devices.
Warning: Incorrect wiring can cause severe damage to the inverter and connected devices. Always double-check polarity before powering on.
5. Naudojimo instrukcijos
5.1 Įjungimas / išjungimas
- After all connections are secure, switch the ON/OFF button on the rear panel to the "ON" position.
- The LCD display will illuminate, showing the output voltage ir kiti eksploataciniai parametrai.
- To power off, switch the ON/OFF button to the "OFF" position.
5.2 LCD ekranas ir indikatoriai
The LCD display provides real-time information about the inverter's status. It can be rotated 180 degrees for convenient viewing.
- Išėjimas ttage: Rodo esamą kintamosios srovės išėjimo tūrįtage (pvz., 220.0 V).
- Gedimų / maitinimo indikatorius: Indicates operational status or error codes.
- Baterijos tūristage: Rodo nuolatinės srovės įėjimo garsumątage iš akumuliatoriaus.
- Apkrovos galia: Displays the current power consumption of connected AC loads.
5.3 USB and RS485 Usage
- USB prievadas: Connect compatible USB devices for charging. The output is 5VDC, Max. 1A.
- RS485 sąsaja: Use this port with an appropriate communication module (sold separately) to connect to a PC or mobile device for advanced monitoring, data logging, and parameter settings via EPEVER's software or app.
6. Priežiūra
Reguliarus keitiklio aptarnavimas užtikrina jo ilgaamžiškumą ir optimalų veikimą.
- Valymas: Periodically clean the inverter's exterior with a dry cloth. Ensure ventilation openings are free from dust and debris. Do not use liquid cleaners.
- Jungtys: Annually check all electrical connections (DC input and AC output) for tightness. Loose connections can cause overheating and damage.
- Aplinka: Užtikrinkite, kad įrengimo aplinka neviršytų nurodytų temperatūros ir drėgmės diapazonų.
- Baterijos būklė: Monitor your battery bank's health and charge level regularly, as it directly impacts inverter performance.
7. Problemų sprendimas
Šiame skyriuje pateikiami dažniausiai pasitaikančių problemų, su kuriomis galite susidurti, sprendimai.
| Problema | Galima priežastis | Sprendimas |
|---|---|---|
| No AC Output / Inverter not turning on |
|
|
| Perkrovos aliarmas |
|
|
| Perkaitimo signalas |
|
|
| Abnormal Output Voltage |
|
|
If the problem persists after trying the above solutions, please contact EPEVER customer support.
8. Techninės specifikacijos
| Funkcija | Specifikacija |
|---|---|
| Prekės ženklas | VISADA |
| Modelio pavadinimas | IPower-Plus Series IP1500-12 Plus |
| Sistemos akumuliatoriaus talpatage | 12V DC |
| Nuolatinė galia | 1500W |
| Pulse Power (5s) | 3000W |
| Išėjimas ttage | 220VAC (±3%); 230VAC (-7%~+3%) |
| Išvesties dažnis | 50/60 Hz ±0.2 % |
| Maksimalus efektyvumas | >93% (30% load) |
| Tuščiosios eigos srovė | <1.2A |
| USB išvestis | 5VDC/Max. 1A |
| RS485 Interface Output | 5VDC / 200mA |
| Apsaugos klasė | IP20 |
| Matmenys (L × P × A) | 387 × 231.5 × 123 mm |
| Grynasis svoris | 6 kg |
| Saugos priemonės | Reverse polarity, Over-voltage, mažas ttage, Overload, Short-circuit, Over-temperature |
9. Garantija ir palaikymas
9.1 Informacija apie garantiją
The EPEVER IPower-Plus Series IP1500-12 Plus inverter comes with a 2 metų gamintojo garantija nuo pirkimo datos. Ši garantija apima medžiagų ir gamybos defektus normaliai naudojant.
Garantija neapima žalos, atsiradusios dėl:
- Netinkamas montavimas arba laidų prijungimas.
- Neleistini pakeitimai ar remontas.
- Nelaimingi atsitikimai, prievarta ar aplaidumas.
- Stichinės nelaimės arba Dievo veiksmai.
- Operating outside specified environmental conditions.
Išsaugokite pirkimo įrodymą, kad galėtumėte kreiptis dėl garantijos.
9.2 Pagalba klientams
For technical assistance, troubleshooting beyond this manual, or warranty claims, please contact your authorized EPEVER dealer or visit the official EPEVER websvetainė, kurioje rasite pagalbos kontaktinę informaciją.
Manufacturer: SolarV (Brand: EPEVER)
Norėdami gauti daugiau informacijos, galite apsilankyti EPEVER Brand Store.
Ask a question about this manual
Ask about setup, troubleshooting, compatibility, parts, safety, or missing instructions. Manuals+ will review the question and use this page’s manual context to help answer it.