EPEVER XTRA4210N
EPEVER MPPT saulės įkrovimo valdiklio vartotojo vadovas
Modelis: XTRA4210N
Prekinis ženklas: EPEVER
1. Įvadas
This manual provides detailed instructions for the installation, operation, and maintenance of your EPEVER MPPT Solar Charge Controller XTRA4210N. This advanced Maximum Power Point Tracking (MPPT) solar charge controller is designed to maximize energy harvest from solar panels for efficient battery charging in off-grid photovoltaic systems.
It supports various battery types including Lead-Acid (Sealed, Gel, Flooded) and Lithium (LiFePO4, Li(NiCoMn)O2, User-defined) and features common negative grounding for wide application compatibility. The kit includes the XTRA4210N controller, MT50 remote meter, RTS temperature sensor cable, and CC-RS485-USB-150U communication PC cable.
2. Saugos informacija
Prieš montuodami ir naudodami atidžiai perskaitykite visas instrukcijas. Nesilaikant šių instrukcijų, gali kilti elektros smūgis, gaisras arba sunkūs sužalojimai.
- Elektros smūgio pavojus: Do not remove the cover. There are no user-serviceable parts inside. Refer servicing to qualified service personnel.
- Elektros smūgio pavojus: Kai fotovoltinė matrica yra veikiama šviesos, ji tiekia nuolatinės srovės tūrįtage prie šios įrangos.
- Karšti paviršiai: To reduce the risk of burns, do not touch hot surfaces during operation.
- Always connect the battery first during installation and disconnect the solar panel last during uninstallation.
- Ensure correct polarity for all connections to prevent damage to the controller and connected devices.
3. Produktas baigtasview ir Savybės
The EPEVER MPPT Solar Charge Controller XTRA4210N is designed for optimal performance and user convenience. Key features include:
- Advanced MPPT Technology with high tracking efficiency up to 99.5% and peak conversion efficiency of 98%.
- Automatinis 12 V / 24 V nuolatinės srovės sistemos garsumo reguliavimastage identifikavimas.
- Max PV input power: 520W for 12V systems, 1040W for 24V systems.
- Common negative grounding design for versatile applications.
- Support for multiple battery types: Sealed (AGM), Gel, Flooded, and User-defined Lithium (LiFePO4, Li(NiCoMn)O2).
- Keturi stages of charging (bulk, absorption, float, equalization) to prolong battery lifespan.
- Blacklight LCD Display with three color LED indicators for intuitive status monitoring.
- Comprehensive protection functions: PV Over Current/Power, PV Short Circuit, PV Reverse Polarity, Night Reverse Charging, Battery Reverse Polarity, Battery Over Voltage, Battery Over Discharge, Battery Overheating, Controller Overheating, Lithium Battery Low Temperature, Load Short Circuit, Load Overload, TVS High Voltage Transients.
- Real-Time energy statistics function.

Figure 1: EPEVER MPPT Solar Charge Controller XTRA4210N Kit Components.
Video 1: EPEVER MPPT Solar Charge Controller XTRA Series Overview. This video provides a visual guide to the product, its components, and basic operation.
4. Sąranka ir diegimas
Follow these steps for proper installation. Always ensure the system is disconnected from power sources before making any connections.
4.1 Komponento identifikavimas

Figure 2: Controller Top and Bottom View with Terminal Labels.

Figure 3: Controller Dimensions.
4.2 Laidų sujungimo žingsniai
Important: Always connect the battery first! Do not use an electric screwdriver for connections.
- Prijunkite akumuliatorių: Loosen the screws for the battery terminals. Connect the positive (+) and negative (-) battery cables to the corresponding terminals on the controller. Ensure correct polarity.
- Prijunkite apkrovą: Connect the load cables to the load terminals on the controller.
- Connect the Solar Panel (PV Array): Connect the solar panel cables to the PV terminals on the controller. Ensure correct polarity.

4 pav.: Pagrindinė prijungimo schema.
For detailed visual instructions on wiring, refer to the "Unboxing and Installation" segment of Video 1.
5. Naudojimo instrukcijos
The controller features an LCD display and LED indicators for monitoring system status and setting parameters.
5.1 LCD ekranas ir navigacija
The LCD displays various parameters such as PV voltage, akumuliatoriaus ttage, load current, and generated energy. Use the buttons below the display to navigate through the screens and adjust settings.

Figure 5: LCD Display Screens and Parameters.
5.2 LED indikatoriai
The LED indicators provide quick visual feedback on the system's status:

Figure 6: LED Indicator Status and Instructions.
5.3 Parametrų nustatymas
Parameters such as battery type, battery capacity, and load working mode can be configured directly from the controller's interface or via the MT50 remote meter. For detailed steps on setting parameters, refer to the "Setting Parameters" segment of Video 1.
- Baterijos tipo pasirinkimas: Paspauskite BATT+/- button for 5 seconds to enter the battery type interface. Use the LOAD+/- buttons to choose the battery type (Sealed, Gel, Flooded, User). Press NUSTATYTI patvirtinti.
- Battery Capacity Setting: From the battery type interface, press BATT+/- to access the battery capacity setting. Use LOAD+/- to adjust the capacity (Ah). Press NUSTATYTI patvirtinti.
- Apkrovos darbo režimas: Paspauskite NUSTATYTI button for 5 seconds to enter the load working mode interface. Use LOAD+/- to select the desired mode (e.g., Manual Control, Light ON/OFF, Light ON+Timer, Time Control). Press NUSTATYTI patvirtinti.
- LCD Cycle Time: Paspauskite NUSTATYTI button for 5 seconds to enter the setting interface. Press BATT+/- twice for the LCD cycle time interface. Use LOAD+/- to set the cycle time. Press NUSTATYTI patvirtinti.
6. Priežiūra
Regular maintenance ensures optimal performance and longevity of your solar charge controller. Perform the following checks periodically:
- Inspect all wiring and connections for loose connections, corrosion, or damage. Tighten as necessary.
- Nuvalykite valdiklio išorę sausa šluoste, kad pašalintumėte dulkes ir šiukšles. Įsitikinkite, kad ventiliacijos angos yra švarios.
- Patikrinkite akumuliatoriaus gnybtus, ar nėra korozijos, ir, jei reikia, nuvalykite.
- Stebėkite LCD ekraną, ar nėra klaidų kodų ar neįprastų rodmenų.
- Ensure the temperature sensor is securely attached to the battery for accurate temperature compensation.
7. Problemų sprendimas
If you encounter issues with your EPEVER MPPT Solar Charge Controller, refer to the LED indicator table (Figure 6) for initial diagnosis. Common issues and their solutions include:
- Nėra ekrano / maitinimo: Patikrinkite akumuliatoriaus jungtis ir įsitikinkite, kad akumuliatoriaus įtampatage yra veikimo diapazone.
- Nėra įkrovimo: Verify solar panel connections and ensure sufficient sunlight. Check PV voltage ekrane.
- Įkrovimas neveikia: Check load connections, ensure the load is not overloaded or short-circuited. Verify load working mode settings.
- Battery Over-Discharged: The battery indicator may show red. This indicates the battery voltage is too low. Disconnect the load and charge the battery.
- Sistemos ttage Klaida: If using a lithium battery, ensure the correct system voltage (12V or 24V) is manually selected, as lithium batteries do not auto-identify system voltage.
For more complex issues, consult the comprehensive user manual provided with the product or contact EPEVER customer support.
8. Techninės specifikacijos
Below are the key technical specifications for the EPEVER MPPT Solar Charge Controller XTRA4210N:
- Nominali įkrovimo srovė: 40A
- Sistemos vardinis ttage: 12V/24VDC Auto identifying
- Baterijos tūristage Diapazonas: 8 V ~ 32 V
- Maks. PV atviros grandinės ttage: 100VDC
- Maksimali PV įėjimo galia: 520W/12V, 1040W/24V
- Palaikomi baterijų tipai: Sealed (AGM), Gel, Flooded, LiFePO4 Lithium, Li(NiCoMn)O2 Lithium, Lithium User (9~68V)
- Įžeminimas: Common Negative Ground
- Ekrano tipas: LCD
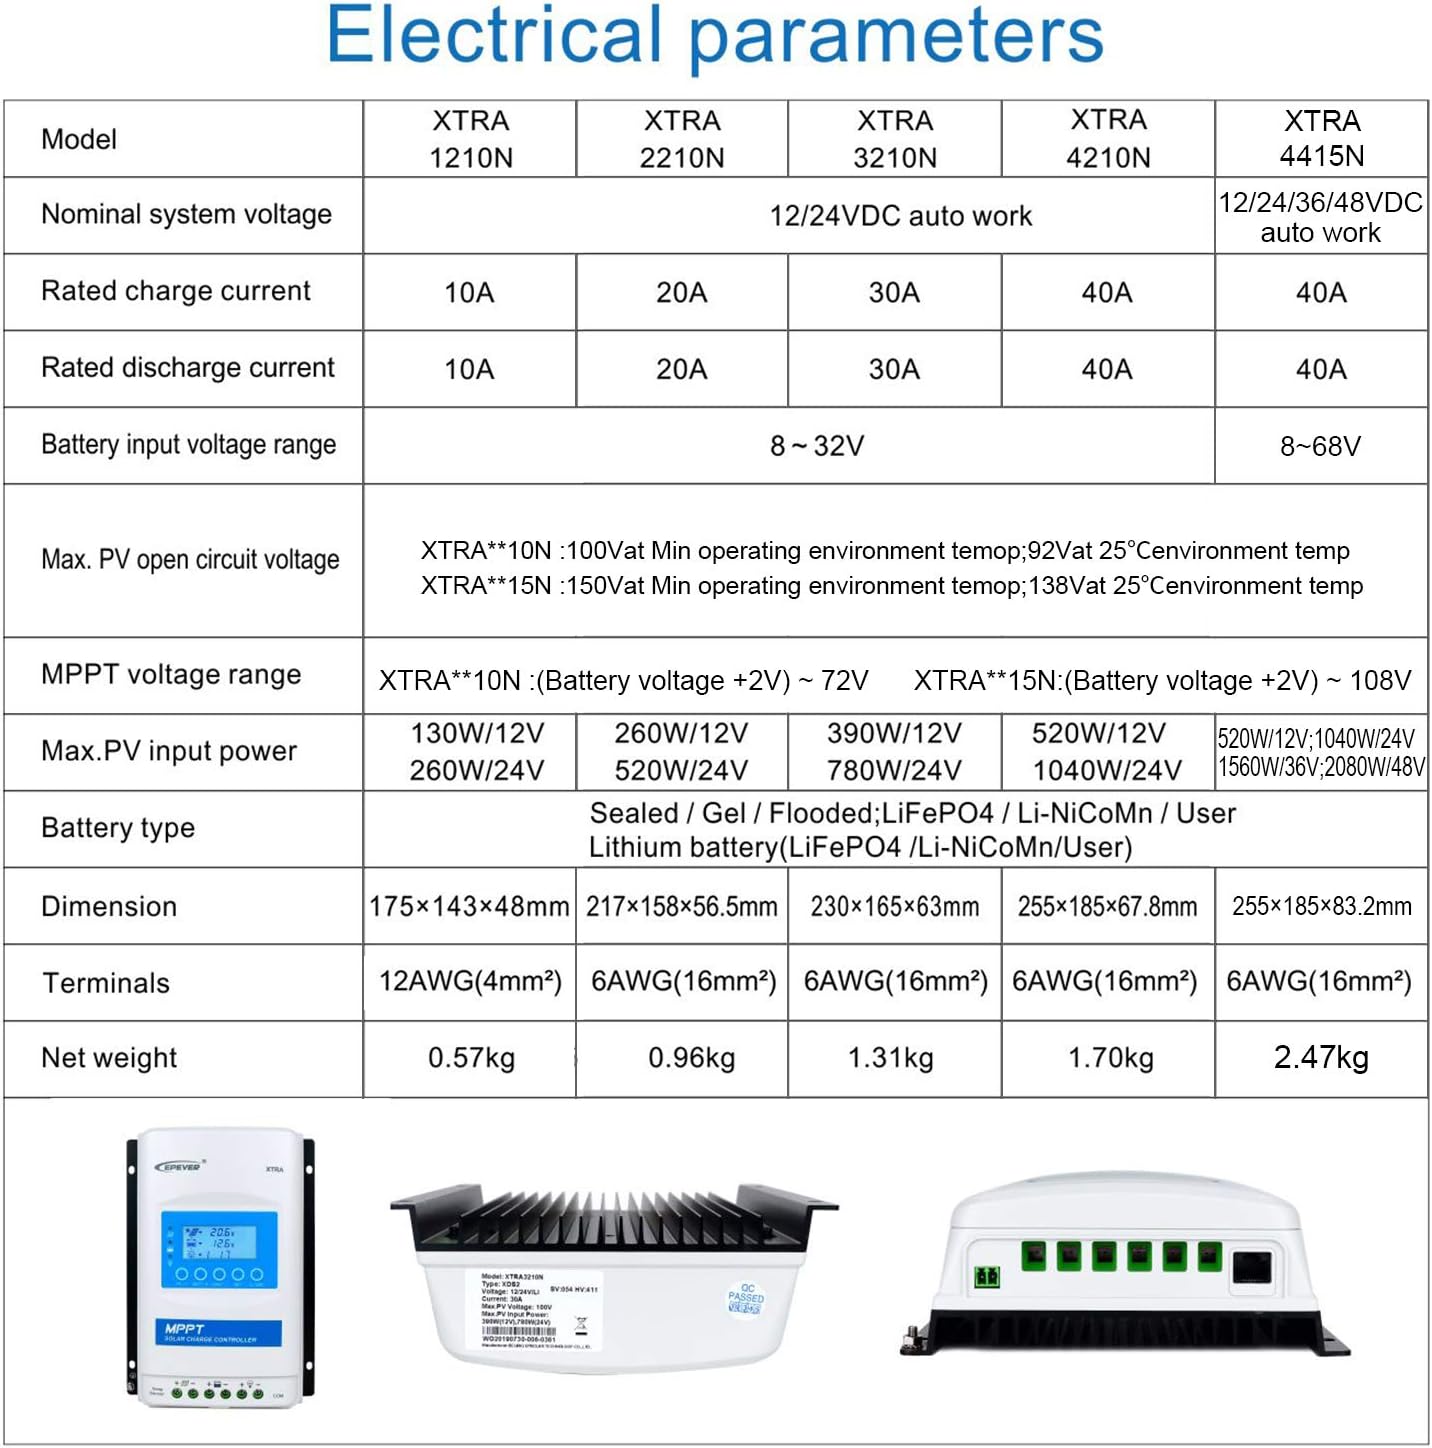
Figure 7: Electrical Parameters for XTRA Series Controllers.
9. Papildomi priedai
Enhance the functionality of your EPEVER MPPT Solar Charge Controller with these optional accessories:
- Nuotolinis skaitiklis (MT50): Displays all operating data and system working status on a large-screen LCD. Allows for simple operation, real-time alarm information, and diversified load control modes.
- Nuotolinis temperatūros jutiklis (RTS300R47K3.81A): Used for battery temperature compensation, ensuring accurate charging parameters.
- RS485 Communication PC Cable (CC-RS485-USB-150U): Enables monitoring and setting parameters via PC software.
- „WiFi“ nuoseklusis adapteris („eBox-WiFi-01“): Allows monitoring and setting parameters via mobile APP through WiFi signals.
- RS485 į „Bluetooth“ adapteris („eBox-BLE-01“): Enables monitoring and setting parameters via mobile APP through Bluetooth signals.
- Registratorius (eLOG01): Records operating status data of the controller for real-time monitoring via PC software.

Figure 8: Controller Connectivity with Optional Accessories.
10. Garantija ir palaikymas
EPEVER products are manufactured to high-quality standards. For warranty information and technical support, please refer to the official EPEVER website or contact the authorized seller, Goland Century. Goland Century provides free technical support and has service centers in various regions to assist customers with their solar product needs.
Ask a question about this manual
Ask about setup, troubleshooting, compatibility, parts, safety, or missing instructions. Manuals+ will review the question and use this page’s manual context to help answer it.