Tomshine 93d6461d-17a8-45d0-bfc9-82643fae0e7c
Tomshine Floor Lamp Vartotojo vadovas
Model: 93d6461d-17a8-45d0-bfc9-82643fae0e7c
Įvadas
This manual provides detailed instructions for the setup, operation, and maintenance of your Tomshine Floor Lamp. Designed for versatile lighting, this LED floor lamp features stepless dimming, four color temperature settings, and convenient control via both a touch sensor and a remote control. Its flexible gooseneck allows for precise light positioning, making it ideal for living rooms, bedrooms, offices, and reading areas.
Saugos instrukcijos
- Užtikrinkite maitinimo šaltinio ttage atitinka lamp's requirements before plugging in.
- Neardykite ir nemodifikuokite lampVisus techninės priežiūros darbus patikėkite kvalifikuotiems darbuotojams.
- Laikykite lamp toliau nuo vandens arba damp environments. This product is designed for indoor use only.
- Avoid direct eye exposure to the LED light source for prolonged periods.
- Padėkite lamp on a stable, flat surface to prevent tipping. The sturdy iron base is designed for stability, but caution is advised around children and pets.
- Atjunkite lamp ištraukite iš elektros lizdo prieš valydami ar atlikdami bet kokią techninę priežiūrą.
Pakuotės turinys
Prieš surinkdami patikrinkite, ar yra visi komponentai:
- LED grindys Lamp (Gooseneck head, multiple pole sections, base)
- Nuotolinio valdymo pultas
- Kintamosios srovės adapteris

1 paveikslas: Lamp Komponentai ir priedai
Sąranka ir surinkimas
Norėdami surinkti grindų dangą, atlikite šiuos veiksmusamp:
- Connect the power cable from the lamp base to the AC adapter.
- Carefully thread the power cable through the pole sections.
- Screw the pole sections together clockwise, ensuring a secure connection. Start from the base and work your way up to the gooseneck section.
- Once all sections are securely connected, plug the AC adapter into a standard wall outlet.
Video 1: Product Features and Assembly Guide. This video demonstrates the lamp's various lighting modes and provides a step-by-step guide for assembling the lamp components, including connecting the power cable and screwing the pole sections together.
Naudojimo instrukcijos
Palieskite jutiklio valdymą
Lamp features a touch control panel located on the stand below the gooseneck:
- Trumpas paspaudimas: Tap the power icon to turn the lamp ON/OFF. Short press the sun icon to cycle through the 4 color temperatures (3000K, 4000K, 5000K, 6000K).
- Ilgas paspaudimas: Slide your finger across the touch surface or long press the sun icon to adjust the brightness steplessly (20%-100%).
Nuotolinio valdymo pultas
The included remote control offers comprehensive control over the lamp's functions. The remote can be conveniently adsorbed onto the lamp post via its magnetic feature.
- Maitinimo mygtukas: Pasukite lamp ĮJUNGTA/IŠJUNGTA.
- Spalvos temperatūros reguliavimas: Mygtukai didinimuiasing arba sumažėjimasasing color temperature.
- Ryškumo reguliavimas: Mygtukai didinimuiasing arba sumažėjimasasing ryškumas.
- Iš anksto nustatyti režimai: Dedicated buttons for various lighting scenes:
- Laisvalaikio režimas
- Skaitymo režimas
- Biuro režimas
- Žindymo režimas
- Pramogų režimas
- Miego režimas
- 100% ryškumas: Instantly set the lamp iki pilno ryškumo.
- Miego laikmatis: Set a 1-hour timer for automatic shut-off.

Figure 2: Remote Control and Touch Panel
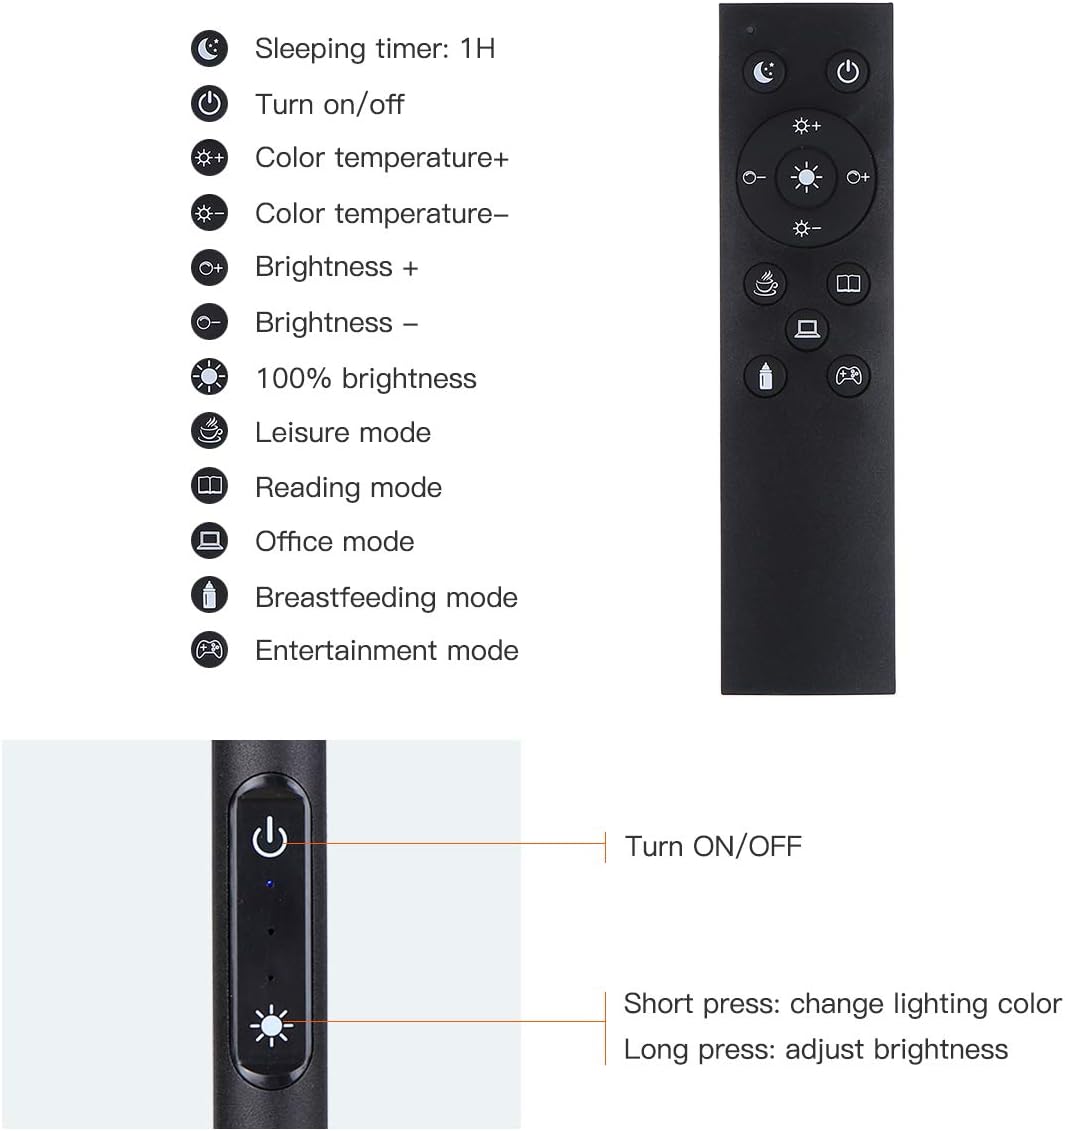
Figure 3: Remote and Touch Control Functions

Figure 4: Color Temperature and Brightness Options
Reguliuojamas žąsies kaklelis
Lamp features a flexible gooseneck and a 360° swivel head, allowing you to direct light precisely where needed. The gooseneck maintains its position once adjusted, preventing drift or drooping.

Figure 5: Flexible Gooseneck and Dimensions
Priežiūra
- Valymas: Prieš valydami atjunkite maitinimą. Nuvalykite minkšta, sausa šluoste.amp. Nenaudokite abrazyvinių valiklių ar tirpiklių.
- LED šviesos šaltinis: Lamp is equipped with integrated LED bulbs that are designed for long life and are not user-replaceable.
- Saugykla: Jei saugote lamp ilgesnį laiką, išardykite jį ir laikykite originalioje pakuotėje sausoje, vėsioje vietoje.
Trikčių šalinimas
| Problema | Galima priežastis | Sprendimas |
|---|---|---|
| Lamp neįsijungia. | Nėra maitinimo šaltinio; atsilaisvinęs kontaktas; sugedęs adapteris. | Check if the power plug is securely inserted into the outlet and the lamp. Ensure the adapter is functioning. Try a different outlet. |
| Nuotolinio valdymo pultas neveikia. | Remote battery low or dead; remote out of range; obstruction. | Pakeiskite nuotolinio valdymo pulto bateriją. Įsitikinkite, kad tarp nuotolinio valdymo pulto ir l nėra kliūčiųamp. Move closer to the lamp. |
| Brightness/Color temperature not adjusting. | Incorrect button pressed; lamp fiksuotu režimu. | Refer to the operating instructions for correct button functions. If in a preset mode, try switching to manual adjustment. |
| Lamp netikėtai mirga arba pritemsta. | Nestabilus maitinimas; atsilaisvinęs prijungimas. | Ensure the power connection is stable. Try plugging into a different outlet. If the issue persists, contact customer support. |
Specifikacijos
| Funkcija | Detalė |
|---|---|
| Prekės ženklas | Tomshine |
| Modelio numeris | 93d6461d-17a8-45d0-bfc9-82643fae0e7c |
| Lamp Tipas | Aukštas Lamp |
| Šviesos šaltinio tipas | LED |
| Ryškumas | 1500 liumenų |
| Vattage | 10 vatų |
| Spalvų temperatūros | 3000K, 4000K, 5000K, 6000K (4 modes) |
| Pritemdymas | Stepless (20%-100%) |
| Kontrolės metodas | Touch, Remote Control |
| Gaminio matmenys | 63.78 "D x 7.87" P x 63.6" A |
| Prekės svoris | 2.76 svaro |
| Bazinė medžiaga | Geležis |
| Atspalvio medžiaga | Metalas |
| Maitinimo šaltinis | Papildinys |
| Naudojimas viduje / lauke | Vidinis |
Garantija ir palaikymas
Tomshine products are manufactured to the highest quality standards. For any questions, technical support, or warranty claims, please contact Tomshine customer service through the retailer's platform or visit the official Tomshine store online. Please retain your proof of purchase for warranty purposes.
Norėdami gauti daugiau informacijos, apsilankykite Tomshine Store.
Ask a question about this manual
Ask about setup, troubleshooting, compatibility, parts, safety, or missing instructions. Manuals+ will review the question and use this page’s manual context to help answer it.