
1. Įvadas
This manual provides essential instructions for the installation, operation, and maintenance of your HP Compaq 6005 Pro Socket AM3 System Motherboard (P/N 531966-001). This motherboard is designed for use in personal computers and supports AMD Socket AM3 processors. Please read this manual thoroughly before proceeding with installation or operation.
2. Saugos informacija
Observe the following safety precautions to prevent damage to the motherboard or personal injury:
- Prieš montuodami arba išimdami bet kokius komponentus, visada atjunkite maitinimo šaltinį nuo sieninio lizdo.
- Wear an anti-static wrist strap and work on an anti-static mat to prevent electrostatic discharge (ESD) damage to sensitive components.
- Handle the motherboard by its edges, avoiding contact with components and connectors.
- Užtikrinkite tinkamą ventiliaciją kompiuterio korpuse, kad išvengtumėte perkaitimo.
- If you are unsure about any installation step, consult a qualified technician.
3. Motherboard Components Overview
Familiarize yourself with the key components and connectors on your HP Compaq 6005 Pro motherboard.

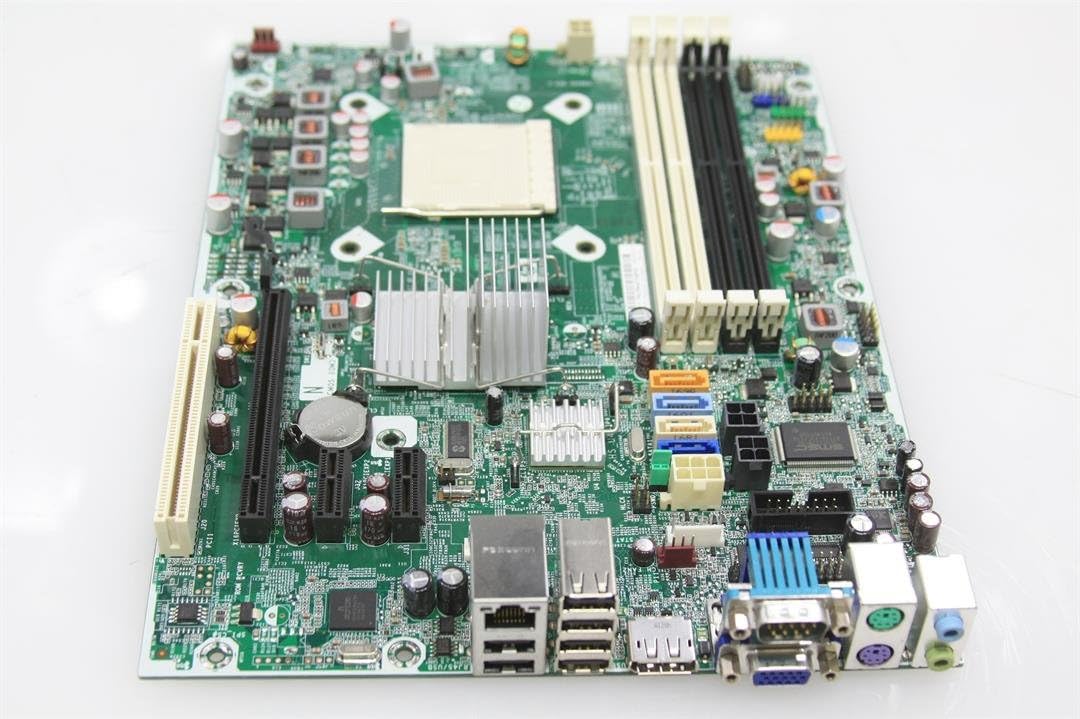
3.1 paveikslas: Iš viršaus į apačią view of the HP Compaq 6005 Pro motherboard, showing the CPU socket, RAM slots, and various chipsets.
The motherboard features an AMD Socket AM3 for compatible processors, four DDR3 DIMM slots for memory, and various expansion slots for additional cards. The rear I/O panel provides connectivity for peripherals.
3.2 paveikslas: Rear I/O panel of the HP Compaq 6005 Pro motherboard, featuring VGA, DisplayPort, DVI, USB ports, Ethernet, and audio jacks.
Key areas include:
- CPU lizdas (AM3): For installing the central processing unit.
- DIMM lizdai: DDR3 atminties modulių diegimui.
- PCIe lizdai: For graphics cards and other expansion cards.
- SATA prievadai: For connecting storage devices like hard drives and SSDs.
- Maitinimo jungtys: Main 24-pin ATX and 4-pin CPU power connectors.
- Priekinio skydelio jungtys: For case buttons, LEDs, and front USB/audio ports.

3.3 paveikslas: Another perspective of the HP Compaq 6005 Pro motherboard, highlighting expansion slots and internal connectors.
4. Sąranka ir diegimas
Norėdami tinkamai įdiegti pagrindinę plokštę ir jos komponentus, atlikite šiuos veiksmus.
4.1. Kontrolinis sąrašas prieš diegimą
- Kompiuterio korpusas su atitinkamais tarpikliais.
- Compatible AMD Socket AM3 processor.
- DDR3 memory modules.
- CPU cooler with thermal paste.
- Maitinimo blokas (PSU).
- Atsuktuvas ir antistatinis riešo dirželis.
4.2. Pagrindinės plokštės montavimas
- Install the I/O shield into the computer case's rear opening.
- Atsargiai įdėkite pagrindinę plokštę į korpusą, sulygiuodami varžtų skyles su tarpikliais.
- Pritvirtinkite pagrindinę plokštę varžtais, užtikrindami, kad ji būtų tvirtai pritvirtinta, bet ne per stipriai priveržta.
4.3. CPU diegimas
- Pakelkite procesoriaus lizdo svirtį.
- Suderinkite trikampį žymę ant procesoriaus su atitinkama žyme ant lizdo.
- Švelniai įdėkite procesorių į lizdą, jo nespausdami jėgos.
- Lower the socket lever to secure the CPU.
- Apply a thin, even layer of thermal paste to the CPU's surface.
- Install the CPU cooler according to its manufacturer's instructions, ensuring good contact with the CPU.
4.4. Atminties (RAM) diegimas
- Atidarykite spaustukus abiejuose DIMM lizdo galuose.
- Suderinkite DDR3 atminties modulio įpjovą su DIMM lizdo rakteliu.
- Tvirtai spauskite abu atminties modulio galus, kol spaustukai užsifiksuos vietoje.
4.5. Maitinimo jungtys
- Connect the 24-pin ATX power cable from the PSU to the main power connector on the motherboard.
- Connect the 4-pin CPU power cable from the PSU to the CPU power connector near the CPU socket.
4.6. Storage Devices and Expansion Cards
- Connect SATA data cables from your storage devices (HDD/SSD) to the SATA ports on the motherboard.
- Install any necessary expansion cards (e.g., graphics card) into the appropriate PCIe slots and secure them with screws.
4.7. Priekinio skydelio ir periferinių įrenginių jungtys
- Connect the front panel cables (power button, reset button, HDD LED, power LED, front USB, front audio) to their respective headers on the motherboard. Refer to your case manual for specific pin assignments.
- Connect external peripherals such as keyboard, mouse, monitor, and network cable to the rear I/O ports.
5. Naudojimo instrukcijos
5.1. Pirmas įkrovimas
- After all components are installed and connected, connect the power cord to the PSU and turn on the power switch.
- Paspauskite kompiuterio korpuso maitinimo mygtuką.
- Sistema turėtų įsijungti ir monitoriuje turėtų matytis ekranas.
5.2. BIOS / UEFI sąranka
Norėdami pasiekti BIOS / UEFI sąrankos programą, paspauskite atitinkamą klavišą (dažniausiai F10 or F12 for HP systems) repeatedly during the initial boot sequence. In the BIOS/UEFI, you can configure system settings, boot order, and monitor hardware status.
5.3. Operacinės sistemos diegimas
Once the system is booting correctly, you can proceed with installing your preferred operating system (e.g., Windows 10) from a bootable USB drive or DVD.
6. Priežiūra
6.1. Valymas
Regularly clean dust from the motherboard, CPU cooler, and case fans using compressed air. Ensure the system is powered off and unplugged before cleaning. Avoid using liquid cleaners directly on components.
6.2. BIOS atnaujinimai
Periodically check the official HP support website for BIOS/firmware updates. BIOS updates can improve system stability, compatibility, and performance. Follow HP's instructions carefully when performing a BIOS update to avoid system damage.
7. Problemų sprendimas
Jei kyla problemų, vadovaukitės toliau pateiktais įprastais trikčių šalinimo veiksmais.
- Nėra galios: Ensure all power cables (24-pin ATX, 4-pin CPU) are securely connected. Check the PSU switch and wall outlet.
- Nėra ekrano: Verify the monitor is connected to the correct video output (VGA, DVI, or DisplayPort) and is powered on. Reseat the graphics card (if applicable) and RAM modules.
- Sistemos pyptelėjimai: Listen for beep codes during startup. These codes often indicate specific hardware issues (e.g., memory failure, graphics card issue). Consult the HP support website for a list of beep codes for your model.
- Sistemos nestabilumas / gedimai: Check for overheating (monitor temperatures in BIOS). Ensure all drivers are up to date. Test memory modules individually.
- Neaptiktas komponentas: Reseat the component (e.g., hard drive, expansion card). Check cable connections. Verify BIOS settings.
8. Specifikacijos
Detailed technical specifications for the HP Compaq 6005 Pro Motherboard (P/N 531966-001).
| Funkcija | Specifikacija |
|---|---|
| Prekės ženklas | HP |
| Modelio pavadinimas | HP Compaq 6005 Pro |
| Modelio numeris | 531966-001 |
| CPU lizdas | AMD lizdas AM3 |
| Suderinami procesoriai | AMD Phenom II, Athlon II, AMD FX |
| Lustų rinkinio tipas | AMD 760MP |
| RAM atminties technologija | DDR3 |
| Galimi atminties lizdai | 4 DIMM lizdai |
| RAM atminties maksimalus dydis | 16 GB |
| Atminties laikrodžio greitis | Up to 2133 MHz (depending on CPU/RAM) |
| Grafikos plokštės sąsaja | PCI Express x16 |
| Išplėtimo lizdai | 1x PCIe x16, 2x PCIe x1, 1x PCI |
| Iš viso SATA prievadų | 4x SATA 2.0 |
| Pagrindinės maitinimo jungties tipas | 24-Pin ATX |
| Galiniai I/O prievadai | 6x USB 2.0, 1x VGA, 1x DVI-D, 1x DisplayPort, 1x RJ-45 Ethernet, Audio In/Out/Mic, 2x PS/2 |
| Suderinami įrenginiai | Asmeninis kompiuteris |
| Platforma | „Windows 10“ (ir ankstesnės suderinamos versijos) |
| Formos faktorius | Mikro-ATX |
9. Informacija apie garantiją
For specific warranty terms and conditions related to your HP Compaq 6005 Pro Motherboard, please refer to the original purchase documentation or contact HP customer support directly. Warranty coverage may vary based on region and point of purchase.
10. Parama
For additional assistance, driver downloads, updated documentation, or to contact technical support, please visit the official HP support websvetainė:
When contacting support, please have your motherboard model number (531966-001) and any relevant system information ready.