Onvis CS2 Security Sensor User Manual
QUICK START GUIDE
- Insert the included 2 pcs AAA alkaline batteries, then close the cover.
- Make sure the Bluetooth of your iOS device is on.
- Use the Home app, or download the free Onvis Home App and open it.
- Tap the `Add accessory’ button, and scan the QR code on the CS2 to add the accessory to your Apple Home system.
- Name the CS2 security sensor. Assign it to a room.
- Set up a Thread HomeKit hub as the CONNECTED hub to enable BLE+Thread connection, remote control and notification.
- For troubleshooting, visit: https://www.onvistech.com/Support/12.html
Note:
- When QR code scanning is NOT applicable, you may manually input the SETUP code printed on the QR code label.
- If the app prompts “Couldn’t add Onvis-XXXXXX”, please reset and re-add the device. Please keep the QR code for future use.
- The use of a HomeKit-enable accessory needs the follow permissions:
a. Settings>iCloud>iCloud Drive>Turn On
b. Settings>iCloud>Keychain>Turn On
c. Settings>Privacy>HomeKit>Onvis Home>Turn On
Thread and Apple Home Hub Setting
Controlling this HomeKit-enabled accessory automatically and away from home requires a HomePod, HomePod mini, or Apple TV set up as a home hub. It is recommended that you update to the latest software and operating system. To build an Apple Thread network, a Thread enabled Apple Home hub device is required to be the CONNECTED hub (seen in the Home app) in the Apple Home system. If you have multiple hubs, please turn off the Non-Thread hubs temporarily, then one Thread hub will automatically be assigned as the CONNECTED hub. You may find the instruction here: https://support.apple.com/en-us/HT207057
Product Introduction
Onvis Security Sensor CS2 is an Apple Home ecosystem compatible, Thread + BLE5.0 enabled, battery powered security system and multi-sensor. It helps deterring trespass, keeps you updated of your home conditions, and offers sensor status for Apple Home automations.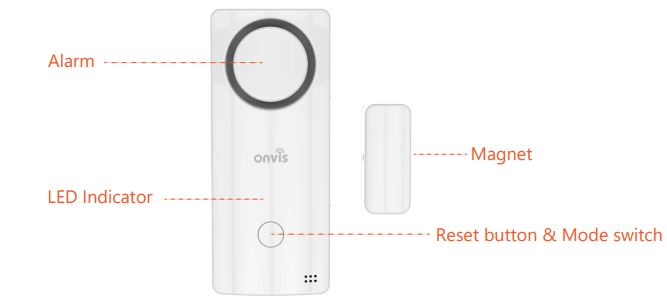
- Thread-Fast Response & flexible deploy
- Security System(modes: Home, Away, Night, Off, Exit, Entrance)
- Automatable 10 Chimes and 8 Sirens
- Timers of modes setting
- Door open reminder
- Max 120 dB Alarm
- Contact Sensor
- Temperature / Humidity sensor
- Long battery life
- Automations, (Critical) Notifications
Restore Factory Settings
Long press the reset button for 10 seconds until a reset chime is played and the LED blinks 3 times.
Specifications
Model: CS2
Wireless connection: Thread + Bluetooth Low Energy 5.0
Alarm max volume: 120 decibels
Operating temperature: -10℃~ 45℃ (14℉~113℉)
Operating humidity: 5%-95% RH
Accuracy: Typical±0.3℃, Typical±5% RH
Dimension: 90*38*21.4mm (3.54*1.49*0.84 inch)
Power: 2 × AAA Replaceable Alkaline Batteries
Battery standby time: 1 year
Usage: Indoor use only
Installation
- Clean the surface of a door/window to install;
- Stick the back tap of the back plate on the target surface;
- Slide the CS2 onto the back plate.
- Target the contact spot of the magnet to the device and make sure the gap is within 20mm. Then stick the back tap of the magnet on the target surface.
- If the CS2 is deployed outdoor, please make sure the device is protected from water.
Tips
- Clean and dry the target surface before deploying CS2 base on.
- Keep the setup code label for future use.
- Do not clean with liquid.
- Do not attempt to repair the product.
- Keep the product away from children under the age of three.
- Keep the Onvis CS2 in clean, dry, indoor environment.
- Be sure the product is adequately ventilated, is positioned securely, and do not place it near other sources of heat (e.g. direct sunlight, radiators, or similar).
FAQ
- Why does the response time slow down to 4-8 seconds? The connection with the hub might have been switched to bluetooth. A reboot of the home hub and device will restore the Thread connection.
- Why did I fail to set up my Onvis Security Sensor CS2 to Onvis Home app?
- Make sure Bluetooth is enabled in your iOS device.
- Make sure your CS2 is within connecting range of your iOS device.
- Before setting up, reset the device by long pressing the button for about 10 seconds.
- Scan the setup code on the device, instruction manual or inner packaging.
- If the app prompts “couldn’t add the device” after scanning the setup code:
a. remove this CS2 that was added before and close the app;
b. restore the accessory to factory settings;
c. add the accessory again;
d. update the device firmware to the latest version.
- No Response
- Please check the battery level. Make sure the battery level is not lower than 5%.
- A Thread connection from a Thread border router is preferred for CS2. Connection radio can be checked in the Onvis Home app.
- If the connection of CS2 with the Thread network is too weak, try putting a Thread router device to improve Thread connection.
- If CS2 is under Bluetooth 5.0 connection, the range is limited to BLE range only and response is slower. So if BLE connection is poor, please consider setting up a Thread network.
- Firmware Update
- A red dot on the CS2 icon in the Onvis Home app means a newer firmware is available.
- Tap the CS2 icon to enter main page, and then tap the upper right to enter details.
- Follow the app prompting to complete firmware update. Do not quit the app during firmware update. Wait about 20 seconds for CS2 to reboot and reconnect.
Warnings and Cautions of Batteries
- Use only Alcaline AAA batteries.
- Keep away from liquids and high humidity.
- Keep battery out of reach of children.
- If you notice any liquid coming out of any of the battery, be sure not to let it come into contact with your skin or clothing as this liquid is acidic and can be poisonous.
- Do not dispose of battery together with household waste.
- Please recycle/dispose of them in accordance with local regulations.
- Remove the batteries when they run out of power or when the device will not be used for a while.
Legal
- Use of the Works with Apple badge means that an accessory has been designed to work specifically with the technology identified in the badge and has been certified by the developer to meet Apple performance standards. Apple is not responsible for the operation of this device or its compliance with safety and regulatory standards.
- Apple, Apple Home, Apple Watch, HomeKit, HomePod, HomePod mini, iPad, iPad Air, iPhone, and tvOS are trademarks of Apple Inc., registered in the U.S. and other countries and regions. The trademark “iPhone” is used with a license from Aiphone K.K.
- Controlling this HomeKit-enabled accessory automatically and away from home requires a HomePod, HomePod mini, Apple TV, or iPad set up as a home hub. It is recommended that you update to the latest software and operating system.
- To control this HomeKit-enabled accessory, the latest version of iOS or iPadOS is recommended.
FCC Compliance Statement
This device complies with part 15 of the FCC Rules. Operation is subject to the following two conditions:
(1) this device may not cause harmful interference, and
(2) this device must accept any interference received, including interference that may cause undesired operation. Any changes or modifications not expressly approved by the party responsible for compliance could void the user’s authority to operate the equipment.
NOTE: This equipment has been tested and found to comply with the limits for a Class B digital device, pursuant to Part 15 of the FCC Rules. These limits are designed to provide reasonable protection against harmful interference in a residential installation. This equipment generates, uses and can radiate radio frequency energy and, if not installed and used in accordance with the instructions, may cause harmful interference to radio communications. However, there is no guarantee that interference will not occur in a particular installation. If this equipment does cause harmful interference to radio or television reception, which can be determined by turning the equipment off and on, the user is encouraged to try to correct the interference by one or more of the following measures:
— Reorient or relocate the receiving antenna.
— Increase the separation between the equipment and receiver.
— Connect the equipment into an outlet on a circuit different from that to which the receiver is connected.
— Consult the dealer or an experienced radio/TV technician for help. The device has been evaluated to meet general RF exposure requirement. The device can be used in portable exposure condition without restriction.
WEEE Directive Compliance
![]() This symbol indicates that it is unlawful to dispose of this product together with other household waste. Please take it to a local recycling center for used equipment.
This symbol indicates that it is unlawful to dispose of this product together with other household waste. Please take it to a local recycling center for used equipment.

contact@evatmaster.com
contact@evatost.com
IC Caution:
This device complies with Industry Canada licence-exempt RSS standard(s). Operation is subject to the following two conditions: (1) This device may not cause interference, and
(2) This device must accept any interference, including interference that may cause undesired operation of the device. The device has been evaluated to meet general RF exposure requirement. The device can be used in portable exposure condition without restriction.
Conformity Declarations
Shenzhen Champon Technology Co., Ltd here by declares that this product meets basic requirements and other relevant obligation as set forth in the following guidelines:
2014/35/EU low voltage Directive (replace 2006/95/EC)
2014/30/EU EMC Directive
2014/53/EU Radio Equipment Directive [RED]
2011/65/EU, (EU) 2015/863 RoHS 2 Directive
For a copy of the Conformity Declaration, visit: www.onvistech.com
This product is approved for use in European Union.
Manufacturer: Shenzhen ChampOn Technology Co., Ltd.
Address: 1A-1004, International Innovation Valley, Dashi 1st Road, Xili, Nanshan, Shenzhen, China 518055
![]()
www.onvistech.com
support@onvistech.com

![]()
Documents / Resources
 | Onvis CS2 Security Sensor [pdf] User Manual 2ARJH-CS2, 2ARJHCS2, CS2 Security Sensor, CS2, Security Sensor, Sensor |