Logitech K360 Compact and Thin Wireless keyboard

User Manual
This compact wireless keyboard is ideal for narrower built and allows you to perform even in constricted workspaces. Equipped with a number pad and 12 easy access keys, you can be more productive -at home or at work.
In The Box

Assembly


Keyboard Features

Enhanced F-keys
To use the enhanced F-keys, press and hold the Fn key, and then press the F-key you want to use.
Fn + F1 = Launches Internet browser
Fn + F2 = Launches email application
Fn + F3 = Launches Windows Search1
Fn + F4 = Launches media player
Fn + F5 = Flip2
Fn + F6 = Shows desktop
Fn + F7 = Minimizes window
Fn + F8 = Restores minimized windows
Fn + F9 = My Computer
Fn + F10 = Locks PC
Fn + F11 = Puts PC in standby mode
Fn + F12 = Launches calculator
To reprogram the enhanced F-keys, use the Logitech® SetPoint™ software, which you can download from www.logitech.com/downloads.
1. One Touch Search if the SetPoint software is installed.
2. Application Switcher if the SetPoint software is installed.
Hotkeys
1. Media navigation
2. Volume adjustment
Unifying

Plug it. Forget it. Add to it.
Your new Logitech product ships with a Logitech® Unifying receiver. Did you know you can add a compatible Logitech wireless device that uses the same receiver as your current Logitech Unifying product?
Are you Unifying-ready?
If you have a Logitech wireless device that’s Unifying-ready, you can pair it with additional Unifying devices. Just look for the orange Unifying logo on the new device or its packaging. Build your ideal combo. Add something. Replace something. It’s easy, and you’ll use only one USB port for up to six devices.
Getting started is easy
If you’re ready to pair your device(s) via Unifying, here’s what you need to do:
1. Make sure your Unifying receiver is plugged in.
2. If you haven’t already, download the Logitech® Unifying software from www.logitech.com/unifying.
3. Start the Unifying software* and follow the onscreen instructions to pair the new wireless device with your existing Unifying receiver.
*Go to Start / All Programs / Logitech / Unifying / Logitech Unifying Software
Help with setup
- Is the keyboard powered on?
- Is the Unifying receiver securely plugged into a computer USB port? Try changing USB ports.
- If the Unifying receiver is plugged into a USB hub, try plugging it directly into a USB port on your computer.
- Did you pull the battery tab? Check the orientation of the batteries inside the keyboard, or replace the two AA alkaline batteries.
- Remove metallic objects between the keyboard and its Unifying receiver.
- Try moving the keyboard closer to the Unifying receiver, or order a USB extension cable at
www.logitech.com/usbextender. - Try reconnecting the keyboard and Unifying receiver using the Logitech Unifying software (Refer to the Unifying section in this guide.)
What do you think?
Please take a minute to tell us. Thank you for purchasing our product.
www.logitech.com/support
United States +1 646-454-3200
Argentina +00800-555-3284
Brasil +0 800-891-4173
Canada +1 866-934-5644
Chile 1230 020 5484
Latin America +1 800-578-9619
Mexico 001 800 578 9619

www.logitech.com
© 2011 Logitech. All rights reserved. Logitech, the Logitech logo, and other Logitech marks are owned by Logitech and may be registered. All other trademarks are the property of their respective owners.
Logitech assumes no responsibility for any errors that may appear in this manual. Information contained herein is subject to change without notice.
620-003221.004
Specs & Details
– Make sure that the NumLock key is enabled. If pressing the key once doesn’t enable NumLock, press and hold the key for five seconds.
– Verify that the correct keyboard layout is selected in Windows Settings and that the layout matches your keyboard.
– Try enabling and disabling other toggle keys such as Caps Lock, Scroll Lock, and Insert while checking if the number keys work on different apps or programs.
– Disable Turn on Mouse Keys:
1. Open the Ease of Access Center — click the Start key, then click Control Panel > Ease of Access and then Ease of Access Center.
2. Click Make the mouse easier to use.
3. Under Control the mouse with the keyboard, uncheck Turn on Mouse Keys.
– Disable Sticky Keys, Toggle Keys & Filter Keys:
1. Open the Ease of Access Center — click the Start key, then click Control Panel > Ease of Access and then Ease of Access Center.
2. Click Make the keyboard easier to use.
3. Under Make it easier to type, make sure all checkboxes are unchecked.
– Verify the product or receiver is connected directly to the computer and not to a hub, extender, switch, or something similar.
– Make sure the keyboard drivers are updated. Click here to learn how to do this in Windows.
– Try using the device with a new or different user profile.
– Test to see if the mouse/keyboard or receiver on a different computer.
In the event your Logitech device needs cleaning we have some recommendations:
Before You Clean
– If your device is cabled, please unplug your device from your computer first.
– If your device has user-replaceable batteries, please remove the batteries.
Be sure to switch off your device and then wait 5-10 seconds before starting to clean.
– Don’t put cleaning liquids directly on your device.
– For devices that are not waterproof, please keep moisture to a minimum and avoid any liquid dripping or seeping into the device
– When using cleaning sprays, spray the cloth and wipe — do not spray the device directly. Never submerge the device in a liquid, cleaning or otherwise.
– Don’t use bleach, acetone/nail polish remover, strong solvents, or abrasives.
Cleaning Keyboards
– To clean the keys, use regular tap water to lightly moisten a soft, lint-free cloth and gently wipe down the keys.
– Use compressed air to remove any loose debris and dust between the keys. If you do not have compressed air available, you could also use cold-air from a hair-dryer.
– You can also use fragrance-free disinfecting wipes, fragrance-free anti-bacterial wet wipes, makeup removing tissue, or alcohol swabs containing less than 25% concentration of alcohol.
– Don’t use bleach, acetone/nail polish remover, strong solvents, or abrasives.
Cleaning Mice or Presentation Devices
– Use tap water to lightly moisten a soft, lint-free cloth and gently wipe down the device.
– Use lens cleaner to lightly moisten a soft, lint-free cloth and gently wipe down your device.
– You can also use fragrance-free disinfecting wipes, fragrance-free anti-bacterial wet wipes, makeup removing tissue, or alcohol swabs containing less than 25% concentration of alcohol.
– Don’t use bleach, acetone/nail polish remover, strong solvents, or abrasives.
Cleaning Headsets
– Plastic parts (headband, mic boom, etc.): it is recommended to use fragrance-free disinfecting wipes, fragrance-free anti-bacterial wet wipes, makeup-removing tissue, or alcohol swabs containing less than 25% concentration of alcohol.
– Leatherette earpads: it is recommended to use fragrance-free disinfecting wipes, fragrance-free anti-bacterial wet wipes, or make-up removal tissue. Alcohol wipes can be used on a limited basis.
– For the braided cable: it is recommended to use anti-bacterial wet wipes. When wiping cables and cords, grip the cord mid-way and pull towards the product. Don’t forcefully pull the cable away from the product or away from the computer.
– Don’t use bleach, acetone/nail polish remover, strong solvents, or abrasives.
Cleaning Webcams
– Use tap water to lightly moisten a soft, lint-free cloth and gently wipe down the device.
– Use lens cleaner to lightly moisten a soft, lint-free cloth and gently wipe down the webcam lens.
– Don’t use bleach, acetone/nail polish remover, strong solvents, or abrasives.
If Your Device Still Isn’t Clean
– In most cases, you can use isopropyl alcohol (rubbing alcohol) or fragrance-free anti-bacterial wipes and apply more pressure when cleaning. Before using rubbing alcohol or wipes, we suggest you test it first in an inconspicuous area to make sure it doesn’t cause discoloration or remove any printing on your device.
– If you’re still not able to get your device clean, please consider contacting us.
COVID-19
Logitech encourages users to properly sanitize their products in accordance with guidelines put out by the World Health Organization and the Centers for Disease Control guidelines.
When using a USB 2.0 2.4GHz wireless peripheral device (such as a mouse, keyboard, or headphones) with a PC that also has a USB 3.0 peripheral device plugged in, you may experience erratic operation caused by interference. This is especially likely to happen when using USB 3.0 remote hard drives or flash drives.
This interference may result in:
– Delayed response to mouse or keyboard inputs
– Missing keyboard characters or mouse commands
– Decreased operating distance between the USB 2.0 wireless device and its receiver
There are some techniques that can help early adopters of USB 3.0 to mitigate potential problems with their existing 2.4GHz wireless devices:
– If your PC has multiple USB 2.0 connectors available, separate your USB 3.0 and USB 2.0 receivers by as much distance as possible. For example, if your PC has a choice of USB 2.0 connectors, use the one on the opposite side of the PC from the USB 3.0 connector.
– Position your USB 2.0 receiver as close as possible to your wireless peripheral (mouse, keyboard, headphones, etc.).
– Use a standard, USB-extender cable to position your USB 2.0 wireless receiver as far away as possible from your USB 3.0 connector.
– A USB-extender cable is available for Logitech customers who are experiencing this problem (click here for more information).
NOTE:
A USB 3.0 connector sometimes referred to as Super Speed USB or SS, normally has a blue plastic insert in the connector. Unlike a USB 2.0 connector which has 4 pins within the connector, a USB 3.0 connector has 9 pins.
Move your USB 2.0 wireless receiver to the opposite side of your computer: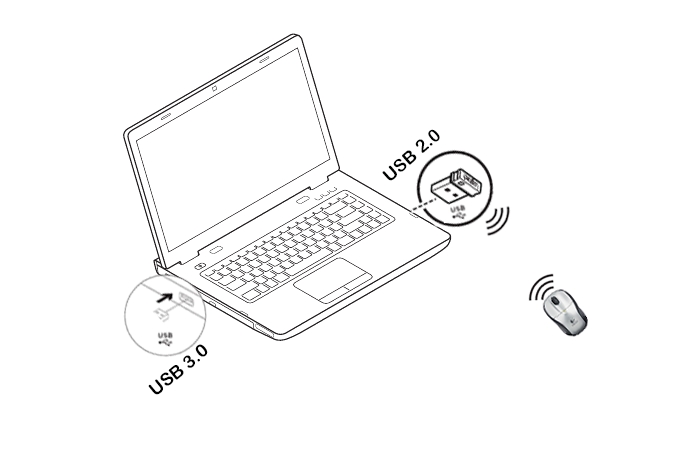
Make sure your USB 2.0 wireless receiver is in the USB 2.0 connector closest to your wireless peripheral:
Use a USB extended cable to position your wireless receiver as far away from your USB 3.0 peripheral as possible:
To check if your Logitech product works with Windows 8 or Windows 10, first select the appropriate product category from the list below.
– Mice and keyboards
– Tablet and laptop accessories
– Gaming products
– Harmony remotes
– Speakers
– Headphones and headsets
– Smart radios
– Squeezebox network music players
– Alert security cameras
– WiLife security cameras
– Webcams
See the following for generic English-language keyboard layouts:
– US
– US International
– United Kingdom
————————————–
US 
US International 
United Kingdom 
Your keyboard was designed with a space where you can store the Unifying receiver. When you’re not using the keyboard, you can store the receiver inside of it.
To locate the storage space for a Unifying receiver in your keyboard:
1. Flip the keyboard over and slide the battery cover off.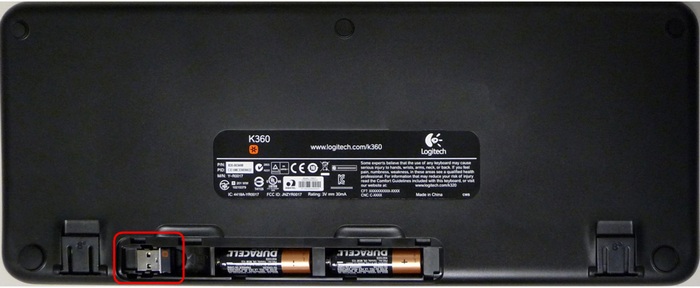
2. Locate the small rectangular slot next to the battery compartment.
3. Slide the receiver into the slot.
4. Replace the battery cover.
– Keyboard is not working
– Keyboard frequently stops working
When your K360 keyboard isn’t working, the problem is likely a lost a connection. The connection between the keyboard and the Unifying receiver can be lost for several reasons, such as:
– Low battery levels
– Moving the receiver from one USB port to another
– Moving the receiver to another computer
– Plugging the receiver into a USB hub or other unsupported device such as a KVM switch (NOTE:
– Your receiver must be plugged directly into your computer)
– Using your wireless keyboard on metal surfaces
– Radio frequency (RF) interference from other sources, such as:
– Wireless speakers
– Computer power supplies
– Monitors
– Cell phones
– Garage door openers
Before connecting your keyboard:
1. Fix or rule out the potential problems listed above.
2. Insert new batteries. For instructions on changing your keyboard batteries, see answer 360023244414.
3. Make sure the keyboard is turned on. For instructions on turning on your keyboard, see answer 360023244414.
4. Plug the receiver securely into a working USB port on your computer.
5. Turn your computer on.
Reconnecting your keyboard
1. Download the correct version of Logitech SetPoint Mouse and Keyboard Software from the K360 Downloads Page.
2. Launch the Logitech Unifying Software:
Windows: Start > Programs > Logitech > Unifying > Logitech Unifying Software
3. Click Next at the bottom of the Welcome screen.
4. Follow the on-screen instructions to turn your keyboard off and then back on.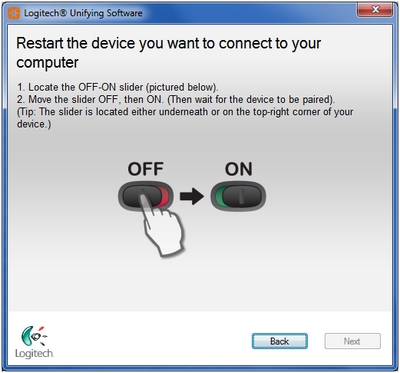
4. When your keyboard is detected, you’ll see this window: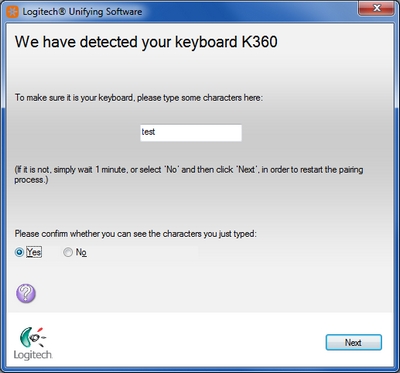
5. If you can type in the testing box, select Yes and then click Next. Otherwise, repeat from step #4.
6. Click Finish to exit the Logitech Unifying Software. Your keyboard should now be connected.
If your keyboard frequently stops working and you keep having to reconnect it with the Unifying receiver, try these suggestions:
– Keep other electrical devices at least 8 inches (20 cm) away from the USB receiver
– Move the keyboard closer to the USB receiver
– Move the receiver to a different USB port on your computer
Your K360 keyboard’s Scroll Lock function key is located just above the number pad.
To toggle Scroll Lock off or on, press the FN + Page Down (PgDn) key at the same time.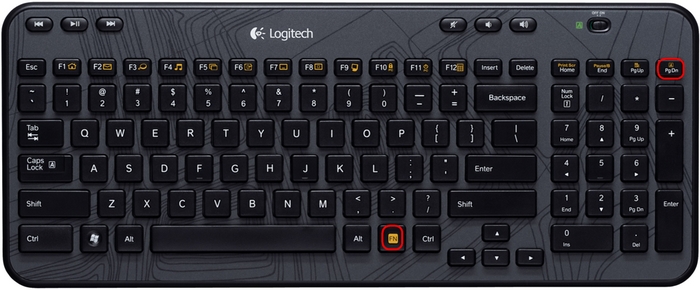
NOTE:
If you’ve installed the Logitech Mouse and Keyboard software (SetPoint), the confirmation message “Scroll Lock Off” or “Scroll Lock On” will be displayed for about two seconds in the lower portion of your monitor each time you toggle the key. See answer 26987 for instructions on downloading SetPoint.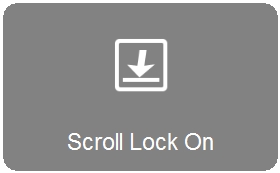
Battery information for your keyboard:
– Requires 2 AA alkaline batteries
– Expected battery life is up to 36 months (3 years)
Checking battery status
You can check your keyboard’s battery status using the Logitech SetPoint mouse and keyboard software. See answer 360023406573 for instructions.
Installing New Batteries
When you install new batteries for your keyboard, make sure they face the correct direction, as shown:
Battery performance tips
For best battery performance:
– Use only quality alkaline batteries.
– Make sure replacement batteries are new and within the manufacturer’s expiration date.
– Don’t mix old and new batteries or batteries of different brands.
The power switch for your K360 keyboard is located at the top right of the keyboard, next to the number pad.
To turn the keyboard on or off:
– Slide the switch to the right to turn it on.
– Slide the switch to the left to turn it off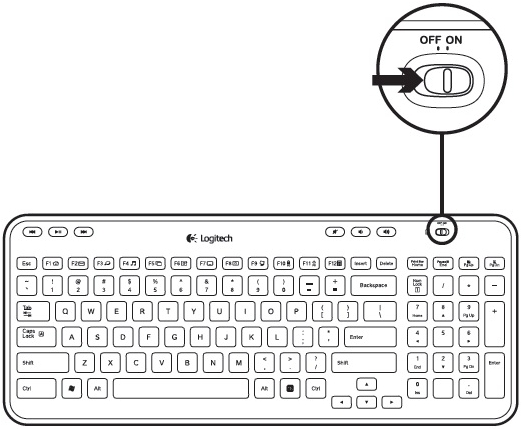
Your K360 keyboard is supported on:
– Windows 7
– Windows XP
– Windows Vista
NOTE: The K360 isn’t supported on Windows 98, Windows ME, Windows 2000, UNIX, Linux or Macintosh operating systems.
If you’ve lost or damaged the Unifying receiver for your keyboard, you can purchase a replacement from the K360 Wireless Keyboard Parts Store.
Your K360 keyboard uses a Unifying receiver that looks like this: .
.
The keyboard won’t work with a non-Unifying receiver. To be sure you have the right receiver, look for this Unifying logo:
You can program the function keys on your keyboard using the Logitech SetPoint mouse and keyboard software.
NOTE:
If you don’t already have SetPoint installed, you can download it.
– Programming function keys (see answer 360023242854)
– Disabling keys (see answer 360023242854)
– Caps Lock indicators
– Num Lock indicator
————————————
There is a Caps Lock indicator light on the keyboard next to the ON/OFF switch. When the keyboard is connected to the computer, the light indicates when Caps Lock is on.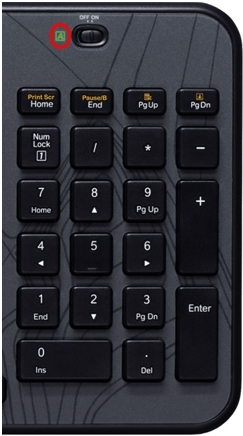
On-screen notification
To know if Caps Lock is on, press the Caps Lock key and look at the on-screen notification.
NOTE:
You need to have Logitech SetPoint software installed in order to receive on-screen notifications. If you don’t have it installed, you can download it from the Wireless Keyboard K360 Downloads Page.
Caps Lock On. When you press the Caps Lock key and see the following “Caps Lock On” message, all of the letters you type will appear in uppercase.
Caps Lock Off. When you press the Caps Lock key and see the following “Caps Lock Off” message, unless you use the Shift button, all of the letters you type will appear in lowercase.
To know if Num Lock is on, press the Num Lock key and look at the on-screen notification.
NOTE:
You need to have Logitech SetPoint software installed in order to receive on-screen notifications. If you don’t have it installed, you can download it from the Wireless Keyboard K360 Downloads Page.
– Num Lock On. When you press the Num Lock at the top left of the number pad and see the following “Num Lock On” message, the number pad will enter numbers.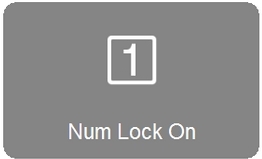
– Num Lock Off. When you press the Num Lock key at the top left of your number pad and see the following “Num Lock Off” message, the number pad will move your cursor in the direction of the arrows printed on them.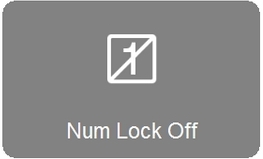
Your wireless keyboard ships with the Unifying receiver:
You can connect your keyboard with any receiver that displays this Unifying logo:
NOTE: Although a device may be supported by the Unifying receiver, SetPoint and/or Logitech Control Center (LCC) software support depends on the specific product.
+Operating distance between the mouse or keyboard and USB receiver
In an ideal environment, a Unifying or non-Unifying device can operate up to 30 feet (10 meters) away from its receiver (shown below) in a clear line of sight.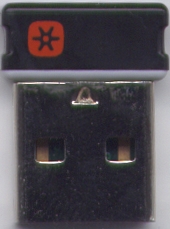

If you’re not getting this distance, try these suggestions:
– Replace the battery/batteries or make sure your mouse or keyboard is fully charged
– Move devices that emit radio waves or could cause radio interference away from your work area (Examples: cell phones, radios, wireless routers, microwaves)
To determine if your environment is shortening your operating range, try using your device in a different environment to see if the distance improves. If it does, look for other possible sources of interference you can remove from your work area.
To uninstall Logitech SetPoint software, first select your operating system:
– Windows XP
– Windows 7 and Vista
– Windows 8
– Windows 10
—————————-
Windows XP
1. Go to Add or Remove Programs:
– Default Start Menu: Start > Control Panel > Add or Remove Programs
– Classic Start Menu: Start > Settings > Control Panel > Add or Remove Programs
2. Select “Logitech SetPoint” from the list.
3. Click the Remove button.
4. Follow the on-screen instructions to remove SetPoint from your system.
NOTE: You may need to restart your computer to finish uninstalling SetPoint.
Windows 7 and Vista
1. Go to Uninstall a program:
– Default Start Menu: Start > Control Panel > Uninstall a program
– Classic Start Menu: Start > Settings > Control Panel > Programs and Features
2. Select “Logitech SetPoint” from the list.
3. Click Uninstall.
4. Follow the on-screen instructions to remove SetPoint from your system.
NOTE: You may need to restart your computer to finish uninstalling SetPoint.
Windows 8
1. Go to Uninstall a program:
– Start screen > Right-click on Mouse and Keyboard Settings > Uninstall
– Start screen > Right-click on empty space and select All apps > Control Panel > Uninstall a program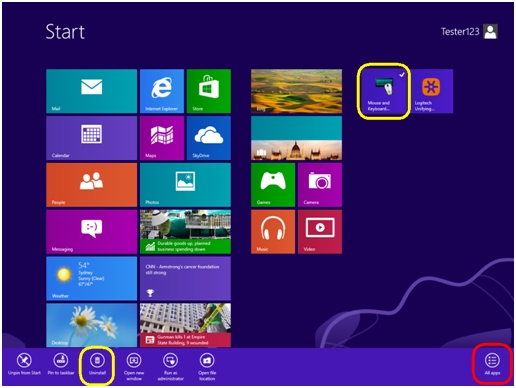
3. Select “Logitech SetPoint” from the list.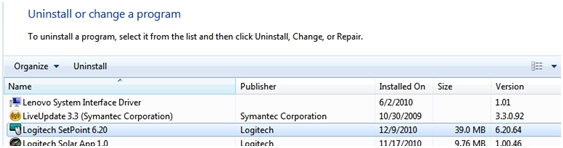
4. Click Uninstall.
5. Follow the on-screen instructions to remove SetPoint from your system.
NOTE: You may need to restart your computer to finish uninstalling SetPoint.
Windows 10
1. Go to Programs and Features:
– Right-click on the Windows logo on the bottom left of the window, then click Programs and Features
2. Select Logitech SetPoint from the list of programs.
3. Click on Uninstall and follow the on-screen instructions to uninstall Setpoint.
NOTE: You may need to restart your computer to finish uninstalling.
We do not support the use of third-party devices with our mice and keyboards. They can interfere with communication between a mouse or keyboard and the computer.
Unsupported third-party devices include:
– KVM switch boxes
– Port replicators
– Docking stations
– USB hubs
NOTE: The manufacturers of these third-party devices implement keyboard and mouse support in different ways. There is currently no industry standard.
Normally, you should be able to customize your mouse or keyboard settings in the Logitech SetPoint mouse and keyboard software on the My Mouse / My Keyboard tab.
Without the My Mouse / My Keyboard tab in SetPoint, only the Tools tab will display, as shown here:
If the My Mouse / My Keyboard tab isn’t displayed, you’ll need to uninstall and re-install SetPoint following the instructions below.
To uninstall and re-install SetPoint:
– Windows XP
– Windows Vista and Windows 7
– Windows 8
———————————————-
Windows XP
1. Go to Add or Remove Programs.
– Default Start Menu view: Start > Control Panel > Add/Remove Programs
– Classic Start Menu view: Start > Settings > Control Panel > Add/Remove Programs
2. Select Logitech SetPoint from the list of programs displayed.
3. Click the Change / Remove button and follow the on-screen instructions to uninstall SetPoint.
4. Download and install the latest version of SetPoint from the Web Downloads Page.
NOTE: You may need to restart your system after SetPoint has been installed.
5. After your system restarts, open SetPoint to verify that the My Mouse / My Keyboard tab is available.
If the My Mouse / My Keyboard tab is still missing:
1. Right-click on the SetPoint icon in the system tray (at the bottom right of your screen) and select Exit.
2. Click the Windows Start button.
3. Choose Run.
3. Type %windir% in the Run dialog box.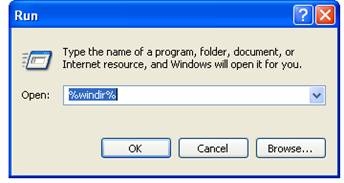
4. Double-click the System32 folder to open it.
5. Double-click the drivers folder.
6. Rename the file wdf01000.sys to wdf01000.bak.
7. Re-install SetPoint.
IMPORTANT: Before you restart your system, make sure the wdf01000.sys file is present in the drivers folders. If you restart without this file, it may prevent some of your hardware — including mice and keyboards — from working properly.
9. If the wdf01000.sys file isn’t in the drivers folder, change wdf01000.bak back to wdf01000.sys.
10. Restart the computer.
11. After your system restarts, open SetPoint to verify that the My Mouse / My Keyboard tab is present.
Windows Vista and Windows 7
1. Go to Uninstall a program.
– Default Start Menu view: Start > Control Panel > Uninstall a program
– Classic Start Menu view: Start > Settings > Control Panel > Programs and Features
2. Select Logitech SetPoint from the list of programs displayed.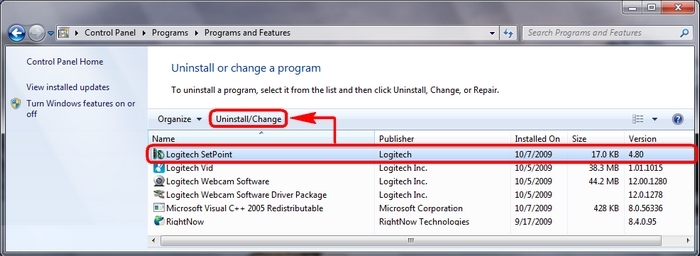
3. Click the Uninstall button highlighted above and follow the on-screen instructions to uninstall SetPoint.
4. Download and install the latest version of SetPoint from the Web Download page.
5. After your system restarts, open SetPoint to make sure the My Mouse / My Keyboard tab is available.
Windows 8
1. Go to Uninstall a program.
– Start screen > Right-click on Mouse and Keyboard Settings > Uninstall
– Start screen > Right-click on empty space and select All apps > Control Panel > Uninstall a program
3. Select “Logitech SetPoint” from the list.
4. Click Uninstall.
5. Follow the on-screen instructions to remove SetPoint from your system.
NOTE: You may need to restart your computer to finish uninstalling SetPoint.
Symptom
After disabling the ability to wake-up the system in Windows Device Manager, the Unifying mouse or keyboard still brings the system out of sleep mode.
Solution
Even if you bought a mouse-only or keyboard-only product, the Unifying receiver that came with it still enumerates for both the mouse and keyboard interfaces.
Example
If you have two mice attached, then you would need to uncheck the “Allow this device to wake the computer” option for both mice plus a keyboard in the Windows Device Manager.
Use the process below to identify and configure the Unifying devices to not wake up the system in Windows Device Manager.
Changing wake-up settings in the Device Manager
To change the wake-up settings in Windows Device Manager, you’ll need to launch it through Computer Management and then make your selections. Here’s how:
1. Click Start, right-click Computer, and then click Manage.
2. Click Device Manager in the navigation pane on the left.
3. Select and expand either the “Keyboards” or “Mice and other pointing devices” category.
4. Right-click on the first entry and go to Properties > Details tab > Hardware IDs under the Property section.
5. Make sure the Value section contains: HID\VID_046D&PID_C52B. If it doesn’t, click Cancel and open the next mouse or keyboard entry in the list.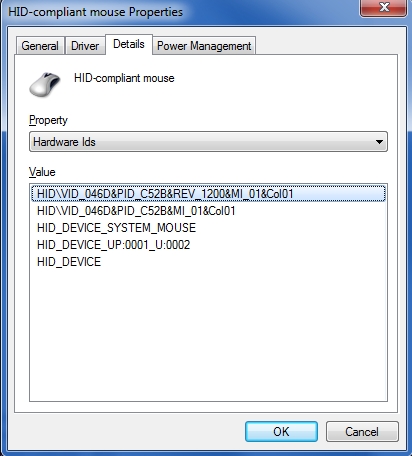
6. Select the “Power Management” tab and uncheck the “Allow this device to wake the computer” check box.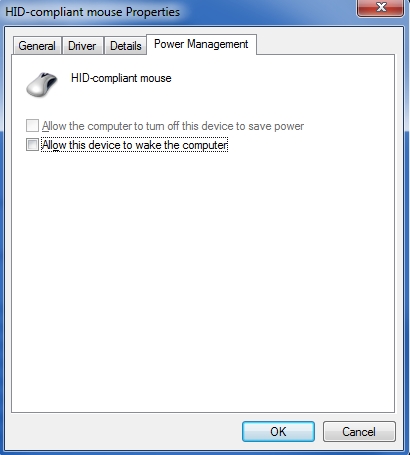
7. Repeat the same steps for all entries in both the “Keyboards” and “Mice and other pointing devices” categories.
By default, the Num Lock on your keyboard is disabled each time Windows 10 boots up after a shutdown or restart.
To configure your operating system so that Num Lock stays on during startup, please contact professional support for your operating system. This requires advanced changes that need to be done under the guidance of a professional technician.


