LightMap Tempest Weather Display Instructions
Introduction
Thank you for purchasing the LightMap Weather Display, designed specifically to pair with your Tempest Weather Station! This manual will guide you through the setup, and operation of your new Weather Display. If you have any questions or need further assistance, feel free to reach out by email using info@lightmaps.io.
What’s in the Box
- LightMap Weather Display
- Power Cord
- Quick Start Guide
Setup Instructions
Power Up
- Connect the LightMap Weather Display to the included 24V power adapter using the circular connector.
- Plug the power adapter into a standard wall outlet.
Get Connected
- Upon powering up, the Weather Display will alternate between green and blue lights.
- When the lights turn blue, use a mobile device or PC to connect to the ‘LightMap’ WiFi network.
- Once connected, a window will appear prompting you to enter your local WiFi name (SSID) and password.
- The Weather Display will switch from blue to green and attempt to connect to your network.
Connecting your Tempest
- Once your Weather Display is connected to your wireless network, the status bar will turn red. Scan the QR code on the back of the product to finish setup.
- Once you have completed connecting your tempest to the display please allow up to 5 minutes for data to begin populating the display.
For more details or technical support, please visit our website: www.lightmaps.io/FAQ or email us at info@lightmaps.io. You can access the settings for your device by visiting setup.lightmaps.io
Using Your Weather Display
Once your Weather Display is connected to your local WiFi network and paired with your Tempest Weather Station it will begin showing live weather conditions from your Tempest. The following information is showed on your Weather Display.
- Status Indicator
- Forecast Dial
- Precipitation Intensity
- Precipitation Accumulation
- UV Index
- Live Weather Conditions
- Humidity
- Wind Direction
- Wind and Gust Speed
- Barometric Pressure
- Moon Phase
- Temperature
- Additional Features and Maintenance
Status Indicator Bar
Located beneath the cloud icon, the status indicator bar works with the devices touch sensor and shows the current mode of your device.

Note that the status indicator bar also will go red if connection to your network or Tempest has been lost.
Forecast data Forecast Data is displayed similarly to current weather except for two differences:
- Forecast Dial shows 24 hour forecast animation. This is the same as current weather except it spins to animate all 24 hours conditions for the day
- Temperature uses fixed colors with blue for daily low temperature and red for daily high temperature and it alternates between them.
Forecast Dial
The Forecast Dial, positioned to the left of the status indicator bar, displays a 12-hour weather forecast from the current time. Each color represents a specific weather condition and is ranked by priority. Below is the meaning of each color in order of importance.
Priority – Color – Meaning
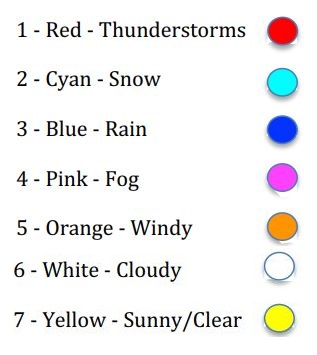
When reading the forecast, the current time led will breathe which allows you to instantly get the weather forecast for the next 12 hours. Some examples of how to read the forecast dial below.
Examples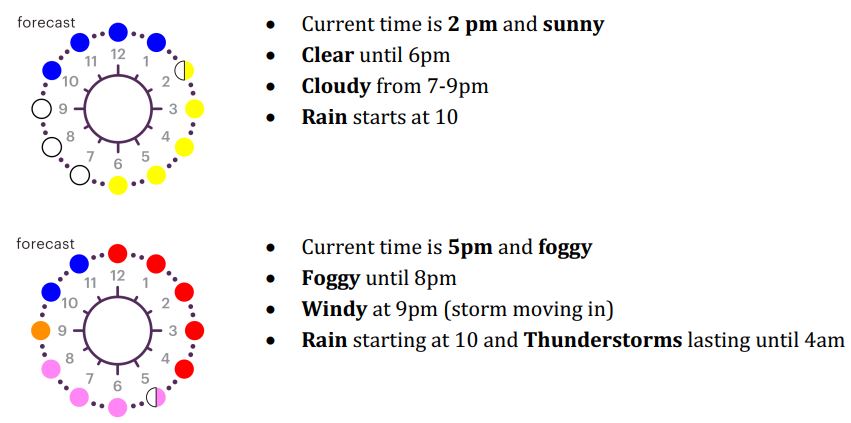
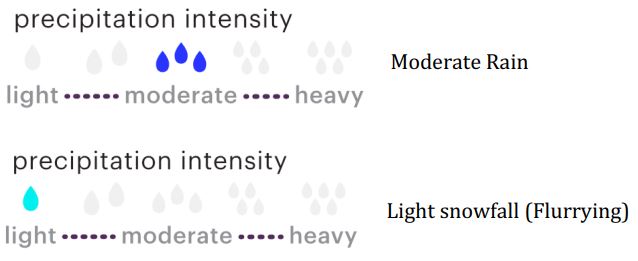
Precipitation Intensity
The precipitation intensity bar shows how heavy it is currently raining or snowing. Blue is used to show rain and Cyan for snow. Below are some examples:
Precipitation Accumulation
The Precipitation Accumulation Bar shows the amount of precipitation that has accumulated over the past 24 hours. The scale changes depending on the type of precipitation. The scale for rain is in inches and displayed in Blue and the scale for snow is in feet and displayed in Cyan. Some examples below:

UV Index Bar
The UV Index Bar shows the level of ultraviolet (UV) radiation from the sun on a given day. It is used to help decide when to use sunscreen and how much sun exposure is safe.

Live Weather Conditions
Live Weather Condition Bar shows the current weather conditions.

Icons in order left to right:
- SUN: clear or partly cloudy
- MOON: Nighttime clear or partly cloudy
- CLOUD: partly cloudy to cloudy
- RAIN: rainy
- SNOW: snowy
- LIGHTNING: thunderstorm
- FOG: foggy
- WIND: windy
- SMOKE: smoky or smoggy
![]()
Humidity Dial
The Humidity Dial shows the current humidity from 0-100%.
For example the image to the right shows current humidity is 50%.

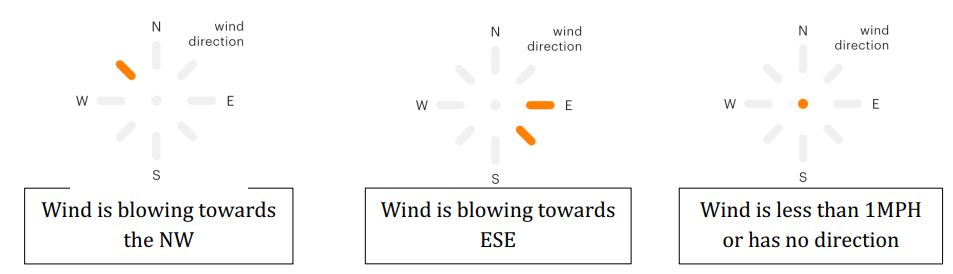
Wind Direction
The wind direction indicator shows the direction the wind is blowing towards, similar to a wind sock.
Some examples below:
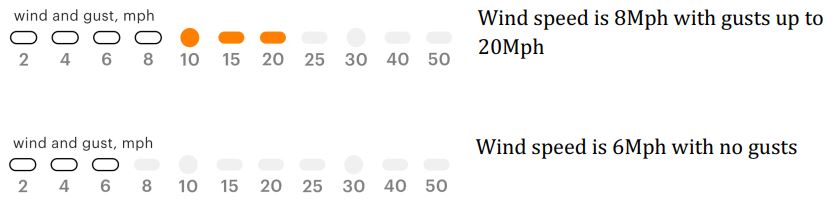
Wind Gust and Speed
Wind and speed bar shows both the current wind speeds and wind gusts. Wind speed is displayed in White and gusts are Orange.
Barometric Pressure
The Weather Display shows current barometric pressure trends using icons and color. The center, clock icon, shows current barometric pressure. Yellow is used for normal pressure, Red for low pressure, and Green for high pressure. Some examples below:

Moon Phase
Your weather display also will show the current moon phase as well as information about whether the moon is waxing or waning. Cyan indicates a waxing moon and Magenta indicates waning. Some examples below:

Temperature
Temperature is displayed in two pieces. The tens component displays the temperature in increments. If the 70 is lit you know the temperature is in the 70’s. The second piece is the ones component. This displays the temperature accurate to one degree.
The color of the lights also indicates temperature. The colors are blended with the following thresholds:
- Blue ~ 0 degrees
- Cyan ~ 20 degrees
- Green ~ 40 degrees
- Yellow ~ 60 degrees
- Red ~ 80 degrees
- Magenta ~100 degrees
Examples:

Special Conditions:
- Temperatures greater than 109 degrees are displayed by illuminating the 100 LED alone with the 10 or 20 LED.
- 0 degrees is displayed using only the the 0 LED
- Negative temperatures are displayed by illuminating the 0/- LED while displaying the tens digit as well as the ones digits.
Additional Features & Maintenance
- Firmware Updates: Your Weather Display will be automatically updated via WiFi to ensure you always have the latest features and improvements. To receive firmware updates, keep your device connected to the internet.
- Cleaning Instructions: Use a soft, lint-free cloth to clean the device. If needed, lightly dampen the cloth with water or a gentle cleaner. Avoid using harsh chemicals or abrasive materials to prevent damage.
- Storage Instructions: When not in use for extended periods, unplug the Weather Display and store it in a dry, cool location. Ensure the device is not exposed to extreme temperatures or moisture.
If you have any questions or concerns, contact LightMaps by emailing info@lightmaps.io
Documents / Resources
 | LightMap Tempest Weather Display [pdf] Instructions Tempest Weather Display, Weather Display, Display |