
1. 서론
This manual provides detailed instructions for the installation, operation, and maintenance of your Zebronics DMS200 Monitor Desk Stand. Please read this manual thoroughly before installation and use to ensure proper function and safety. The DMS200 is designed to support monitors from 17 to 32 inches, with a maximum load capacity of 7 kg, offering ergonomic adjustments for an optimized view경험.

Image 1.1: Zebronics DMS200 Monitor Desk Stand overview.
2. 안전 정보
부상이나 제품 손상을 방지하기 위해 다음 안전 예방 조치를 준수하세요.
- 최대 중량 용량 7kg(15.4파운드)을 초과하지 마십시오.
- Ensure the desk surface is stable and strong enough to support the combined weight of the stand and monitor.
- Always follow the installation instructions carefully. Improper installation can lead to equipment damage or personal injury.
- 설치 중에는 어린이와 애완동물이 가까이 가지 않도록 하십시오. 작은 부품은 질식 위험이 있습니다.
- 나사를 너무 세게 조이지 마세요. 손상될 수 있습니다.
- 모든 연결이 안전한지 정기적으로 확인하십시오.
3. 패키지 내용
설치를 시작하기 전에 모든 구성 요소가 있는지 확인하세요.
- 모니터 암 어셈블리
- 데스크 Clamp (C-clamp)
- 그로밋 마운트 베이스
- VESA 플레이트
- 하드웨어 키트(나사, 와셔, 육각 렌치)
- 사용 설명서
4. 설정 및 설치
The Zebronics DMS200 offers two installation methods: C-clamp 또는 그로밋 마운트 방식이 있습니다. 책상에 가장 적합한 방식을 선택하세요.
4.1. 설치 방법 선택
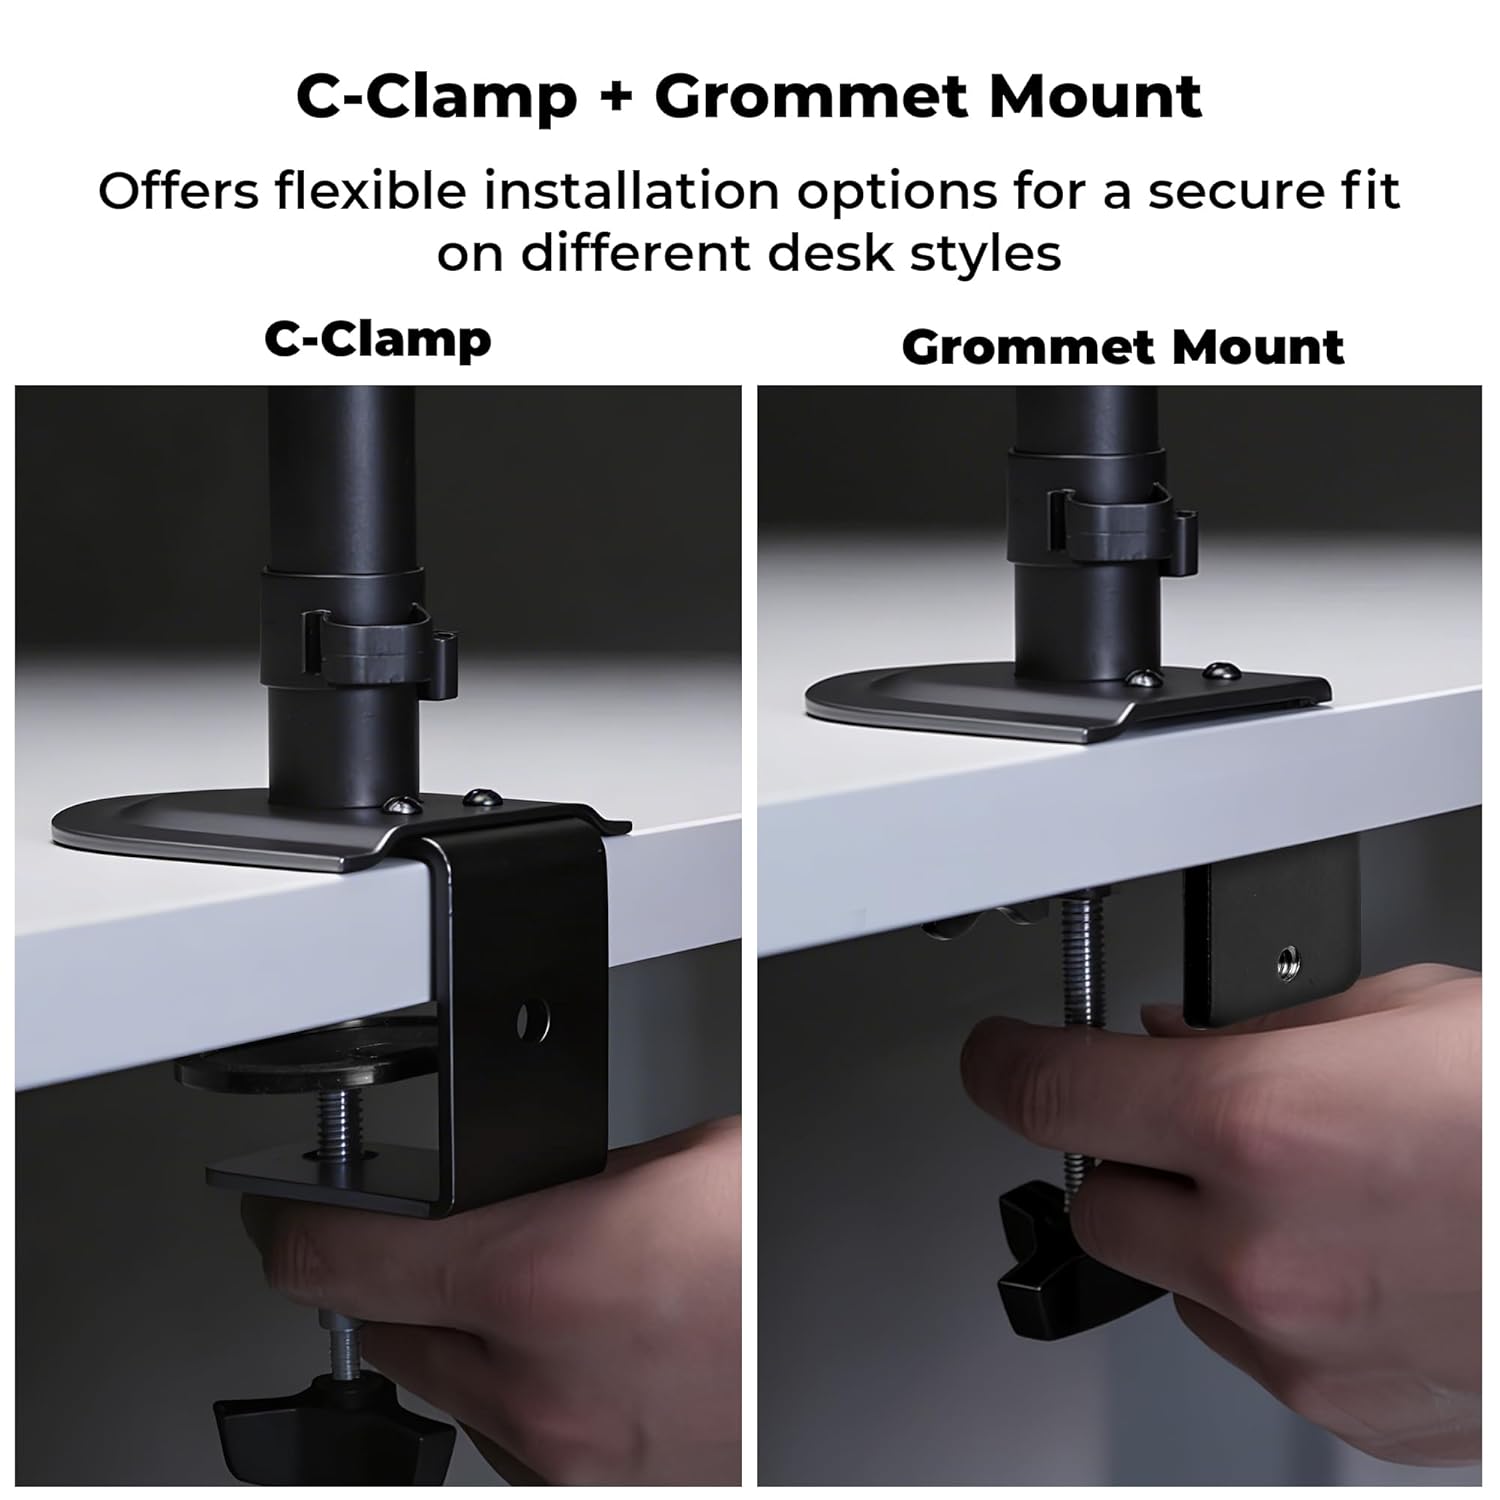
Image 4.1: C-Clamp and Grommet Mount options.
- C-Clamp: Ideal for desks without pre-drilled holes. Clamps to the edge of the desk.
- 그로밋 마운트: Requires a pre-drilled hole (or drilling one) in the desk. Provides a more flush installation.
4.2. C-Clamp 설치
- C-cl을 부착하세요amp to the bottom of the main pole.
- 스탠드를 책상 가장자리에 놓으세요.
- C-cl을 조입니다amp screw until the stand is securely fastened to the desk. Ensure it is stable and does not wobble.
4.3. 그로밋 마운트 설치
- C-cl을 분해하세요amp from the main pole if it was pre-attached.
- Insert the main pole through the grommet hole in your desk.
- Secure the grommet base plate and tighten the nut from underneath the desk until the stand is firm.
4.4. 안정성 확보
After mounting the stand, verify its stability on the desk. The anti-slip base and robust construction ensure reliable support for monitors up to 7 kg.

Image 4.4: Stand stability and maximum load capacity.
4.5. 모니터 연결
The DMS200 supports VESA patterns of 75x75mm and 100x100mm.

Image 4.5: VESA mount plate for monitor attachment.
- Attach the VESA plate to the back of your monitor using the appropriate screws from the hardware kit. Ensure the screws are not overtightened.
- Carefully slide the monitor (with the VESA plate attached) onto the monitor arm's mounting head.
- Secure the monitor to the arm by tightening the locking screw or mechanism on the mounting head.
4.6. 케이블 관리
Utilize the integrated cable management clips to keep your workspace tidy.

Image 4.6: Integrated cable management.
- Route your monitor's power and display cables through the clips located along the arm and pole.
- Ensure cables have enough slack for full range of motion without being strained.
5. 사용 설명서
The DMS200 monitor arm provides various adjustments for optimal ergonomic positioning.

Image 5.1: Monitor arm adjustment capabilities.
- 높이 조정: Loosen the collar on the main pole, adjust the arm to the desired height, and then re-tighten the collar.
- 기울기 조정: The monitor can be tilted up to ±5°. Adjust the tilt angle by gently pushing or pulling the top or bottom of the monitor. If the monitor does not hold its position, tighten the tilt mechanism screw with an Allen key.
- 회전 조정: The arm allows for ±90° swivel. Gently rotate the monitor left or right to achieve the desired view잉 각도.
- 회전: The VESA plate allows for 360° rotation, enabling portrait or landscape orientation. Rotate the monitor gently to switch orientations.
- 팔 뻗기: The mechanical arm can extend up to 42 cm. Adjust the arm's position by gently pulling or pushing it to bring the monitor closer or further away.
6. 유지관리
To ensure the longevity and proper function of your monitor stand:
- 청소: 스탠드를 부드러운 천으로 닦으세요.amp 천으로 닦으십시오. 마감재를 손상시킬 수 있는 연마성 세척제나 용제는 사용하지 마십시오.
- 정기 점검: 정기적으로 모든 나사와 연결부를 점검하여 단단히 조여져 있는지 확인하십시오. 필요한 경우 다시 조이십시오.
- 하중 용량: Do not place items on the monitor arm or exceed the maximum weight capacity.
7. 문제 해결
| 문제 | 가능한 원인 | 해결책 |
|---|---|---|
| Monitor sags or does not hold tilt position. | Tilt mechanism screw is loose. | Tighten the tilt adjustment screw on the VESA head using the provided Allen key. |
| 받침대가 흔들리거나 불안정합니다. | 데스크 CLamp/grommet mount is not tight enough. | C-cl을 다시 조여주세요amp or grommet mount screw/nut. Ensure the desk surface is stable. |
| Monitor cannot be rotated or swiveled smoothly. | Joints may be too tight or require lubrication. | Check for any obstructions. If joints are too stiff, apply a small amount of silicone-based lubricant (avoid oil-based). |
| Cables are strained during adjustment. | Insufficient slack in cable management. | Re-route cables, ensuring enough slack is provided for the full range of arm movement. |
8. 사양
| 특징 | 세부 사항 |
|---|---|
| 모델 | 디엠에스200 |
| 지원되는 화면 크기 | 17~32인치 |
| 최대 하중 용량 | 7kg(15.4파운드) |
| VESA 호환성 | 75x75mm, 100x100mm |
| 장착 유형 | C-Clamp, 그로밋 마운트 |
| 조정 | Height, Tilt (±5°), Swivel (±90°), Rotation (360°) |
| 팔 연장 | 최대 42cm |
| 재료 | Metal (Rust-Proof) |
| 색상 | 검은색 |
| 품목 무게 | 1670그램 |
9. 보증 및 지원
보증: The Zebronics DMS200 Monitor Desk Stand comes with a 1-year carry-in warranty to the service center from the date of purchase.
지원하다: For technical assistance, troubleshooting, or warranty claims, please contact Zebronics customer support. Refer to the official Zebronics web자세한 연락처 정보는 해당 사이트나 구매 설명서를 참조하세요.
Manufacturer: Zebronics India Private Limited, 13/7 Smith Road, Royapettah, Chennai, Tamil Nadu - 600 002, India.