
1. 서론
This manual provides detailed instructions for the safe installation, operation, and maintenance of your Philips LED 4-Inch Slim Downlight. This product features a canless design, dimmable functionality, and offers five selectable color temperatures (CCTs) to suit various lighting needs. Please read this manual thoroughly before installation and retain it for future reference.

Figure 1: Philips LED 4-inch slim downlight showing its canless design, dimmable function, 5 CCT options, and suitability for damp 위치.
2. 안전 정보
경고: 화재 또는 감전 위험.
- 설치나 정비를 하기 전에 항상 회로 차단기의 전원을 끄세요.
- 본 제품은 해당 설치 규정에 따라 제품의 구조, 작동 및 관련 위험을 잘 아는 사람이 설치해야 합니다.
- 모든 전기 연결이 안전한지 확인하고 현지 규정과 조례를 준수하세요.
- 배선을 변경, 이전 또는 제거하지 마십시오.amp holders, or other electrical components.
- d에 적합amp locations. Do not use in areas with direct water exposure.
- IC는 절연체와 직접 접촉하도록 정격이 지정되었습니다.
3. 패키지 내용
설치를 시작하기 전에 모든 구성 요소가 있는지 확인하세요.
- Philips LED 4-Inch Slim Downlight (quantity as per pack)
- Junction Box (one per downlight)
- 사용 설명서(본 문서)
4. 설치 지침
- 전원 끄기: 시작하기 전에 설치 구역의 전원이 차단기에서 꺼져 있는지 확인하십시오.
- 천장 개구부 준비: Cut a circular hole in the ceiling at the desired location. Refer to the product specifications for the exact hole size (typically 4.25 inches or 108 mm for a 4-inch downlight). Ensure there are no obstructions behind the ceiling before cutting.
-
접속함에 배선을 연결하세요: Open the junction box cover. Connect the household electrical wires (live, neutral, ground) to the corresponding wires inside the junction box using the provided screwless connectors. Ensure all connections are secure. Close the junction box cover.

Figure 2: Screwless junction box wiring for easy connection.
-
색온도(CCT)를 선택하세요: Before inserting the downlight into the ceiling, locate the CCT selection switch on the side of the junction box or the downlight itself. Choose your desired color temperature (2700K, 3000K, 3500K, 4000K, or 5000K) by sliding the switch to the appropriate setting.

Figure 3: CCT selection switch on the junction box.
- 다운라이트를 접속함에 연결하세요: Plug the downlight's connector cable into the corresponding receptacle on the junction box. Ensure a firm connection.
-
다운라이트 삽입: Gently push the spring clips on the downlight upwards and insert the downlight into the prepared ceiling opening. The clips will secure the fixture in place. Ensure the downlight is flush with the ceiling surface.
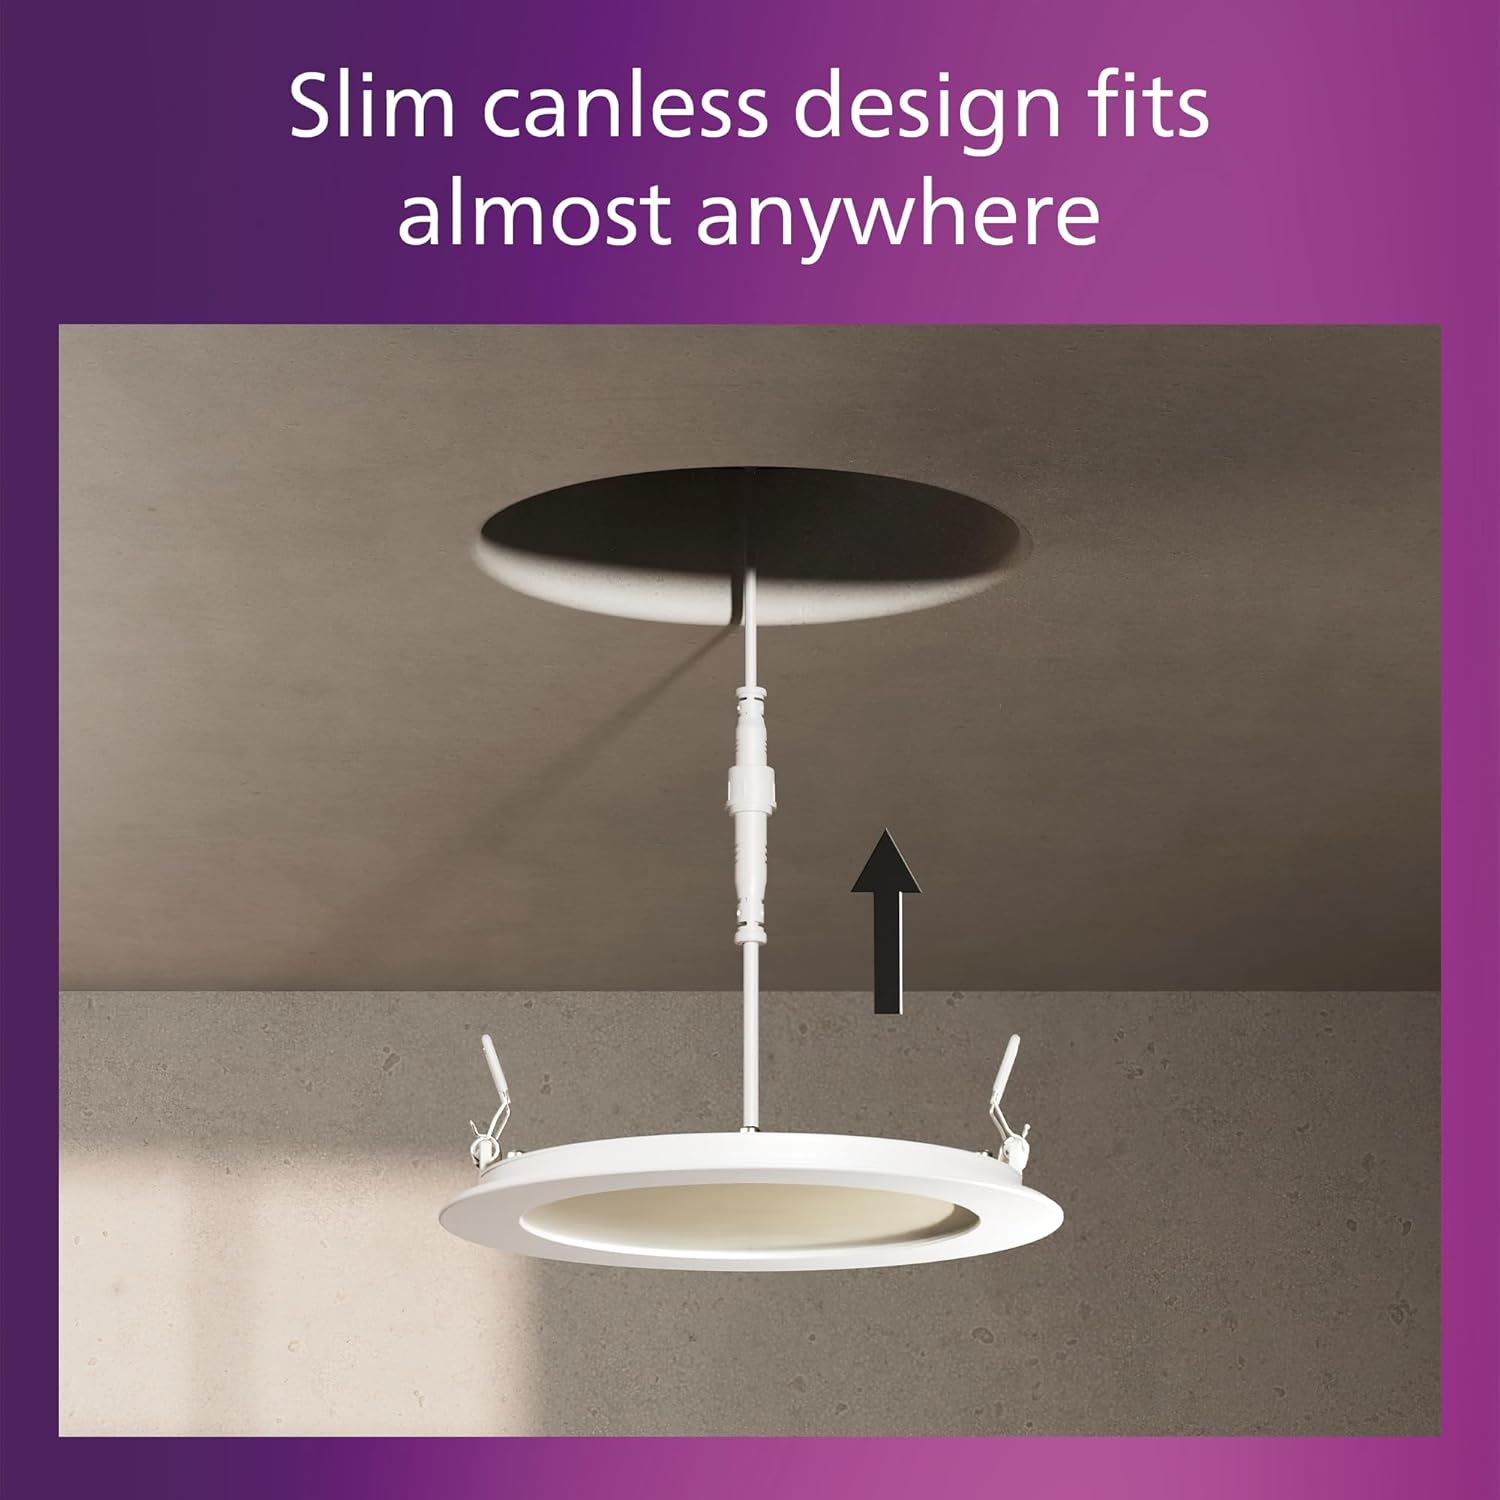
Figure 4: Installing the slim canless downlight into the ceiling.
- 복원력 : 설치가 완료되면 회로 차단기에서 전원을 복구하세요.
The Philips LED Slim Downlight is IC rated, meaning it is suitable for direct contact with insulation, providing safe installation in various ceiling types.

Figure 5: IC rated for safe installation in insulated ceilings.
5. 사용 설명서
The Philips LED Slim Downlight is designed for simple operation:
- 전원 켜기/끄기: Use your standard wall switch to turn the downlight on or off.
-
디밍 : This downlight is dimmable from 100% down to 5% brightness. Use a compatible dimmer switch (sold separately) to adjust the light output to your preferred level. Refer to the troubleshooting section for dimmer compatibility information.

Figure 6: Smooth dimming capability from 100% to 5% brightness.
- 색온도: The color temperature is set during installation using the switch on the junction box. It cannot be changed during normal operation without accessing the junction box.
6. 유지관리
The Philips LED Slim Downlight requires minimal maintenance:
- 청소하기 전에 전원이 꺼져 있는지 확인하십시오.
- 조명기구를 부드럽고 마른 천이나 약간 젖은 천으로 닦으십시오.amp 천. 연마성 세척제나 용매를 사용하지 마십시오.
- No user-serviceable parts inside. Do not attempt to open or repair the fixture.
7. 문제 해결
| 문제 | 가능한 원인 | 해결책 |
|---|---|---|
| 조명이 켜지지 않습니다. |
|
|
| 조명이 부적절하게 깜빡이거나 어두워집니다. |
|
|
| 색온도가 올바르지 않습니다. |
|
|
디머 호환성 차트
For optimal dimming performance, use dimmers listed in the compatibility chart below. Performance may vary with other dimmer models.

Figure 7: Dimmer compatibility chart.
8. 사양
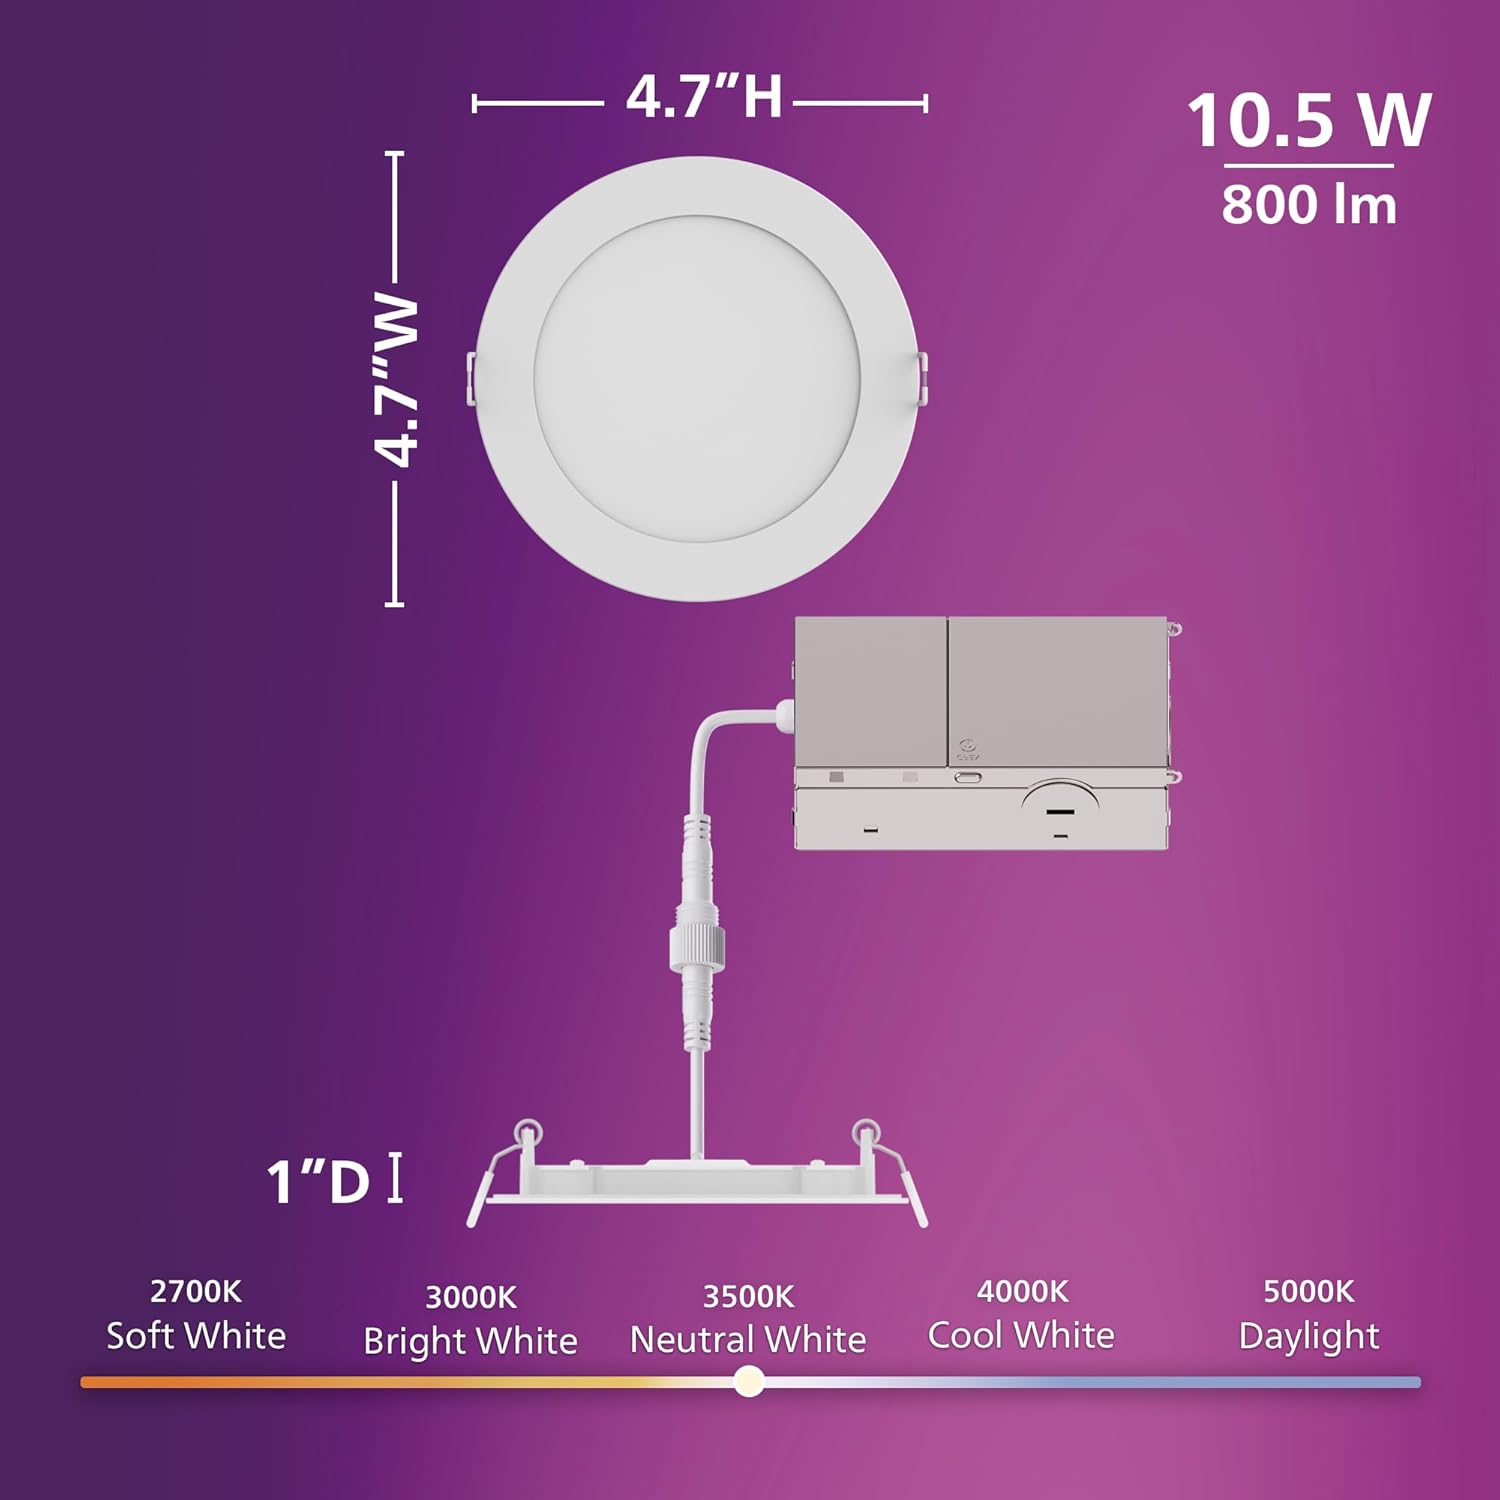
Figure 8: Product dimensions and CCT switch location.
| 특징 | 세부 사항 |
|---|---|
| 모델 번호 | 608869 |
| 상표 | 필립스 |
| 광원 | 주도의 |
| 왓tage | 10.5 와트 |
| 명도 | 800루멘 |
| 권tage | 120 볼트 |
| 색온도(CCT) | 2700K, 3000K, 3500K, 4000K, 5000K (선택 가능) |
| 밝기 조절 가능 | 네 (5%까지 감소) |
| 생활 시간 | 25,000시간 |
| 설치 유형 | Flush Mount, Canless Design |
| 객실 유형 | 실내 |
| 재료 | 플라스틱 |
| 제품 치수 | 11.9L x 11.9W x 11.9H centimetres (approx. 4.7 x 4.7 x 4.7 inches) |
| 방수 레벨 | 방수 기능 (d에 적합)amp 위치) |
| 인증 | IC Rated, ETL, FCC certified |
9. 보증 정보
This Philips LED 4-Inch Slim Downlight is covered by a 2년 제조사 보증 구매일로부터. 본 보증은 정상적인 사용 중 발생하는 재료 및 제조상의 결함에 적용됩니다. 보증 청구를 위해 구매 증빙 자료를 보관해 주십시오.
The warranty does not cover damage caused by improper installation, misuse, abuse, accidents, or unauthorized modifications.
10. 고객 지원
If you have any questions, require technical assistance, or need to make a warranty claim, please contact Philips customer support. Refer to the product packaging or the official Philips web최신 연락처 정보는 사이트에서 확인하세요.
자세한 내용은 다음을 방문하세요. www.philips.com