1. 서론
This manual provides essential information for the safe and efficient operation of your GROWNEER 12 Inch Shutter Exhaust Fan with Temperature Humidity Controller. This fan is designed to improve air quality and regulate environmental conditions in various spaces such as greenhouses, garages, and sheds.
The fan features a 1200 CFM airflow capacity, capable of ventilating areas up to 1400 sq. ft. It includes an intelligent remote control for convenient adjustment of temperature, humidity, and fan speed settings.
2. 안전 정보
설치 및 작동 전에 모든 안전 지침을 주의 깊게 읽으십시오. 지침을 따르지 않으면 감전, 화재 또는 심각한 부상이 발생할 수 있습니다.
- 전원 공급 장치의 용량이 팬의 용량과 일치하는지 확인하십시오.tag요구 사항(120볼트 AC).
- Disconnect power before installing, cleaning, or performing any maintenance.
- 손상된 코드나 플러그로 팬을 작동하지 마십시오.
- 작동 중에는 움직이는 부품에 손, 머리카락, 헐렁한 옷이 닿지 않도록 하세요.
- Install the fan in a location where it is protected from direct water exposure, unless specifically designed for such conditions. The fan is designed to resist moisture intrusion, but proper installation is key.
- 본 기기는 신체적, 감각적 또는 정신적 능력이 저하된 사람(어린이 포함)이나 경험 및 지식이 부족한 사람이 사용하도록 의도된 것이 아니며, 안전을 책임질 사람으로부터 기기 사용에 관한 감독이나 지시를 받은 경우에만 사용할 수 있습니다.
3. 패키지 내용
패키지에 모든 구성 요소가 들어 있는지 확인하세요.
- 12인치 셔터 배기팬
- 온습도 컨트롤러
- 설치 설명서
- Expansion bolts (5 pieces, 4 required + 1 spare)

그림 3.1: Contents of the GROWNEER 12 Inch Shutter Exhaust Fan package.
4. 사양
| 특징 | 사양 |
|---|---|
| 상표 | 재배자 |
| 모델 번호 | AX252303002 |
| 제품 크기(D x W x H) | 14.96인치 깊이 x 14.96인치 너비 x 7.48인치 높이 |
| 권tage | 120 볼트 |
| 왓tage | 30 와트 |
| 기류 용량 | 1200 분당 입방피트(CFM) |
| 소음 수준 | 50데시벨 |
| 속도의 수 | 10 |
| 제어 방법 | 원격 제어 |
| 재료 | 합금강 |
| 실내/실외 사용 | 실내, 실외 |

그림 4.1: 제품 치수 및 주요 사양
5. 설정 및 설치
The GROWNEER Shutter Exhaust Fan is designed for straightforward installation in various locations such as attics, sheds, or walls. Ensure you have the necessary tools and follow local electrical codes.
5.1 팬 장착
- 위치를 선택하십시오 : Select a suitable location for the fan, ensuring adequate space for airflow and access for maintenance.
- 오프닝 준비: Create an opening in the wall or structure that matches the fan's dimensions.
- 안전한 팬: Mount the fan securely using the provided expansion bolts. Ensure the fan is level and firmly attached to prevent vibration and noise.
- 전원 연결: Plug the fan into a compatible 120V AC power outlet. The fan comes with a 2-meter long power cord for flexible placement.

그림 5.1: Example installation and remote control range.
5.2 리모컨 페어링
The fan operates wirelessly with the included temperature and humidity controller. Follow these steps to pair the controller with the fan:
- 리모컨에 배터리를 넣으세요(배터리는 포함되어 있지 않습니다).
- Ensure the fan is plugged into a power source.
- Press the power button on the remote control. The fan should respond by turning on. If not, ensure the remote is within the 20-meter operating range and try again.
메모: There is no manual switch on the fan unit itself. All operations are controlled via the wireless remote. If pairing issues persist, ensure batteries are correctly inserted and fully charged, and that there are no significant obstructions between the remote and the fan.
동영상 5.1 : Demonstration of fan installation and remote control pairing and operation.
6. 사용 설명서
The intelligent remote control allows for precise management of your exhaust fan. Familiarize yourself with the control panel layout:
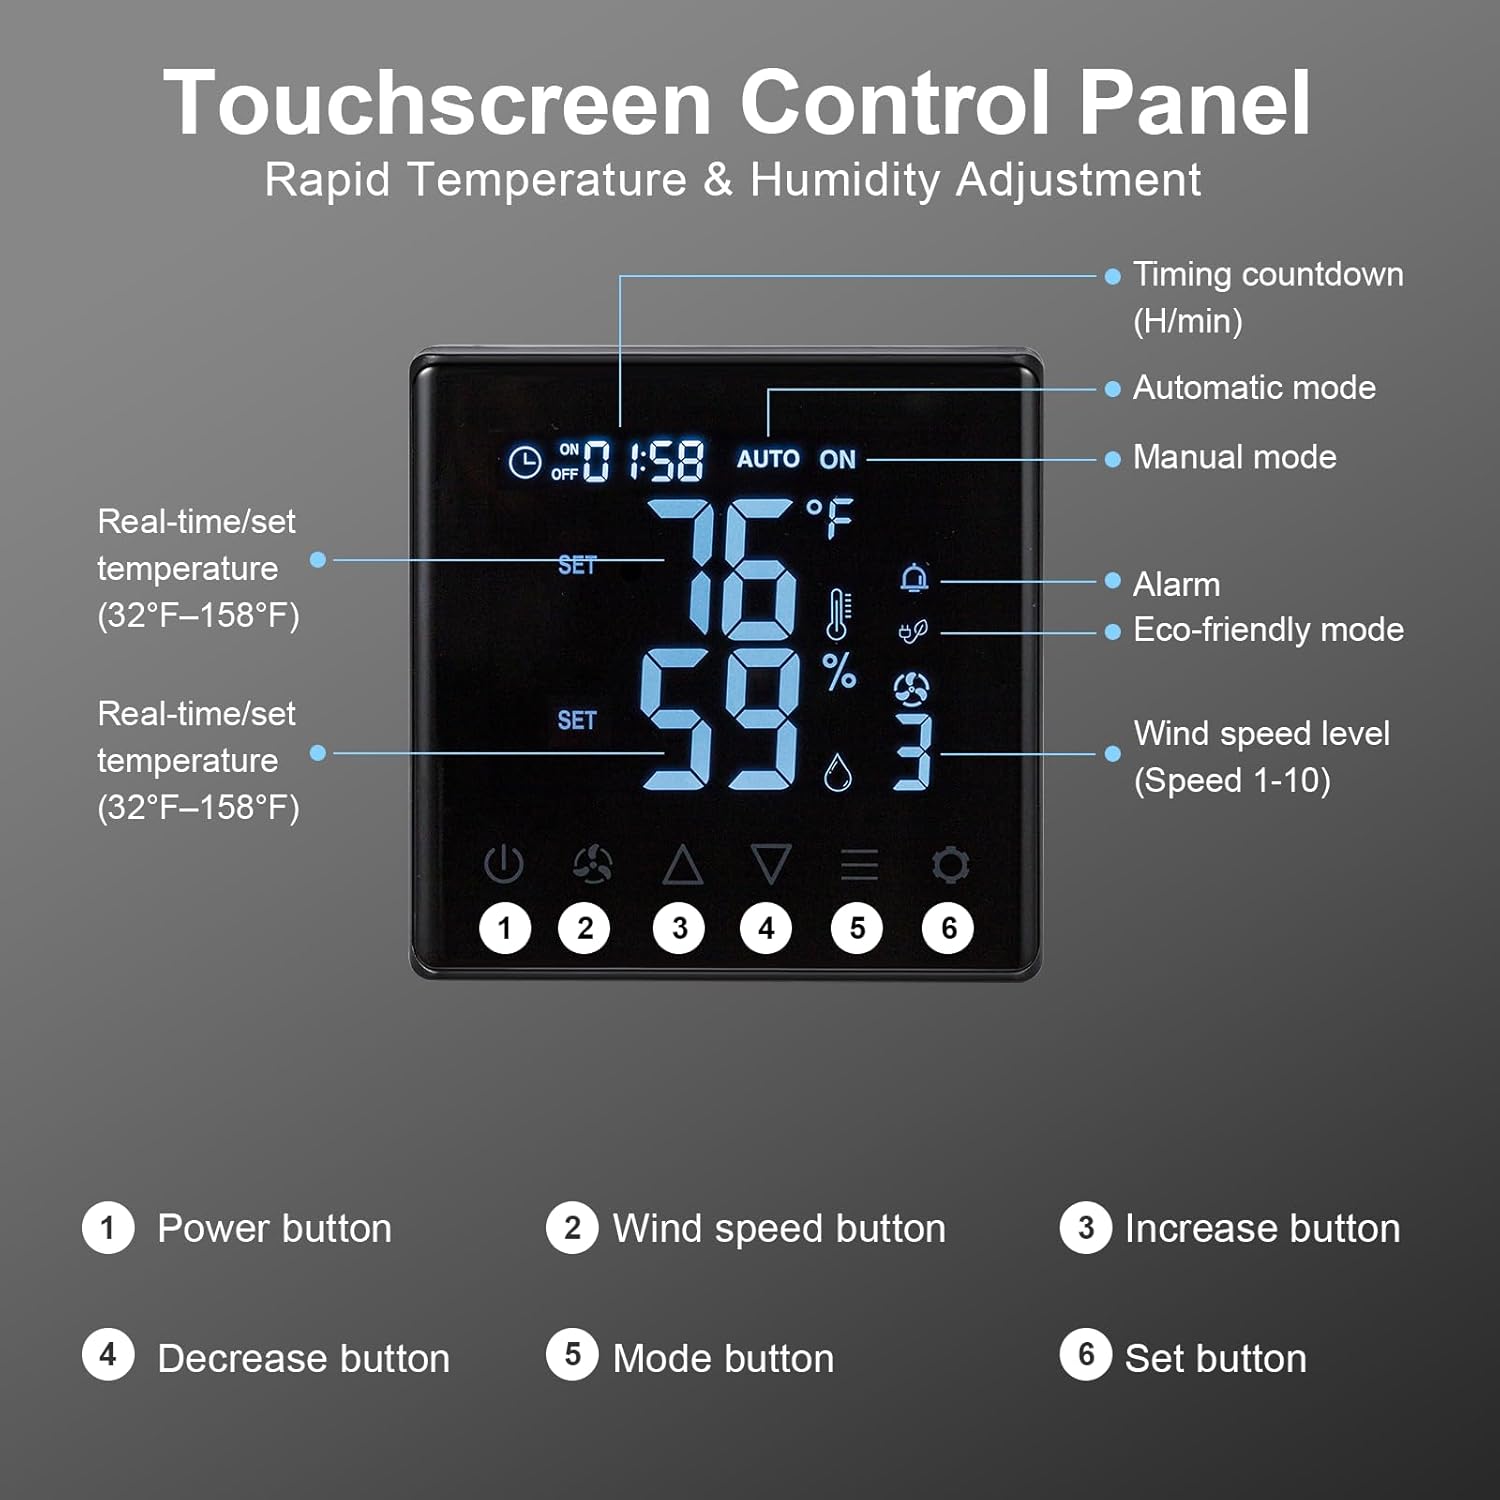
그림 6.1: Touchscreen Control Panel overview.
- 전원 버튼: 선풍기를 켜거나 끕니다.
- 풍속 버튼: Cycles through 10 adjustable fan speeds.
- 증가/감소 버튼: Adjust temperature, humidity, or timer settings upwards or downwards.
- 모드 버튼: Selects between operating modes:
- 수동 모드: Fan operates continuously at the set speed.
- 자동 모드 : Fan automatically turns ON/OFF based on set temperature and humidity thresholds.
- Eco-friendly Mode: Optimizes fan operation for energy efficiency based on environmental conditions.
- 설정 버튼: Confirms selected settings for temperature, humidity, or timer.
To set desired temperature and humidity, enter Auto mode, then use the Increase/Decrease buttons to adjust the target values, and the Set button to confirm.

그림 6.2: Fan operating with 10-level wind control.
7. 유지관리
정기적인 유지관리를 통해 배기팬의 최적의 성능과 수명을 보장할 수 있습니다.
- 청소: Periodically clean the fan blades and housing to prevent dust and debris buildup, which can reduce efficiency and increase noise. 청소하기 전에 항상 전원을 분리하십시오. 부드러운 d를 사용하세요amp 천. 연마성 세척제는 사용하지 마십시오.
- 셔터 점검: Check the automatic gravity shutters for smooth operation. Ensure they open and close freely without obstruction to protect the fan from rain and debris when off.
- 전원 코드: Inspect the power cord for any signs of damage. If damaged, contact customer support for replacement.

그림 7.1: Automatic gravity shutters protecting the fan from elements.
8. 문제 해결
If you encounter issues with your GROWNEER exhaust fan, refer to the following common problems and solutions:
| 문제 | 가능한 원인 | 해결책 |
|---|---|---|
| 팬이 켜지지 않습니다. | No power; Remote not paired; Dead remote batteries. | Check power connection. Ensure remote batteries are fresh and correctly inserted. Re-attempt pairing as described in Section 5.2. |
| 리모컨이 응답하지 않습니다. | Out of range; Obstruction; Low/dead batteries. | Move closer to the fan (within 20m). Remove any large obstructions. Replace remote batteries. |
| Low airflow or unusual noise. | Fan blades or shutters obstructed; Dust buildup. | Disconnect power and inspect fan blades and shutters for obstructions. Clean any dust or debris. |
| Automatic mode not activating. | Temperature/humidity settings not met; Sensor issue. | Verify the set temperature and humidity thresholds. Ensure the sensor on the remote is not covered or obstructed. |
9. 보증 및 지원
GROWNEER products are manufactured to high-quality standards. For warranty information, technical support, or replacement parts, please contact GROWNEER customer service. Keep your purchase receipt as proof of purchase.
For further assistance, visit the official GROWNEER store: GROWNEER Store on Amazon