1. 서론
This manual provides essential information for the safe and effective operation, maintenance, and troubleshooting of the Huskie Tools Robo Crimp 6 Ton Battery Powered Inline Latch Crimper, model ECO-EZ558. Please read this manual thoroughly before using the tool to ensure proper function and to prevent injury or damage.
The ECO-EZ558 is a 6-ton streamline battery-powered compression tool designed for crimping commonly used service entrance connectors, lugs, sleeves, H-taps, and C-taps. Its compact design and swivel head allow for use in limited access areas. The tool features a built-in, factory pre-set 6-ton bypass cartridge to ensure complete compression with every use. It accepts "W", "O" or "X" type dies, and "D3" nest dies are included as standard.
2. 안전 정보
경고: 이 전동 공구와 함께 제공된 모든 안전 경고, 지침, 그림 및 사양을 읽으십시오. 아래 나열된 모든 지침을 따르지 않으면 감전, 화재 및/또는 심각한 부상을 입을 수 있습니다.
- 안전 고글, 장갑, 보호복 등 적절한 개인 보호 장비(PPE)를 항상 착용하십시오.
- 작업 공간을 깨끗하고 밝게 유지하세요. 어수선하거나 어두운 곳은 사고의 위험이 높습니다.
- 가연성 액체, 가스, 먼지 등 폭발 위험이 있는 환경에서는 전동 공구를 작동하지 마세요.
- 전동 공구를 작동하는 동안 어린이와 주변 사람을 멀리하십시오. 주의가 산만해지면 제어력을 잃을 수 있습니다.
- 의도치 않게 작동되지 않도록 주의하세요. 배터리 팩에 연결하거나 공구를 들어 올리거나 운반하기 전에 스위치가 꺼져 있는지 확인하세요.
- 용도에 맞는 도구를 사용하세요. 도구에 무리한 힘을 가하지 마세요.
- 전동 공구를 조정하거나, 액세서리를 교체하거나, 보관하기 전에는 반드시 공구에서 배터리 팩을 분리하세요.
- 전동 공구와 액세서리를 유지 관리합니다. 움직이는 부품의 정렬 불량이나 바인딩, 부품 파손 및 전동 공구 작동에 영향을 줄 수 있는 기타 조건을 점검합니다.
- 작업 조건과 수행할 작업을 고려하여 이 지침에 따라 전동 공구, 액세서리 및 공구 비트를 사용하십시오.
- Only use battery packs and chargers specified by the manufacturer.
3. 패키지 내용
포장을 풀 때 모든 품목이 들어 있고 손상되지 않았는지 확인하세요.
- 1 x Huskie Tools Robo Crimp 6 Ton Battery Powered Inline Latch Crimper (ECO-EZ558)
- 2 x BP-82 Batteries
- 1 x 배터리 충전기
- 1 x 운반 가방
- D3 Nest Dies (pre-installed or included separately)
4. 제품 오버view
Familiarize yourself with the components of your ECO-EZ558 crimper.

그림 1: Huskie Tools ECO-EZ558 Robo Crimp 6 Ton Battery Powered Inline Latch Crimper. This image shows the full tool, highlighting its compact design, red housing, and the crimping head at the top.

그림 2: 클로즈업 view of the ECO-EZ558 crimping head. The image details the latching mechanism and the open jaws, ready for connector insertion. The head can rotate 180 degrees for optimal maneuverability.
주요 특징:
- Latching Head: Features a 1.8-inch jaw opening for easy connector insertion and consistent, uniform crimps.
- 6 Ton Force: Provides powerful crimping capability.
- Die Compatibility: Accepts all "W", "X", and "O" type dies. Comes standard with D3 Nest Dies.
- Versatile Crimping: Capable of crimping #8 to 500 MCM Copper and #8 to 350 MCM Aluminum conductors.
- 애플리케이션: Suitable for commonly used service entrance connectors, lugs, sleeves, H-taps, and C-taps.
- Bypass Cartridge: A built-in, factory pre-set 6-ton bypass cartridge ensures complete compression every time.
- 인체공학적 디자인: Lightweight and compact for one-handed operation and maneuverability in tight spaces.
5. 설정
5.1 배터리 충전
- 충전기를 표준 전기 콘센트에 연결하세요.
- Insert the BP-82 battery into the charger. Ensure it is seated correctly.
- 배터리가 완전히 충전될 때까지 기다리십시오. 충전 상태는 충전기의 표시등을 참조하십시오.
- 충전이 완료되면 배터리를 충전기에서 분리하세요.
5.2 배터리 설치
- Ensure the tool's ON/OFF switch is in the OFF position.
- Align the charged battery pack with the battery slot at the base of the tool.
- 배터리가 제자리에 단단히 고정될 때까지 슬롯에 밀어 넣습니다.
5.3 다이 설치/교체
The ECO-EZ558 accepts "W", "X", and "O" type dies. D3 Nest Dies come standard.
- Ensure the tool is powered off and the battery is removed.
- Open the latching head jaws.
- Carefully insert the appropriate crimping dies into their respective slots in the jaws. Ensure they are seated flush and securely.
- Close the latching head.
6. 사용 설명서
6.1 Preparing for Crimping
- Select the correct crimping dies for the conductor and connector size.
- Ensure the conductor is properly stripped to the recommended length for the connector.
- 컨덕터를 커넥터에 삽입합니다.
6.2 Performing a Crimp
- With the battery installed and the correct dies in place, open the latching head jaws.
- Position the connector and conductor assembly within the crimping dies. Ensure the connector is centered and fully seated in the dies.
- Close the latching head securely around the connector. The 180-degree rotating head can be adjusted for optimal access in tight spaces.
- Press the trigger to initiate the crimping cycle. The tool will apply 6 tons of force.
- The built-in bypass cartridge will ensure a complete compression. The tool will automatically stop when the crimp is complete.
- Release the trigger and open the latching head jaws to remove the crimped connector.
- 크림프가 제대로 형성되고 안전한지 검사합니다.
메모: The tool is designed for one-handed operation due to its lightweight and ergonomic design.
7. 유지관리
Regular maintenance ensures the longevity and reliable performance of your crimper.
- 청소: After each use, clean the tool, especially the crimping head and dies, to remove any debris, dirt, or residue. Use a clean, dry cloth. Do not use harsh chemicals or solvents.
- 매끄럽게 하기: Periodically apply a light coat of machine oil to the moving parts of the crimping head and die slots to ensure smooth operation.
- 배터리 관리 : Store batteries in a cool, dry place. Do not expose them to extreme temperatures. Charge batteries regularly, even if not in use, to maintain their health.
- 점검: Regularly inspect the tool for any signs of wear, damage, or loose components. Check the dies for wear or deformation. Replace damaged parts immediately.
- 저장: Store the tool and accessories in the provided carrying bag in a dry, secure location, away from moisture and direct sunlight.
8. 문제 해결
| 문제 | 가능한 원인 | 해결책 |
|---|---|---|
| 도구가 작동하지 않습니다. | 배터리가 충전되지 않았거나 제대로 설치되지 않았습니다. | 배터리가 완전히 충전되었고 올바르게 삽입되었는지 확인하세요. |
| Tool stops mid-crimp. | 배터리 충전량이 낮습니다. | 완전히 충전된 배터리로 교체하십시오. |
| Crimp is incomplete or poor quality. | Incorrect dies used; dies worn; improper conductor/connector placement. | Verify correct dies for application. Inspect dies for wear and replace if necessary. Ensure proper placement of connector in dies. |
| 턱이 부드럽게 열리거나 닫히지 않습니다. | Debris in jaws; lack of lubrication. | Clean jaws thoroughly. Apply light machine oil to moving parts. |
9. 사양
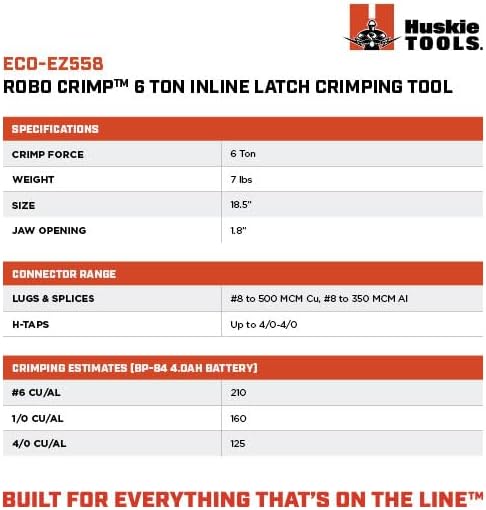
그림 3: Detailed specifications for the Huskie Tools ECO-EZ558 Robo Crimp tool, including crimp force, weight, size, jaw opening, and connector ranges.
| 특징 | 세부 사항 |
|---|---|
| 모델 번호 | ECO-EZ558 |
| 압착력 | 6톤 |
| 무게 | 7파운드(3.18kg) |
| 길이 | 18.5인치(47cm) |
| 턱 열림 | 1.8인치(4.57cm) |
| Compatible Dies | "W", "X", "O" type dies; D3 Nest Dies (standard) |
| Crimping Capacity (Copper) | #8 to 500 MCM Cu |
| Crimping Capacity (Aluminum) | #8 to 350 MCM Al |
| H-Taps Capacity | Up to 4/0-4/0 |
| 배터리 유형 | BP-82 (Lithium-ion) |
| 재료 | 플라스틱, 금속 |
| 색상 | 빨간색 |
10. 보증 및 지원
For warranty information, technical support, or service inquiries, please contact Huskie Tools directly. Keep your purchase receipt as proof of purchase.
- 제조업체: Huskie Tools
- Web대지: www.huskietools.com
- 연락처 정보: Refer to the official Huskie Tools web최신 연락처 정보는 웹사이트 또는 제품 포장에서 확인하실 수 있습니다.
이 제품은 소규모 업체 브랜드 제품입니다. 소규모 업체를 응원해주세요.
11. 폐기정보
Do not dispose of electrical appliances, batteries, or packaging materials with household waste. Please recycle where facilities exist. Check with your local authority for recycling advice.
- 배터리: Lithium-ion batteries should be recycled or disposed of according to local regulations. Do not incinerate.
- 도구: At the end of its service life, the tool should be returned to a designated collection point for the recycling of electrical and electronic equipment.