1. 안전 정보
본 제품을 사용하기 전에 모든 안전 지침을 주의 깊게 읽어 주십시오. 이 지침을 따르지 않을 경우 감전, 화재 또는 기타 위험이 발생할 수 있습니다.
- 화재나 감전을 방지하려면 프로젝터를 비나 습기에 노출시키지 마십시오.
- 프로젝터를 열지 마십시오asing. 내부에는 사용자가 직접 수리할 수 있는 부품이 없습니다. 모든 수리는 자격을 갖춘 서비스 담당자에게 맡기십시오.
- 적절한 환기를 유지하세요. 환기구를 막지 마세요.
- 프로젝터와 함께 제공된 전원 어댑터만 사용하세요.
- 프로젝터 렌즈에 눈이 직접 닿지 않도록 주의하세요.amp 켜져있습니다.
- 프로젝터를 열원과 직사광선으로부터 멀리 두십시오.
2. 패키지 내용
아래 나열된 모든 품목이 패키지에 포함되어 있는지 확인하세요.
- 1 x Jectse Mini LED Projector
- 1 x Remote Control (2 AAA batteries not included)
- 1 x AV Line (3-in-1 RCA cable)
- 1 x 사용 설명서
- 1 x 전원 어댑터

Figure 2.1: Contents of the Jectse Mini LED Projector package.
3. 제품 오버view
The Jectse Mini LED Projector is a compact and portable device designed for various multimedia applications. It features a 1080P resolution, LED light source, and multiple connectivity options.

그림 3.1: 전면 및 상단 view of the Jectse Mini LED Projector.
3.1 프로젝터 구성 요소

Figure 3.2: Top panel controls of the Jectse Mini LED Projector.
- 렌즈: 화면에 이미지를 투사합니다.
- 환기 그릴: 냉각을 위해 적절한 공기 흐름을 보장합니다.
- 제어 버튼: (Refer to Figure 3.2) For basic navigation and power control.
- 초점 휠: 이미지 선명도를 조정합니다.
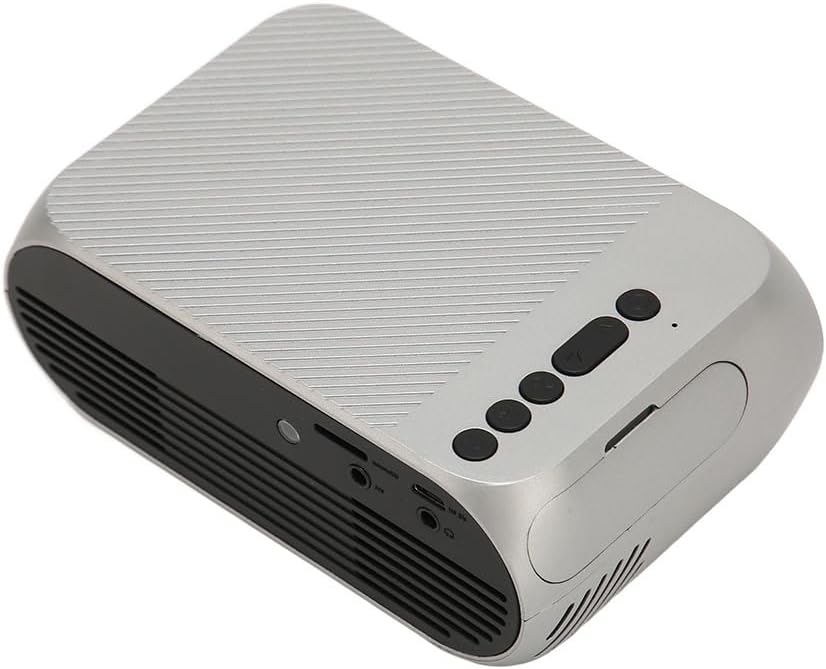
그림 3.3: 후면 및 측면 view 입출력 포트가 있습니다.
3.2 입력/출력 포트
- HD 멀티미디어 인터페이스(HDMI): For connecting devices like laptops, gaming consoles, and media players.
- AV 포트: 동봉된 AV 케이블을 사용하여 구형 기기를 연결할 수 있습니다.
- USB 포트: 미디어를 재생하기 위해 USB 드라이브를 연결하려면 file직접적으로.
- 전원 입력: 전원 어댑터를 연결합니다.
- 오디오 출력(3.5mm 잭): 외부 스피커나 헤드폰을 연결하는 데 사용합니다.
4. 설정
4.1 배치
Place the projector on a stable, flat surface. Ensure there is adequate space around the projector for ventilation. The ideal projection distance is between 1.5 to 2 meters for optimal image size and clarity.

Figure 4.1: Recommended projection distance and screen sizes.
4.2 전원 연결
- 전원 어댑터를 프로젝터의 전원 입력 포트에 연결합니다.
- 전원 어댑터를 적절한 전기 콘센트(100-240V)에 꽂으십시오.
4.3 입력 소스 연결
The projector supports HD Multimedia Interface, AV, and USB inputs.

Figure 4.2: Projector compatibility with various devices.
- HD Multimedia Interface: Connect an HD Multimedia Interface cable from your source device (e.g., laptop, game console) to the projector's HD Multimedia Interface port.
- 유명인 : Connect the included AV cable to the projector's AV port and the corresponding audio/video output ports on your source device.
- USB: Insert a USB flash drive into the projector's USB port.
4.4 초점 조정
After powering on the projector, rotate the focus wheel (usually located near the lens) until the projected image appears clear and sharp.
5. 사용 설명서
5.1 전원 켜기/끄기
- 전원을 켜려면: Press the Power Switch button on the projector or the power button on the remote control.
- 전원을 끄려면: Press the Power Switch button again. The projector will shut down.
5.2 소스 선택
After powering on, use the "Signal Source Button" on the projector or the "Source" button on the remote control to cycle through available input sources (HD Multimedia Interface, AV, USB).
5.3 메뉴 탐색
Use the Direction Buttons and Confirm Button on the projector or the arrow keys and OK button on the remote control to navigate through the projector's on-screen menu for settings adjustments (e.g., picture mode, aspect ratio, sound settings).
5.4 원격 제어 사용
Insert two AAA batteries (not included) into the remote control. Point the remote control towards the projector's IR receiver to operate functions such as power, source selection, volume, and menu navigation.
6. 유지관리
6.1 렌즈 청소
광학 렌즈 전용으로 제작된 부드럽고 보풀 없는 천으로 프로젝터 렌즈를 살살 닦아주세요. 연마성 세척제나 과도한 힘을 사용하면 렌즈에 흠집이 생길 수 있으므로 사용하지 마십시오.
6.2 일반 청소
Wipe the exterior of the projector with a soft, dry cloth. Do not use liquid cleaners or solvents. Ensure the ventilation grilles are free from dust and debris to maintain optimal cooling.
7. 문제 해결
| 문제 | 가능한 원인 | 해결책 |
|---|---|---|
| 이미지가 투영되지 않았습니다 |
|
|
| 이미지가 흐릿함 |
|
|
| 소리가 나지 않습니다 |
|
|
| 리모컨이 작동하지 않습니다 |
|
|
8. 사양
| 특징 | 세부 사항 |
|---|---|
| 상표 | 제크체 |
| 모델 번호 | Jectse3giz17bkpy |
| 해결 | 1920*1080p |
| 광원 | 주도의 |
| LED 수명 | 3000시간 |
| 투사 거리 | 1.5-2m |
| 투사 비율 | 1.6시 1분 |
| 종횡비 | 16시 9분 |
| 전원 입력 | 100-240V |
| 제품 크기 | 13 x 8.5 x 5cm (약 5.1 x 3.3 x 2인치) |
| 품목 무게 | 1.1파운드 |
| 연결 기술 | HD Multimedia Interface, AV, USB |
| 특별 기능 | Adjustable, Portable Design |
9. 보증 및 지원
For warranty information or technical support, please refer to the contact details provided with your purchase or visit the official Jectse web사이트. 보증 청구를 위해 구매 증빙 자료를 보관하세요.