1. 서론
This manual provides essential information for setting up, operating, and maintaining your Beelink Mini S13 Mini PC. Please read it thoroughly before using the device to ensure proper function and longevity.

Image: The Beelink Mini S13 Mini PC in a typical desktop setup.
2. 패키지 내용
패키지에 모든 품목이 들어 있는지 확인하세요.
- Beelink Mini S13 N150 미니 PC 1대
- 1 x 사용자 설명서
- 1 x HDMI 케이블
- 1 x 전원 어댑터
- 벽걸이 브래킷 1개

Image: Contents of the Beelink Mini S13 package.
3. 설정 지침
3.1 Connecting the Mini PC
- 디스플레이에 연결: Use the provided HDMI cable to connect the Mini PC to your monitor or TV. The Mini S13 supports dual 4K 60Hz displays.
- 주변기기 연결: Plug in your USB keyboard, mouse, and any other USB devices into the available USB 3.2 Gen2 ports.
- 네트워크에 연결: 유선 인터넷을 사용하려면 이더넷 케이블을 2.5G LAN 포트에 연결하십시오. 무선 인터넷의 경우, 이 장치는 Wi-Fi 6를 지원합니다.
- 전원 연결: 전원 어댑터를 미니 PC의 DC 잭에 꽂은 다음 전원 콘센트에 연결하십시오.
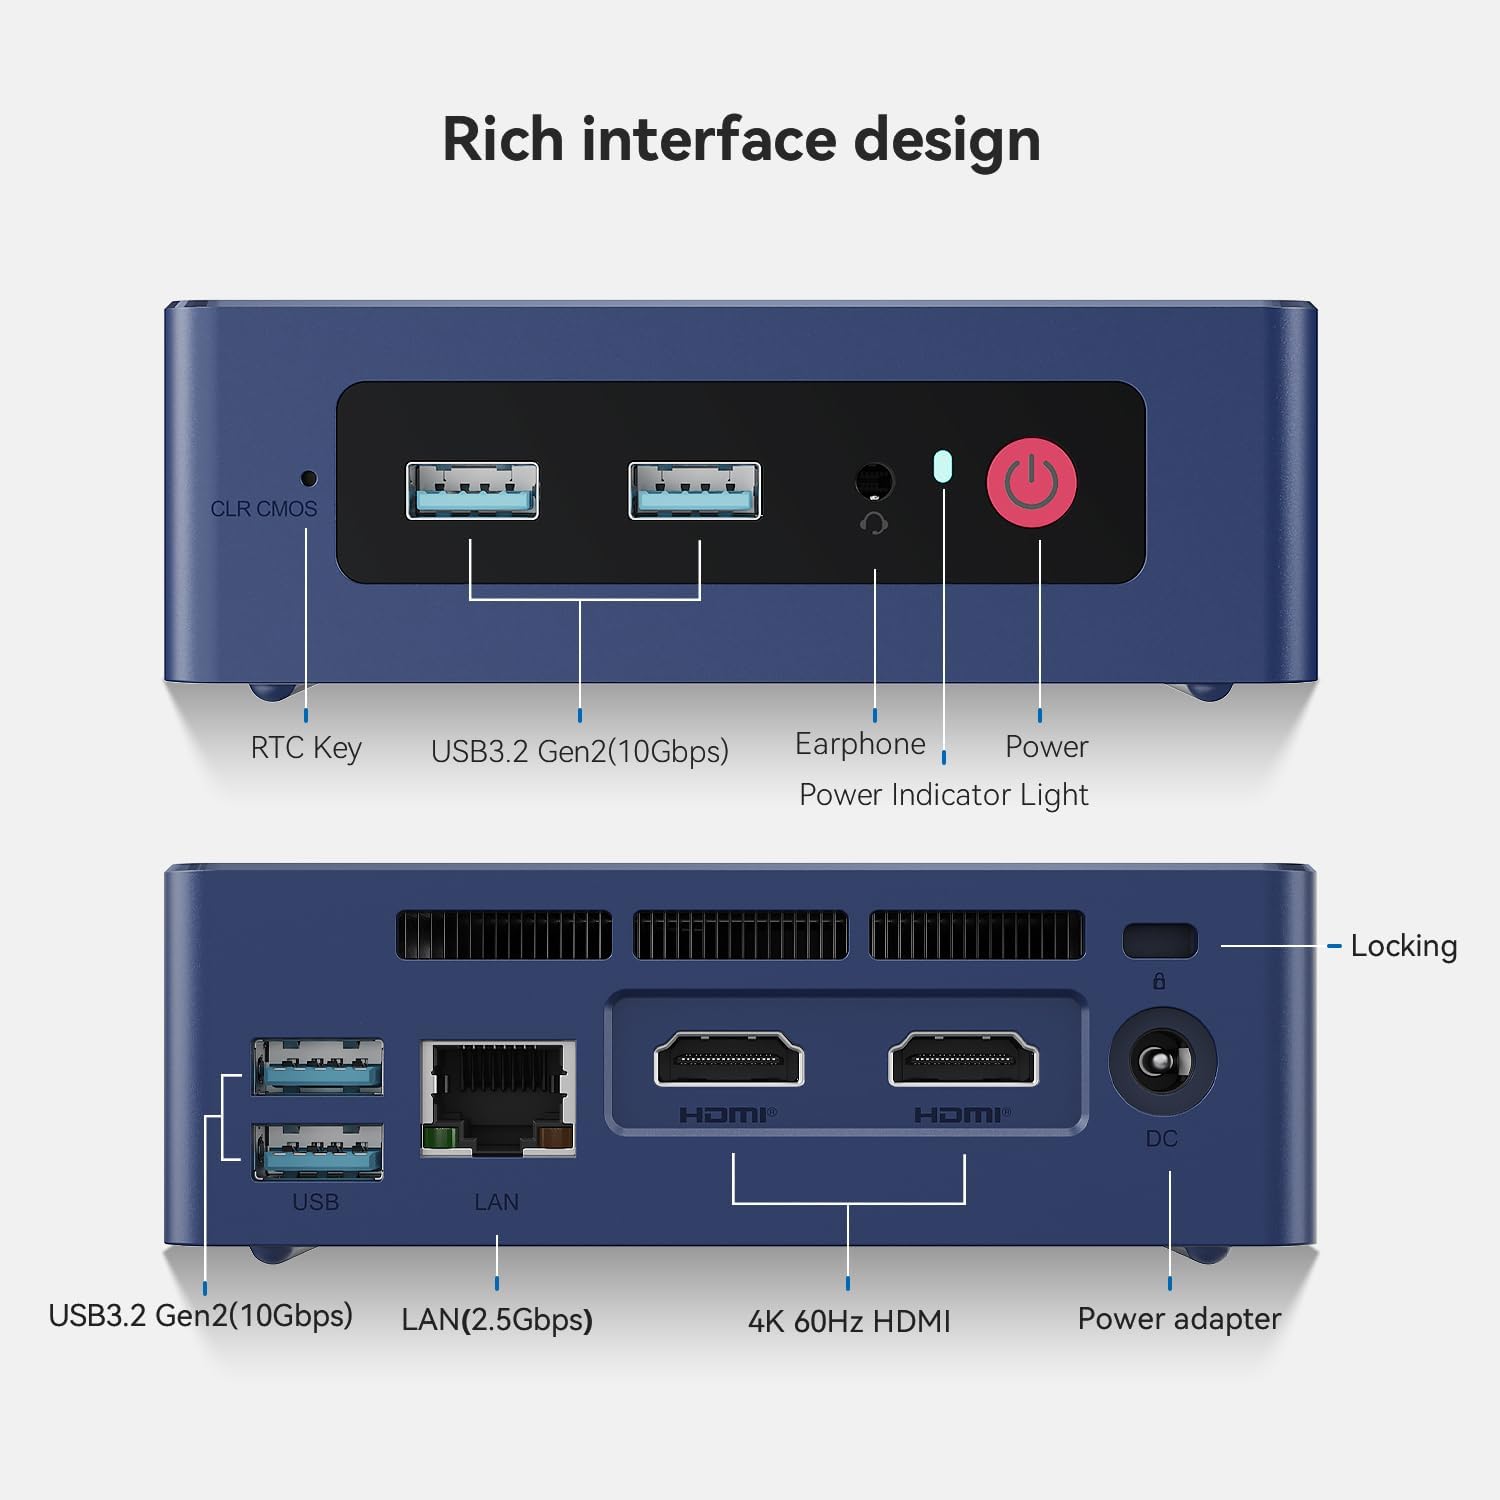
Image: Front and rear interfaces of the Mini S13.
3.2 첫 번째 부팅
- 미니 PC 전면에 있는 전원 버튼을 누르세요. 전원 표시등이 켜집니다.
- 화면에 나타나는 지시에 따라 운영 체제 초기 설정을 완료하십시오.
3.3 벽면 장착
The included wall-mounted bracket allows you to attach the Mini PC to the back of a VESA-compatible monitor or to a wall. Secure the bracket using appropriate screws, then slide the Mini PC into place.
4. 사용 설명서
4.1 전원 켜기/끄기
- 전원 켜기: 전원 버튼을 누르세요.
- 전원 끄기 : 운영 체제의 종료 기능을 사용하십시오. 또는 전원 버튼을 5초 동안 길게 눌러 강제로 종료할 수 있습니다(필요한 경우에만 사용하십시오).
4.2 듀얼 디스플레이 설정
The Mini PC supports connecting two displays simultaneously via its two HDMI ports. This feature enhances multitasking and productivity.

Image: Dual-screen display setup for enhanced work efficiency.
4.3 네트워크 연결
- 유선 네트워크: Connect an Ethernet cable to the 2.5G LAN port for high-speed wired internet access.
- 무선 네트워크(WiFi 6): Access network settings in your operating system to connect to available WiFi 6 networks.
- 블루투스 5.2 : Pair Bluetooth devices such as keyboards, mice, or headphones through your operating system's Bluetooth settings.

Image: Wireless connectivity features including WiFi 6 and Bluetooth 5.2.
4.4 스토리지 확장
The Mini PC comes with a 512GB SATA3 SSD and supports dual-channel storage expansion up to 4TB. You can add or upgrade M.2 SSDs (NVMe 2280 or SATA3 SSDs) in the available slots.

Image: Dual SSD high-speed storage slots for expansion.
5. 유지관리
5.1 청소
- 미니 PC의 외부를 부드럽고 마른 천으로 정기적으로 닦아주세요.
- Ensure ventilation openings are free from dust and debris to maintain optimal airflow. Use compressed air if necessary.
5.2 냉각 시스템
The Mini S13 features a silent fan and heat sink system designed for efficient cooling. Avoid blocking the air vents to prevent overheating and ensure stable performance.

Image: CPU silent fan and heat sink system.
5.3 소프트웨어 업데이트
Keep your operating system and drivers updated to ensure system stability, security, and optimal performance.
6. 문제 해결
- 디스플레이 없음:
- 미니 PC와 모니터 모두에 연결된 HDMI 케이블의 연결 상태를 확인하십시오.
- 모니터의 전원이 켜져 있고 올바른 입력 소스로 설정되어 있는지 확인하세요.
- 가능하다면 다른 HDMI 케이블이나 모니터를 사용해 보세요.
- 전원 없음:
- Verify the power adapter is securely connected to the Mini PC and a working power outlet.
- 전원 버튼을 확실하게 눌렀는지 확인하세요.
- 네트워크 연결 문제:
- 유선 연결의 경우 이더넷 케이블과 라우터 상태를 확인하세요.
- For wireless connections, ensure WiFi is enabled in the operating system and you are connected to the correct network with the correct password.
- 라우터/모뎀을 다시 시작하세요.
- 시스템 속도 저하/과열:
- Ensure the Mini PC's ventilation openings are not blocked.
- 백그라운드에서 실행 중인 불필요한 애플리케이션을 닫으세요.
- Check for excessive dust accumulation and clean as described in the Maintenance section.
7. 사양
| 특징 | 세부 사항 |
|---|---|
| 프로세서 | 13th Gen Intel Alder Lake-N150 (4C/4T, up to 3.6GHz) |
| 제도법 | 인텔 UHD 그래픽스 24EU 1000MHz |
| 숫양 | 12GB LPDDR5 4800MT/s |
| 저장 | 512GB SATA3 SSD (Expandable up to 4TB dual-channel) |
| 디스플레이 출력 | 2 x HDMI (Max 4K 60Hz), Dual Display Support |
| USB 포트 | 4 x USB 3.2 Gen2(10Gbps) |
| 회로망 | 2.5G LAN, WiFi 6 (802.11ax), Bluetooth 5.2 |
| 오디오 | 1 x 3.5mm Phone Jack (Two-in-One) |
| 전원 입력 | 5.5*2.5 DC Jack, 12V/3A Adapter |
| 치수 | 4.52 x 4.01 x 1.54인치(115 x 102 x 39mm) |
| 운영 체제 | OS (Pre-installed Windows 11 Home typically) |
| 추가 기능 | RTC Key, CLR CMOS Button, Wake On LAN, Auto Power ON |
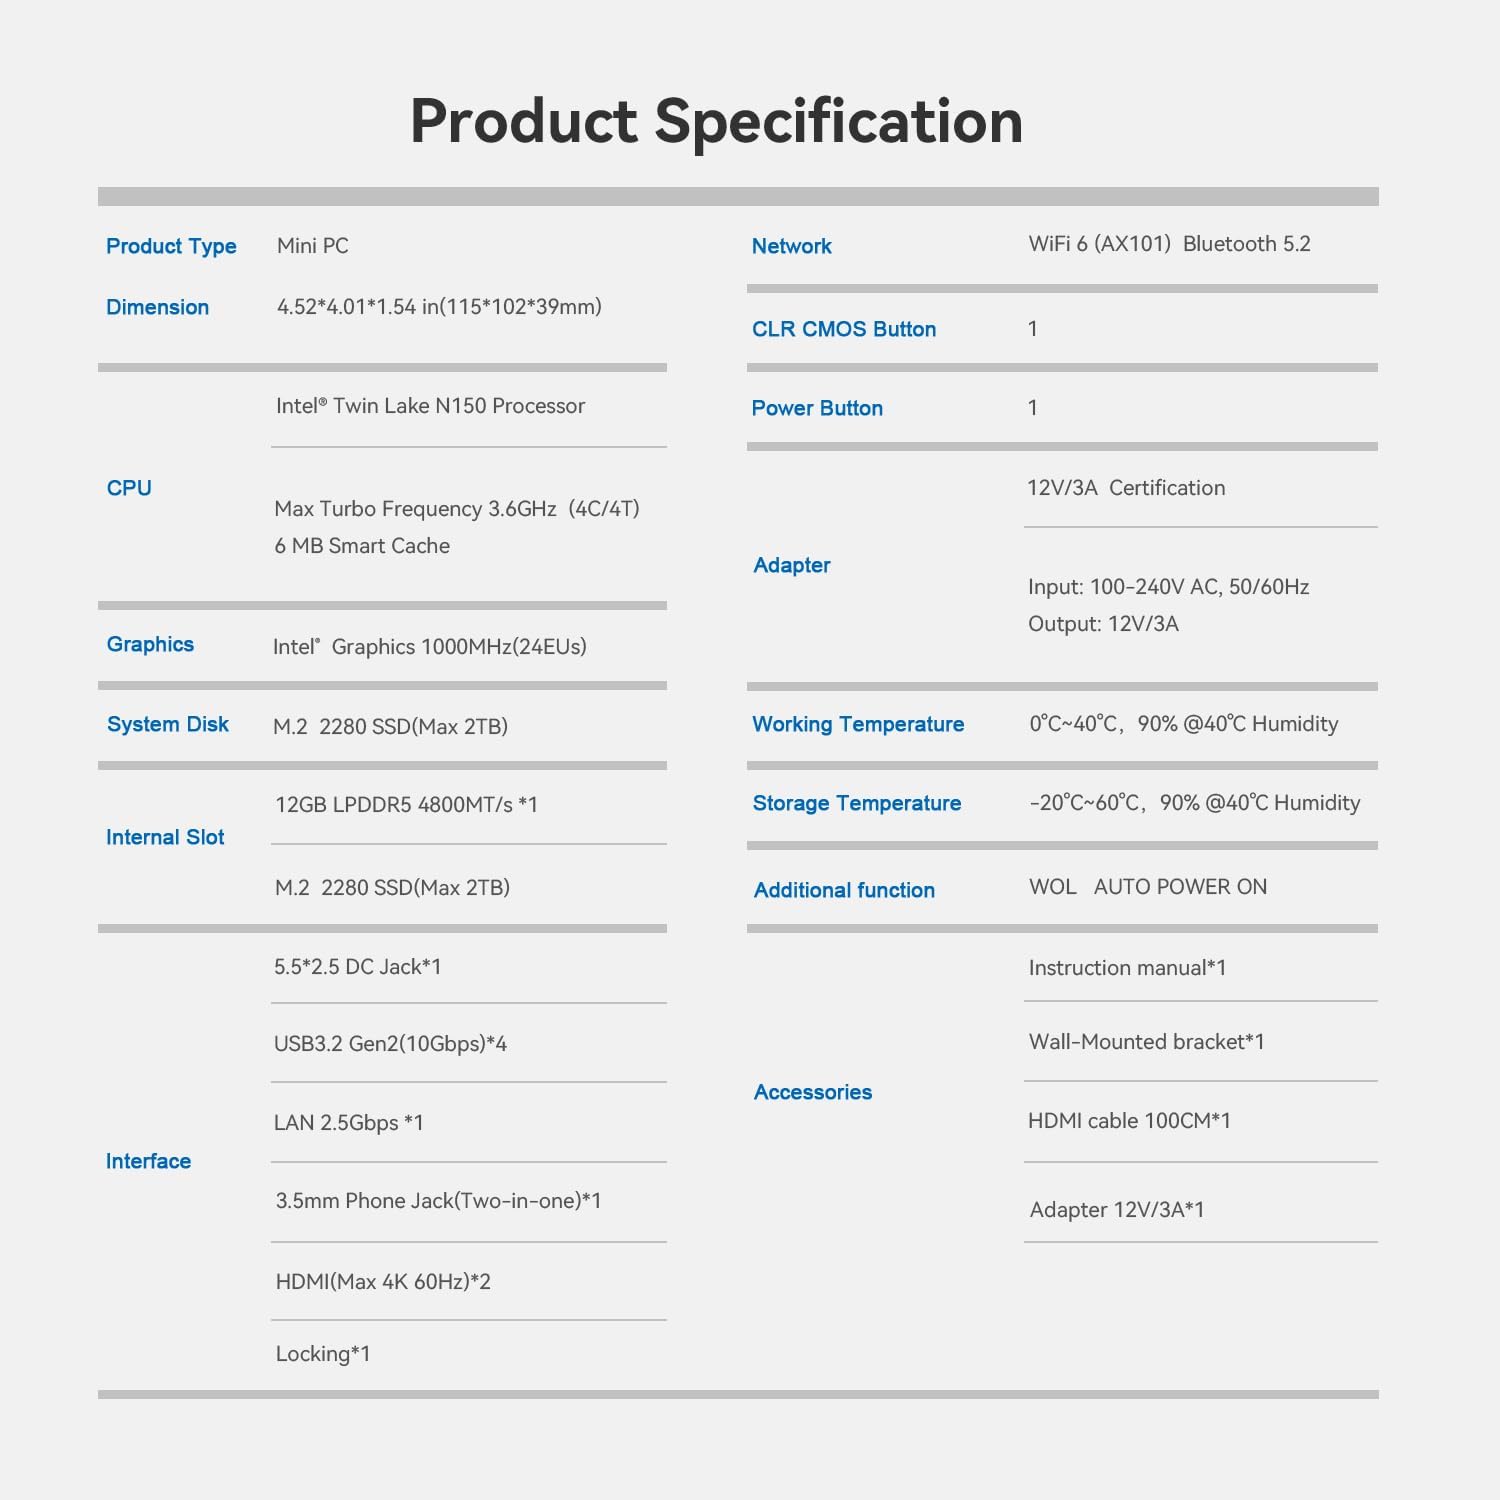
이미지: 제품 사양표.
8. 보증 및 지원
Beelink provides customer support and warranty services for its products. For specific warranty details and support inquiries, please refer to the following:
- 보증: Typically includes a 1-year free maintenance period.
- 기술 지원: Lifetime technical support is generally provided.
- 고객 서비스: 7 days a week, 24 hours a day customer service.
- 보고: Products are typically eligible for refund/replacement within 30 days of purchase.
For assistance, you can contact Beelink support through the platform where you purchased the product (e.g., Amazon's 'Your Account' -> 'Your Orders' -> 'Click Get Help').

Image: Beelink After-Sales Service Information.