1. 소개 및 안전 정보
Thank you for choosing the ANENG V8 Digital Multimeter. This device is designed for safe and accurate measurement of AC/DC voltage, AC/DC current, resistance, capacitance, frequency, temperature, diode, continuity, and battery testing. Please read this manual thoroughly before use to ensure proper operation and to prevent potential hazards.
1.1 안전 예방 조치
- 멀티미터를 사용하기 전에 항상 정상 작동 상태인지 확인하십시오. 테스트 리드에 손상이 없는지 점검하십시오.
- 볼륨을 적용하지 마십시오tage or current that exceeds the maximum rated values for the multimeter.
- vol으로 작업할 때 극도의 주의를 기울이십시오.tag직류 36V 이상 또는 교류 실효값 25V 이상은 감전 위험이 있으므로 사용하지 마십시오.
- 항상 회로의 전원을 끊고 모든 고전압을 방전하십시오.tag저항, 연속성, 다이오드 또는 정전용량을 측정하기 전에 커패시터를 먼저 검사합니다.
- Ensure the rotary switch is in the correct position for the desired measurement before connecting the test leads to the circuit.
- 폭발성 가스, 증기 또는 먼지가 많은 환경에서 멀티미터를 작동하지 마십시오.
- 배터리 부족 표시등이 켜지면 정확한 측정값을 얻기 위해 즉시 배터리를 교체하십시오.
2. 제품 오버view
2.1 패키지 내용
The ANENG V8 Digital Multimeter package typically includes the following items:
- ANENG V8 Digital Multimeter
- 테스트 리드(빨간색 및 검은색)
- 온도 프로브
- 운반 케이스
- 사용자 설명서

Image: ANENG V8 Digital Multimeter with its standard accessories, including test leads, a temperature probe, and a protective carrying case.
2.2 컨트롤 및 디스플레이
The multimeter features an 8000-count LCD backlight display for clear readings in various lighting conditions. Key controls include a rotary switch for function selection and buttons for range, data hold, and other features.

이미지: 상세 view of the multimeter's front panel, highlighting the LCD screen, the central rotary selector, and various control buttons.
3. 설정
3.1 배터리 설치
The ANENG V8 Digital Multimeter is powered by batteries. To install or replace batteries:
- 멀티미터가 꺼져 있는지 확인하고 모든 테스트 리드를 분리하세요.
- 장치 뒷면에서 배터리 덮개를 찾으세요.
- 드라이버를 사용하여 배터리 덮개를 고정하는 나사를 풀어주세요.
- 덮개를 제거하세요.
- Insert new batteries, observing the correct polarity (+ and -) as indicated inside the compartment. The device typically uses AA batteries.
- 배터리 덮개를 다시 씌우고 나사로 고정하십시오.
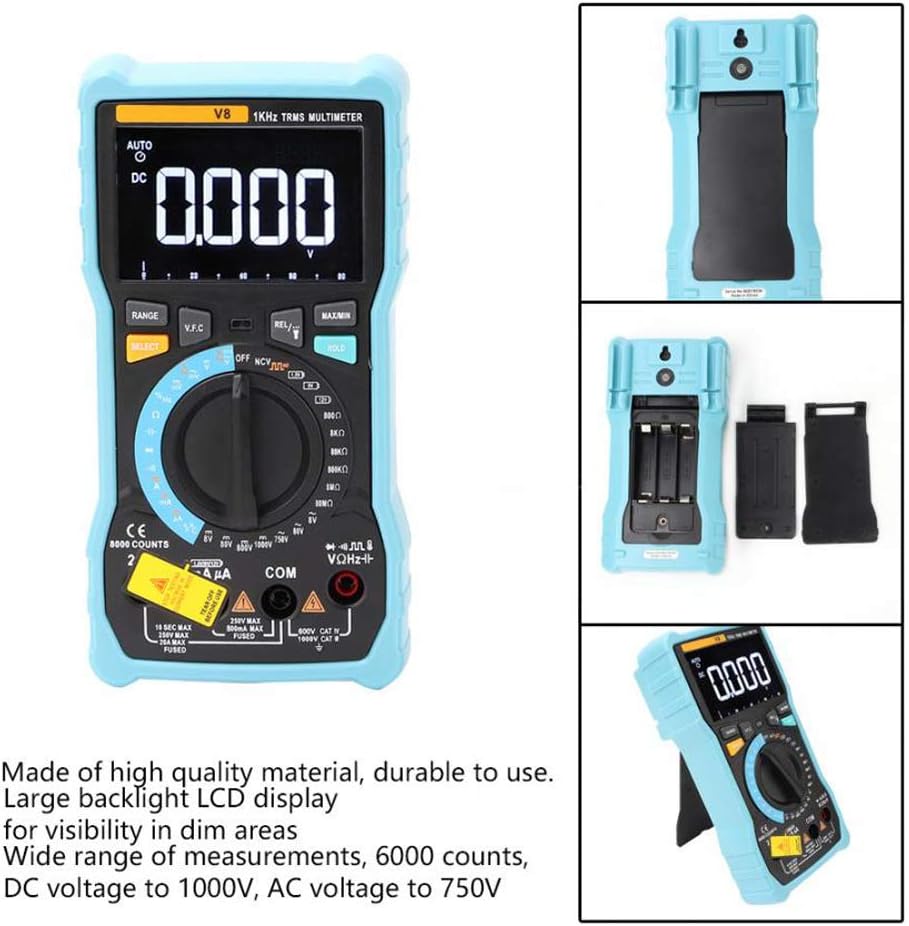
이미지: 후면 view of the multimeter with the battery compartment open, illustrating the correct placement for three AA batteries.
4. 사용 설명서
Before any measurement, ensure the test leads are correctly inserted into the input jacks and the rotary switch is set to the appropriate function.
4.1 직류/교류 전압 측정tage
- Set the rotary switch to the 'V–' (DC Voltage) or 'V~' (AC Voltag전자) 위치.
- 빨간색 테스트 리드를 'VΩmA' 잭에 연결하고 검은색 테스트 리드를 'COM' 잭에 연결하십시오.
- 측정하려는 회로 또는 부품에 테스트 리드를 병렬로 연결하십시오.
- vol을 읽어보세요tag디스플레이의 e 값.
4.2 직류/교류 전류 측정
- Set the rotary switch to the 'A–' (DC Current) or 'A~' (AC Current) position. For milliamp(mA) 또는 마이크로ampere (µA) measurements, select the corresponding range.
- For current up to 800mA, connect the red test lead to the 'VΩmA' jack. For current up to 20A, connect the red test lead to the '20A' jack. Connect the black test lead to the 'COM' jack.
- 회로의 전원을 차단하십시오. 전류를 측정하려는 회로의 개방 회로를 만드십시오. 멀티미터를 회로에 직렬로 연결하십시오.
- 회로에 전원을 공급하고 디스플레이에 표시되는 전류 값을 읽으십시오.
4.3 저항 측정
- Set the rotary switch to the 'Ω' (Resistance) position.
- 빨간색 테스트 리드를 'VΩmA' 잭에 연결하고 검은색 테스트 리드를 'COM' 잭에 연결하십시오.
- Ensure the circuit is de-energized and all capacitors are discharged. Connect the test leads across the component to be measured.
- 디스플레이에서 저항 값을 읽으십시오.
4.4 NCV(비접촉식 볼tage) 탐지
- 회전 스위치를 'NCV' 위치로 설정하십시오.
- Move the top end of the multimeter near the conductor or outlet.
- AC 전압이 정상 범위 내에 있으면 멀티미터에서 경고음이 울리고 NCV 표시등이 깜빡입니다.tage is detected, indicating the presence of live voltag신체적 접촉 없이.
4.5 온도 측정
- Set the rotary switch to the '°C/°F' (Temperature) position.
- Connect the temperature probe to the 'VΩmA' and 'COM' jacks, observing polarity if applicable.
- 측정하려는 물체 위 또는 근처에 온도계 끝을 놓으십시오.
- 디스플레이에 표시된 온도 값을 읽으십시오.
4.6 기타 기능
- 정전 용량: Set the rotary switch to the 'F' position. Connect leads across the discharged capacitor.
- 주파수/듀티 사이클: Set the rotary switch to the 'Hz/%' position. Connect leads to the signal source.
- 다이오드 테스트: Set the rotary switch to the 'Diode' position. Connect leads across the diode.
- 연속성 테스트: Set the rotary switch to the 'Continuity' position. Connect leads across the circuit. An audible beep indicates continuity.
- 배터리 테스트: Set the rotary switch to the 'Battery' position. Connect leads to the battery terminals (1.5V, 9V, or 12V).
- 데이터 보유 : 'HOLD' 버튼을 누르면 현재 측정값이 디스플레이에 고정됩니다. 다시 누르면 해제됩니다.
- 백라이트/손전등: Press the backlight button to turn on/off the display backlight or flashlight.
- 자동 전원 끄기: 멀티미터는 배터리 수명 절약을 위해 일정 시간 동안 사용하지 않으면 자동으로 전원이 꺼집니다.
5. 유지관리
5.1 청소
광고로 케이스를 닦으세요amp 천과 순한 세제를 사용하십시오. 연마제나 용제를 사용하지 마십시오. 입력 단자에 먼지와 습기가 들어가지 않도록 하십시오.
5.2 퓨즈 교체
전류 측정 기능이 작동하지 않으면 퓨즈를 교체해야 할 수 있습니다. 올바른 퓨즈 종류와 정격은 제품 사양을 참조하십시오. 퓨즈 교체는 자격을 갖춘 전문가만 수행해야 합니다.
5.3 보관
When not in use for extended periods, remove the batteries to prevent leakage and store the multimeter in a dry, cool place.
6. 문제 해결
- 디스플레이 없음: 배터리 설치 상태와 충전 상태를 점검하십시오. 필요한 경우 배터리를 교체하십시오.
- 잘못된 판독: Ensure the rotary switch is set to the correct function and range. Check test lead connections. Verify battery charge.
- 현재 측정이 작동하지 않음: Check the fuse. Replace if blown (refer to fuse replacement section).
- NCV 감지 안 됨: Ensure the NCV function is selected and the multimeter is close enough to the AC voltag출처.
7. 사양
| 매개변수 | 값 |
|---|---|
| 표시하다 | 8000 카운트 LCD 백라이트 포함 |
| DC 볼륨tag전자 (V) | 8.000V / 80.00V / 800.0V / 1000V |
| DC 볼륨tag전자(mV) | 800mV |
| AC 볼륨tag전자 (V) | 8.000V / 80.00V / 750V |
| AC 볼륨tag전자(mV) | 800mV |
| 직류 전류(A) | 8.000A / 20.00A |
| DC 전류 (mA) | 8.000mA / 80.00mA / 800.0mA |
| 직류 전류(µA) | 800µA / 8000µA |
| AC 전류 (A) | 8.000A / 20.00A |
| AC 전류 (mA) | 8.000mA / 80.00mA / 800.0mA |
| AC 전류(µA) | 800µA / 8000µA |
| 저항 | 800.0Ω / 8.000kΩ / 80.00kΩ / 800.0kΩ / 8.000MΩ / 80.00MΩ |
| 정전 용량 | 9.999nF / 99.99nF / 999.9nF / 9.999µF / 99.99µF / 999.9µF / 9.999mF / 99.99mF |
| 빈도 | 9.999Hz / 99.99Hz / 999.9Hz / 9.999kHz / 99.99kHz / 999.9kHz / 9.999MHz |
| 듀티 사이클 | 1% ~ 99% |
| 온도 범위 | -20°C ~ 1000°C (-4°F ~ 1832°F) |
| 배터리 테스트 | 1.5V / 9V / 12V |
| 범위 | 자동 / 수동 |
| 업데이트 속도 | 3 회 / 초 |
| 진정한 RMS | 예 |
| 데이터 보류 | 예 |
| 백라이트/손전등 | 예 |
| 배터리 부족 경고 | 예 |
| 자동 전원 끄기 | 예 |
| 재료 | ABS / PVC |
| 전원 | 배터리 구동 |
8. 보증 및 지원
This product is covered by a standard manufacturer's warranty against defects in materials and workmanship. Please refer to the warranty card included with your purchase for specific terms and conditions. For technical support or service inquiries, please contact your retailer or the manufacturer's customer service department.
9. 공식 제품 영상
현재 판매자가 제공하는 공식 제품 영상은 내장할 수 없습니다.