
Homtime C1
Homtime C1 Digital Alarm Clock User Manual
모델 : C1
1. 서론
구매해주셔서 감사합니다asing the Homtime C1 Digital Alarm Clock. This device combines a digital alarm clock with dual USB charging ports, offering convenience and functionality for your bedside or office. Its user-friendly design, featuring a rotary button and dimmable LCD screen, ensures ease of use for all ages. Please read this manual thoroughly before operation to ensure proper use and maintenance.

Image: The Homtime C1 Digital Alarm Clock, turquoise in color, displayed on a wooden surface with a succulent plant in the background. The clock shows the time 20:08 and an alarm set for 15:00.
2. 안전 정보
안전한 작동을 보장하고 손상을 방지하려면 다음 예방 조치를 준수하세요.
- 기기를 물이나 과도한 습기에 노출시키지 마세요.
- 라디에이터, 난방 장치, 스토브 또는 기타 장치(예: 열원) 근처에 장치를 두지 마십시오. amp열을 생성하는 발전기.
- Use only the power adapter and charging cable provided or recommended by Homtime.
- 기기를 직접 분해, 수리 또는 개조하지 마십시오. 모든 서비스는 자격을 갖춘 서비스 담당자에게 맡기십시오.
- 장치를 강한 자기장에서 멀리 두십시오.
- 마른 천으로만 닦으십시오.
3. 패키지 내용
다음 품목이 패키지에 포함되어 있는지 확인하세요.
- Homtime C1 Digital Alarm Clock
- 전원 어댑터
- Charging Cable (Multi-connector for various mobile phones)
- 사용자 설명서

Image: A gold-colored multi-connector charging cable with USB-A, Micro USB, Lightning, and USB-C connectors, indicating its versatility for various mobile devices.
4. 제품 오버view
Familiarize yourself with the different parts of your Homtime C1 alarm clock:
- 앞쪽: Large LCD display for time and alarm.
- 맨 위: Rotary button for setting time/alarm, snooze/dimmer button, alarm ON/OFF button.
- 뒤쪽에: 전원 입력 포트.
- 측면(오른쪽): 듀얼 USB 충전 포트.

Image: A composite image showing various angles of the Homtime C1 Digital Alarm Clock, including front, top, side, and bottom views, highlighting its compact design and port locations.
5. 설정
- 전원 연결: Plug the provided power adapter into the DC input port on the back of the alarm clock, then plug the adapter into a standard wall outlet. The display will light up.
- 초기 시간 설정: The clock will typically display a default time. To set the correct time, proceed to the 'Setting Time' section under Operating Instructions.
6. 사용 설명서
6.1 설정 시간
- Press and hold the rotary button on top of the clock until the hour digits start blinking.
- Rotate the button clockwise or counter-clockwise to adjust the hour.
- Press the rotary button once to switch to minute adjustment.
- Rotate the button to adjust the minutes.
- Press the rotary button again to confirm the time and exit time setting mode.
6.2 알람 설정
- Press and hold the alarm setting button (bell icon) on top of the clock until the alarm hour digits start blinking.
- Rotate the rotary button to adjust the alarm hour.
- Press the alarm setting button once to switch to alarm minute adjustment.
- Rotate the rotary button to adjust the alarm minutes.
- Press the alarm setting button again to confirm the alarm time.
- To activate or deactivate the alarm, press the alarm ON/OFF button (next to the rotary button). An alarm icon will appear on the display when activated.

Image: A person's hand with green nail polish is shown pressing the large circular button on top of a white Homtime C1 alarm clock, demonstrating the interaction for setting time or alarm.
6.3 스누즈 기능
When the alarm sounds, press the large rotary button on top of the clock to activate the snooze function. The alarm will pause for a few minutes (default snooze time is typically 9 minutes) and then sound again. To turn off the alarm completely, press the alarm ON/OFF button.
6.4 Display Brightness (Dimmable)
The Homtime C1 features an auto-dimmable display. The brightness adjusts automatically based on ambient light conditions. You can also manually adjust the brightness by briefly pressing the snooze/dimmer button (usually the large rotary button or a dedicated button next to it) to cycle through different brightness levels.
USB 충전 포트 6.5개
The Homtime C1 is equipped with dual USB charging ports (5V/2.1A) on its side, allowing you to charge your mobile devices directly from the clock. Simply connect your device's USB charging cable to one of the ports. These ports are compatible with most smartphones and tablets, including iPhone and Android devices.
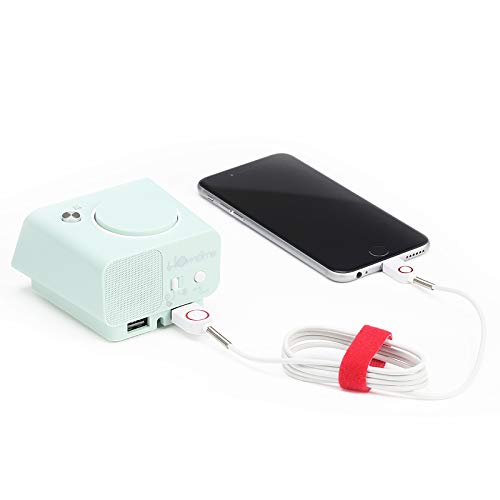
Image: The Homtime C1 alarm clock, turquoise in color, with a white charging cable connected to its side USB port, actively charging a black smartphone. This illustrates the dual USB charging capability.
7. 유지관리
- 청소: Use a soft, dry cloth to clean the surface of the clock. Do not use liquid cleaners or aerosol sprays.
- 저장: 장기간 기기를 보관할 경우, 전원 콘센트에서 플러그를 뽑고 서늘하고 건조한 곳에 보관하세요.
- 충격 방지: Do not drop or subject the clock to strong impacts, as this may damage internal components.
8. 문제 해결
| 문제 | 가능한 원인 | 해결책 |
|---|---|---|
| 시계 표시가 꺼져 있습니다. | 전원이 연결되지 않았습니다. | 전원 어댑터가 시계와 벽면 콘센트에 제대로 꽂혀 있는지 확인하십시오. |
| 알람이 울리지 않습니다. | 알람이 활성화되지 않았거나 잘못 설정되었습니다. | Check if the alarm icon is displayed. Re-set the alarm time. |
| USB 충전이 작동하지 않습니다. | 케이블 문제 또는 장치 호환성 문제. | Try a different USB cable. Ensure your device is compatible with 5V/2.1A charging. |
| Display too dim/bright. | Auto-dimming or manual setting. | Briefly press the snooze/dimmer button to cycle through brightness levels. |
9. 사양
- 상표: 홈타임
- 모델: C1
- 색상: Turquoise (Green)
- 디스플레이 유형: 디지털 LCD
- 특별 기능: Alarm, Auto Dimmable, Snooze, Dual USB Charging Ports
- 전원: 코드식 전기
- 재료: 아크릴로니트릴 부타디엔 스티렌, 플라스틱
- 장착 유형: 테이블탑
- USB 출력: 5V/2.1A (Total for both ports)
- 치수: (정확한 치수는 제품 포장을 참조하십시오.)
- 원산지: 중국
10. 보증 및 지원
Homtime products are designed and manufactured to the highest quality standards. For information regarding warranty coverage, please refer to the warranty card included with your product or visit the official Homtime website. For technical support or service inquiries, please contact Homtime customer service through the contact information provided on the product packaging or web대지.
보증 목적으로 구매 증빙서류로 구매 영수증을 보관하세요.
관련 문서C1


Ask a question about this manual
Ask about setup, troubleshooting, compatibility, parts, safety, or missing instructions. Manuals+ will review the question and use this page’s manual context to help answer it.