소개
The Korg nanoKONTROL Studio is a compact and versatile Bluetooth/USB MIDI control surface designed for intuitive control of Digital Audio Workstations (DAWs) and DJ software. It features 8 faders, 8 rotary knobs, and a variety of backlit switches and transport controls, offering a hands-on experience for music production and performance. This manual provides essential information for setting up, operating, maintaining, and troubleshooting your nanoKONTROL Studio.
제품 끝view
The nanoKONTROL Studio is engineered for portability and seamless integration into various setups, supporting both USB and wireless Bluetooth connectivity. Its refined design ensures ease of use in mobile or desktop environments.

그림 1: 상단 view of the Korg nanoKONTROL Studio, showing faders, knobs, and control buttons.
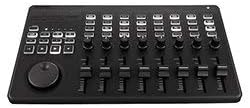
그림 2: 각도 view of the Korg nanoKONTROL Studio, highlighting its compact form factor.
설정
1. 장치 전원 공급
The nanoKONTROL Studio can be powered via USB or with batteries.
- 배터리 설치: Requires 2 AA batteries (included). Open the battery compartment on the underside of the unit, insert the batteries according to the polarity indicators, and close the compartment.
- USB 전원 : Connect the nanoKONTROL Studio to your computer using a standard USB cable. The unit will draw power directly from the USB port.
2. 연결성
- 블루투스 연결 : To connect wirelessly, ensure the power switch is set to the 'Bluetooth' position. On your computer or iOS device, enable Bluetooth and search for available devices. Select 'nanoKONTROL Studio' to pair.
- USB 연결: To connect via USB, ensure the power switch is set to the 'USB' position. Connect the unit to your computer using a USB cable.
3. 소프트웨어 설치 및 구성
For optimal performance and customization, download and install the Korg KONTROL Editor software from the official Korg website. This software allows you to assign MIDI messages to the controls and save custom scenes.
- 드라이버 설치: For Windows users, a dedicated USB MIDI driver may be required. Mac and iOS devices typically operate class-compliant, meaning no additional driver installation is necessary. Refer to the Korg website for the latest driver information.
- DAW 호환성: The nanoKONTROL Studio is compatible with various DAWs, including Ableton Live, Avid Pro Tools, and FL Studio. Refer to your DAW's documentation for instructions on setting up external MIDI controllers.
작동 지침
1. Control Layout and Functions
The nanoKONTROL Studio features a comprehensive set of controls:
- Faders (8): Control volume, send levels, or other continuous parameters.
- 회전식 손잡이(8개): Control pan, EQ, effects, or other continuous parameters.
- Mute Buttons (8): Mute individual tracks or channels.
- Solo Buttons (8): Solo individual tracks or channels.
- Rec Buttons (8): Arm tracks for recording.
- Select Buttons (8): Select tracks or other elements within your software.
- 운송 통제: Dedicated buttons for Play, Stop, Record, Fast Forward, Rewind, Cycle, Set, and Marker functions.
- 조그 휠: Navigate timelines, scrub audio, or control other parameters.
- 장면 버튼: Cycle through up to five user-defined scenes, allowing for quick changes in control assignments.
2. 작동 모드
The nanoKONTROL Studio can operate in different modes, which define how its controls interact with your software:
- DAW Mixer Control Mode: Optimized for controlling mixer functions (volume, pan, mute, solo, record arm) in compatible DAWs.
- Generic MIDI Controller Mode: Allows for custom MIDI mapping of all controls to any parameter in your software. This mode is highly customizable using the Korg KONTROL Editor.
3. Using with Software
After connecting and configuring your nanoKONTROL Studio, open your preferred DAW or music software. Most software will detect the controller automatically. If not, manually select it as a MIDI input device in your software's preferences or settings. Use the Korg KONTROL Editor to create and load custom control maps (scenes) tailored to your workflow.
유지
To ensure the longevity and optimal performance of your nanoKONTROL Studio, follow these maintenance guidelines:
- 청소: Use a soft, dry cloth to wipe the surface of the unit. Avoid abrasive cleaners, solvents, or waxes.
- 저장: 제품을 직사광선, 극한 온도 및 높은 습도를 피해 서늘하고 건조한 곳에 보관하십시오.
- 배터리 관리 : 장기간 사용하지 않을 경우 배터리 누출을 방지하기 위해 배터리를 제거하세요.
- 손질: Avoid dropping the unit or subjecting it to strong impacts. Do not apply excessive force to faders, knobs, or buttons.
문제 해결
If you encounter issues with your nanoKONTROL Studio, refer to the following common solutions:
- 장치 전원이 켜지지 않음: Check battery installation and charge level, or ensure the USB cable is securely connected and providing power.
- No MIDI Signal/Not Recognized by Software:
- Ensure the power switch is in the correct position (USB or Bluetooth) for your connection type.
- Verify that the USB cable is functional and properly connected.
- For Bluetooth, ensure the device is paired correctly and within range.
- Check your DAW's MIDI settings to ensure the nanoKONTROL Studio is enabled as an input device.
- Install the latest drivers (if applicable for your operating system) from the Korg web대지.
- 컨트롤이 제대로 작동하지 않습니다:
- Verify that the correct control map (scene) is selected on the nanoKONTROL Studio and within your software.
- Use the Korg KONTROL Editor to check and re-assign MIDI messages to controls.
- 공장 초기화 : If the unit behaves unexpectedly, a factory reset can restore default settings. To perform a factory reset, hold down the 주기 button and the two 길 buttons (left and right arrow buttons in the Track section) while powering on the unit via USB.
기술 사양
| 품목 무게 | 1.46파운드 |
| 제품 치수 | 13.5 x 6.81 x 1.65 인치 |
| 모델 번호 | NANOKONST |
| 배터리 | 2개의 AA 배터리 필요(포함) |
| 호환 장치 | Smartphone, Tablet, PC/Mac |
| 커넥터 유형 | USB |
| 하드웨어 인터페이스 | USB |
| 지원 소프트웨어 | 에이블턴 라이브, 에이비드 프로툴즈, FL 스튜디오 |
| 믹서 채널 수량 | 8 |
| 연결 기술 | 블루투스, USB |
| 특징 | 컴팩트하고 가벼움 |
보증 및 지원
For detailed warranty information, product registration, and technical support, please visit the official Korg web대지. NS website provides access to the latest drivers, software updates, and comprehensive support resources for your nanoKONTROL Studio.
You can also refer to the 'What's in the Box' section of your product packaging, which confirms the inclusion of a user manual for further guidance.
For additional assistance, contact Korg customer support through their official channels.