
1. 서론
This manual provides essential instructions for the installation, operation, and maintenance of your HP Compaq 6005 Pro Socket AM3 System Motherboard (P/N 531966-001). This motherboard is designed for use in personal computers and supports AMD Socket AM3 processors. Please read this manual thoroughly before proceeding with installation or operation.
2. 안전 정보
Observe the following safety precautions to prevent damage to the motherboard or personal injury:
- 구성 요소를 설치하거나 제거하기 전에 항상 벽면 콘센트에서 전원 공급 장치를 분리하세요.
- 정전기 방지 손목 스트랩을 착용하고 정전기 방지 매트 위에서 작업하여 민감한 부품의 정전기 방전(ESD) 손상을 방지하십시오.
- 마더보드를 다룰 때는 가장자리를 잡고, 부품이나 커넥터에 닿지 않도록 주의하십시오.
- 과열을 방지하려면 컴퓨터 케이스 내부의 적절한 환기를 확보하세요.
- 설치 과정 중 확실하지 않은 부분이 있으면 자격을 갖춘 기술자에게 문의하십시오.
3. 마더보드 구성 요소view
Familiarize yourself with the key components and connectors on your HP Compaq 6005 Pro motherboard.

그림 3.1: 위에서 아래로 view of the HP Compaq 6005 Pro motherboard, showing the CPU socket, RAM slots, and various chipsets.
The motherboard features an AMD Socket AM3 for compatible processors, four DDR3 DIMM slots for memory, and various expansion slots for additional cards. The rear I/O panel provides connectivity for peripherals.
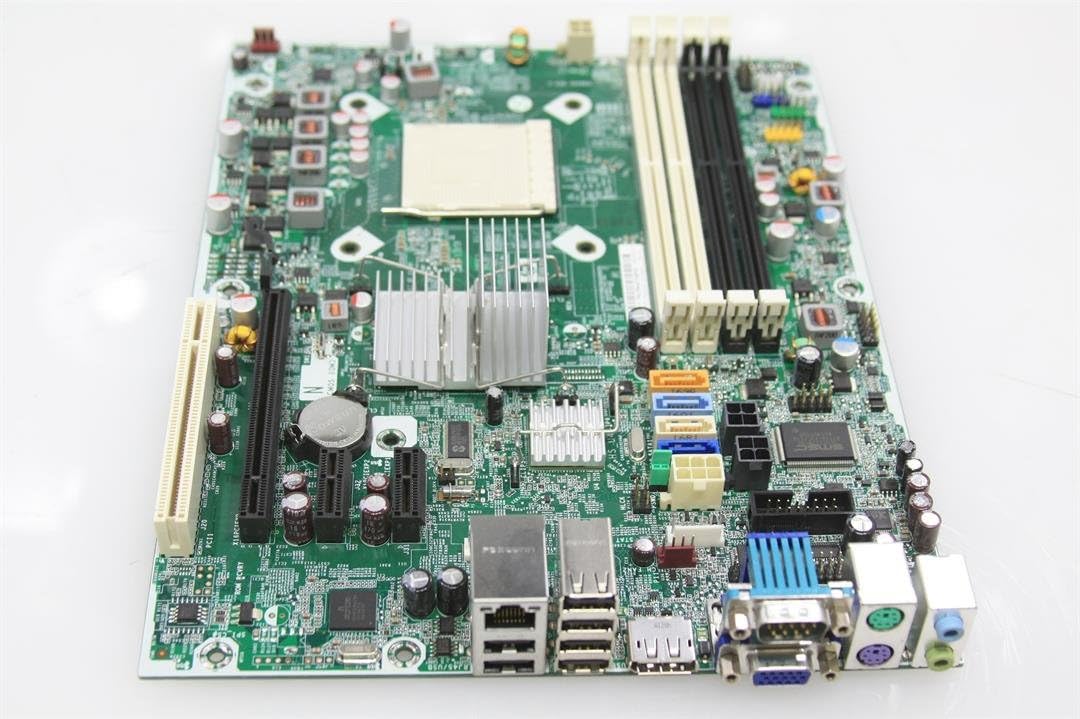
그림 3.2: Rear I/O panel of the HP Compaq 6005 Pro motherboard, featuring VGA, DisplayPort, DVI, USB ports, Ethernet, and audio jacks.
주요 영역은 다음과 같습니다.
- CPU 소켓(AM3): For installing the central processing unit.
- DIMM 슬롯: DDR3 메모리 모듈 설치용입니다.
- PCIe 슬롯: 그래픽 카드 및 기타 확장 카드용.
- SATA 포트: For connecting storage devices like hard drives and SSDs.
- 전원 커넥터 : Main 24-pin ATX and 4-pin CPU power connectors.
- 전면 패널 커넥터: For case buttons, LEDs, and front USB/audio ports.

그림 3.3: Another perspective of the HP Compaq 6005 Pro motherboard, highlighting expansion slots and internal connectors.
4. 설정 및 설치
Follow these steps to properly install your motherboard and its components.
4.1. 설치 전 체크리스트
- 적절한 스탠드오프가 포함된 컴퓨터 케이스.
- Compatible AMD Socket AM3 processor.
- DDR3 memory modules.
- CPU cooler with thermal paste.
- 전원 공급 장치(PSU).
- 드라이버와 정전기 방지 손목 스트랩.
4.2. 마더보드 설치
- Install the I/O shield into the computer case's rear opening.
- 나사 구멍을 스탠드오프에 맞춰서 마더보드를 케이스에 조심스럽게 놓습니다.
- 마더보드를 나사로 고정하되, 단단히 고정되도록 하되 너무 세게 조이지 마십시오.
4.3. CPU 설치
- CPU 소켓 레버를 들어 올리세요.
- CPU의 삼각형 표시와 소켓의 해당 표시를 일치시키십시오.
- CPU를 억지로 끼우지 말고 조심스럽게 소켓에 넣으세요.
- CPU를 고정하려면 소켓 레버를 아래로 내리십시오.
- Apply a thin, even layer of thermal paste to the CPU's surface.
- Install the CPU cooler according to its manufacturer's instructions, ensuring good contact with the CPU.
4.4. 메모리(RAM) 설치
- DIMM 슬롯의 양쪽 끝에 있는 클립을 엽니다.
- DDR3 메모리 모듈의 노치를 DIMM 슬롯의 키에 맞춥니다.
- 클립이 제자리에 고정될 때까지 메모리 모듈의 양쪽 끝을 단단히 누릅니다.
4.5. 전원 연결
- Connect the 24-pin ATX power cable from the PSU to the main power connector on the motherboard.
- Connect the 4-pin CPU power cable from the PSU to the CPU power connector near the CPU socket.
4.6. Storage Devices and Expansion Cards
- 저장 장치(HDD/SSD)의 SATA 데이터 케이블을 마더보드의 SATA 포트에 연결하십시오.
- Install any necessary expansion cards (e.g., graphics card) into the appropriate PCIe slots and secure them with screws.
4.7. 전면 패널 및 주변 장치 연결
- Connect the front panel cables (power button, reset button, HDD LED, power LED, front USB, front audio) to their respective headers on the motherboard. Refer to your case manual for specific pin assignments.
- Connect external peripherals such as keyboard, mouse, monitor, and network cable to the rear I/O ports.
5. 사용 설명서
5.1. 첫 번째 부팅
- After all components are installed and connected, connect the power cord to the PSU and turn on the power switch.
- 컴퓨터 케이스의 전원 버튼을 누르세요.
- 시스템 전원이 켜지고 모니터에 화면이 표시될 것입니다.
5.2. BIOS/UEFI 설정
BIOS/UEFI 설정 유틸리티에 접근하려면 지정된 키(일반적으로)를 누르십시오. F10 or F12 for HP systems) repeatedly during the initial boot sequence. In the BIOS/UEFI, you can configure system settings, boot order, and monitor hardware status.
5.3. 운영체제 설치
Once the system is booting correctly, you can proceed with installing your preferred operating system (e.g., Windows 10) from a bootable USB drive or DVD.
6. 유지관리
6.1. 청소
Regularly clean dust from the motherboard, CPU cooler, and case fans using compressed air. Ensure the system is powered off and unplugged before cleaning. Avoid using liquid cleaners directly on components.
6.2. BIOS 업데이트
HP 공식 지원 페이지를 주기적으로 확인하세요. website for BIOS/firmware updates. BIOS updates can improve system stability, compatibility, and performance. Follow HP's instructions carefully when performing a BIOS update to avoid system damage.
7. 문제 해결
문제가 발생하면 다음의 일반적인 문제 해결 단계를 참조하세요.
- 전원 없음: Ensure all power cables (24-pin ATX, 4-pin CPU) are securely connected. Check the PSU switch and wall outlet.
- 디스플레이 없음: Verify the monitor is connected to the correct video output (VGA, DVI, or DisplayPort) and is powered on. Reseat the graphics card (if applicable) and RAM modules.
- 시스템 신호음: Listen for beep codes during startup. These codes often indicate specific hardware issues (e.g., memory failure, graphics card issue). Consult the HP support website for a list of beep codes for your model.
- 시스템 불안정/충돌: Check for overheating (monitor temperatures in BIOS). Ensure all drivers are up to date. Test memory modules individually.
- 구성 요소가 감지되지 않았습니다. Reseat the component (e.g., hard drive, expansion card). Check cable connections. Verify BIOS settings.
8. 사양
Detailed technical specifications for the HP Compaq 6005 Pro Motherboard (P/N 531966-001).
| 특징 | 사양 |
|---|---|
| 상표 | HP |
| 모델명 | HP Compaq 6005 Pro |
| 모델 번호 | 531966-001 |
| CPU 소켓 | AMD 소켓 AM3 |
| 호환 프로세서 | AMD Phenom II, Athlon II, AMD FX |
| 칩셋 유형 | AMD 760MP |
| RAM 메모리 기술 | DDR3 |
| 사용 가능한 메모리 슬롯 | DIMM 슬롯 4 개 |
| RAM 메모리 최대 크기 | 16GB (XNUMX기가바이트) |
| 메모리 클럭 속도 | Up to 2133 MHz (depending on CPU/RAM) |
| 그래픽 카드 인터페이스 | PCI 익스프레스 x16 |
| 확장 슬롯 | 1x PCIe x16, 2x PCIe x1, 1x PCI |
| 총 SATA 포트 수 | 4x SATA2.0 |
| 주 전원 커넥터 유형 | 24핀 ATX |
| 후면 I/O 포트 | 6x USB 2.0, 1x VGA, 1x DVI-D, 1x DisplayPort, 1x RJ-45 Ethernet, Audio In/Out/Mic, 2x PS/2 |
| 호환 장치 | 개인용 컴퓨터 |
| 플랫폼 | Windows 10(및 이전 호환 버전) |
| 폼 팩터 | 마이크로 ATX |
9. 보증 정보
For specific warranty terms and conditions related to your HP Compaq 6005 Pro Motherboard, please refer to the original purchase documentation or contact HP customer support directly. Warranty coverage may vary based on region and point of purchase.
10. 지원
For additional assistance, driver downloads, updated documentation, or to contact technical support, please visit the official HP support web대지:
When contacting support, please have your motherboard model number (531966-001) and any relevant system information ready.