1. 서론
This manual provides detailed instructions for the safe and effective use of your Sony HXR-NX100 Full HD NXCAM Camcorder. Please read this manual thoroughly before operating the camcorder and retain it for future reference.
주요 특징:
- 1.0-type Exmor R CMOS sensor for high sensitivity and resolution across various shooting conditions.
- Sony G Lens with 12x optical zoom, expandable to 24x with Clear Image Zoom and 48x with Digital Extender.
- Optical Steady Shot for image stabilization.
- Integrated ND filter control mechanism with four positions.
- Three independent lens rings for manual control of focus, zoom, and iris.
- XAVC S recording at 59.94p in Full HD 1920 x 1080.
- Dual media slots for simultaneous or relay recording.
- Slow & Quick Motion recording capabilities.
- Multi Interface Shoe (MI Shoe) for flexible accessory connection.
- Two 3-Pin XLR Audio Inputs.
- AVCHD 2.0 and DV Recording Codecs.
2. 상자 안에 무엇이 들어있나요?
Verify that all the following items are included with your Sony HXR-NX100 Camcorder:
- Sony HXR-NX100 Full HD NXCAM Camcorder (Black)
- 렌즈 후드
- 렌즈 캡
- EVF Eyepiece
- USB 케이블
- 배터리
- AC 어댑터
- 전원 코드
- 배터리 충전기
- IR 무선 리모컨
- 보증 정보
- 사용 설명서(본 문서)
3. 제품 오버view
Familiarize yourself with the various parts of your camcorder.

그림 3.1: 전면 3/4 view of the Sony HXR-NX100 Camcorder with the LCD monitor closed, showcasing the lens, handle, and main body.

그림 3.2: 왼쪽 view of the camcorder, highlighting the lens barrel and control panel.

그림 3.3: 상세한 view of the Sony G Lens, showing the 24x Clear Image Zoom marking and the three independent control rings for focus, zoom, and iris.
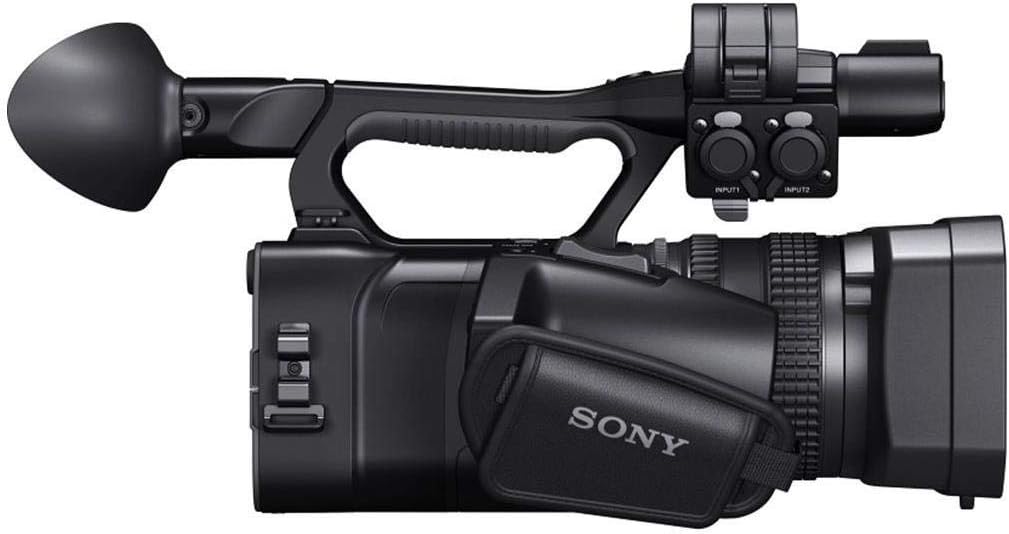
그림 3.4: 오른쪽 view of the camcorder with the LCD monitor open, revealing additional controls and the hand strap.

그림 3.5: 후면 3/4 view of the camcorder, showing the open LCD monitor, viewfinder, and various rear panel controls.

그림 3.6: 뒤쪽 view of the camcorder with the battery compartment open, showing the battery slot and various input/output ports.

그림 3.7: 맨 위 view of the camcorder, illustrating the handle, microphone, and top-mounted controls.

그림 3.8: 앞쪽 view of the camcorder, focusing on the lens and lens hood.
4. 초기 설정
4.1 배터리 충전
- Connect the AC adaptor to the battery charger.
- AC 어댑터를 벽면 콘센트에 꽂습니다.
- Insert the supplied battery into the charger. The charging indicator will illuminate.
- Once charging is complete, the indicator will turn off. Remove the battery.
4.2 배터리 삽입
- 캠코더의 전원이 꺼져 있는지 확인하십시오.
- 캠코더 뒷면에 있는 배터리함 덮개를 여세요.
- Align the battery with the battery slot, ensuring the contacts match.
- Gently push the battery into the compartment until it clicks into place.
- 배터리 덮개를 닫습니다.
4.3 메모리 카드 삽입
- 캠코더의 전원이 꺼져 있는지 확인하십시오.
- Locate the memory card slots (typically on the side or rear).
- 메모리 카드 슬롯 커버를 엽니다.
- Insert a compatible Memory Stick or SD card into the slot with the correct orientation until it clicks.
- 메모리 카드 슬롯 커버를 닫습니다.
4.4 렌즈 후드 부착
- 렌즈 후드를 렌즈 앞면에 맞춥니다.
- Rotate the lens hood clockwise until it locks securely into position.
5. 기본 동작
5.1 전원 켜기/끄기
- 전원을 켜려면 전원 스위치를 ON 위치로 밀어주세요.
- 전원을 끄려면 전원 스위치를 OFF 위치로 밀어주세요.
5.2 비디오 녹화
- Ensure a charged battery and formatted memory card are inserted.
- Set the camcorder to the desired shooting mode (e.g., Camera mode).
- LCD 모니터를 사용하여 구도를 잡으세요. view파인더.
- Press the START/STOP button (usually located on the handle or rear) to begin recording. The recording indicator will illuminate.
- 녹화를 중지하려면 시작/정지 버튼을 다시 누르십시오.
5.3 줌 컨트롤
- Use the zoom rocker on the handle for electronic zoom control.
- For manual zoom, rotate the dedicated zoom ring on the lens barrel.
5.4 초점 조정
- 자동 초점을 맞추려면 FOCUS 스위치를 AUTO로 설정하십시오.
- Set the FOCUS switch to MANUAL and rotate the focus ring on the lens barrel for precise manual focus.
5.5 Iris (Aperture) Control
- Set the IRIS switch to AUTO for automatic aperture control.
- Set the IRIS switch to MANUAL and rotate the iris ring on the lens barrel to adjust the aperture manually.
5.6 ND Filter Function
- Use the ND FILTER switch to select from four built-in neutral density filter positions (Clear, 1/4, 1/16, 1/64).
- These filters help control the amount of light entering the lens, useful in bright conditions.
6. 유지관리
6.1 캠코더 청소
- 몸: 캠코더 본체를 부드럽고 마른 천으로 닦으십시오. 잘 지워지지 않는 얼룩은 물기를 살짝 묻힌 천으로 닦아내십시오.ampened with water or a mild detergent solution, then wipe dry.
- 렌즈: 렌즈 브러시를 사용하여 먼지를 제거한 후, 렌즈 세척용 천과 렌즈 세척액을 사용하여 부드럽게 닦아주세요. 손가락으로 렌즈 표면을 만지지 않도록 주의하세요.
- LCD 모니터/View파인더: Use a soft, dry cloth specifically designed for LCD screens. Do not apply pressure.
6.2 보관
- 캠코더는 직사광선과 극한의 온도를 피해 서늘하고 건조한 곳에 보관하세요.
- 장시간 캠코더를 사용하지 않을 경우에는 배터리를 제거하세요.
- 습한 환경에서는 곰팡이와 녹이 생기는 것을 방지하기 위해 건조제를 사용하세요.
7. 문제 해결
캠코더 사용 중 문제가 발생하면 다음의 일반적인 문제 및 해결 방법을 참조하십시오.
- 캠코더 전원이 켜지지 않습니다: 배터리가 완전히 충전되었는지, 그리고 올바르게 장착되었는지 확인하십시오. 외부 전원을 사용하는 경우 AC 어댑터가 제대로 연결되었는지 확인하십시오.
- 녹음할 수 없습니다: Verify that a memory card is inserted and has sufficient free space. Ensure the card is formatted correctly. Check if the camcorder is in recording mode.
- 이미지가 흐릿함: Check the focus setting. If in manual focus, adjust the focus ring. If in auto focus, ensure there is sufficient light and contrast for the camcorder to focus. Clean the lens if it is dirty.
- 음성 녹음 안 됨: Ensure external microphones are properly connected to the XLR inputs and their levels are set correctly. Check internal microphone settings.
- 배터리가 빨리 소모됩니다. Ensure the battery is fully charged before use. Operating in cold environments or using power-intensive features (e.g., continuous recording, LCD backlight) can reduce battery life.
보다 복잡한 문제의 경우, 소니 공식 지원 자료를 참조하거나 고객 서비스 센터에 문의하십시오.
8. 사양
| 특징 | 사양 |
|---|---|
| 제품 치수 | 14.63 x 6.75 x 7.37 인치 |
| 품목 무게 | 4파운드 |
| 품목 모델 번호 | HXRNX100 |
| 배터리 | 1개의 리튬 이온 배터리 필요(포함) |
| 제조업체 | 소니 |
| 포토 센서 기술 | CMOS |
| 비디오 캡처 해상도 | 1080p |
| 최대 초점 거리 | 111.6 밀리미터 |
| 최대 조리개 | 4.5 밀리미터 |
| 플래시 메모리 유형 | 메모리 스틱, 메모리 스틱 듀오 |
| 비디오 캡처 형식 | HD |
| 지원되는 오디오 형식 | Dolby Digital/AC-3 |
| 화면 크기 | 3.5 인치 |
| 연결 기술 | USB |
9. 지원 및 보증
9.1 추가 지원
For additional support, detailed guides, software updates, or to contact customer service, please visit the official Sony support website. You can also refer to the comprehensive PDF user manual available 여기.
9.2 보증 정보
Your Sony HXR-NX100 Camcorder is covered by a limited warranty. Please refer to the warranty card included in your product packaging for specific terms, conditions, and registration details. Keep your proof of purchase for warranty claims.