1. 서론
This manual provides essential instructions for the safe and efficient operation of your Sharp CD-DH950P 240W Mini-Component System. This system features a 5-disc CD changer, a cassette deck, an iPod/iPhone docking station, a USB host for digital audio playback, and an AM/FM tuner. Please read this manual thoroughly before using the system and retain it for future reference.
2. 안전 정보
- 전원: 지정된 용량의 AC 콘센트에만 기기를 연결하십시오.tage.
- 통풍: 충분한 환기를 유지하세요. 환기구를 막지 마세요.
- 물과 습기: 제품을 비, 습기 또는 액체가 떨어지거나 튀는 곳에 노출시키지 마십시오.
- 열: 장치를 라디에이터, 난방 조절기, 스토브 또는 열을 발생시키는 기타 장치와 같은 열원으로부터 멀리 두십시오.
- 청소: 청소하기 전에 벽면 콘센트에서 전원 플러그를 뽑으세요. 부드럽고 마른 천을 사용하세요.
- 서비스: 이 제품을 직접 수리하려고 하지 마십시오. 모든 서비스는 자격을 갖춘 서비스 담당자에게 문의하십시오.
3. 패키지 내용
패키지에 다음 품목이 포함되어 있는지 확인하십시오.
- Main Unit (CD-DH950P)
- 왼쪽 스피커
- 오른쪽 스피커
- 배터리를 사용한 원격 제어
- AM 루프 안테나
- FM 와이어 안테나
- 전원 코드
4. 설정
4.1 스피커 연결
Connect the speaker wires from the main unit to the corresponding terminals on the back of each speaker. Ensure correct polarity (red to red, black to black) for optimal sound quality. The left speaker connects to the left speaker output, and the right speaker to the right speaker output.
4.2 Connecting the Antennas
- FM 안테나: Connect the supplied FM wire antenna to the FM antenna terminal on the rear of the main unit. Extend the wire for better reception.
- AM 안테나: Connect the supplied AM loop antenna to the AM antenna terminals on the rear of the main unit. Position the antenna for best reception.
4.3 전원 연결
Plug the power cord into the AC IN jack on the rear of the main unit, then plug the other end into a standard AC wall outlet.
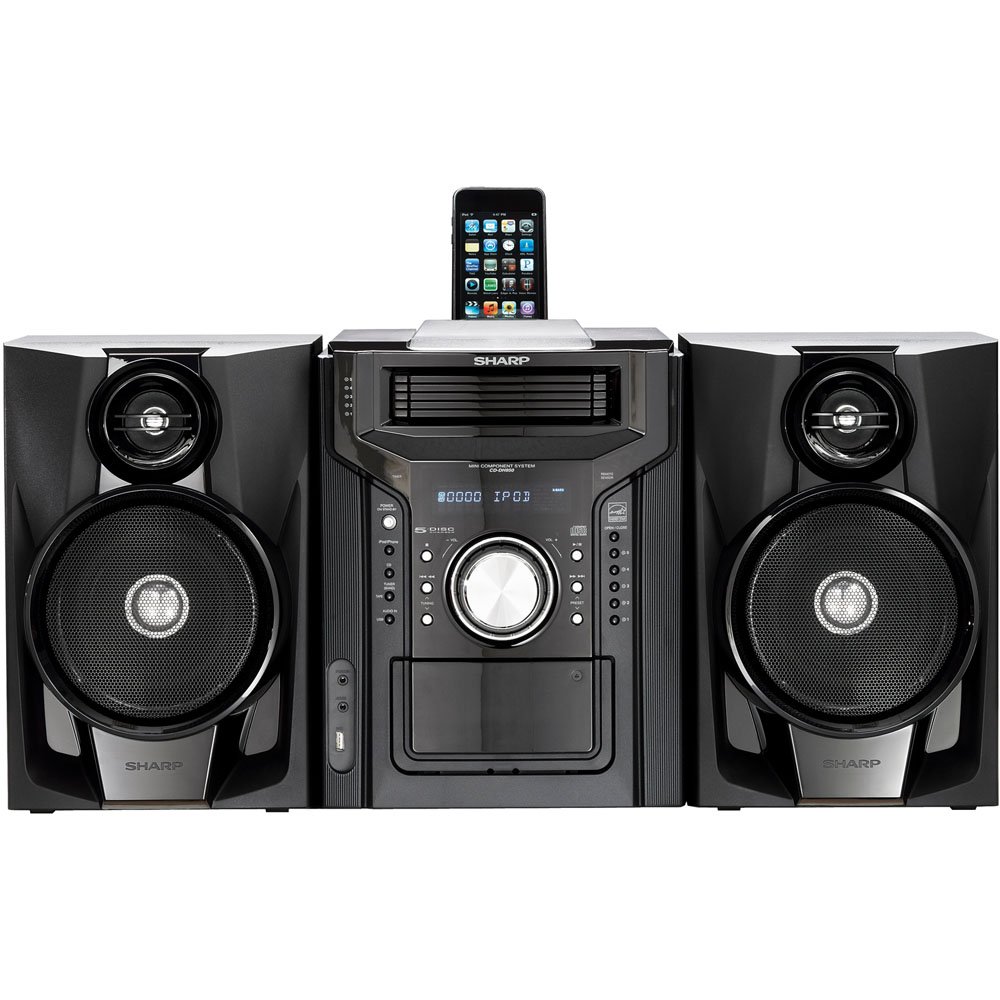
그림 4.3.1: 전체 view of the Sharp CD-DH950P Mini-Component System, showing the main unit flanked by two speakers, with an iPhone docked on top of the main unit.
5. 사용 설명서
5.1 전원 켜기/끄기 및 볼륨 제어
- 를 누르세요 힘 전면 패널이나 리모컨의 버튼을 눌러 장치를 켜거나 끕니다.
- 회전하다 용량 전면 패널의 손잡이를 사용하거나 볼륨 +/- 리모컨의 버튼을 눌러 사운드 레벨을 조절합니다.
5.2 CD 재생
This system features a 5-disc CD changer.
- 를 누르세요 열기/닫기 CD 트레이를 여는 버튼입니다.
- Place up to five CDs on the disc trays, label side up.
- 누르다 열기/닫기 다시 눌러 트레이를 닫습니다.
- 를 누르세요 CD CD 기능을 선택하려면 버튼을 클릭하세요.
- 를 누르세요 재생/일시정지 버튼을 눌러 재생을 시작합니다.
- 사용하세요 건너뛰다 buttons to navigate between tracks or discs.
5.3 카세트 데크 작동
- 를 누르세요 TAPE OPEN/CLOSE button to open the cassette deck.
- 카세트 테이프를 넣으세요.
- 를 누르세요 테이프 카세트 기능을 선택하려면 버튼을 누르세요.
- 누르다 놀다 재생을 시작합니다.
- To record, ensure the source is selected (e.g., CD, Tuner) and press the 기록 카세트 데크의 버튼.
5.4 iPod/iPhone 도킹
The system includes a top-mounted docking slot for compatible iPod and iPhone devices (30-pin connector).
- Carefully place your iPod or iPhone into the docking slot.
- The system will automatically switch to iPod/iPhone mode or you may need to press the iPod / iPhone 단추.
- Use the system's controls or your device's controls to play music. The device will also charge while docked.
5.5 USB Host Playback
Connect a USB storage device containing MP3 or WMA audio files to the USB port on the front panel.
- USB 장치를 USB 포트에 삽입합니다.
- 를 누르세요 USB button to select the USB function.
- Use the playback controls to navigate and play files.
5.6 AM/FM 튜너
- 를 누르세요 조율사 AM 또는 FM 라디오를 선택하는 버튼입니다.
- 사용하세요 튜닝 +/- 방송국을 수동으로 맞추는 버튼입니다.
- 자동 스캔을 하려면 버튼을 길게 누르세요. 튜닝 +/- 버튼.
- To store a preset, tune to the desired station, then press 메모리 followed by a preset number.
5.7 오디오 입력
Connect an external audio device (e.g., MP3 player, smartphone) to the AUDIO IN jack on the front panel using a 3.5mm stereo cable.
- Connect your device to the AUDIO IN jack.
- 를 누르세요 오디오 입력 이 소스를 선택하려면 버튼을 클릭하십시오.
- 연결된 기기에서 재생을 제어하세요.
6. 유지관리
6.1 장치 청소
부드럽고 마른 천으로 제품 외부를 닦으십시오. 연마성 세제, 왁스 또는 용제를 사용하지 마십시오. 청소하기 전에 제품의 전원을 반드시 뽑으십시오.
6.2 CD and Cassette Care
- Handle CDs by their edges to avoid fingerprints and scratches. Clean discs with a soft, lint-free cloth from the center outwards.
- Store cassette tapes away from strong magnetic fields and direct sunlight.
7. 문제 해결
| 문제 | 가능한 원인 | 해결책 |
|---|---|---|
| 전원이 없습니다 | 전원 코드가 연결되지 않았습니다. 전원 콘센트에 결함이 있습니다. | 전원 코드가 제대로 꽂혀 있는지 확인하십시오. 다른 콘센트에 꽂아 보십시오. |
| 소리가 나지 않습니다 | 볼륨이 너무 작습니다. 스피커가 연결되지 않았습니다. 잘못된 소스가 선택되었습니다. | 볼륨을 높이세요. 스피커 연결을 확인하세요. 올바른 입력 소스를 선택하세요. |
| CD가 재생되지 않습니다 | Disc inserted incorrectly; Disc is dirty or scratched | Insert disc correctly (label side up); Clean or replace disc |
| 라디오 수신 불량 | Antenna not positioned correctly; Weak signal | Adjust position of AM/FM antennas; Try auto-tuning or manual fine-tuning |
| iPod/iPhone not charging/playing | Device not properly docked; Device not compatible (e.g., newer connector) | Re-dock the device; Note that this system uses a 30-pin connector, newer devices may require an adapter (not included) |
8. 사양
- 상표: 날카로운
- 모델: CD-DH950P
- 총 출력 전력 : 240 Watts RMS (85W/ch FTC)
- 스피커 구성: 2.1채널
- 지원되는 오디오 형식: CD, MP3, WMA
- 신호 대 잡음비 : 100데시벨
- 호환 장치: MP3 Player, Smartphone (via 30-pin dock or USB/Audio In)
- 치수(길이 x 너비 x 높이): 27.6 x 13.6 x 13.5 인치
- 품목 무게: 24.4 파운드
- 한국어: 074000369863, 074000369290
9. 보증 정보
This product is covered by a 1-year limited warranty from the date of purchase. Please refer to the warranty card included with your product for full terms and conditions, or contact Sharp customer service for details.
10. 지원
For further assistance, technical support, or service inquiries, please contact Sharp customer service. Contact information can typically be found on the Sharp official web사이트 또는 제품과 함께 제공된 설명서를 참조하세요.