AAU FC-BP120
AAU Blood Pressure Monitor FC-BP120 User Manual
მოდელი: FC-BP120
1. შესავალი
This manual provides detailed instructions for the proper use and maintenance of your AAU Automatic Upper Arm Blood Pressure Monitor, model FC-BP120. Please read this manual thoroughly before using the device to ensure accurate measurements and safe operation. Keep this manual for future reference.

Image 1.1: The AAU Blood Pressure Monitor FC-BP120, showing the main unit and the adjustable arm cuff.
2. მნიშვნელოვანი უსაფრთხოების ინფორმაცია
Observe the following precautions to ensure safe and effective use:
- თუ გაქვთ რაიმე სამედიცინო მდგომარეობა, ამ მოწყობილობის გამოყენებამდე მიმართეთ ექიმს.
- არ გამოიყენოთ ეს მოწყობილობა ჩვილებზე, ბავშვებზე ან იმ პირებზე, რომლებსაც არ შეუძლიათ თანხმობის გამოხატვა.
- მოერიდეთ გაზომვების აღებას მოძრავ სატრანსპორტო საშუალებაში ან ფიზიკური აქტივობის დროს.
- Do not attempt to repair or modify the device yourself. Contact customer support for assistance.
- მოწყობილობა და მანჟეტი წყლისა და ექსტრემალური ტემპერატურისგან მოარიდეთ.
- This device is intended for home use and should not replace professional medical advice or treatment.
3. პაკეტის შიგთავსი
დარწმუნდით, რომ შეფუთვაში ყველა ნივთია:
- 1 x AAU Blood Pressure Monitor (Model FC-BP120)
- 1 x Adjustable Upper Arm Cuff (8.66-16.54 inches / 22-42 cm)
- 1 x USB Type-C კაბელი
- 1 x ინსტრუქციის სახელმძღვანელო
- 1 x სწრაფი დაწყების სახელმძღვანელო

Image 3.1: The complete package contents, including the monitor, cuff, USB cable, and manuals.
4. პროდუქტი დასრულდაview
4.1. Main Unit and Display
The monitor features a large LCD display and intuitive buttons for easy operation. The display provides clear readings of systolic pressure, diastolic pressure, pulse rate, and other indicators.

Image 4.1: Labeled diagram of the LCD display, indicating battery icon, user number, systolic pressure, diastolic pressure, pulse rate, time/date, cuff self-check icon, body motion detection icon, average icon, memory icon, and irregular heartbeat icon.
4.2. ღილაკები
- SET ღილაკი: Used to enter settings mode (e.g., date, time, user selection).
- START/STOP ღილაკი: Initiates and stops a measurement. Also used to power the device on/off.
- MEM ღილაკი: წვდომა აქვს შენახულ გაზომვის ჩანაწერებზე.
5. დაყენება
5.1. დენის წყარო
მონიტორის კვება შესაძლებელია როგორც AAA ტიპის ელემენტებით, ასევე Type-C USB კაბელით.
- ბატარეის დაყენება: Open the battery compartment cover on the back of the monitor. Insert four (4) AAA batteries, ensuring correct polarity (+/-). Close the cover securely.
- USB Type-C კვების წყარო: Connect the provided Type-C USB cable to the monitor's port and to a compatible USB power adapter (not included) or a computer USB port.
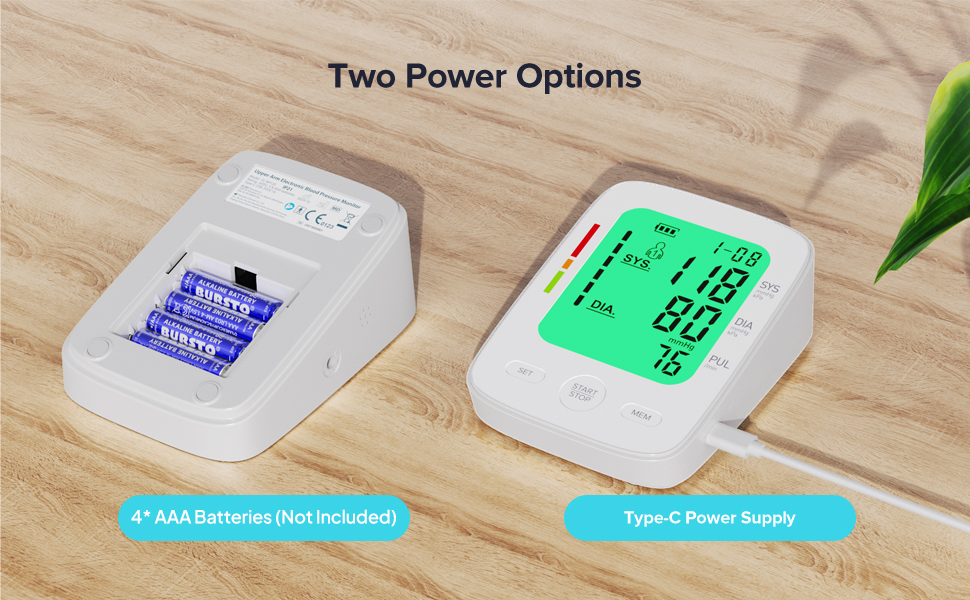
Image 5.1: Illustration of the two power options: inserting 4 AAA batteries into the compartment or connecting via a Type-C USB cable.
5.2. მანჟეტის შეერთება
Insert the air plug of the cuff firmly into the air jack on the side of the monitor.
6. საოპერაციო ინსტრუქციები
6.1. მომზადება გაზომვისთვის
For accurate readings, follow these steps before taking a measurement:
- იჯექით კომფორტულად, ზურგზე მხარდაჭერილი და ფეხები იატაკზე დადებული.
- ხელი მაგიდაზე დააწყვეთ ისე, რომ მანჟეტი გულის დონეზე იყოს.
- Ensure the cuff is placed directly on your bare upper arm, 1-2 cm above the elbow joint. The air tube should run down the center of your arm.
- Relax for 5 minutes before measuring. Avoid talking or moving during the measurement.
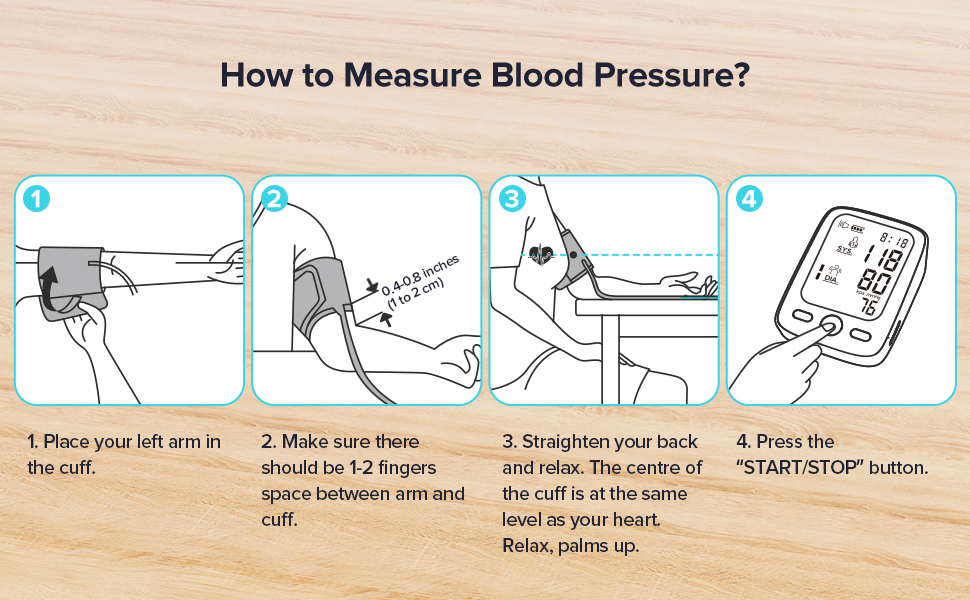
Image 6.1: A visual guide demonstrating the four key steps for proper blood pressure measurement: cuff placement, finger space, arm position, and pressing the start button.
6.2. გაზომვის ჩატარება
With the cuff correctly positioned and the device powered on:
- დააჭირეთ START/STOP ღილაკი. მანჟეტი ავტომატურად გაიბერება.
- Remain still and silent during inflation and deflation.
- Once the measurement is complete, the results (Systolic, Diastolic, Pulse) will be displayed on the screen.
- The device will automatically shut off after 2 minutes of inactivity to conserve power.
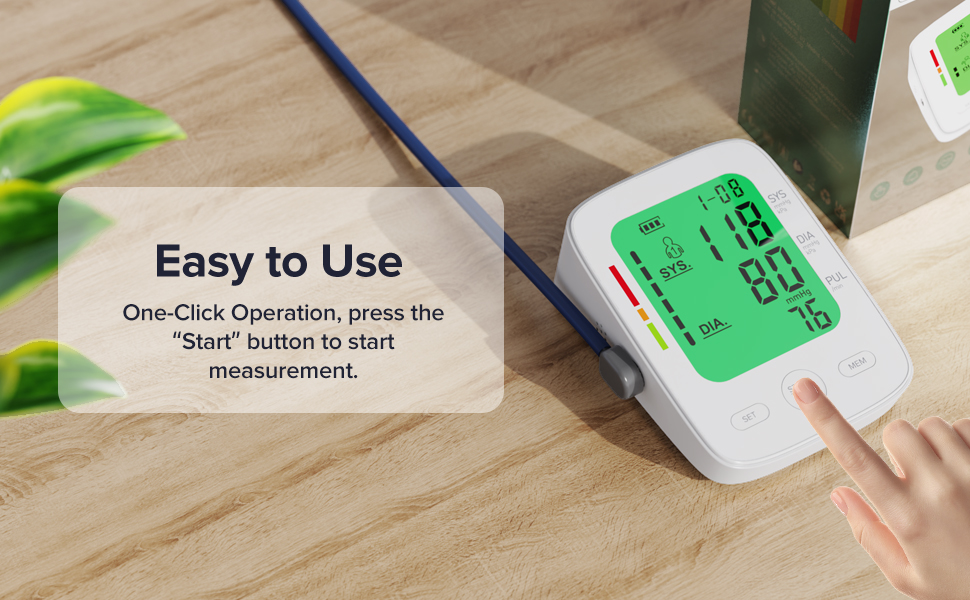
Image 6.2: A hand initiating a measurement by pressing the START/STOP button on the monitor.
6.3. Understanding Your Results
The monitor displays Systolic (SYS), Diastolic (DIA), and Pulse (PUL) readings. It also features a 3-color backlight display to help interpret blood pressure levels:
- მწვანე: Indicates blood pressure within the normal range.
- ნარინჯისფერი: Indicates elevated or pre-hypertensive blood pressure.
- წითელი: Indicates high blood pressure (hypertension).
An irregular heartbeat icon will appear if an irregular pulse is detected during measurement.
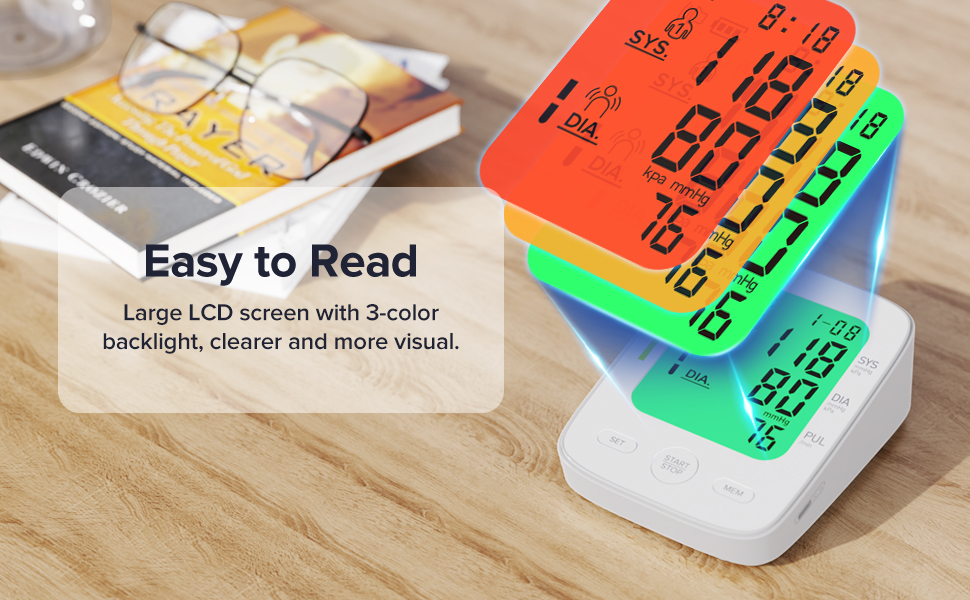
Image 6.3: The monitor's display with a visual guide explaining the 3-color backlight system for blood pressure interpretation (Green for normal, Orange for elevated, Red for high).
6.4. Dual User Mode and Memory Function
The device supports two users, each with 99 memory sets, allowing for tracking of individual blood pressure trends.
- მომხმარებლის შერჩევა: ლოდინის რეჟიმში დააჭირეთ ღილაკს SET button to toggle between User 1 and User 2.
- Viewing Memory: დააჭირეთ MEM ღილაკი view stored readings. Repeatedly press MEM to scroll through records.
- Average Function: The monitor can display the average of the last three measurements.

Image 6.4: An illustration of the dual-user mode, showing separate measurement records for User 1 and User 2.
7. მოვლა
7.1. დასუფთავება
მონიტორი და მანჟეტი რბილი, მშრალი ქსოვილით გაწმინდეთ. საჭიროების შემთხვევაში, გამოიყენეთ ოდნავ მშრალიamp ნაჭერი რბილი საპნით გაწმინდეთ და შემდეგ გაამშრალეთ. არ გამოიყენოთ აბრაზიული საწმენდები და არ ჩაყოთ მოწყობილობა წყალში.
7.2. შენახვა
Store the device in a clean, dry place, away from direct sunlight, extreme temperatures, and humidity. If not in use for an extended period, remove the batteries.
8. Დიაგნოსტიკა
| პრობლემა | შესაძლო მიზეზი | გამოსავალი |
|---|---|---|
| No power/Display blank | Batteries are dead or incorrectly inserted; USB cable not connected. | შეცვალეთ ელემენტები ახლით, დარწმუნდით, რომ სწორი პოლარობაა. შეამოწმეთ USB კაბელის შეერთება. |
| "Err" or "E" displayed | Cuff not applied correctly; excessive movement during measurement; air leakage. | Reapply cuff correctly. Remain still and silent. Check cuff and tube for damage. |
| არაზუსტი წაკითხვები | Incorrect posture; talking during measurement; cuff size incorrect. | Ensure proper posture and silence. Verify cuff fits arm circumference (8.66-16.54 inches). |
| მანჟეტი არ იბერება | Air plug not fully inserted; cuff or tube damaged. | Ensure air plug is securely connected. Check for visible damage to cuff or tube. |
9. სპეციფიკაციები
- მოდელის სახელი: FC-BP120
- პროდუქტის ზომები: 5.5" სიგრძე x 3.5" სიგანე x 2.7" სიგანე
- ნივთის წონა: 0.9 ფუნტი (დაახლოებით 14.4 უნცია)
- მანჟეტის ზომა: Adjustable, 8.66-16.54 inches (22-42 cm)
- დენის წყარო: 4* AAA Batteries (not included) or Type-C Power Supply
- ჩვენების ტიპი: ციფრული LCD
- მეხსიერება: 2 users x 99 sets of readings
- გაზომვის მეთოდი: ოსცილომეტრიული
- მწარმოებელი: Shenzhen Finicare Co., Ltd.
10. გარანტია და მომხმარებელთა მხარდაჭერა
AAU provides professional customer service. If you have any questions or require assistance with your FC-BP120 Blood Pressure Monitor, please contact our customer support team. Refer to the contact information provided in your quick start guide or product packaging for details.
Ask a question about this manual
Ask about setup, troubleshooting, compatibility, parts, safety, or missing instructions. Manuals+ will review the question and use this page’s manual context to help answer it.