შესავალი
This manual provides essential information for setting up, operating, maintaining, and troubleshooting your Lenovo Tab M11 tablet. Please read this guide thoroughly to ensure optimal performance and longevity of your device.
1. დაყენება
1.1 ყუთის გახსნა და შეფუთვის შიგთავსი
Carefully unpack your Lenovo Tab M11. The standard package includes:
- Lenovo Tab M11 პლანშეტი
- Lenovo Tab Pen
- ფოლიოს საქმე
- 256 GB SD ბარათი (წინასწარ დაინსტალირებული ან ცალკე)
- USB-C დამტენი კაბელი
- კვების ადაპტერი (შეიძლება განსხვავდებოდეს რეგიონის მიხედვით)
- სწრაფი დაწყების სახელმძღვანელო და უსაფრთხოების ინფორმაცია
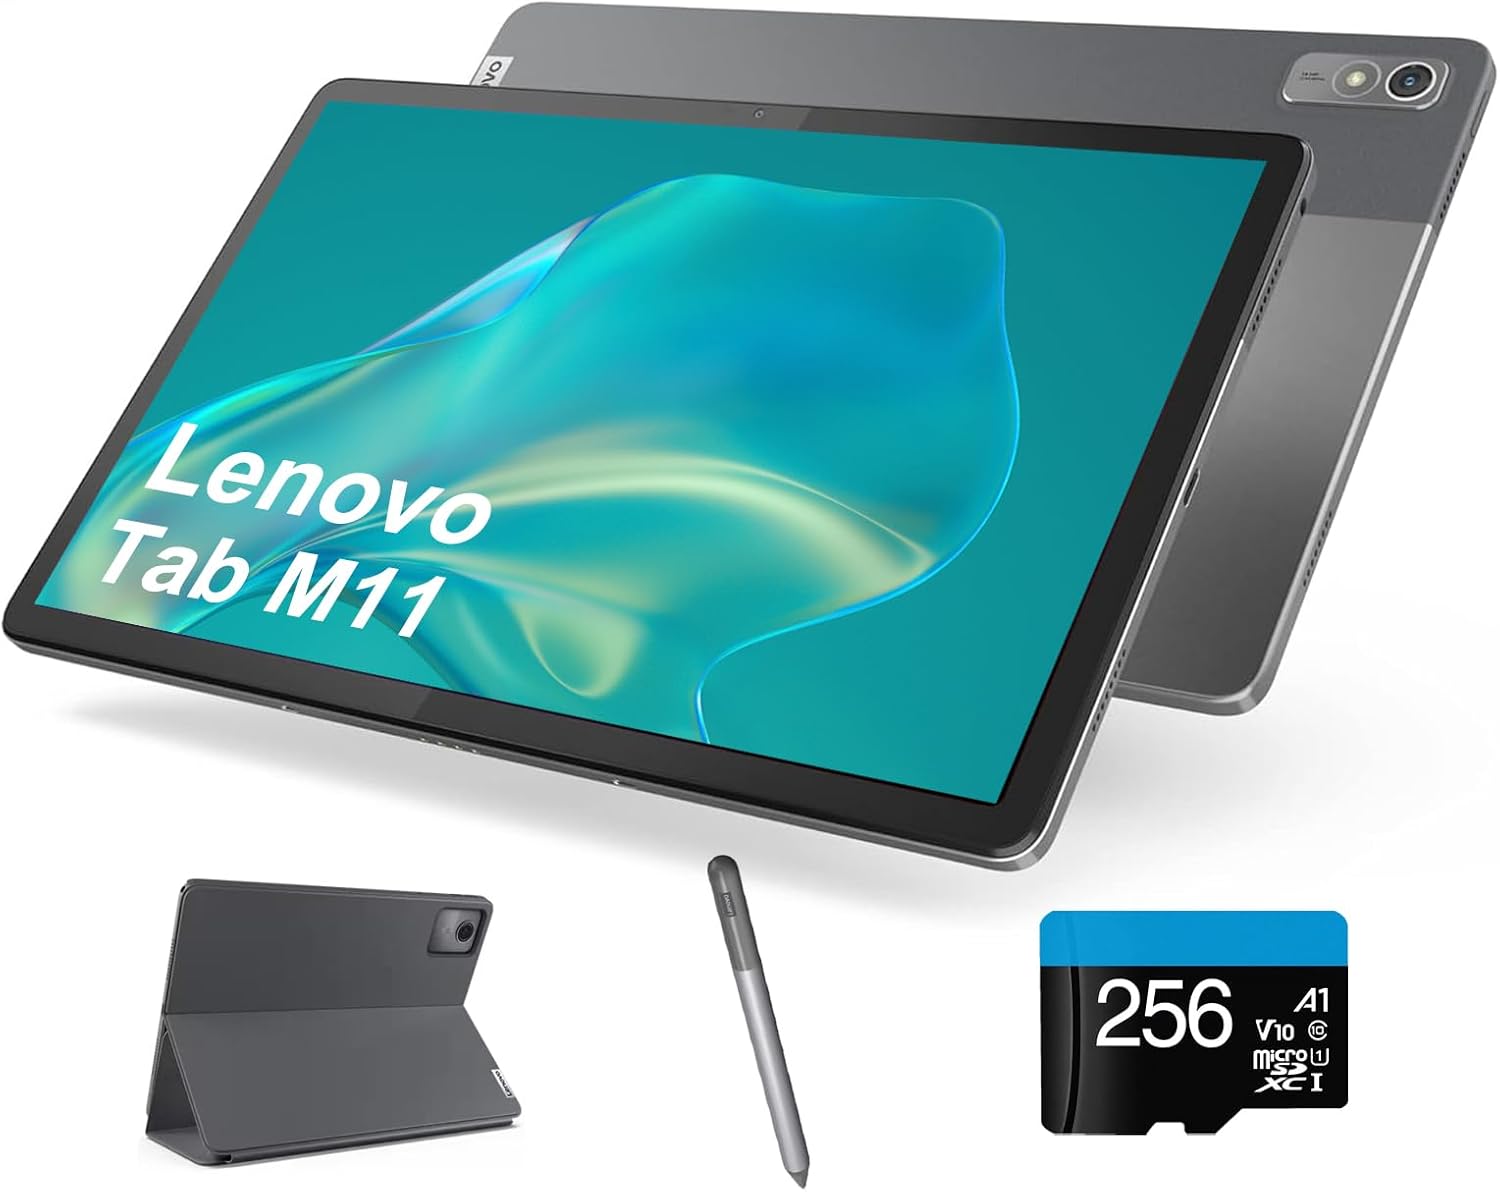
Image: The Lenovo Tab M11 tablet displayed with its bundled accessories, including the Lenovo Tab Pen, a protective folio case, and a 256GB microSD card, illustrating the complete package contents.
1.2 პლანშეტის დატენვა
Before first use, fully charge the tablet. Connect the USB-C cable to the tablet's USB-C port and the other end to the power adapter. Plug the adapter into a wall outlet. The battery indicator on the screen will show charging status.
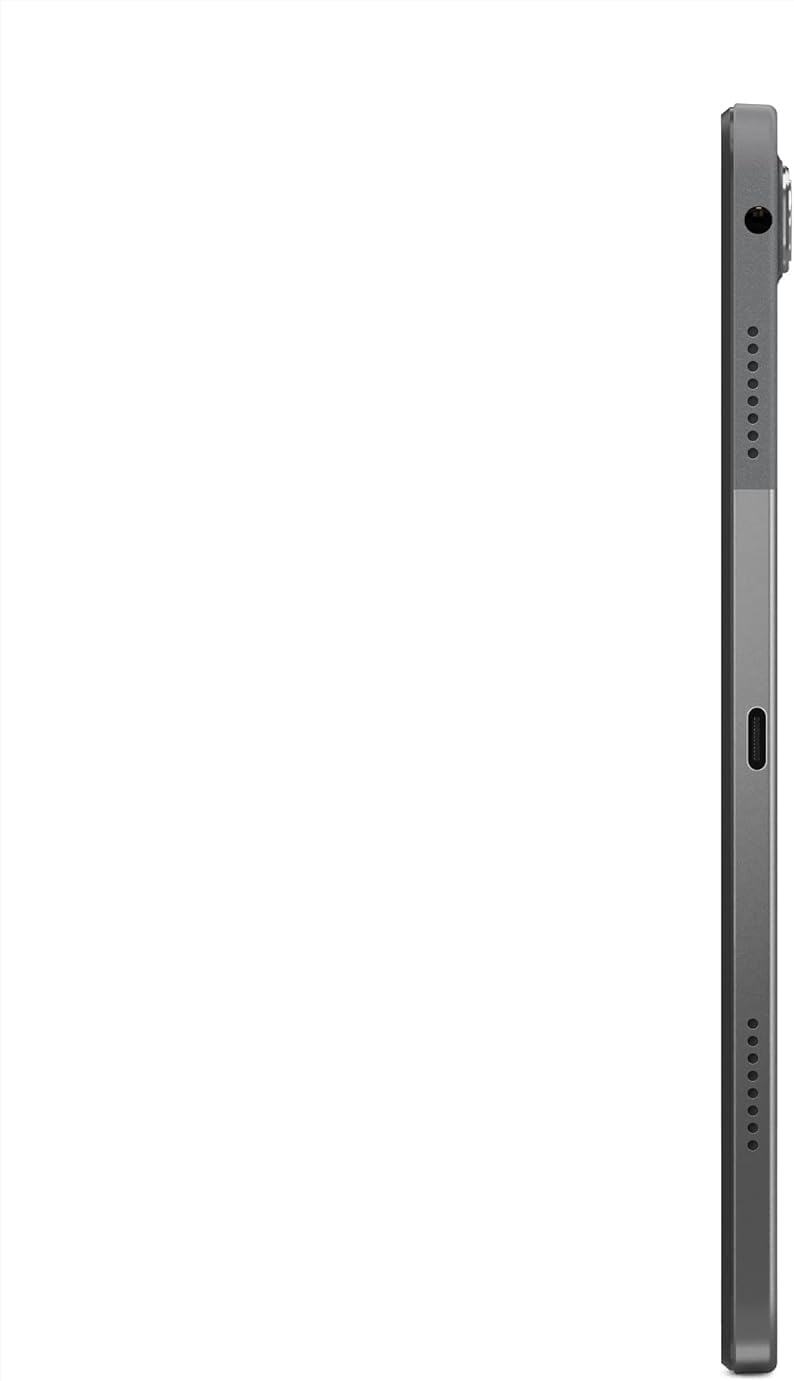
სურათი: დეტალური გვერდი view of the Lenovo Tab M11, highlighting the USB-C port for charging and data transfer, along with volume buttons and the power button.
1.3 ჩართვა/გამორთვა
- ჩართვა: ხანგრძლივად დააჭირეთ ჩართვის ღილაკს, სანამ არ გამოჩნდება Lenovo-ს ლოგო.
- გამორთვა: დააჭირეთ და გააჩერეთ ჩართვის ღილაკი, შემდეგ ეკრანზე არსებული ვარიანტებიდან აირჩიეთ „გამორთვა“.
- გადატვირთვა: დააჭირეთ და გეჭიროთ ჩართვის ღილაკი, შემდეგ კი პარამეტრებიდან აირჩიეთ „გადატვირთვა“.
1.4 საწყისი დაყენება
პირველი ჩართვისას, მიჰყევით ეკრანზე მოცემულ მითითებებს:
- აირჩიეთ თქვენი ენა და რეგიონი.
- დაუკავშირდით Wi-Fi ქსელს.
- შედით თქვენი Google ანგარიშით ან შექმენით ახალი.
- ეკრანის დაბლოკვის დაყენება (PIN კოდი, ნიმუში, პაროლი).
- Review და დაეთანხმეთ წესებსა და პირობებს.
1.5 MicroSD ბარათის ჩასმა
The Lenovo Tab M11 supports expandable storage via a MicroSD card. Locate the card slot on the side of the tablet. Use the provided SIM ejector tool (if applicable) or a paperclip to open the tray. Insert the MicroSD card into the designated slot, ensuring correct orientation, then close the tray securely.
1.6 Lenovo Tab Pen-ის გამოყენება
The included Lenovo Tab Pen allows for precise input and creative tasks. No pairing is typically required; the pen is ready to use with the tablet's touchscreen. Use it for writing, drawing, or navigating the interface.
1.7 ფოლიოს ქეისის მიმაგრება
The folio case provides protection and can act as a stand. Align the tablet with the case and gently press it into place. The case typically has magnetic closures and can be folded to prop up the tablet for viewინგ.

Image: The Lenovo Tab M11 tablet securely placed within its folio case, positioned to stand upright, with the Lenovo Tab Pen visible in the foreground, demonstrating its use as a protective cover and stand.
2. საოპერაციო ინსტრუქციები
2.1 ძირითადი ნავიგაცია
- შეხება: აპლიკაციის გასახსნელად ან ელემენტის ასარჩევად შეეხეთ ხატულას.
- დარტყმა: ეკრანებს შორის გადასახვევად ან გადასართავად გადაიტანეთ თითი ეკრანზე.
- მასშტაბირება თითებით: მოათავსეთ ორი თითი ეკრანზე და გადაანაწილეთ ისინი ერთმანეთს ან შეაერთეთ მასშტაბის გასაზრდელად ან დასაპატარავებლად.
- გრძელი პრესა: დამატებითი ვარიანტებისთვის დააჭირეთ და გააჩერეთ ერთეულზე.
2.2 ეკრანის პარამეტრები
Access display settings by swiping down from the top of the screen and tapping the settings icon, then navigating to "Display". Here you can adjust:
- სიკაშკაშე: Manually adjust or enable Adaptive brightness.
- განახლების სიჩქარე: The 90Hz refresh rate provides smoother visuals.
- ეკრანის დროის ამოწურვა: Set how long the screen stays active before turning off.
- შრიფტის ზომა და ეკრანის ზომა: Customize text and element scaling.

სურათი: გამჭვირვალე წინა მხარე view Lenovo Tab M11-ის ჩვენებაasing its 11-inch WUXGA (1920x1200) IPS display with vibrant colors, demonstrating the tablet's visual clarity.
2.3 Audio and Dolby Atmos
The tablet features four speakers with Dolby Atmos technology for an enhanced audio experience. Adjust volume using the physical volume buttons on the side or through the quick settings panel. Dolby Atmos settings can be configured in the Sound & Vibration section of the tablet's settings.

Image: The rear panel of the Lenovo Tab M11, featuring the prominent Dolby Atmos logo, indicating its advanced audio capabilities, alongside the integrated camera module.
2.4 კამერის გამოყენება
The Lenovo Tab M11 is equipped with an 8.0MP front camera and an 8.0MP rear camera. Open the Camera app to take photos or record videos. Tap the camera icon to switch between front and rear cameras. Various modes and settings are available within the app.

Image: The back of the Lenovo Tab M11 tablet, showcasing its sleek design and the placement of the rear 8.0MP camera module, along with the Lenovo brand logo.
2.5 დაკავშირება
- Wi-Fi: Connect to wireless networks via Settings > Network & internet > Wi-Fi. Supports 2.4GHz and 5GHz (802.11 a/b/g/n/ac).
- Bluetooth: Pair with Bluetooth devices like headphones or speakers via Settings > Connected devices > Bluetooth. Supports Bluetooth 5.1.
2.6 პორტები
- USB-C 2.0: Used for charging, data transfer, and connecting USB-C digital headsets.
- 3.5 მმ ყურსასმენის ჯეკი: For connecting wired headphones or external audio devices.
- ბარათის სლოტი: For MicroSD card expansion.
2.7 Android 13 ოპერაციული სისტემა
Your Lenovo Tab M11 runs on Android 13. This version offers enhanced privacy controls, improved notification management, and personalized themes. Lenovo anticipates providing two major OS upgrades, up to Android 15, ensuring your device stays updated with the latest features and security patches.
3. მოვლა
3.1 მოწყობილობის გაწმენდა
To clean your tablet, power it off and disconnect all cables. Use a soft, lint-free cloth slightly dampened with water or a screen cleaner. Avoid harsh chemicals, abrasive materials, or excessive moisture. Do not spray cleaners directly onto the screen.
3.2 ბატარეის მოვლა
- მოერიდეთ ექსტრემალურ ტემპერატურას, რამაც შეიძლება ბატარეის ხანგრძლივობა შეამციროს.
- არ დაუშვათ ბატარეის სრულად დაცლა ხშირად.
- გამოიყენეთ მხოლოდ მოწოდებული ან სერტიფიცირებული დამტენი აქსესუარები.
- If storing the tablet for an extended period, charge it to about 50-60% first.
3.3 პროგრამული უზრუნველყოფის განახლებები
Regularly check for and install software updates to ensure your tablet has the latest features, security patches, and performance improvements. Go to Settings > System > System update to check for available updates.
3.4 შენახვის მართვა
ოპტიმალური მუშაობის შესანარჩუნებლად, პერიოდულად მართეთ თქვენი ტაბლეტის მეხსიერება. წაშალეთ არასაჭირო ინფორმაცია. files, გამოუყენებელი აპლიკაციების დეინსტალაცია და დიდი მედიის გადატანა files to the MicroSD card or cloud storage. You can check storage usage in Settings > Storage.
4. Დიაგნოსტიკა
4.1 საერთო საკითხები და გადაწყვეტილებები
- პლანშეტი არ ირთვება: დარწმუნდით, რომ აკუმულატორი დატენილია. შეაერთეთ დამტენთან მინიმუმ 30 წუთის განმავლობაში, შემდეგ სცადეთ ხელახლა ჩართვა.
- ეკრანი არ რეაგირებს: Restart the tablet by holding the power button for about 10-15 seconds until it reboots.
- Wi-Fi კავშირის პრობლემები:
- Wi-Fi-ს ჩართვა და გამორთვა.
- გადატვირთეთ თქვენი Wi-Fi როუტერი.
- დაივიწყეთ ქსელი და ხელახლა დაუკავშირდით.
- ნელი შესრულება:
- დახურეთ გამოუყენებელი აპები.
- Clear app caches (Settings > Apps > [App Name] > Storage & cache > Clear cache).
- გაათავისუფლეთ შენახვის ადგილი.
- გადატვირთეთ ტაბლეტი.
- აპლიკაციების გაჭედვა:
- დარწმუნდით, რომ აპლიკაცია განახლებულია უახლეს ვერსიაზე.
- Clear the app's cache and data.
- ხელახლა დააინსტალირეთ აპლიკაცია.
4.2 ქარხნული პარამეტრების გადატვირთვა
If persistent issues occur and other troubleshooting steps fail, a factory reset may be necessary. გაფრთხილება: ეს წაშლის თქვენს ტაბლეტზე არსებულ ყველა მონაცემს. გაგრძელებამდე შექმენით მნიშვნელოვანი მონაცემების სარეზერვო ასლი.
- გადადით პარამეტრებში > სისტემაში > პარამეტრების გადატვირთვაზე.
- აირჩიეთ "ყველა მონაცემის წაშლა (ქარხნული პარამეტრების გადატვირთვა)".
- Confirm your decision. The tablet will restart and restore to its original factory settings.
5. სპეციფიკაციები
| ფუნქცია | დეტალი |
|---|---|
| მოდელი | Lenovo Tab M11 |
| ჩვენება | 11" WUXGA (1920 x 1200) IPS, anti-fingerprint, touchscreen, 400 nits, 90Hz refresh rate |
| პროცესორი | MediaTek Helio G88 Octa-Core (2x A75 @2.00 GHz + 6x A55 @1.80 GHz) |
| ოპერატიული მეხსიერება | 4 GB LPDDR4X |
| შიდა საცავი | 128 GB SSD |
| გაფართოებადი საცავი | MicroSD card slot (256GB SD Card included) |
| ბატარეა | 7040 mAh, Up to 10 hours battery life |
| აუდიო | 4 x speakers with Dolby Atmos |
| კამერები | წინა 8.0MP / უკანა 8.0MP |
| WLAN | WiFi 2.4Ghz / 5Hz (802.11 a/b/g/n/ac) |
| Bluetooth | Bluetooth 5.1 |
| პორტები | 1x USB-C 2.0, 1x 3.5mm headphone jack, 1x Card slot |
| ოპერაციული სისტემა | Android 13 (expect 2 OS upgrades until Android 15) |
| ფერი | არქტიკული რუხი |
| ზომები (LxWxH) | 10.04" x 6.54" x 0.28" |
| წონა | 1.02 ფუნტი |
6. ინფორმაცია გარანტიის შესახებ
Your Lenovo Tab M11 is covered by a manufacturer's warranty. The specific terms and duration of the warranty may vary by region and point of purchase. Please refer to the warranty card included in your product packaging or visit the official Lenovo support webსაიტი გარანტიის შესახებ დეტალური ინფორმაციისთვის.
შეინახეთ შეძენის დამადასტურებელი საბუთი საგარანტიო პრეტენზიებისთვის.
7. მხარდაჭერა
For further assistance, technical support, or to download updated drivers and manuals, please visit the official Lenovo Support webსაიტი:
You can also contact Lenovo customer service through the contact information provided on their webსაიტი.