
1. შესავალი
Thank you for choosing the VEVOR Simulator Cockpit. This manual provides essential information for the safe assembly, operation, and maintenance of your racing simulator. Please read these instructions thoroughly before use and retain them for future reference.

Image 1.1: The VEVOR Simulator Cockpit, designed for an immersive racing experience.
2. უსაფრთხოების ინსტრუქციები
უსაფრთხო მუშაობისა და ტრავმების ან დაზიანების თავიდან ასაცილებლად, გთხოვთ, დაიცვათ შემდეგი უსაფრთხოების ზომები:
- Always assemble the cockpit on a flat, stable surface.
- Ensure all bolts and fasteners are securely tightened before use. Regularly check for loose connections.
- არ გადააჭარბოთ მაქსიმალურ დასაშვებ წონას 200 კგ-ს (440 ფუნტი).
- რეგულირების დროს ხელები და თითები მოძრავ ნაწილებს მოარიდეთ.
- This product is intended for gaming use only. Do not use it for any other purpose.
- შეინახეთ პატარა ნაწილები ბავშვებისგან შორს, რათა თავიდან აიცილოთ დახრჩობის საფრთხე.
- If any part is damaged or missing, do not attempt to assemble or use the product. Contact customer support.
3. პაკეტის შიგთავსი
აწყობის დაწყებამდე დარწმუნდით, რომ ყველა კომპონენტი ადგილზეა. შეფუთვაში უნდა შედიოდეს:
- 1 x Racing Seat
- 1 x Metal Frame (multiple sections)
- All necessary assembly hardware (bolts, washers, wrenches, foot pads)

სურათი 3.1: დასრულდაview of the main components and assembly hardware.
4. დაყენების ინსტრუქციები
Follow these steps carefully for proper assembly of your VEVOR Simulator Cockpit. For visual guidance, please refer to the installation video below.
- Install the Foot Pads: Attach the adjustable foot pads to the base frame sections.
- Assemble Connection Rods: Connect the main frame sections using the provided connection rods and fasteners.
- Assemble Extension Rods: Insert and secure the extension rods into the main frame to adjust the overall length.
- ბაზის შეკრება: Secure the base frame components together, ensuring all connections are firm.
- პედლების მონტაჟი: Attach the adjustable pedal plate to the front section of the frame. Ensure it is securely fastened and the angle can be adjusted.
- საყრდენი ღეროების დაყენება: Attach the support rods for the wheel stand to both sides of the main frame.
- Anchor the Table Board: Secure the wheel mounting plate (table board) to the top of the support rods.
- Install Fixing Plate on Chair: Attach the fixing plate to the bottom of the racing seat using the provided hardware.
- Anchor the Chair: Place the assembled racing seat onto the main frame and secure it using the designated anchor points.
- სახელურის მონტაჟი: Assemble the shifter mount handle components.
- სახელურის გასწორება: Attach the assembled shifter mount handle to either the left or right side of the cockpit frame, according to your preference.

Image 4.1: Optional shifter mounting positions for left or right-handed users.
ინსტალაციის ვიდეო ინსტრუქცია:
Video 4.2: This video provides a step-by-step visual guide on how to assemble the VEVOR Racing Wheel Stand, demonstrating each stagინსტალაციის პროცესის ე.
5. საოპერაციო ინსტრუქციები
The VEVOR Simulator Cockpit is designed for adjustability to accommodate various user heights and preferences. Utilize the adjustment points to find your optimal racing position.
- სავარძლების რეგულირება: The racing seat can slide forward and backward, and its recline angle is adjustable from 0 to 135 degrees. Use the levers located beneath the seat to adjust its position.
- Wheel Mount Adjustment: The steering wheel mount can be adjusted for height (up/down) to suit your arm length and preferred wheel position. Loosen the knobs on the vertical supports, adjust, and re-tighten.
- Pedal Mount Adjustment: The pedal plate angle can be adjusted from 10 to 40 degrees to provide comfortable foot placement. Loosen the fasteners, set the desired angle, and re-secure.

Image 5.1: Visual representation of the cockpit's adjustable components.
6. მოვლა
Regular maintenance helps prolong the life and performance of your simulator cockpit.
- დასუფთავება: გაწმინდეთ კადრი რეკლამითamp cloth. For the synthetic leather seat, use a mild soap solution and a soft cloth, then dry thoroughly. Avoid harsh chemicals.
- შესაკრავის შემოწმება: Periodically inspect all bolts, nuts, and adjustment knobs to ensure they are tight. Re-tighten as necessary.
- შენახვა: When not in use for extended periods, store the cockpit in a dry, cool place away from direct sunlight. The foldable design allows for easier storage.
7. Დიაგნოსტიკა
ეს განყოფილება განიხილავს გავრცელებულ პრობლემებს, რომლებსაც შეიძლება წააწყდეთ.
| პრობლემა | შესაძლო მიზეზი | გამოსავალი |
|---|---|---|
| Cockpit feels unstable or wobbly. | ფხვიერი შესაკრავები; არათანაბარი იატაკი. | Check and tighten all bolts and nuts. Adjust the foot pads to level the cockpit on uneven surfaces. |
| Difficulty adjusting seat/wheel/pedal. | Adjustment knobs/levers are too tight or stiff. | Loosen adjustment mechanisms sufficiently before attempting to move components. Apply a small amount of lubricant if stiffness persists. |
| ნაწილების ნაკლებობა აწყობის დროს. | შეფუთვის შეცდომა ან დაკარგვა გახსნის დროს. | Carefully check all packaging materials. If parts are genuinely missing, contact VEVOR customer support with your purchase details. |
8. სპეციფიკაციები
Key technical specifications for the VEVOR Simulator Cockpit:
- მასალა: Carbon Steel Frame, Synthetic Leather Seat
- ფერი: შავი
- დატვირთვის მოცულობა: 200 კგ (440 ფუნტი)
- Supported Height: 120 cm (47 inches) to 210 cm (82.6 inches)
- სავარძლების რეგულირება: Slides forward & back, recline 0-135 degrees
- Wheel Mount Adjustment: Height adjustable (24-27 inches)
- Pedal Mount Adjustment: Angle adjustable (10-40 degrees)
- საერთო ზომები (LxWxH): 147.3 სმ x 49.5 სმ x 101.6 სმ (58" x 19.5" x 40")
- წმინდა წონა: 30 კგ (66 ფუნტი)
- თავსებადობა: Logitech G25, G27, G29, G920; Thrustmaster T500RS, T300RS, TX Ferrari 458; Fanatec Porsche and CSR wheels, Clubsport pedals, CSR elite pedals.
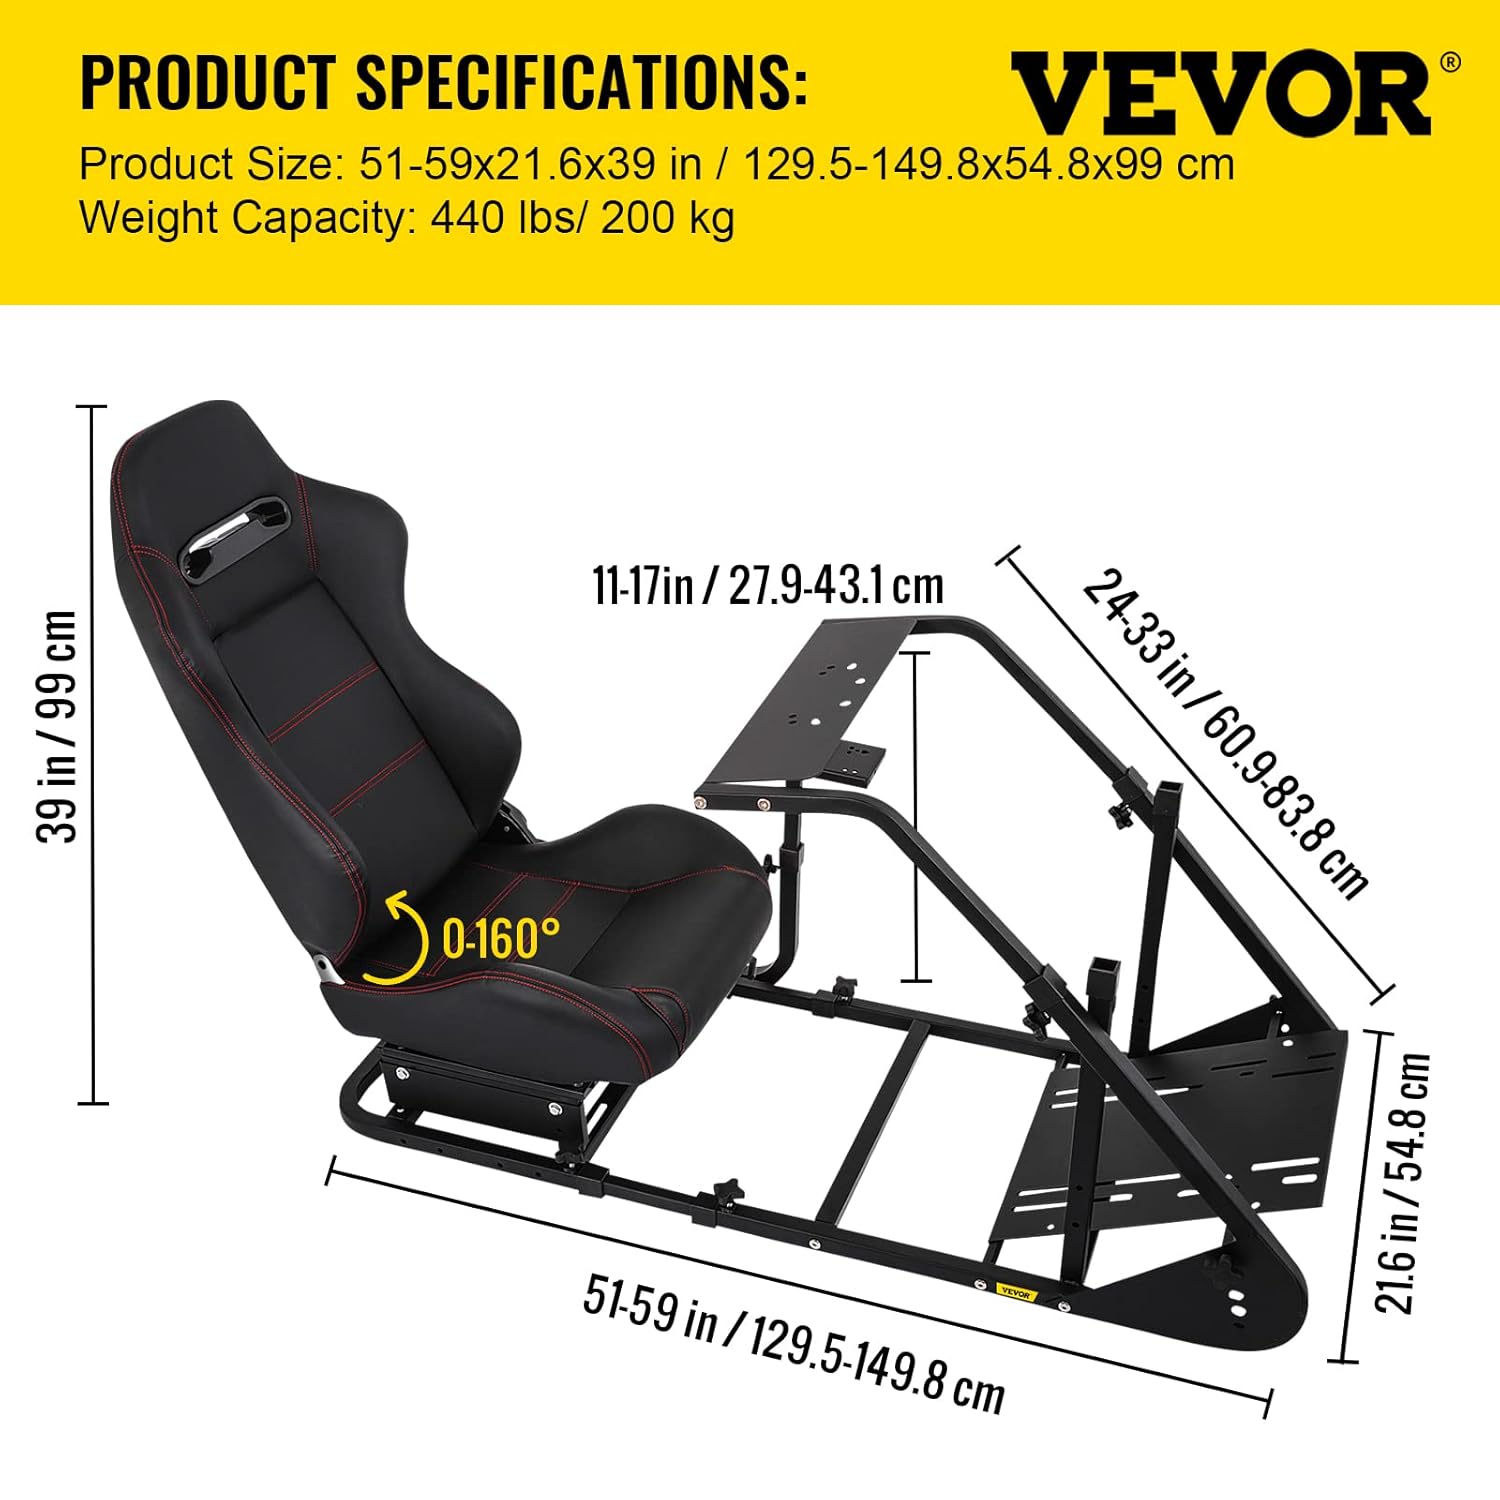
სურათი 8.1: პროდუქტის დეტალური ზომები და სპეციფიკაციები.
9. გარანტია და მხარდაჭერა
VEVOR-ის პროდუქცია შექმნილია გამძლეობისა და მუშაობისთვის. კონკრეტული გარანტიის შესახებ ინფორმაციისთვის, გთხოვთ, იხილოთ თქვენს პროდუქტთან ერთად მოწოდებული გარანტიის ბარათი ან ეწვიოთ VEVOR-ის ოფიციალურ ვებგვერდს. website. If you encounter any issues or require technical assistance, please contact VEVOR customer support through their official channels. Have your product model number (B07LCKHC2X) and purchase date ready.