アトムスタックR8
ATOMSTACK R8 レーザーロータリーチャック彫刻機 ユーザーマニュアル
モデル: R8
ブランド: ATOMSTACK
1.製品オーバーview
The ATOMSTACK R8 Laser Rotary Chuck Engraver is a versatile accessory designed to expand the engraving capabilities of compatible laser engravers, particularly for irregular and cylindrical objects. It provides precise rotation and stability, enabling high-quality engraving on a variety of shapes that standard flatbed engravers cannot accommodate.

Figure 1.1: ATOMSTACK R8 Laser Rotary Chuck Engraver and included components.
主な特徴:
- Ideal for Irregular Cylinder Engraving: Designed for objects like balls, rings, spherical items, and cups with handles, offering up to 180° angle adjustment and 360° rotation.
- Precision & High-Speed: Features a high-torque motor for speeds up to 10000mm/Min and 0.1mm accuracy. The high-hardness brass claw ensures durability and stability.
- No Installation Required & Easy to Operate: Upgraded high-strength aluminum alloy structure allows for immediate use. Tool-free adjustment of roller distance.
- 互換性: Suitable for ATOMSTACK P1 K2 Laser Engraver and compatible with popular software such as LaserGRBL and LightBurn.
- 付属品: Comes with four 100mm raised footpads for use with compatible engravers like the ATOMSTACK P1 K2.
2.セットアップガイド
This section outlines the steps to set up your ATOMSTACK R8 Laser Rotary Chuck Engraver with a compatible laser engraving machine.
2.1 開梱と初期検査
Carefully remove all components from the packaging. Verify that all parts listed in the product manual are present and undamaged. If any parts are missing or damaged, contact customer support immediately.
2.2 Connecting the R8 to Your Engraver
- 配置: Position the R8 rotary chuck on a stable, level surface.
- Engraver Height Adjustment: If using with an ATOMSTACK P1 K2 Engraver, utilize the four included 100mm raised footpads to elevate the engraving machine. This ensures proper clearance and alignment with the R8 rotary chuck.
- Y-axis Terminal Connection: Connect the R8 rotary chuck to your engraving machine by replacing the Y-axis terminal. This allows the engraver to control the rotation of the R8.
- USB接続: Connect the R8 to your computer via USB. Upon connection, the system should automatically enter roller processing mode.

Figure 2.1: USB connection and software interface for roller processing mode.
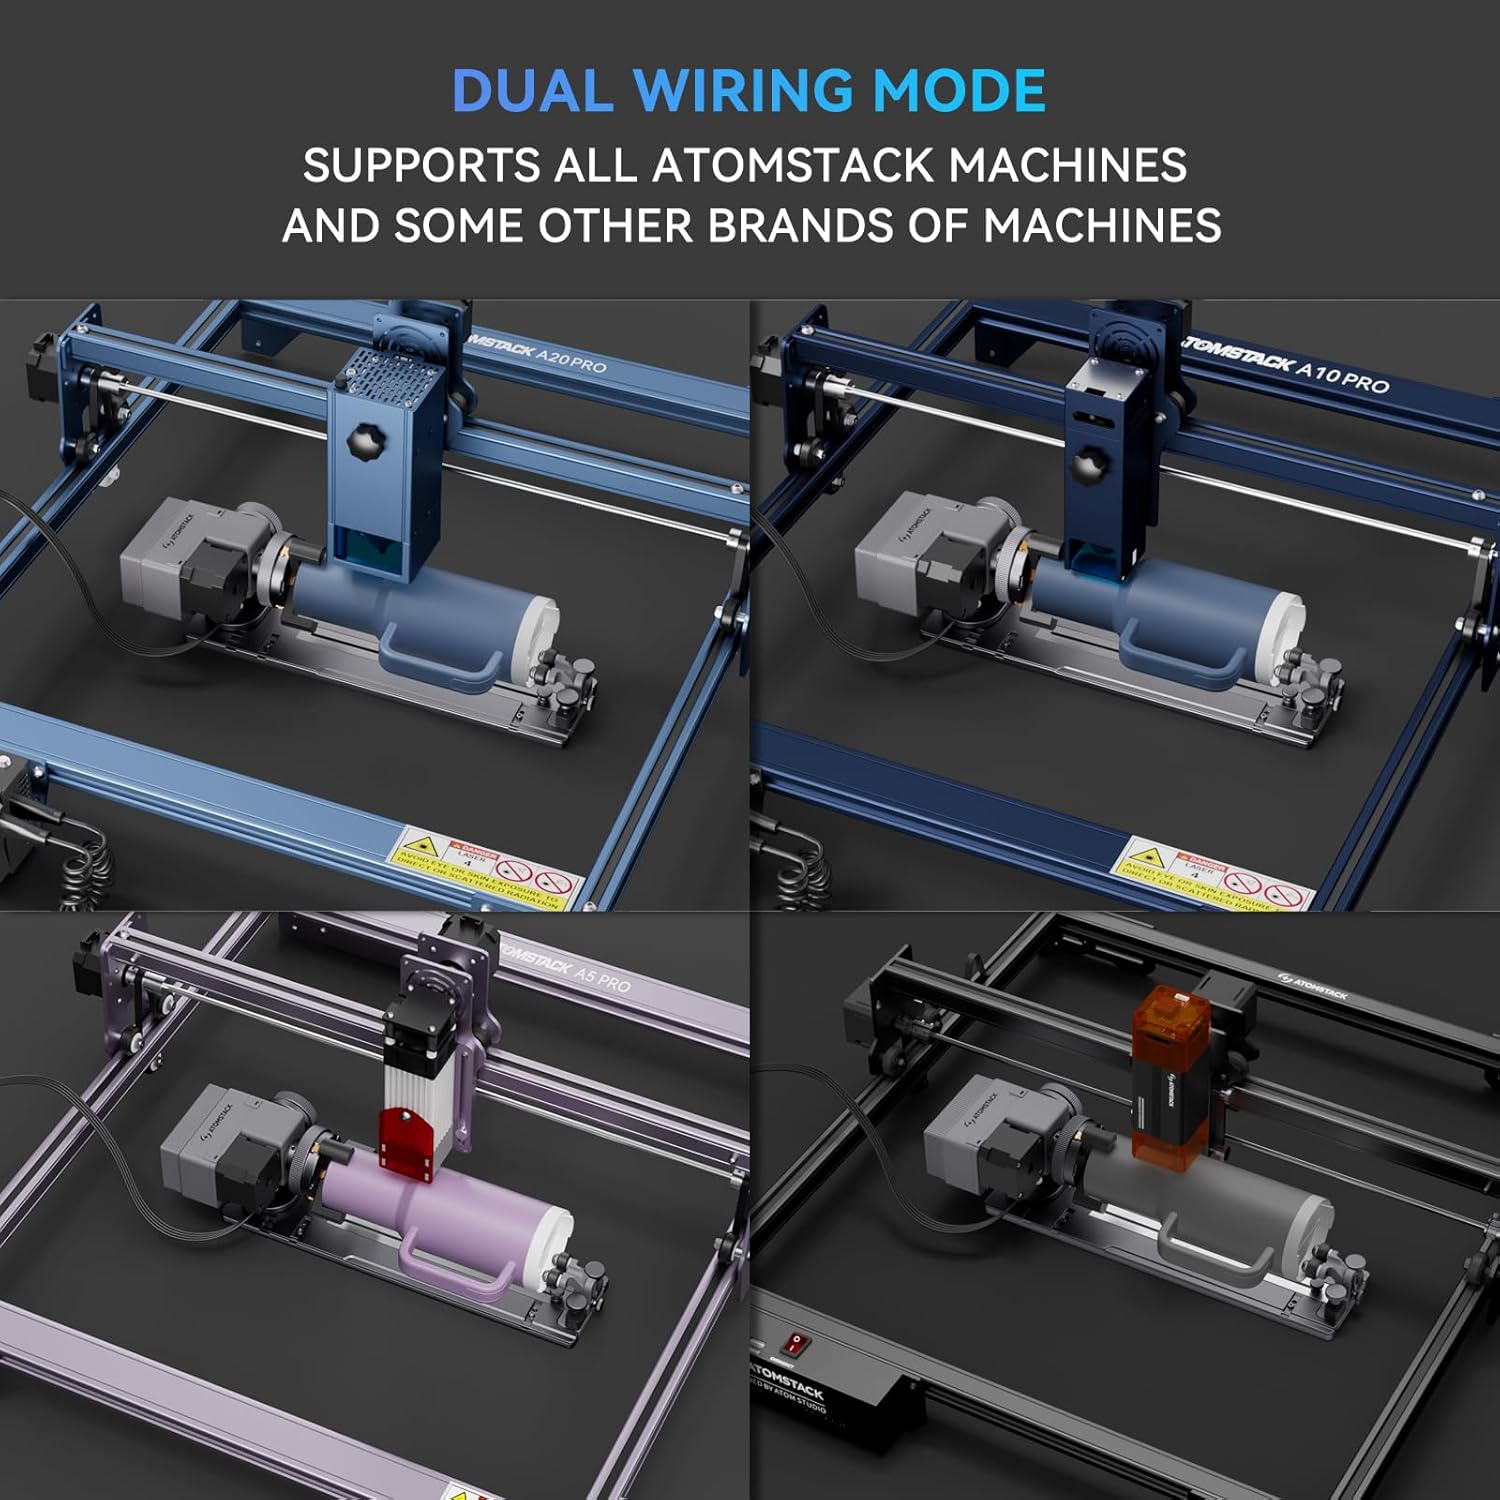
Figure 2.2: The R8 supports dual wiring modes and is compatible with various ATOMSTACK machines and some other brands.
3. 操作手順
This section provides guidance on operating the ATOMSTACK R8 for various engraving tasks.
3.1ソフトウェア構成
Before using the rotary roller, it is essential to modify the configuration parameters within your laser engraving software (e.g., LaserGRBL, LightBurn). Refer to your software's documentation for specific instructions on setting up rotary axis engraving.

図3.1:例ample of software interface for managing engraving projects and settings.
3.2 Engraving Regular Cylindrical Objects
For objects like tumblers, cans, or pens, place them securely on the R8's rollers. Adjust the roller distance as needed to ensure the object is stable and rotates smoothly. No tools are required for this adjustment.

Figure 3.2: Engraving a regular cylindrical object using the R8 rotary chuck.
3.3 不規則な形状や球状の物体の彫刻
The R8 is designed to handle a wide range of irregular cylindrical objects, including those with handles, and spherical items. It offers up to 180° angle adjustment and 360° rotation. Utilize the included fixtures to secure uniquely shaped items.

図3.3:例amples of irregular cylindrical objects being engraved.

Figure 3.4: The R8 is equipped with three sets of fixtures to adapt to multiple special-shaped materials, including objects with handles and spherical items.
3.4 Applications and Exampレ
The R8 expands your engraving possibilities to include various household items and personalized gifts.

図3.5:例amples of items that can be engraved, such as mugs, tumblers, goblets, rings, and flowerpots.
4. メンテナンス
Proper maintenance ensures the longevity and optimal performance of your ATOMSTACK R8 Laser Rotary Chuck Engraver.
4.1 クリーニング
- Regularly clean the rollers and chuck jaws to remove dust, debris, and engraving residue. Use a soft, dry cloth.
- For stubborn residue, a slightly damp 布を使用することもできますが、次回使用する前にデバイスのプラグを抜いて完全に乾燥させてください。
- Avoid using abrasive cleaners or solvents that could damage the surface or internal components.
4.2 検査
- Periodically inspect the chuck jaws and rollers for any signs of wear or damage.
- Ensure all screws and fasteners are secure. Tighten if necessary.
- Check the connection cables for fraying or damage. Replace if any issues are found.
5。 トラブルシューティング
This section addresses common issues you might encounter with the ATOMSTACK R8 and provides solutions.
| 問題 | 考えられる原因 | 解決 |
|---|---|---|
| R8 does not rotate or respond. | Incorrect Y-axis terminal connection; USB not connected; software not configured. | Ensure the R8 is correctly connected to the engraver's Y-axis terminal. Verify USB connection to the computer. Check software settings for rotary mode. |
| Engraving is distorted or inconsistent. | Object not securely held; incorrect software parameters (e.g., steps per rotation); object slipping. | Ensure the object is firmly secured by the chuck jaws or rollers. Adjust roller distance for optimal grip. Verify and calibrate rotary parameters in your engraving software. Clean rollers if slipping occurs. |
| R8 cannot be used with ATOMSTACK P1/K2 engraver. | Engraver height is insufficient; missing or incorrect risers. | Ensure the four 100mm raised footpads are correctly installed under the ATOMSTACK P1/K2 engraver to provide necessary clearance for the R8. |
| Chuck jaws are stiff or not gripping properly. | Accumulated debris; lack of lubrication. | Clean the chuck jaws thoroughly. Apply a small amount of appropriate lubricant if recommended by the manufacturer (refer to the full product manual for specific lubrication guidelines). |
If you encounter issues not covered here, please refer to the comprehensive online resources or contact ATOMSTACK customer support.
6. 仕様
| 特徴 | 詳細 |
|---|---|
| モデル番号 | R8 |
| 製品寸法 | 15.75 x 6.3 x 5.51インチ |
| アイテム重量 | 3.12ポンド |
| メーカー | アトムスタック |
| 原産国 | 中国 |
| 彫刻精度 | 0.1mm (as per feature bullets) |
| マックス。 回転速度 | 10000mm/Min (as per feature bullets) |
| 角度調整 | Up to 180° (as per feature bullets) |
| 回転機能 | 360° (as per feature bullets) |
7. 保証とサポート
ATOMSTACK is committed to providing excellent customer service and support for its products.
- 保証: The ATOMSTACK R8 comes with a 1-year warranty.
- 交換部品: 交換部品をご用意しております。
- テクニカルサポート: Lifetime technical support is provided. Professional technical and support teams are available 24/7 to answer any questions or concerns.
For assistance, please contact ATOMSTACK customer service through their official channels or visit their webFAQ とサポート リソースのサイト。
関連文書 - R8
 |
ATOMSTACK R8 ロータリーチャック ユーザーマニュアル - レーザー彫刻ガイド ATOMSTACK R8ロータリーチャックアタッチメントの包括的なユーザーマニュアルです。様々な形状のオブジェクトへのレーザー彫刻におけるセットアップ、組み立て、使用方法、接続、ソフトウェア設定、安全上の注意事項を網羅しています。 |
 |
ATOMSTACK MAKER R1 ロータリーチャック ユーザーマニュアルおよびインストールガイド この包括的なガイドでは、レーザー彫刻機用ATOMSTACK MAKER R1ロータリーチャックの取り付け、接続、操作について詳しく説明します。梱包内容、セットアップ手順、LightBurnを使用したソフトウェア設定、円筒形、球形、その他の形状のオブジェクトへの彫刻に関する重要な注意事項についても説明しています。 |
 |
ATOMSTACK R1 V2 ロータリーローラーの取り付けおよびユーザーマニュアル ATOMSTACK R1 V2 ロータリー ローラーの包括的なガイド。インストール、セットアップ、LightBurn ソフトウェアでの使用、円筒形および球形のオブジェクトのレーザー彫刻に関する注意事項について詳しく説明します。 |
 |
ATOMSTACKR3ロータリーローラーユーザーマニュアル ATOMSTACK R3 ロータリー ローラーの包括的なユーザー マニュアル。機能、インストール、LaserGRBL および LightBurn を使用したソフトウェアのセットアップ、操作ガイドライン、レーザー彫刻アプリケーションの安全上の注意事項について詳しく説明しています。 |
 |
ATOMSTACK A5/A5 Pro レーザー彫刻機 インストールマニュアル ATOMSTACK A5 および A5 Pro レーザー彫刻機の組み立て、コンポーネントのインストール、ケーブル管理を網羅したステップバイステップのインストール ガイドです。 |
 |
ATOMSTACK R6 ユーザーマニュアル: セットアップ、使用方法、安全性 ATOMSTACK R6 ロータリー ローラーの包括的なユーザー マニュアル。セットアップ手順、使用ガイドライン、重要な安全上の注意事項が英語、ドイツ語、フランス語で記載されています。 |
Ask a question about this manual
Ask about setup, troubleshooting, compatibility, parts, safety, or missing instructions. Manuals+ will review the question and use this page’s manual context to help answer it.