XK 806B
Instruction Manual for XK-2.0 Horsepower 806B Tire Changer Machine
Model: 806B | Brand: XK
製品終了view
The XK-2.0 Horsepower 806B Tire Changer Machine is designed for efficient and reliable tire mounting and demounting. It features a robust construction with a high-density aluminum casting piston for extended service life and precision steel cast clamping jaws for durability. The machine incorporates protective sleeves on the clamping jaws to safeguard tires and rims during operation. Its universal bead breaker and vertical inflation tool box enhance usability, while the iron stamping pedal provides durable control. The clamping range is adjustable to accommodate various tire sizes.

Figure 1: XK-806B Tire Changer Machine
安全情報
Always read and understand all instructions before operating the machine. Failure to follow safety guidelines may result in serious injury or equipment damage.
- Ensure the machine is properly grounded and connected to the correct power supply (110/220/380V, 0.75/1.1kW).
- 操作中は、安全メガネや手袋などの適切な個人用保護具 (PPE) を着用してください。
- Keep hands and clothing clear of moving parts, especially the turntable and clampジョーズ。
- Do not exceed the maximum wheel diameter (1180mm) or tire width (3-14 inches) specified for this machine.
- 清潔で明るい作業場を維持してください。
- Never attempt to service or repair the machine while it is powered on. Disconnect from power source before maintenance.
- Ensure proper air pressure (8-10 bar) for pneumatic components.
コンポーネントオーバーview
The XK-806B Tire Changer Machine consists of several key components designed for efficient tire service:
- ターンテーブル: Rotates the wheel during mounting and demounting.
- Clamping Jaws: Securely hold the wheel on the turntable. Equipped with protective sleeves.
- Mount/Demount Head: Positions and manipulates the tire bead.
- Bead Breaker: Separates the tire bead from the rim.
- インフレガン: Used for inflating tires after mounting.
- フットペダル: Control various functions such as turntable rotation, clamping, and bead breaking.
- Air Filter/Lubricator Unit: Ensures clean and lubricated air supply to pneumatic components.
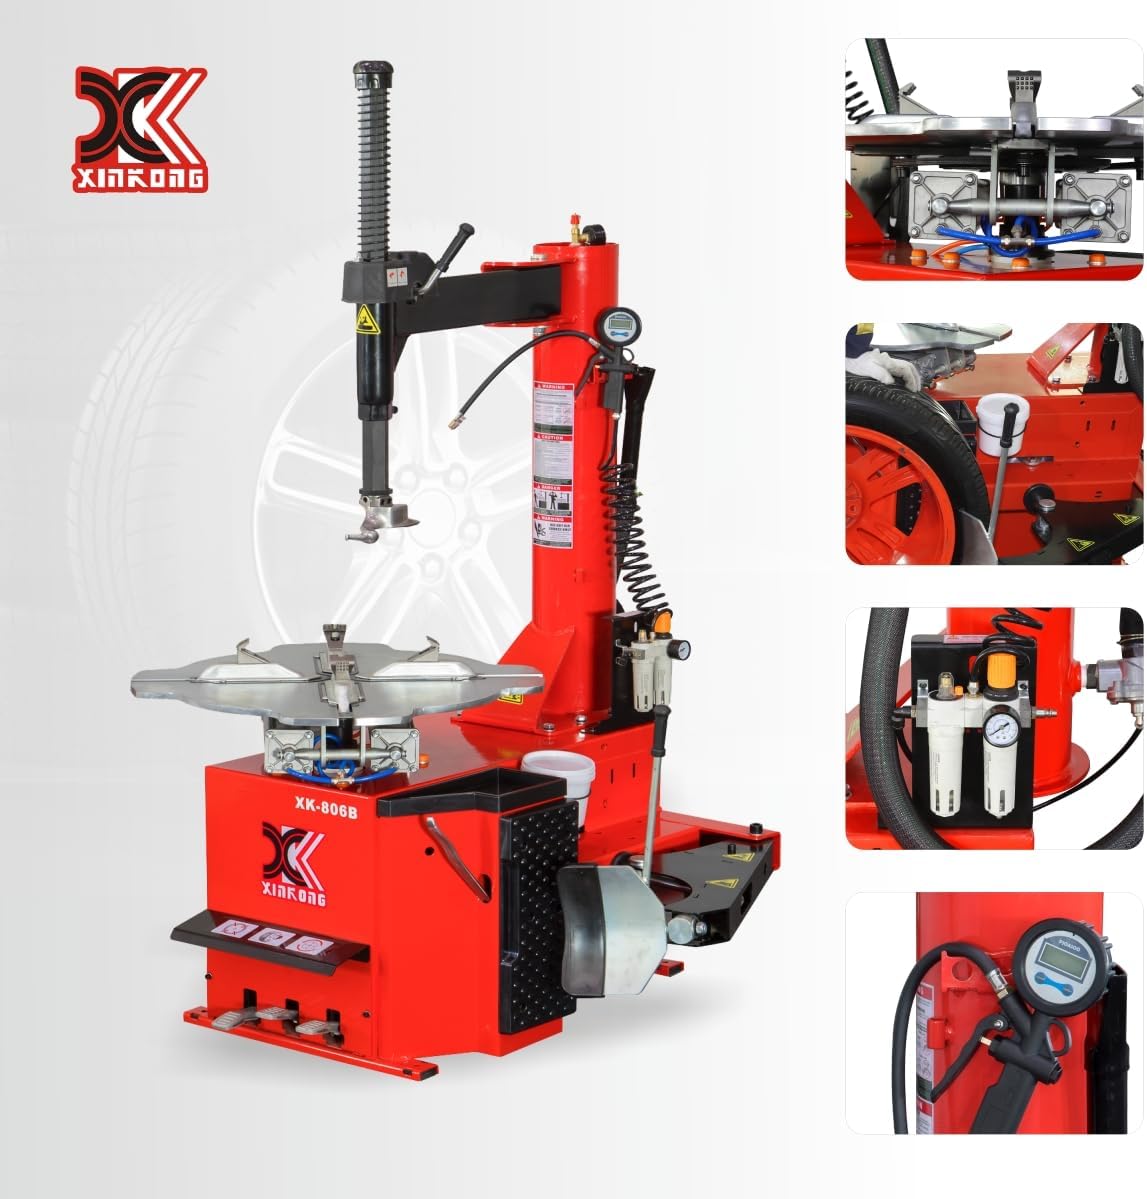
図2:詳細 view clのamping jaw and mount/demount head.

図3: 下面 view clのampメカニズム。

Figure 4: Air preparation unit, inflation gun, and lubricant container.
設定
Before operating the XK-806B Tire Changer, ensure proper installation and connection:
- 開梱と検査: Carefully unpack all components. Inspect for any shipping damage. Report any damage to the carrier immediately.
- 配置: Position the machine on a flat, stable, and level surface capable of supporting its weight (approximately 542 pounds). Ensure adequate clearance around the machine for safe operation.
- 電源接続: Connect the machine to a suitable electrical outlet. Verify that the voltage (110/220/380V) and power (0.75/1.1kW) match the machine's requirements and local electrical codes.
- 空気供給接続: Connect a compressed air line to the machine's air inlet. Ensure the air supply provides the recommended working pressure of 8-10 bar.
- 潤滑: Fill the lubricant container (if applicable) with appropriate tire mounting lubricant.
- 初期チェック: Before first use, check all bolts and fasteners for tightness. Verify that all moving parts operate smoothly without obstruction.
操作手順
Follow these steps for safe and effective tire changing operations:
Video 1: Operational demonstration of the XK-806B Tire Changer Machine.

Figure 5: Visual guide for tire changing steps.
- 準備: Remove the valve core to fully deflate the tire. Remove any wheel weights.
- Bead Breaking (Step 1): Place the wheel on the bead breaker arm. Use the bead breaker pedal to separate the tire bead from the rim. Repeat for both sides of the tire.
- Mounting on Turntable (Step 2): Position the wheel onto the turntable. Use the clamping pedal to secure the wheel firmly with the clamping jaws. Adjust the slider position if necessary to change the clamp範囲。
- Lubrication (Step 3): Apply appropriate tire lubricant to both tire beads and the rim edges.
- Demounting Top Bead (Step 4): Position the mount/demount head correctly relative to the rim. Use a tire lever to lift the top bead over the mount/demount head. Activate the turntable rotation pedal to fully demount the top bead.
- Demounting Bottom Bead (Step 5): Reposition the tire. Use the tire lever to lift the bottom bead over the mount/demount head. Activate the turntable rotation pedal to fully demount the bottom bead.
- Mounting New Tire (Step 6): Place the bottom bead of the new tire onto the rim, ensuring it is below the mount/demount head. Activate the turntable rotation pedal to guide the bead onto the rim.
- Mounting Top Bead (Step 7): Push down on the top bead while activating the turntable rotation pedal to guide it onto the rim. Ensure the bead does not pinch.
- Inflation (Step 8): Reinstall the valve core. Connect the inflation gun to the valve stem. Inflate the tire to the recommended pressure, using the foot pedal for controlled inflation. The machine features a vertical inflation tool box for convenience.
- 最終チェック: Check for leaks and ensure the tire is properly seated on the rim.
メンテナンス
Regular maintenance ensures the longevity and optimal performance of your XK-806B Tire Changer:
- 毎日:
- Clean the machine, especially the turntable and clamping jaws, to remove tire debris and lubricant residue.
- Check air pressure and ensure the air filter/lubricator unit is functioning correctly. Drain any accumulated water from the air filter.
- 毎週:
- すべてのホースと接続部に漏れや損傷がないか検査してください。
- Lubricate moving parts, such as the mount/demount head pivot points and clamping jaw mechanisms, with appropriate grease or oil.
- Check the tightness of all fasteners and bolts.
- 月次/四半期:
- Inspect the drive belt (if applicable) for wear and tension.
- CLの状態を確認するamping jaw protective sleeves and replace if worn.
- Verify the accuracy of the inflation gauge.
- ストレージ: If storing the machine for an extended period, ensure it is clean, lubricated, and disconnected from power and air supplies.
トラブルシューティング
このセクションでは、発生する可能性のある一般的な問題に対する解決策を示します。
| 問題 | 考えられる原因 | 解決 |
|---|---|---|
| マシンの電源が入りません。 | No power supply; tripped circuit breaker; faulty power switch. | Check power connection; reset circuit breaker; contact customer support. |
| ターンテーブルが回転しない。 | Motor issue; foot pedal malfunction; insufficient air pressure. | Check air supply; inspect foot pedal connections; contact customer support. |
| Clamping jaws do not operate. | Low air pressure; air line blockage; faulty pneumatic cylinder. | Verify air pressure (8-10 bar); check air lines for kinks; contact customer support. |
| Bead breaker is not effective. | Insufficient air pressure; improper positioning of wheel; worn bead breaker pad. | Check air pressure; reposition wheel; inspect and replace bead breaker pad if worn. |
| Tire or rim damage during operation. | Improper technique; worn protective sleeves on clamping jaws; incorrect mount/demount head adjustment. | Review operating instructions; replace worn protective sleeves; adjust mount/demount head properly. |
仕様
Detailed technical specifications for the XK-806B Tire Changer Machine:

Figure 6: Product details including voltage、パワー、寸法。

Figure 7: Additional specifications such as noise level and net weight.
| 仕様 | 価値 |
|---|---|
| メーカー | XK |
| ブランド | XK |
| モデル | 806B |
| アイテム重量 | 542ポンド |
| 巻tage | 110/220/380V |
| 力 | 0.75/1.1kW |
| Turntable Rotation Speed | 7回転 |
| 最大ホイール径 | 1180mm |
| タイヤの幅 | 3~14インチ |
| リムClamp 外から | 12~23インチ |
| リムClamp 中から | 15~26インチ |
| 作動圧力 | 8~10バール |
| 騒音レベル | 70dB未満 |
| 初回利用可能日 | 29年2024月XNUMX日 |
保証とサポート
XK is committed to providing quality products and customer satisfaction.
- 戻り値: この商品は30日間返品可能です。詳しくは販売店の返品ポリシーをご覧ください。
- カスタマーサポート: For any questions, technical assistance, or service inquiries, please contact XK customer support. Contact information can typically be found on the product packaging or the retailer's webサイト。
Ask a question about this manual
Ask about setup, troubleshooting, compatibility, parts, safety, or missing instructions. Manuals+ will review the question and use this page’s manual context to help answer it.