1. はじめに
This manual provides comprehensive instructions for the setup, operation, maintenance, and troubleshooting of your Lamzu Maya X Wireless Gaming Mouse. Please read this manual carefully to ensure proper use and to maximize the performance of your device.
2.製品オーバーview
2.1 主な特徴
- 超軽量設計: Weighs approximately 47g for extended comfort during use.
- 対称形状: Accommodates various grip styles including palm, claw, and fingertip.
- 光スイッチ: Durable and responsive, rated for over 70 million clicks.
- Dust-Proof Encoder: 30-grid roller for precise and responsive scroll wheel actions.
- Pixart PAW 3950 センサー: Supports up to 30,000 DPI and 750 IPS.
- ノルディック 52840 MCU: Ensures power efficiency, fast response times, and accurate motion tracking.
- 高いポーリングレート: Up to 8,000 Hz with the optional 8K dongle.
2.2 パッケージ内容
- Lamzu Maya X ワイヤレスゲーミングマウス
- PTFE Skates (x1 set)
- 8K Dongle (x1)
- MAYA X 防塵シール
- 1.8m Type-C Paracord Cable
- ベルベットバッグ
- MAYA X マウスグリップ
2.3 マウスのコンポーネント
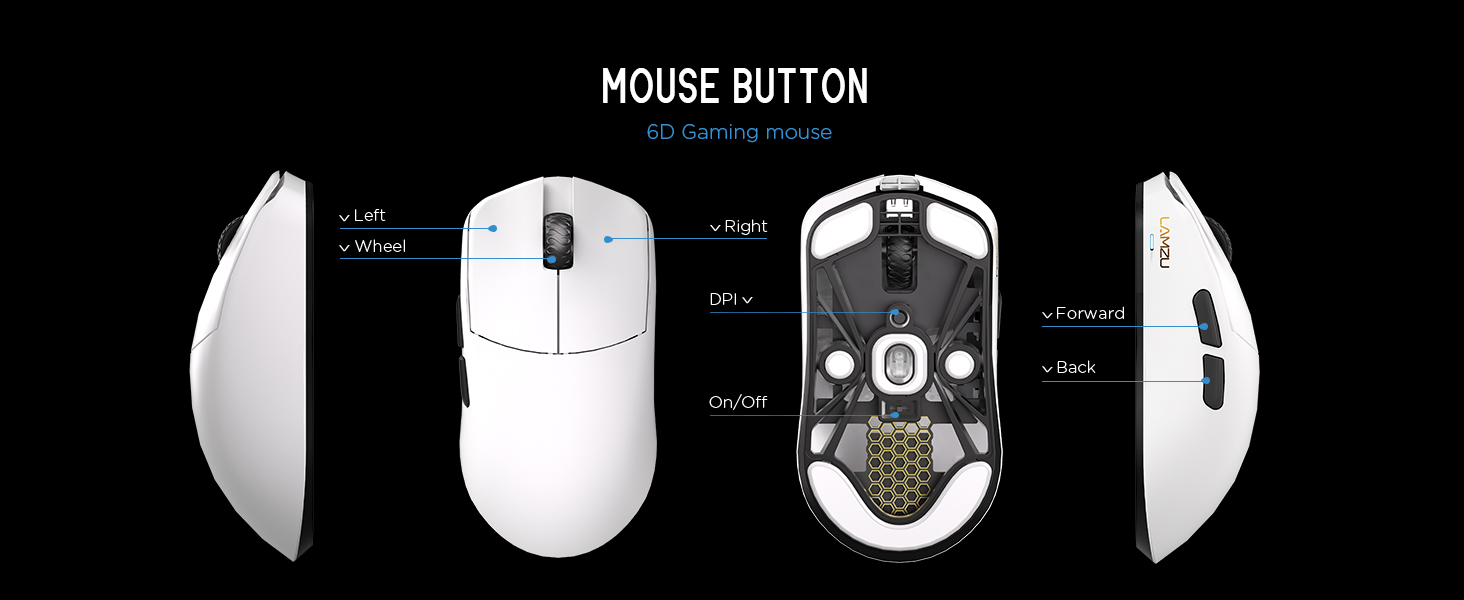
画像2.3.1: Diagram illustrating the various buttons and internal structure of the Lamzu Maya X mouse, including left click, right click, scroll wheel, DPI button, forward, back buttons, and the on/off switch.
- 左ボタン: 主なクリック機能。
- 右ボタン: セカンダリクリック機能。
- スクロールホイール: スクロールと中クリック機能用。
- DPIボタン: Adjusts Dots Per Inch sensitivity.
- 進むボタン: Navigational function (e.g., browser forward).
- 戻るボタン: Navigational function (e.g., browser back).
- オン/オフスイッチ: マウスの電源をオンまたはオフにします。
3. セットアップ
3.1 初期接続と充電
- マウスを充電する: Connect the provided Type-C paracord cable to the mouse and a USB port on your computer. The mouse will charge while connected.
- 電源オン: マウスの裏側にあるオン/オフスイッチを見つけて、「オン」の位置にスライドします。
- Connect Wireless Dongle: Insert the 8K wireless dongle into an available USB port on your computer. The mouse should automatically pair.
- Wired Mode (Optional): To use the mouse in wired mode, connect the Type-C paracord cable directly to the mouse and your computer. The mouse will function as a wired device and charge simultaneously.
画像3.1.1: The Lamzu Maya X mouse connected via its Type-C paracord cable, illustrating both wired operation and charging capabilities.
3.2 ドライバとソフトウェアのインストール
Lamzu Maya Xマウスは web-based driver for customization. To access the software and update firmware:
- 公式Lamzuをご覧ください webサイト。
- Navigate to the support or downloads section for the Maya X model.
- ダウンロード web driver application. This application allows for DPI adjustment, polling rate settings, macro programming, and firmware updates.

画像3.2.1: オーロラのスクリーンショット Web Driver interface, displaying options for macro creation, button customization, DPI settings (up to 30000), polling rate selection (up to 8000Hz), and Lift-Off Distance (LOD).
4. 操作手順
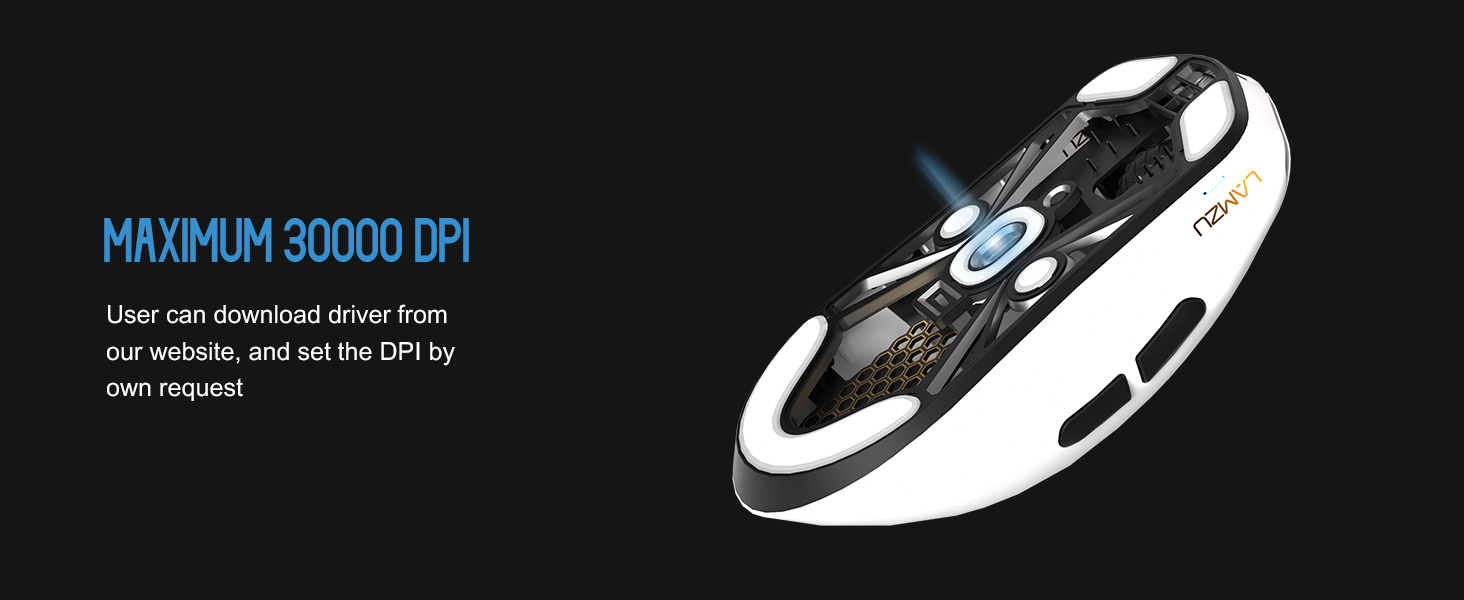
4.1 DPI調整
The DPI (Dots Per Inch) setting controls the mouse cursor's sensitivity. You can adjust the DPI using the dedicated DPI button on the mouse or through the Aurora Web Driver software. The Pixart PAW 3950 sensor supports up to 30,000 DPI.
画像4.1.1: 裏側 view of the Lamzu Maya X mouse, emphasizing its optical sensor and the capability to reach a maximum of 30,000 DPI, configurable via software.
4.2 ポーリングレート
The polling rate determines how often the mouse reports its position to the computer. The Maya X supports up to 8,000 Hz polling rate when using the included 8K dongle. Higher polling rates result in smoother cursor movement and reduced input lag.
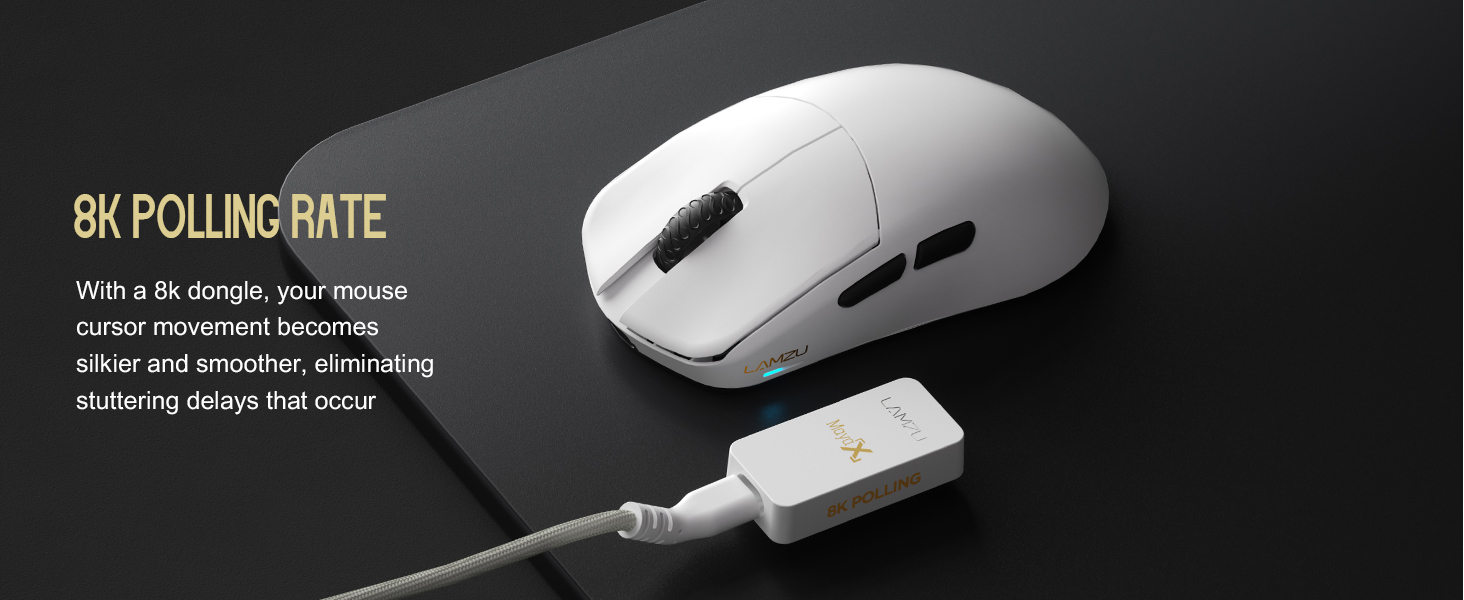
画像4.2.1: The Lamzu Maya X mouse positioned next to its 8K polling rate dongle, highlighting the benefit of smoother and more responsive cursor movement provided by high polling rates.
4.3 グリップスタイル
The symmetrical design of the Maya X mouse is engineered to accommodate various common grip styles:
- パームグリップ: The entire palm rests on the mouse.
- クローグリップ: Fingers are arched, and the palm rests on the back of the mouse.
- 指先グリップ: Only the fingertips make contact with the mouse.
画像4.3.1: A visual guide demonstrating the three primary mouse grip styles—Palm Grip, Claw Grip, and Fingertip Grip—and how the Maya X mouse is designed to be compatible with each.
4.4 有線モードと無線モード
The Maya X mouse supports both 2.4G wireless and wired (USB Type-C) connectivity. You can switch between modes by connecting or disconnecting the Type-C cable. In wired mode, the mouse operates at a 1K polling rate, while wireless mode with the 8K dongle supports up to 8K polling.
5. メンテナンス
5.1 クリーニング
- クリーニングする前に、マウスの電源がオフになっていることを確認してください。
- 柔らかく糸くずの出ない布を軽く拭いてください。ampマウスの表面を水または中性洗浄液で拭いてください。
- 強力な化学薬品、研磨剤、溶剤の使用は避けてください。
- 圧縮空気を使用して、隙間やボタンの周りのほこりを取り除きます。
- 光学センサーの場合は、綿棒で軽く拭きます。ampイソプロピルアルコールでレンズを優しく拭いてください。
5.2バッテリーケア
- バッテリーの寿命を延ばすには、マウスを頻繁に完全に放電しないようにしてください。
- 長期間使用しない場合は、マウスを室温で保管してください。
- 長期間保管する場合は、保管前にバッテリーを約 50% まで充電してください。
6。 トラブルシューティング
- マウスが反応しない:
- マウスの電源がオンになっていることを確認してください。
- バッテリーレベルを確認し、必要に応じて充電してください。
- ワイヤレス ドングルが USB ポートにしっかりと接続されていることを確認します。
- 機能を確認するには、マウスを有線モードで接続してみてください。
- コンピュータを再起動します。
- 断続的な接続:
- Ensure the wireless dongle is not obstructed and is close to the mouse.
- 干渉を引き起こす可能性のある他のワイヤレス デバイスの近くにドングルを置かないでください。
- Update mouse firmware via the Aurora Web 運転者。
- カーソルのジャンプまたは遅延:
- 光学センサーを清掃します(セクション5.1を参照)。
- Ensure the mousepad surface is clean and uniform.
- Adjust the polling rate in the software.
- Check for any background applications consuming excessive system resources.
- ボタンが機能しない:
- Check button assignments in the Aurora Web 運転者。
- ボタンを押すのを妨げる物理的な障害物がないことを確認します。
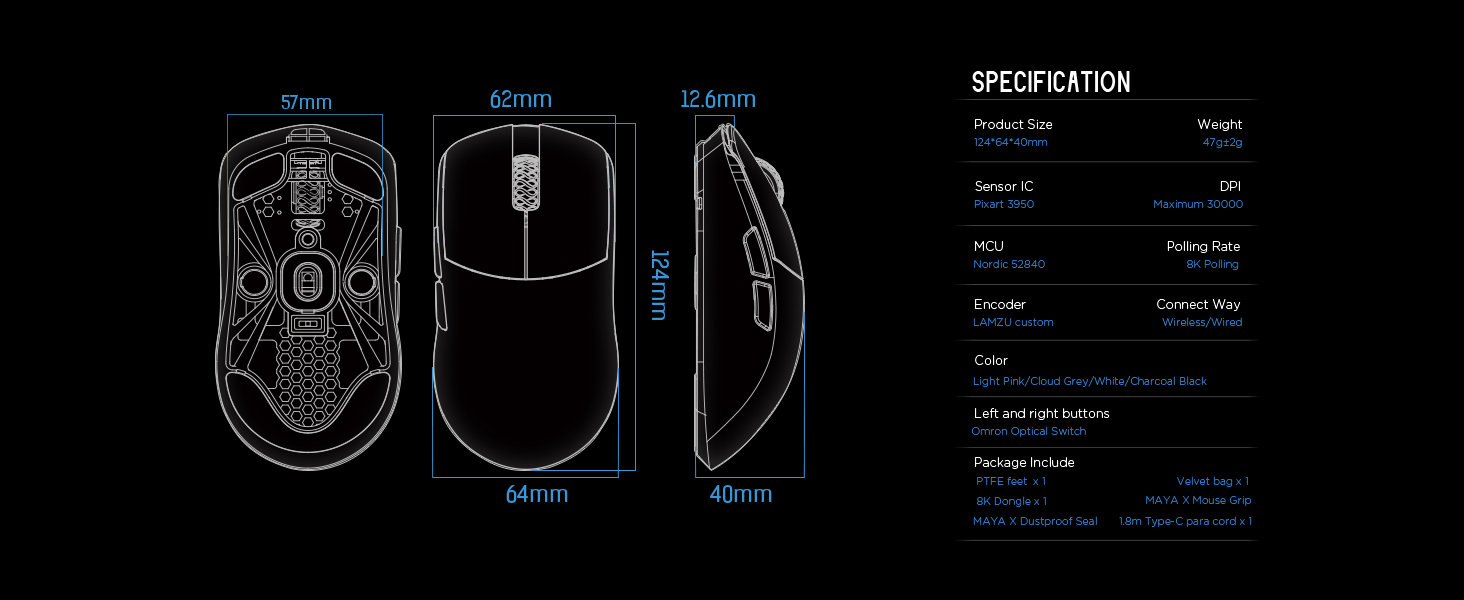
7. 仕様
| 製品寸法 | 4.88 x 2.52 x 0.04 インチ (124 x 64 x 40 mm) |
| アイテム重量 | 1.66オンス(47g) |
| センサーIC | ピクアート PAW 3950 |
| 最大DPI | 30,000 |
| マイレージ | 北欧52840 |
| ポーリングレート | 最大8,000 Hz(8Kドングル使用時) |
| 接続技術 | 2.4Gワイヤレス、USB Type-C有線 |
| スイッチ | Optical Switches (Left/Right buttons) |
| エンコーダ | Dust-Proof Encoder |
| バッテリー | リチウムイオン電池1個(付属) |
| メーカー | ラムズ |

画像7.1.1: A technical diagram detailing the dimensions (length, width, height) of the Lamzu Maya X mouse and a summary of its key specifications, including weight, sensor, MCU, DPI, and polling rate.
8. 保証とサポート
For warranty information and technical support, please refer to the official Lamzu website or contact their customer service directly. Details regarding product registration, warranty claims, and frequently asked questions can typically be found in the support section of the webサイト。
正式 Webサイト: www.lamzu.com


