1. はじめに
This manual provides essential information for the safe operation, maintenance, and troubleshooting of your CRAFTSMAN 8 Gallon Oil-Free 1.8 HP Portable Air Compressor. Please read and understand all instructions before operating the compressor to ensure safe and efficient use. This portable air compressor is designed for various applications including tire inflation, auto repair, painting, and woodworking tasks.
2. 安全情報
火災、感電、および人身傷害のリスクを軽減するため、常に基本的な安全上の注意事項に従ってください。このマニュアルは、今後の参考のために保管してください。
- 電気安全: Ensure the compressor is connected to a properly grounded outlet. Do not operate in wet conditions.
- 圧力安全性: エアツールやアクセサリの最大作動圧力を超えないようにしてください。amp安全弁付き。
- 個人用保護具: Always wear safety glasses or goggles. Hearing protection is recommended during operation.
- 作業エリア: Keep the work area clean and well-lit. Do not operate the compressor near flammable liquids or gases.
- メンテナンス: メンテナンスや調整を行う前に電源を切ってください。
3. コンポーネントと機能
Familiarize yourself with the key components of your air compressor.

図3.1: 全体 view of the CRAFTSMAN 8 Gallon Air Compressor, highlighting its main components such as the large regulator knob, quick-connect coupler, removable handle, rubber wheels, rubber feet, and air tank drain valve.
Large Regulator Knob

図3.2: The large regulator knob is designed for easy and precise adjustment of the output air pressure.
Quick and Easy-to-Connect Coupler
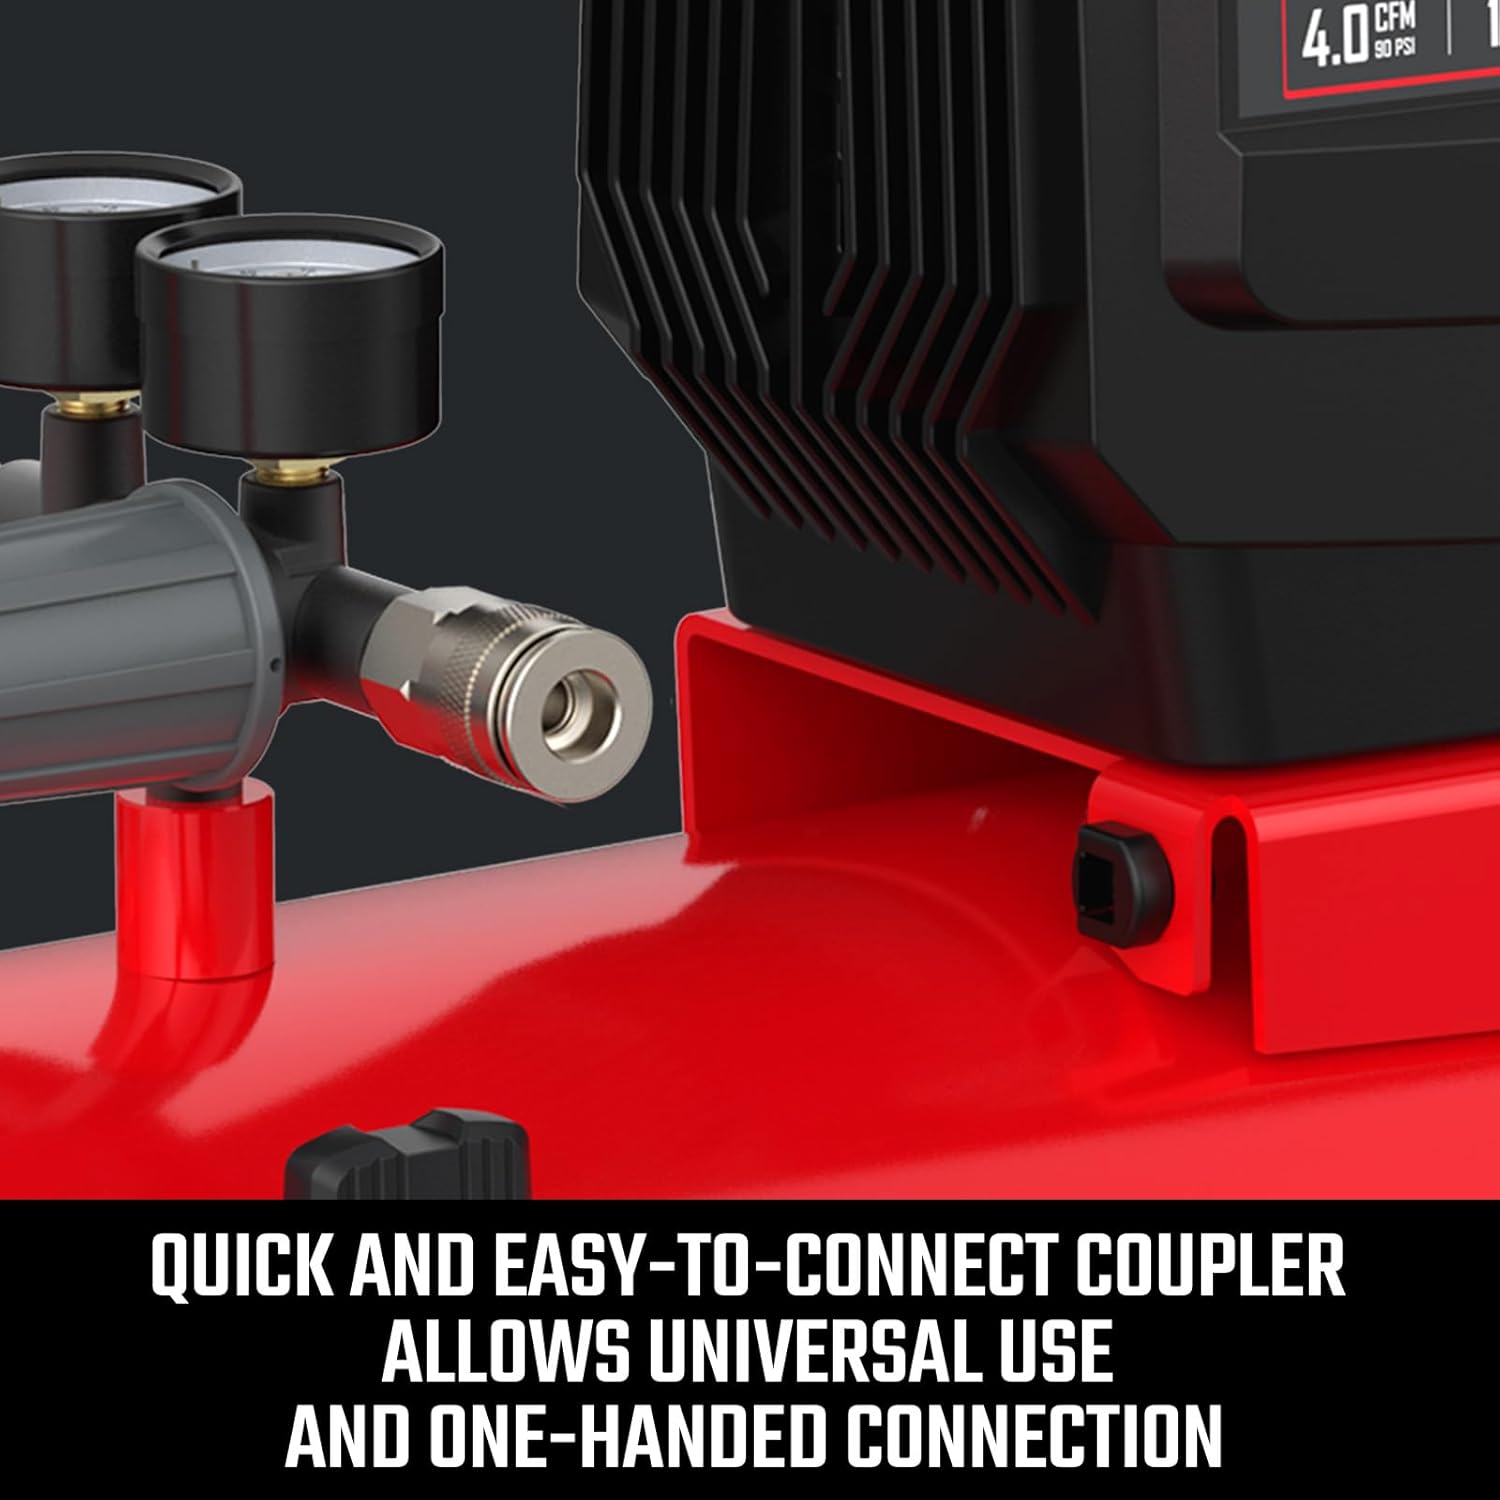
図3.3: This coupler allows for universal use and convenient one-handed connection of air tools and hoses.
取り外し可能なハンドル
The handle can be removed to accommodate various storage and transportation needs, enhancing portability.
ラバーホイール

図3.4: Durable rubber wheels facilitate easy transport of the compressor around your workspace.
ゴム足

図3.5: Rubber feet are integrated to reduce vibration during operation and increase overall stability.
エアタンクドレンバルブ
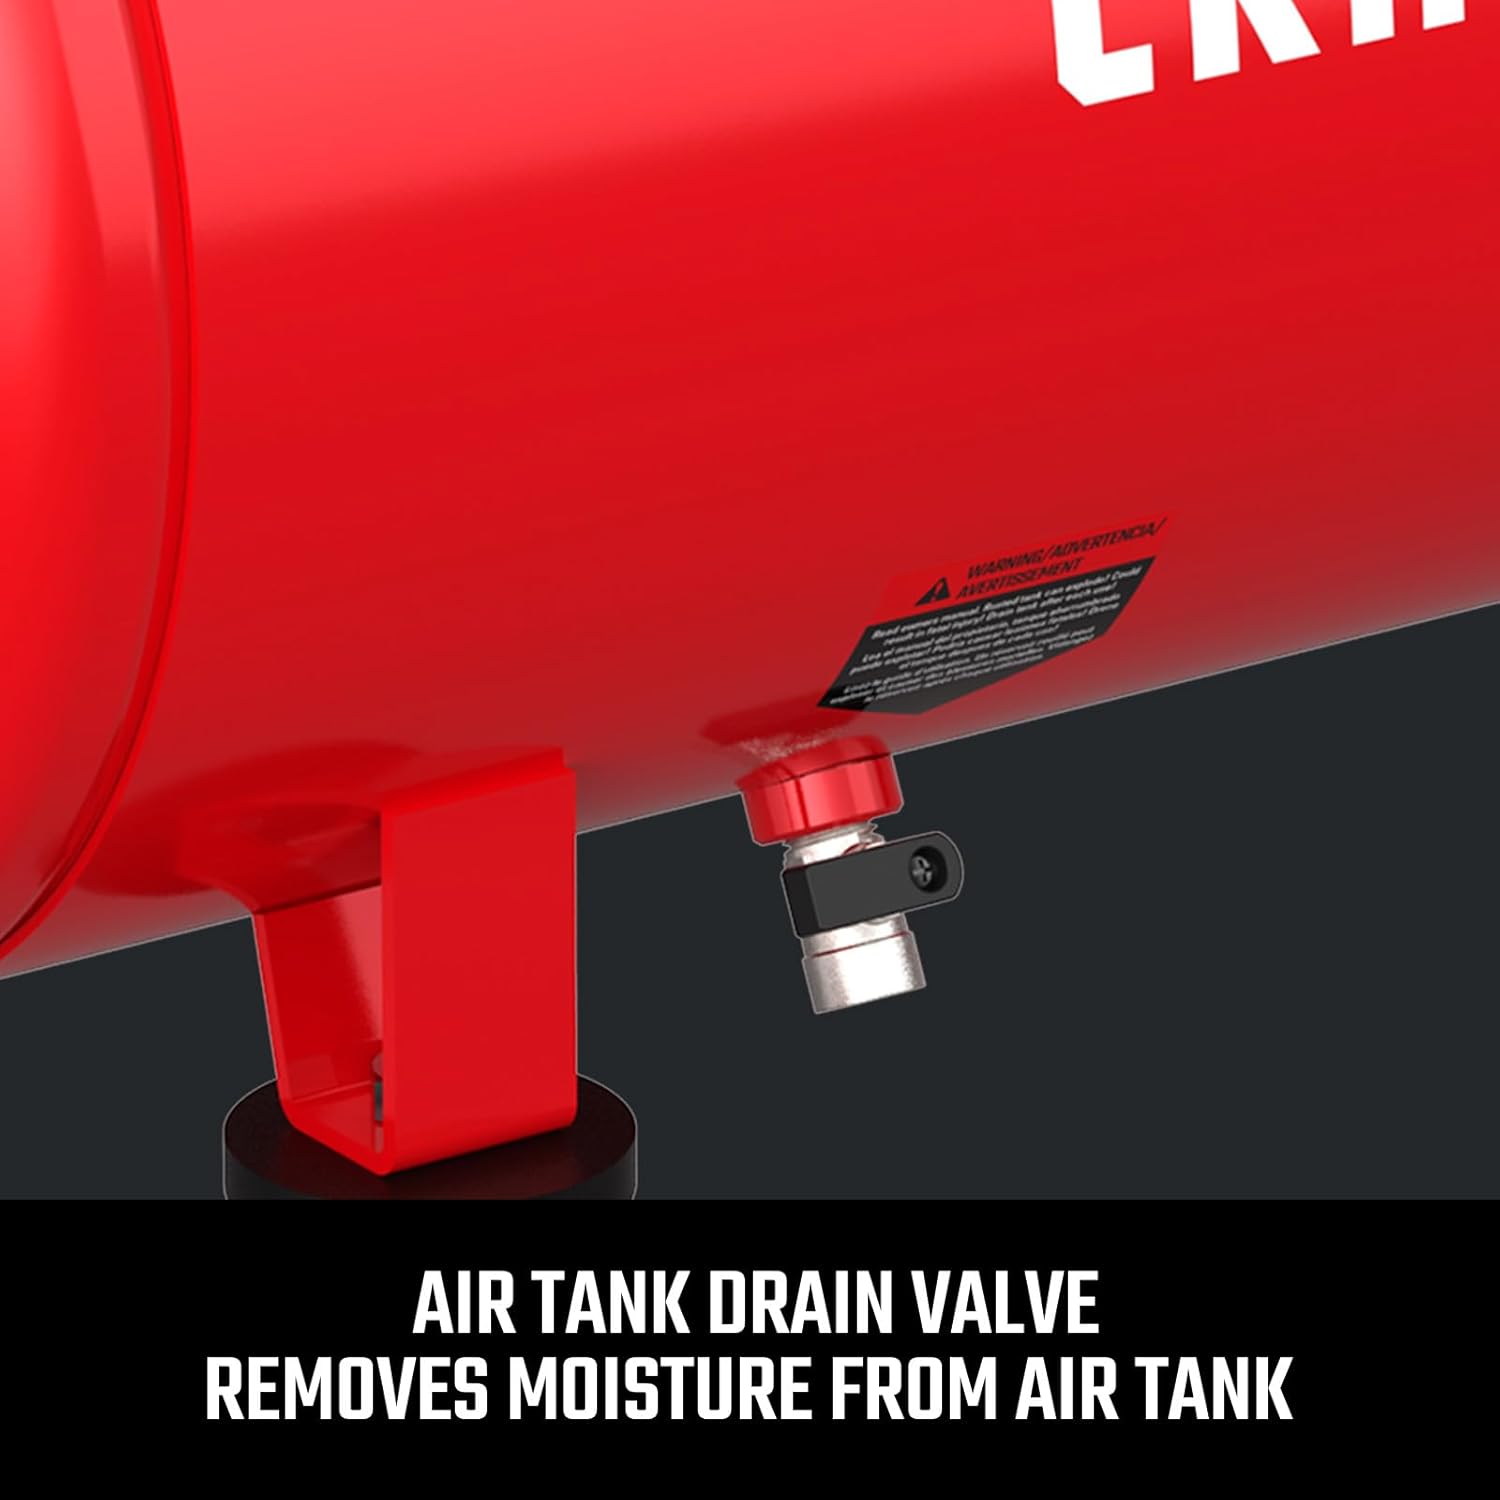
図3.6: The drain valve is located at the bottom of the tank to remove accumulated moisture, preventing rust and extending tank life.
4. セットアップ
初めて使用する前に、次の初期設定の手順に従ってください。
- 開梱: コンプレッサーを梱包から慎重に取り出し、輸送中の損傷がないか確認してください。
- Handle and Wheel Assembly: Attach the handle and wheels if they are not pre-assembled. Refer to the included assembly diagram for specific instructions.
- 配置: コンプレッサーは、清潔で換気の良い場所の、しっかりとした平らな場所に設置してください。空気の循環を確保するために、ユニットの周囲に十分なスペースを確保してください。
- 電源接続: Connect the power cord to a grounded 120 Volt AC electrical outlet. Ensure the circuit can handle the compressor's power requirements.
5. 操作手順
Learn how to safely operate your air compressor.
- 電源オン: Turn the power switch to the 'ON' position. The compressor will begin to build pressure.
- 圧力を調整する: Once the tank is full and the compressor stops, connect your air hose and tool to the quick-connect coupler. Use the large regulator knob to adjust the output pressure to the recommended setting for your specific tool.
- エアツールの使用: Operate your air tool as per its manufacturer's instructions. The compressor will cycle on and off automatically to maintain tank pressure.
- 電源を切る: 終了したら、電源スイッチを「OFF」の位置に切り替えます。
- 減圧: Before disconnecting any hoses or tools, release all air pressure from the tank by opening the drain valve or using an air tool until the tank is empty.
6. メンテナンス
Regular maintenance ensures optimal performance and extends the life of your compressor.
- エアタンクの排水: Daily or after each use, drain moisture from the air tank using the drain valve. This prevents rust and corrosion.
- オイルフリーポンプ: This compressor features an oil-free pump, eliminating the need for oil changes.
- クリーンエアフィルター: Periodically inspect and clean the air intake filter. A clogged filter can reduce performance.
- ホースと接続部の点検: Regularly check all hoses, fittings, and connections for wear, damage, or leaks. Replace any damaged components immediately.
- 一般的な清掃: コンプレッサーの外側を清潔に保ち、ほこりやごみが付かないようにしてください。
7。 トラブルシューティング
一般的な問題とその解決策については、このセクションを参照してください。
| 問題 | 考えられる原因 | 解決 |
|---|---|---|
| コンプレッサーが起動しない | No power; tripped circuit breaker; faulty switch | Check power connection; reset breaker; contact service if switch is faulty. |
| コンプレッサーは連続的にまたは頻繁に作動する | Air leak; excessive air usage; pressure switch malfunction | Check for leaks with soapy water; reduce air tool usage; contact service for switch issues. |
| 低気圧 | Regulator set too low; air leak; clogged air filter | Adjust regulator; check for leaks; clean/replace air filter. |
| 過度の騒音または振動 | Loose components; uneven surface; worn parts | Tighten fasteners; place on level surface; contact service for worn parts. |
8. 仕様
Key technical specifications for the CRAFTSMAN Air Compressor.
- ブランド: 職人
- モデル番号: CMXECXA0200842
- 容量: 8ガロン
- 最大圧力: 150PSI
- 最大出力: 1.8馬力
- 気流容量: 5 立方フィート/分 (CFM)
- 巻tage: 120ボルト
- 騒音レベル: 87デシベル
- 電源: コード式電気
- 商品の重量: 24.9 ポンド
- 寸法(長さ×幅×高さ): 長さ65.5 x 幅27.9 x 高さ61.2センチメートル
- 材質タイプ: 金属
- 特集: Heavy Duty, Portable, Oil-Free
9. 保証情報
For specific warranty details, please refer to the warranty card included with your product or visit the official CRAFTSMAN website. Generally, CRAFTSMAN products come with a limited warranty covering defects in material and workmanship under normal use.
10. サポート
If you require further assistance or have questions not covered in this manual, please contact CRAFTSMAN customer support. You can find contact information on the official CRAFTSMAN webサイトまたは製品のドキュメントを通じて入手できます。
訪問する クラフツマンストア 詳しい製品と情報については、こちらをご覧ください。